You can print your task list by selecting Print Tasks… from the File/Print menu in Diary mode. Doing this will display the Print Tasks dialog box.
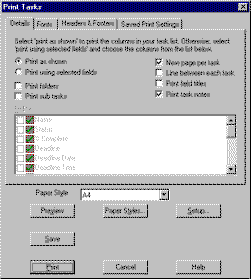
Note: You can also bring up the Print Tasks dialog box by pressing the {bmct help0022.bmp} button located at the top of the task list or by selecting Print the contents of the window from the window menu.
The fields and buttons in the Details page of the Print Tasks dialog box are described in the table below:
| Field/Button | Description |
| New page per task. | Check this check box if you wish to start a new page for every new task printed. |
| Line between each task. | Check this check box if you wish to print a line between each task printed |
| Print field titles | Check this check box if you wish to print the title of each field printed. |
| Print task notes | Check this check box if you wish to print the notes associated with each task. |
| Print folders | Check this check box if you wish to print task folders and the tasks held within them. |
| Print sub tasks | Check this check box if you wish to print all sub tasks. |
| Font | Description |
| Title Font | The font used to print the field titles. This is relevant only if you have selected the Print field titles check box |
| Folder Font | The font used to draw task folders. This is useful to distinguish task folders from ordinary tasks. It is applicable only if you checked the Print folders check box. |
| Task Font | The font used to draw each task. |
| Sub Task Font | The font used to draw each sub task. |
| Group Header Font | The font used to draw group headers. This is only appropriate if the task list has been grouped. |