


To print the contents of the History list, apply the appropriate filters to the list in order to display the history items that you wish to print and then select Print History from the File/Print menu. The Print History dialog box is displayed.
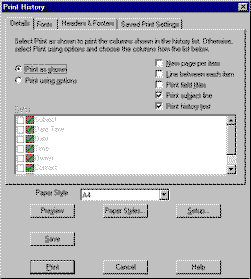
The Details tab of the Print History dialog box contains two radio buttons which control which fields you print with each history item. If you select the Print As Shown radio button, OfficeTalk will print only those fields corresponding to the columns that are currently shown in the History list. By default, these columns are Date, Subject, Owner, Contact and Company. If you select the Print using options radio button then the Fields list will become enabled, allowing you to manually select which fields to print with each history item. You may choose from the following fields:
| Field | Description |
| Subject | The subject of the history item |
| Date/Time | The date and time when the history item was created |
| Date | The date when the history item was created |
| Time | The time when the history item was created |
| Owner | The user who created the history item |
| Contact | The contact with whom the history item is related |
| Company | The company with which the history item is related |
| Categories | Any categories to which the history item belongs |
Any fields that are selected are printed from left to right, across the page. If you wish to print the field titles, such as "Subject", "Contact" etc., then check the Print Field Titles check box. The field titles will be printed above each field as shown below:
Selecting the New Page per Item check box will start a new page for each history item. Similarly, selecting the Line between each item check box will draw a horizontal line after each history item. This is useful if you do not start a new page for each record, yet you wish to be able to distinguish the end of one history item from the start of the next.
The Fonts page of the Print History dialog box contains two buttons which let you choose the font of any titles that you print and the font of all fields which are printed for each history record.
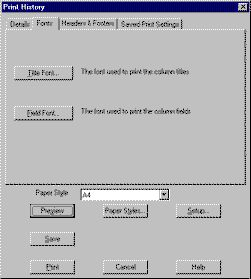
Note: There is no button to choose the font of the History detail text since this is rich text and is therefore already formatted.
OfficeTalk provides common print functionality in all Print dialog boxes. This functionality includes:
Defining headers and footers
Printer setup
Page Style Selection
Saved Print Settings
Preview capability
For more information on this common print functionality, see Printing.
Once you have selected the required options in the Print History dialog box, press the Preview button to check the appearance of your print out and then send it to the printer by pressing the Print button.