


OfficeTalk lets you import companies and contacts from CSV files. A CSV (Comma Separated Values) file is an ASCII file which can represent a series of data records. Each line of the CSV file represents a record of data with the exception of the first line which is usually a header line that describes the format of each record. An example of a simple contact CSV file is shown below:
"Name", "Company", "Address 1", "Address 2"
"John Noble", "XYZ Ltd", "103 High Street", "Wycombe"
"Mike Price", "GreenBurrows", "St Ives", "Cornwall"
"Peter Lord", "ABC Plc", "1, Wote St", "Aylesbury"
OfficeTalk requires the following fields for each data type:
| Data Type | Minimum Fields |
| Companies | Name |
| Contacts | Last Name |
Select either Company CSV Records or Contact CSV Records from the File/Import menu in Contact mode. The CSV Import Wizard is displayed, showing the File page.
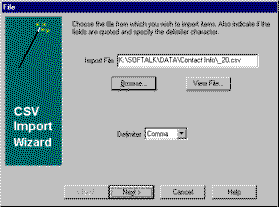
The File page lets you choose the CSV file that you wish to import. Either type in a filename in the Import File field or press the Browse… button and search for the required file. Once you have specified a valid filename in this field, you may view the file by pressing the View File… button. Pressing Next will show the Address Book Options Page.
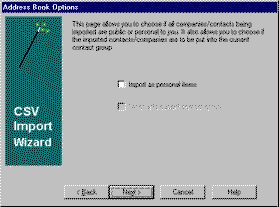
The Address Book Options page lets you select whether or not all imported records will be marked as private to you. This may be done by checking the Import as Personal Items check box. If a contact group is currently open (other than the All contact group), then the Import into current contact group check box will be enabled. Checking this check box will add all imported records to the current contact group. Pressing Next will show the Connections page.
The Connections page lets you connect the available fields in the selected CSV file with the relevant data type's available fields. For example, if you were importing the sample file above into your contact address book the Connections page would show the following:
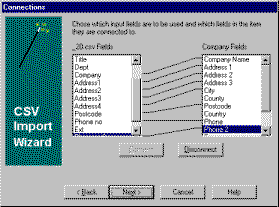
Connect up the fields contained in the CSV file with the appropriate company or contact fields from the right-hand list. For example, if you are importing companies, connect 'Company' in the left-hand list to 'Company Name' in the right-hand list and connect 'Address 1' and 'Address 2' in the left-hand list to the corresponding fields in the right-hand list. To connect two fields, select the relevant field from each list and press the Connect button. If you make a mistake you can disconnect a field by selecting the relevant field from the right hand list and pressing Disconnect. Alternatively, just connect the field in the right hand list to a different field in the left hand list.
Note: The CSV Import Wizard will let you connect a field in the right hand list to more than one field in the left hand list. The result is that data held in the relevant field in the CSV file is copied to each connected field in the company or contact.
Pressing Next will display the Preview page. This page lets you verify that the connections you have made are correct by allowing you to step through the first few records that will be added. This way, you will be able to spot any mistakes prior to loading the data into OfficeTalk.
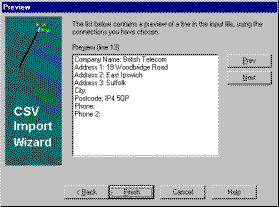
The Prev and Next buttons may be used to step through each record in the CSV file. When you are happy that the data will import correctly, press Finish. OfficeTalk will import the data as either Companies or Contacts, depending upon whether you selected Import CSV Companies or Import CSV Contacts.
Note: Importing companies does just that, it does not import contact information. If you have a CSV file containing both company and contact information then you must firstly import the companies and then import the contacts using the same CSV file. For details on how to do this, see "Connecting Contacts to Companies via a CSV Import" below.
More:
Connecting Contacts to Companies via a CSV Import