
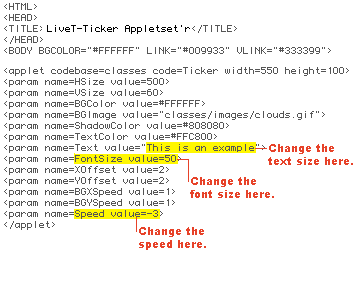
![]() After you've placed a PageCharmer applet in your Web page, you can easily
make modifications to the applet by simply changing the HTML in your web page. To
do this, you will need to view your Web page with a word processor, text editor,
or Web page layout program and view the HTML code. Next, look for the PageCharmer
applet code by searching for the HTML tag that begins with "<applet codebase=classes..."Then simply change the param values that correspond with the functionality of the
applet that you wish to modify. Since each param tag is named the same as the field
name in the AppletSet'r, you can review the Glossary
of AppletSet'r Property Terms to help determine how each param will affect the
applet's behavior. The following example illustrates how to change the speed, font
size, and text message displayed in a typical LiveT-Ticker:
After you've placed a PageCharmer applet in your Web page, you can easily
make modifications to the applet by simply changing the HTML in your web page. To
do this, you will need to view your Web page with a word processor, text editor,
or Web page layout program and view the HTML code. Next, look for the PageCharmer
applet code by searching for the HTML tag that begins with "<applet codebase=classes..."Then simply change the param values that correspond with the functionality of the
applet that you wish to modify. Since each param tag is named the same as the field
name in the AppletSet'r, you can review the Glossary
of AppletSet'r Property Terms to help determine how each param will affect the
applet's behavior. The following example illustrates how to change the speed, font
size, and text message displayed in a typical LiveT-Ticker:
Note: The AppletSet'r only generates parameter tags for parameters that are actually used. If you want to use other parameters, it is best to return to use the AppletSet'r.
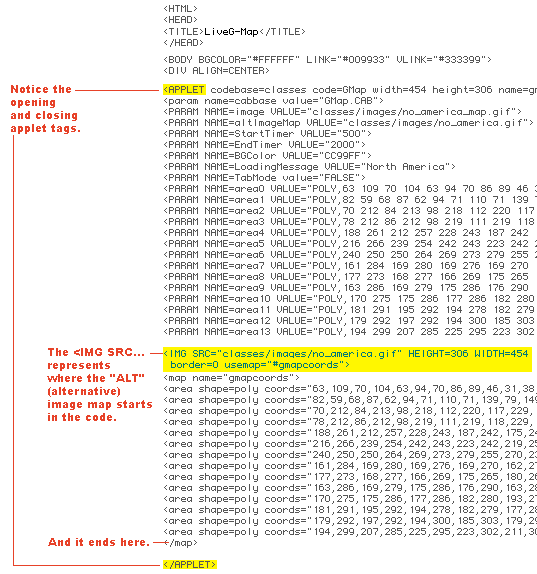
![]() Assigning an "ALT" (alternative) image to a LiveG-Map is a powerful
option. It is important to understand where it is in the HTML code if you are going
to be editing the applet on your Web page. It will look like any other HTML image
map but it will be in between the "<applet..." and "</applet>"tags. Below is an example of this.
Assigning an "ALT" (alternative) image to a LiveG-Map is a powerful
option. It is important to understand where it is in the HTML code if you are going
to be editing the applet on your Web page. It will look like any other HTML image
map but it will be in between the "<applet..." and "</applet>"tags. Below is an example of this.
![]() After you've placed a PageCharmer applet in your Web page, you can make
modifications to the applet by copying the applet HTML code from your Web page, and
pasting it back into the .html file for the appropriate AppletSet'r. Sometimes starting
from scratch is simpler if you plan to make extensive changes.
After you've placed a PageCharmer applet in your Web page, you can make
modifications to the applet by copying the applet HTML code from your Web page, and
pasting it back into the .html file for the appropriate AppletSet'r. Sometimes starting
from scratch is simpler if you plan to make extensive changes.
![]() To do this, you will need to view your Web page with a word processor
or Web page layout program and view the HTML code. Next, look for the PageCharmer
applet code by searching for the HTML tag that begins with "<applet codebase=classes..."Then copy all the HTML code from the beginning of the line, "<applet codebase=classes..."and through the line "</applet>". Next, open the .html file for the
corresponding AppletSet'r for the applet you wish to modify. For example, if you
are modifying a LiveT-Ticker PageCharmer applet, open the original PageCharmer file
named "LiveT-Ticker.html". The next step is to replace the HTML code for
the first applet in this file (identified by the first occurrence of the "<applet
codebase=classes..." tag) with the HTML code you've just copied from your web
page.
To do this, you will need to view your Web page with a word processor
or Web page layout program and view the HTML code. Next, look for the PageCharmer
applet code by searching for the HTML tag that begins with "<applet codebase=classes..."Then copy all the HTML code from the beginning of the line, "<applet codebase=classes..."and through the line "</applet>". Next, open the .html file for the
corresponding AppletSet'r for the applet you wish to modify. For example, if you
are modifying a LiveT-Ticker PageCharmer applet, open the original PageCharmer file
named "LiveT-Ticker.html". The next step is to replace the HTML code for
the first applet in this file (identified by the first occurrence of the "<applet
codebase=classes..." tag) with the HTML code you've just copied from your web
page.
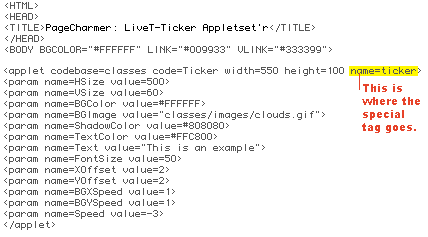
![]() Last, you will need to add one very important piece of code, if you
are working with the LiveG-Button, LiveGT-Button, LiveT-Button, LiveG-Marquee, and
the LiveT-Marquee. These AppletSet'rs file have one small piece of code that
does not appear in the normal PageCharmer Designer Applets (applets that are ultimately
placed in your Web pages). That special piece of code belongs in the first line and
looks like: "name=x" where x=the name of the applet. For example, the LiveT-Ticker
applet has the special piece of code highlighted below:
Last, you will need to add one very important piece of code, if you
are working with the LiveG-Button, LiveGT-Button, LiveT-Button, LiveG-Marquee, and
the LiveT-Marquee. These AppletSet'rs file have one small piece of code that
does not appear in the normal PageCharmer Designer Applets (applets that are ultimately
placed in your Web pages). That special piece of code belongs in the first line and
looks like: "name=x" where x=the name of the applet. For example, the LiveT-Ticker
applet has the special piece of code highlighted below:
![]() Each PageCharmer applet has it's own unique "name" that will
need to be added using the above technique. The following chart includes all of these
names:
Each PageCharmer applet has it's own unique "name" that will
need to be added using the above technique. The following chart includes all of these
names:
| LiveG-Button | name=gbutton |
| LiveT-Button | name=tbutton |
| LiveGT-Button | name=gtbutton |
| LiveG-Marquee | name=gmarquee |
| LiveT-Marquee | name=marquee |
| LiveG-Ticker | name=gticker |
| LiveT-Ticker | name=ticker |
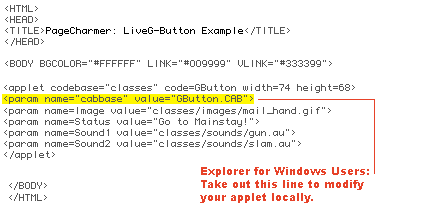
![]() PageCharmer applets are provided in two file formats. A normal format
and a CAB format. The latter format is compressed in size and requires a special
line of HTML for quicker download access. PageCharmer's AppletSet'rs automatically
produce this line of code. A problem however is that HTML pages with this line of
code will not load properly on Windows machines using Internet Explorer when the
CAB file is accessed locally.
PageCharmer applets are provided in two file formats. A normal format
and a CAB format. The latter format is compressed in size and requires a special
line of HTML for quicker download access. PageCharmer's AppletSet'rs automatically
produce this line of code. A problem however is that HTML pages with this line of
code will not load properly on Windows machines using Internet Explorer when the
CAB file is accessed locally.
If you are using Internet Explorer for Windows you will need to take out the CAB param line shown below so that you can modify your Web pages locally.
![]() If you've encountered a problem running PageCharmer applets in your Web
pages, first check to make sure of the following:
If you've encountered a problem running PageCharmer applets in your Web
pages, first check to make sure of the following:
![]() If the above tasks have all been accomplished, then it's possible that
your files have been uploaded incorrectly, or there is a problem with your server.
Please read through the following sections to continue trouble shooting.
If the above tasks have all been accomplished, then it's possible that
your files have been uploaded incorrectly, or there is a problem with your server.
Please read through the following sections to continue trouble shooting.
![]() If you see the following error message displayed at the bottom of your
browser window, (or any similar message in the Java console for Netscape Navigator)
then your .class file has been corrupted when you uploaded it to the server.
If you see the following error message displayed at the bottom of your
browser window, (or any similar message in the Java console for Netscape Navigator)
then your .class file has been corrupted when you uploaded it to the server.
![]()
To fix this problem, do the following:
![]() If you are using the program "Fetch" for Macintosh, make sure
to use the "Put File..." command, and that "Raw Data" is selected
before clicking the OK button.
If you are using the program "Fetch" for Macintosh, make sure
to use the "Put File..." command, and that "Raw Data" is selected
before clicking the OK button.
![]() If you are running your own server and have never served Java applets,
you may need to check your Suffix Mapping. If you are using an Internet Service Provider
(ISP), and uploading files to their server, this section does not apply.
If you are running your own server and have never served Java applets,
you may need to check your Suffix Mapping. If you are using an Internet Service Provider
(ISP), and uploading files to their server, this section does not apply.
![]() If everything seems to be normal, but the applets simply do not run, your
server might not have the correct Suffix Mapping for .class files. See your server
software instructions for more information on how to add a Suffix Mapping for .class
files.
If everything seems to be normal, but the applets simply do not run, your
server might not have the correct Suffix Mapping for .class files. See your server
software instructions for more information on how to add a Suffix Mapping for .class
files.