Segment Editing
Split-Up
If you want to add a Vertex in the middle of a selected segment you can use the "Split-Up" feature to split-up a segment into two smaller segments. A Vertex will automatically be inserted halfway between the existing Vertices.Transform
To change a segment select the new setting from the Segment menu then select the Transform command to apply the change. All track specific settings will be lost after the Transform is complete.Make Straight
One of the most useful features is the Make Straight command. It can be very hard some times to line up the track in a perfect straight line. When you have the segment you want to make straight selected, select the Make Straight command.Track-Segments Settings
You will want to change the properties of a segment many times during the construction of your coaster. Select a Segment, and then use the Segment Settings button to bring up a handy menu. All segments can be individually colored, and tunnels can be added. The Track Settings window looks like this:
The Track-Settings
The default color scheme for your coaster is set in the Coaster settings dialog. To use the individual colors click on the check box "use individual colors" and select the colors by clicking on the color-boxes and the windows-color-dialog will appear.
If you want to have a tunnel click the "Tunnel" checkbox.
Transport-Segment Settings
The Transport Settings menu will allow you to adjust the behavior
of the devices controlling the train. If the train is going faster than
the set speed it will be decelerated to that speed, and if it is going
slower than the set speed it will be accelerated. You can modify the power
of the acceleration and deceleration by changing the G forces.
![]()
The Transport-Settings
You can choose how the segment will appear in the Simulator by selecting either friction wheels or LIMs, but either one will behave the same way.
Brake-Segment Settings
A Brake is a 2-point control device, which means there are only 2 states: on and off. If the brake is on it will decelerate the train at a certain rate that can be modified. If the brake is off it will not affect the train at all. The brake is switched on by the 2 point control device if the speed of the incoming train is greater than Speed limit + Hysteresis and will be switched off if the speed is lower than Speed limit Hysteresis. As the Hysteresis gets smaller the speed will be controlled more accurately, but the brake will be more active.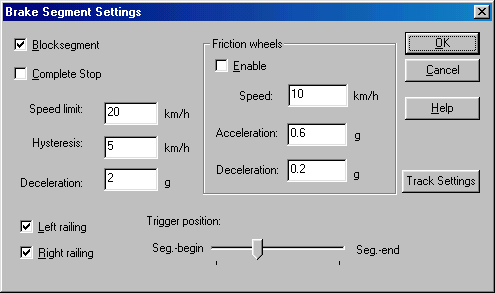
The Brake-Settings
You can enable or disable the Block feature for the brake if necessary for your design. A nice feature is the "complete-stop" option that if enabled will bring the train to complete stop first before the described two-point-controlled mechanism is activated. Most brakes are inclined slightly downward so that the train can start rolling again using gravity. The Make Straight feature comes in handy when making brakes. If you want to use a non-inclined brake you may use Friction tires to accelerate the train. They are set the same way they are set for the Transport Segment.
The Trigger Position is very important. It controls when the brake is activated for the first time and is defined relative to the segment. The further towards the left that the slider is set the sooner the brake will engage when the train arrives. Conversely the further to the right you set the slider the later the brake will engage. With this trigger you have full control of when the brake is triggered for the ultimate in realism.
The rails have no real purpose other than physical aesthetics in the game. They will not affect the performance of the train.
Lift-Segment Settings
The Lift Settings are very similar to the Transport Settings. A train will be accelerated if its speed is slower than the Lifts speed, and will be decelerated if it is faster. On a chain lift the deceleration is very small and is mainly caused by the anti-rollback resistance friction (anti-rollbacks cause the clicking noise). It tends to zero when the train moves, but might be larger if you are using a Friction Wheel lift.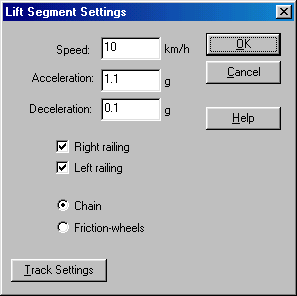
The Lift-Settings
Adjacent lift segments behave just like one really long segment. The settings on the last segment will apply to the entire connected lift. If you try to change the settings of the other lift segments you will find them grayed out. If you break up a lift hill with a non-lift segment you will generate 2 individual lifts.
Once again the rails have no real purpose other than physical aesthetics in the game. They will not affect the performance of the train.
Station-Segment Settings
The Station Segment Settings allow you to modify the stations properties. Primarily you can set the wait time of your coaster. Other options include friction wheels and pre-brakes. Friction Wheels will accelerate a train when dispatched. If you do not want to use friction wheels you should make sure that the station is inclined so the train will start rolling on its own.A pre-brake option is used to slow the train down on its way into the station. This is useful if your train is entering the station at a very high speed. The pre-brake can slow a train and the main brake will later stop it.

The Station-Settings
The wait time is computed randomly via Gaussian-normal-distribution. This means that a random number will be generated around the mean time. As the Standard Deviation number gets bigger (you can set this number) the variation is greater. This is to simulate slower riders getting in and out and holding up dispatch of the train.
Average and Std. Deviation will determine the average wait time and how much the program can deviate from that. The min and max wait time will limit the deviation much like RCT.
All dispatches at stations that have the synchronize option enabled will be synchronized. Please keep in mind, that the min. and max. wait-time will take affect on the dispatch time even if the synchronization is enabled. It is a good idea to lower the min. wait-time and to higher the max. wait-time to increase the synchronization probability.
The simple station building option will hide the station top if enabled. The radio buttons below control the side of entrance.