
Advanced
Snap and the Grid
The Snap and Grid can be configured in the "Preferences" dialog found in the "Options" menu.Each view has its own Snap and Grid. The 3D-View does not have a Grid. The Grid makes it easier to identify the measurements of your coaster. The Snap is used to define the way a mouse click and the dragging will be interpreted. Grid and Snap can be set differently for each view. In addition the Snap can be turned off and on by a handy button on the tool bar.
The Coaster Settings
The "Coaster settings" dialog can be found in the "Coaster" menu. In the dialog you can set the coaster-style and set other global coaster properties like the colors of the trains.The track-styles are based on real coasters but for copyright reasons the original names have been changed.
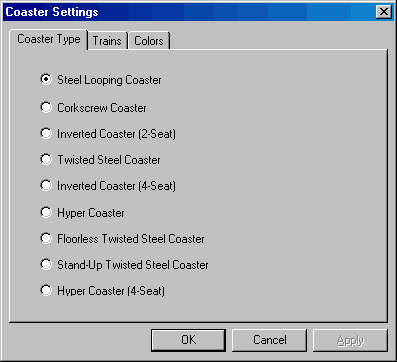
The Coaster-Type property-page
The Train Settings
In the "train settings" page you can set the properties of the trains and cars. Here you can specify a special texture that will be used for each individual train or its main color. The number of cars per train is global for all trains. The maximum number of trains allowed depends on the block-count.The train-texture must be a ".tga"-file in either 24 or 32 bit color depth. Its dimension must be squared and a power of 2, and the size should not exceed 256x256 pixels. Via the alpha channel the primary train color will be blended on the cars. All car textures must be located in the cartextures subfolder. Each train has its own default texture which can be used as a starting point for making your own. Use a train-texture path with no characters to fall back to the default texture.
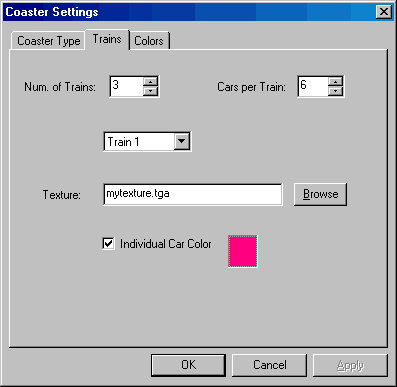
The Train-Settings property-page
Colors
You can set the colors for the train and the coaster in the Colors dialogue. Click on the color you wish to change and then select the desired new color. These are the global color choices, and can be overridden by individual track segments or train settings.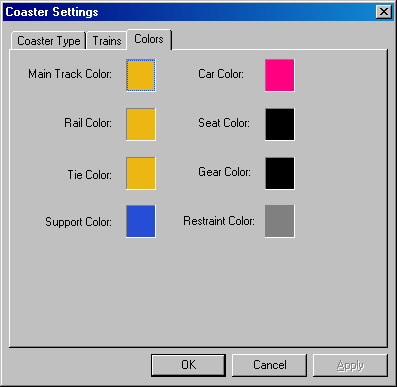
The Color-Settings property-page
Saving and Loading Elements
You can save your own prefabricated elements to reuse later. Using the Control key select a series of adjacent segments (not the vertices). When you have the entire element selected simply choose the Save Element option in the File menu. To insert an element at the end of a disconnected track simply choose the Insert Element command in the File Menu.You will see this dialog: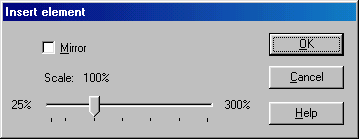
The Insert-Element dialog
The mirror-option lets you mirror the element and with the scaling factor you can alter the size. Each element will be inserted relative to the current position, so you should be sure that the element will not extend beyond the boundaries to the program.
Scene Objects
Scene objects can be used to add additional scenery to coaster tracks. A scene object is a .3DS file that has to be copied into the "objects" folder. A scene object can have textures. These textures have to be located also in this folder. The current version can only load .TGA and .JPG textures. The textures must have a pixel resolution of a power of two (16x16, 32x32, 64x64, 128x128...). For best compatibility the resolution should not exceed 256x256 pixels. All scene objects that can be found will be displayed in a list inside the editor when selecting "Choose scene object" in the scenery menu. To add a scene object to a track, select a scene object and add it like a tree object. You can modify (scale, rotate and move) the scene objects afterwards by its colored handles. When saving a track, the scene objects will not be saved together with the track. Instead only a link to the scene object will be saved. Therefore the scene objects and textures must be distributed separately when exchangingtracks. Please keep in mind that only the basic features that the .3DS format offers are supported.
Terrain
You can add terrain to your coaster by using the NoLimits Terraformer. The Terraformer is an additional tool that gives you control about the terrain surrounding of your track. You can create mountains, valleys and lakes. The current version of the NoLimits editor is not able to display the terrain data. The terrain data will be saved inside the track files.Riding a Coaster
You can pre-ride the coaster in the Editor to see if it works. Simply hit the Green Light and the simulation will begin with wire frame trains. If you have made an error a warning will pop up. If you wish to ride the coaster in the Editor you have to switch to the 3D view, then select the On Board view. You also can auto-start the simulator by pressing F5 or the corresponding toolbar button in the simulation bar. The current file will be saved automatically before the simulator will be opened.
Pre-riding the coaster