Creating a track
Saving and Loading Tracks
The editor by default will load an empty track. You can load or save your coaster under the File menu. You may only edit one track at a time. All tracks should be located in the Tracks subfolder so the Simulator will be able to find them. Always save your track before riding it in the Simulator.Importing RCT Tracks
RCT tracks can be imported with the corresponding file menu item. Not all tracks can be imported, only those that are compatible with NoLimits. To ride a RCT track it must be imported and saved as a NoLimits track file afterwards.The Editing Modes
There are 4 main editing-modes that affect the way the mouse-cursor and its actions are interpreted.- "Select/Modify"
- "Add Vertex"
- "Add scenery object"
- "Add supports"
The Edit-Toolbar
When in the Add Vertex mode anytime you click anywhere in the edit area you will add a new Vertex. A new track segment will automatically connect to the new Vertex. You will not be able to modify any objects while in this mode. You will not be able to add new Vertices while in the 3D View. One good method for coaster construction is to place a few Vertices in the Top View then modify them in the other views to a rough shape of your coaster. You can always fine-tune the design after it is complete. For more information on Vertices please read the Vertex section of this guide.
The Add Scenery Object mode allows you to place a scenery-object to the scene. Each time you click in the area you will add a new object. You can choose which object in the Scenery menu. Adding Scenery Objects is best done in the Top view, as there is no need to adjust the height of these objects.
The Add Supports mode allows you to place either pre-defined supports or build custom supports. The type of support you will add is selected in the support menu or in the tool bar. For more information on placing supports please read the Supports section of this guide.
The Segment-Types
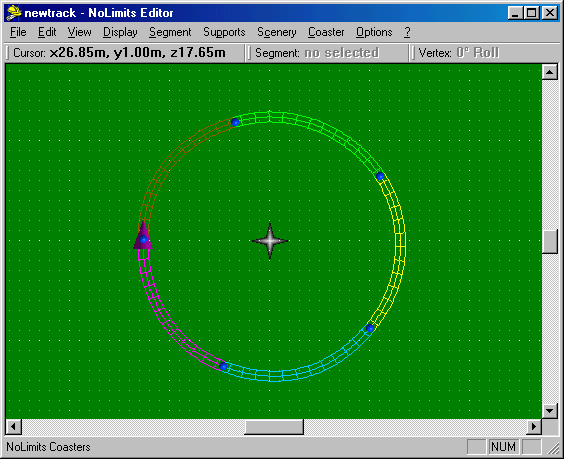
When you add a new Vertex a new Segment will automatically be drawn to connect to the new Vertex. There are 5 different Segment types that have different properties that will affect your coaster. They are all color-coded so you will identify them easily. The 5 types are:- Normal Track" (blue)
- "Station" (brown)
- "Lift" (green)
- "Transport" (yellow)
- "Brake" (violet)

A circular track with all segment types visible
The following is a basic description of each Segment Types function.
For advanced properties and to learn how to configure them please read
the Segment section of this
guide.
Normal Track
This is just standard track, and it is the default segment. Most of your coaster will be comprised of Normal Track. It does not influence your coaster in any way except the normal friction and gravity that all segments simulate. Without gravity your coaster wouldnt go anywhere. Friction will gradually slow your coaster down, just like in real life. You cannot change the gravity or friction in NoLimits. Gravity is accurate, and friction is determined from a number of factors (such as speed, air resistance, etc) to simulate realistic behavior. There is some randomness to it, so your coaster will not always work exactly the same.
Station
All coasters must have exactly one station segment. The Station can be extensively configured to your imagination of how you think a Station should work. A Station segment counts as a Block. More on this in the next chapter. In a station the train will be waiting to simulate the loading and unloading of passengers. When the next Block is clear and after the wait time is up the train will be automatically dispatched.
Transport
Transport segments are used to give the coaster a boost if you need it somewhere in your track. You may decide that you need some friction wheels to move a train over flat track at a constant speed. Or you may want to start your coaster with a powerful magnetic LIM launch. Either way you can use a Transport segment. A Transport segment does not count as a Block. More on that in the next section.
Lift
A Lift segment is primarily used to pull a train up an incline at a set speed. A Lift can either consist of the traditional chain system, or a friction tire system. The main difference between a Lift segment and a Transport segment is that a Lift segment does count as a Block. More on Blocks in the next section. Adjacent Lift segments will count as one and selecting the last Lift segment in the line sets the settings for the entire lift.
Brake
A Brake is a segment used primarily to stop your coaster if the block ahead is occupied, or slow it to a controlled speed if the block is clear. Brake segments are blocks by default, but the block tag can be turned off. Brakes come in 2 varieties: normal and with friction tires. Brakes equipped with friction tires will slow a train then advance it at a set speed. Brakes without friction tires must rely on gravity to get them rolling again.
