Before you can work with images, they need to be imported into the StudioLine Image Archive.
See the chapter Importing Images for further information.
Image Tools
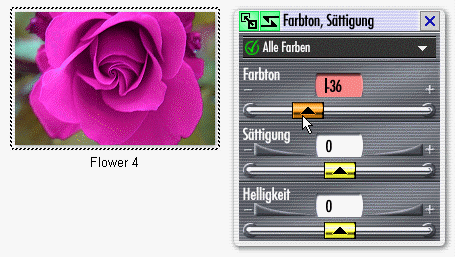
In StudioLine, you edit your images by applying image tools to them. Each image tool performs specific functions against an image. For instance, there are images to rotate and crop, correct color hues or to subject the image to various special effects.
For every image, StudioLine remembers the tools you used and their settings and uses those when displaying an image. However, the original image is maintained unchanged. This way, you can experiment with image tools, change settings or reverse any actions û even months later.
To apply an image tool on an image in the Image Archive, select the particular image by clicking on it with the left mouse button. On the ôImage Toolsö panel, click on one of the tools and filters listed. A panel opens with the settings for the selected tool. Use the various controls to change the tool settings û and StudioLine will immediately update the thumbnail picture to show the effect.
There is no need to confirm your actions with an ôOKö button. Any tools and settings can easily be changed or reversed at any time.
To apply the same tool against multiple images, first select these images before accessing tools or changing their settings: Press and hold the Ctrl key while clicking the chosen images with your mouse. You may also click left mouse button on the workspace background, then hold the mouse button down while moving the mouse pointer across the chosen images to create a selector band around them. You may still add additional images to your selection, by using the Ctrl key.
See the chapter on Selecting Objects, for further information. [->LINK].
For every image, StudioLine remembers the list of filters that may have been applied and their settings. To view the list of active tools, select an image and choose ôActive Toolsö from the ôEditö menu. (You can also click the right mouse button on an image to access its Context Menu and then choose ôActive Toolsö.)
You can control the order in which tools are applied against an image, but dragging them in the Active Tools list. StudioLine will apply the tools top to bottom.
To illustrate the effect of the processing order, assume you applied the ôColorizeö tool first and then the ôBlack and Whiteö tool. The resulting picture will be black and white û totally negating the effect of any colorizing you did first. However, by changing the processing order, the image would be first turned into black and white and then the black and gray areas would be colorized. The result would be a uni-color picture with various color saturations.
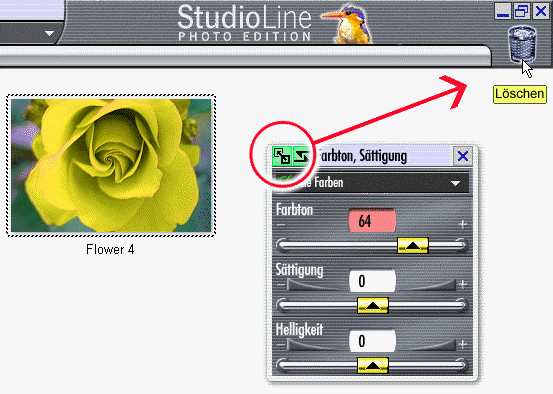
To discard the effect of an image tool, simply drag the tool from the ôActive Toolsö list of a particular image to the Trash Can in the upper right corner of the StudioLine window. If the toolÆs settings panel is currently open, you may also select the particular image and then drag the ôCopyö button from the top left corner of the toolÆs setting panel to the Trash Can.
There are a number of ways how you can copy tool settings from one image to another.
Dragging the ôCopyö Button to a Single Image
Click the left mouse button on the image, which already has the correct image tools settings.
Open the image tool you wish to copy.
Drag the ôCopyö button of the image toolÆs settings panel to any other image that should inherit the identical settings.

Clicking the Copy Button
Click the left mouse button on the image, which already has the correct image tools settings.
Open the image tool you wish to copy.
Hold down the Ctrl key to select additional images (be certain that the original images remains selected!)
Click the ôCopyö button of the image toolÆs settings panel to apply the same settings to all selected images.
Using the Active Tools List
To copy the settings of a single image tool, drag the particular tool from the Active Tools list to any target images.
To copy all image tools, drag ôCopyö button of the Active Tools list onto any target images (or use the Ctrl key to select additional images and then click the ôCopyö button.)
Using the Lock Button
The ôLockö button will freeze the current settings of this tool. The button will turn red, to indicate that these settings are locked. You may now freely select target images located elsewhere in StudioLine (e.g., other Image Archive folders). When you have located a target image, use or drag the ôCopyö button to apply the settings. You can continue this process as long as you choose. Once completed, unlock the settings by clicking the ôLockö button a second time.
The Image Archive offers a number of additional functions that are covered elsewhere in the online help: