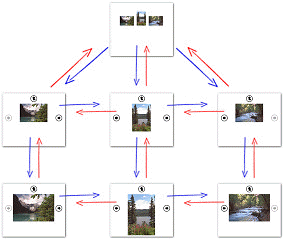

The true powers of templates and layouts come to light when they define image view pages. Layouts with image views will automatically generate interlinked sub-pages with common style elements, navigation buttons and automatic text generated from image and page descriptors.
The size of the image prototype determines the picture size used for a particular image view. Typically, the image prototype for the page would be of a small size. The resulting main page consists of a thumbnail gallery for all pictures dropped on the page. The image prototype for the image views could have increasingly larger sizes. The resulting sub-pages display only one picture each û but each with increasing detail. A web visitor would simply click on a picture to see a larger version, or choose a navigation link to browse between image view pages.
This feature is a great time-saver for publishing pictures in a user-friendly manner. For a product catalogue, listing pages can show small preview pictures for each item û and the detail page with a full view is only a mouse-click away.
Photographers can design extensive thumbnail galleries that load quickly, yet visitors can still gain access to full-size images. By adding an Automatic Forward from the Page menu, one can even publish a self-running slide show.

The appearance of each image view page is based on the design for its particular level of detail.
To design a specific image view page:
Open the layout or template.
Select an existing item on the Image Views panel, or press the New Image View button.
Whenever possible, use placeholders instead of static text. This way, text is automatically substituted against image, page and system descriptors.
Not all pictures on a page have to have image views. Buttons, banners and logos are usually to be excluded.
To cause image view pages for a single picture to be created:
Click the right mouse button on an image.
Choose Link from the object context menu
Choose Link to Image View in the Link panel.
To cause image views to be created for all images on a page:
Open a layout or layout template.
Click the right mouse button on the image prototype.
Choose Link from the object context menu
Choose Link to Image View in the Link panel.
To prevent image view pages from being created for an individual image, or to remove existing image views, simply change its link settings to ôNo Linkö.
If an object links to an image view page, one can easily switch to it.
Select the object.
Either choose Follow Link from the Navigation menu, or open the objectÆs context menu with the right mouse button and choose Follow Link.
From an image view page, use the Navigation menu to switch to other pages.