
Installation - Solaris/Unix
You must run JCloak for the first time with an X windows display-even if you do not specify the "-show" option-in order to register JCloak.
To run the shell-script, issue the commands
  chmod a+x JCloak.sh
  JCloak.sh -show
In order to run in command line mode, simply, leave off the -show.
Note: the Solaris version of JCloak does not yet include an executable
launcher program. The JCloak.jar file is an executeable
Jar, and you can run it with the command 'java
-jar JCloak.jar <jcloak-args>'
Also, JCloak.sh is a Borne/Bash shell script that will
start the command-line JCloak. The shell script assumes the JRE 1.2 is
loaded in a subdirectory of the JCloak install directory. If you have the
JDK or JRE for JDK 1.2 installed on your path, modify the shell script
accordingly.
Installation - Windows
Run the self-extracting installer, 'install.exe'. You will be prompted to choose an installation directory, and the installer will unpack JCloak into the specified directory.
To run JCloak in command-line mode use the JCloak.exe program. To run in GUI mode use JCloakGUI.exe (You can also make a shortcut to the JCloakGUI.exe program.) If you have the JRE or JDK for Java 2 installed, the JCloak.jar file will start the GUI program if you double click on it.
Note: if you did not download JRE 1.2 with the installer, and have not already downloaded the JDK 1.2, you can do so from Sun's JDK 1.2 download page.
Start the GUI (windows run JCloakGUI.EXE, Solaris JCloak.sh -show). The first screen to come up will be the registration screen.
|
|
You must enter all four fields to enable the register button. If you wish to be on the mailing list for updates (which we strongly recommend) check the appropriate box. Note: if your company uses a gateway/firewall you mayl be prompted for a local SMTP (mail) server. |
After JCloak displays the opening registration or splash screen the main project view window is displayed.
Select the 'File: New menu' option to create a new project
configuration. The New Project Wizard dialog is displayed.
Use the New Project Wizard dialog to create an initial project configuration. The wizard dialog walks the user through a sequence of steps to create a new project. You can move back at any time, or forward when the tab you are on is complete.
Note: the project is not saved until you complete the wizard and use the File:Save command on the main window menu.
In the following sections we will highlight the major wizard tabs in sequence. The example used is the Java2D demo from the JDK 1.2 download.
Next you will specify the classpath for the main class or classes for your program. JCloak will automatically generate the classpath if you browse for either a .class file, directory or a jar or zip file containing your classes. This intial classpath is set to be included in the output and obfuscated.
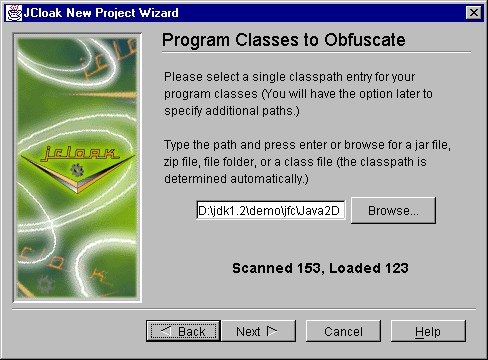
Note: after typing a path into the edit box, you must hit enter before JCloak will begin loading classes.
Once you have specified a valid class location, JCloak will begin scanning all classes it finds in that path. Note that JCloak will automatically skip loading any classes it scans that do not fit with the classpath or are otherwise corrupted.
Once class loading is complete the 'Next' button will be enabled .
The skipped classes are show on the final wizard screen.
JCloak scans the loaded classes and presents various alternatives based on what it finds. JCloak searches for Applet's, Servlet's and classes defining main().
If JCloak locates a class derived directly from Applet or JApplet in your program classes you are presented this option. You may select one of the Applet classes to include in the obfuscation or choose none at all.

Note that if you have a class defining main() (including the Applet class) you will have the opportunity to include it as well in the next tab
If JCloak locates a class which defined main() (public static void main(String args[])) you are presented this option. You may select one of the main classes to include in the obfuscation or choose none at all.

In the example JCloak found the 'Java2Demo' class which we chose to include as our main() class.
This tab is usually only useful for Applets where space is an issue, and is disabled by default.

If you enable unreferenced method/field and/or class removal, JCloak makes multiple passes removing unreferenced methods until no unreferenced code is found.
JCloak scan for references from the Applet class and/or any other class that's name is preserved (see the section on Controlling Class Renamingfor details of how to preserve class names). These preserved classes are considered to be 'externally referenced'
Any methods or fields JCloak encounters that are excluded from obfuscation are also excluded from removal if they are unreferenced.We have opted to allow JCloak to remove the unreferenced symbols and classes.
In this example we have opted to remove the unreferenced symbols and classes. The default setting is to preserve unreferenced classes and symbols.
Here you are presented with output options appropriate
to the type of program (Applet, Main, etc. ...).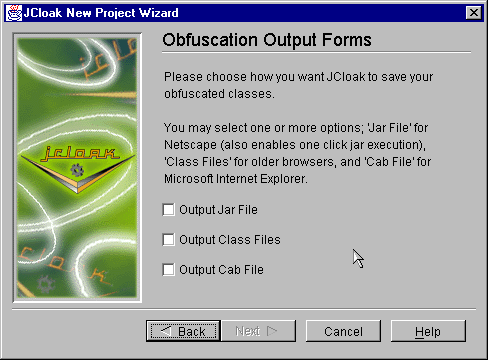
In our example, all three forms are enabled since the Java 2 Demo specifies an Applet.
We select 'Output Class Files' to generate only the obfuscated class files.
In this tab you will specify the output paths for each of the output types you requested.

The 'class files' path must specify a file folder (directory) where the class tree is to be saved. The Java 2 file selection dialog on Windows forces you to create the folder before you can save to it. You can simply type the path to the folder in the edit box and JCloak will create it when the classes are written.
The New Project Wizard shows you your final selections on the last panel. Click 'Finish' if you are satisfied and JCloak will start building the tree based on your classes references. You may be prompted for additional classes by the Locate Class Dialog.
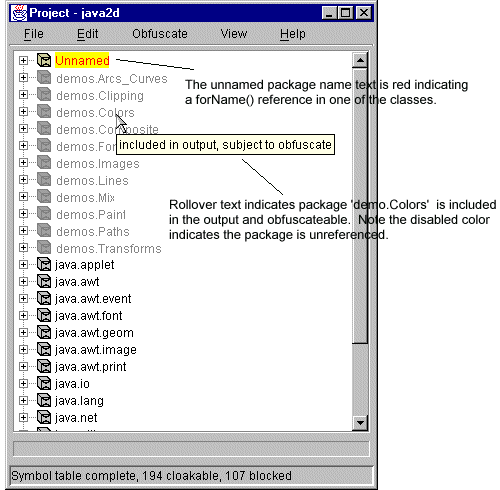 When the
classes have been loaded and analyzed JCloak will show a package tree on the
main window. The intial package tree for the Java2D demo is show at the
right.
When the
classes have been loaded and analyzed JCloak will show a package tree on the
main window. The intial package tree for the Java2D demo is show at the
right.
The packages with the disabled icons (demos.*) are unreferenced classes. Note that the 'Unnamed' package is show in red: this indicates one or more classes in the 'Unnamed' package reference forName().
Moving down the tree we find that DemoPanel's constructor does the reference. Double click on the method to open a source viewer and we find this code:
   public DemoPanel(Object obj) {
        setLayout(new BorderLayout());
        try {
            if (obj instanceof String) {
                className = (String) obj;
                obj = Class.forName(className).newInstance();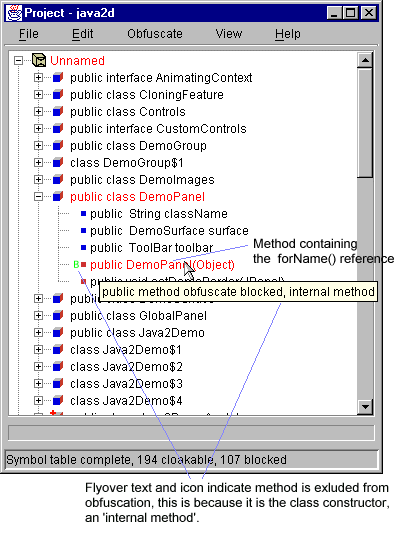
On casual inspection of the demo's source we find the DemoGroup constructs classnames from a fairly grissley looking manipulation of the getResource() returned URL (which does not work if the classes are jar'ed)
This is why the 'demo' package's classes are not referenced explicitly from the Java2Demo main().
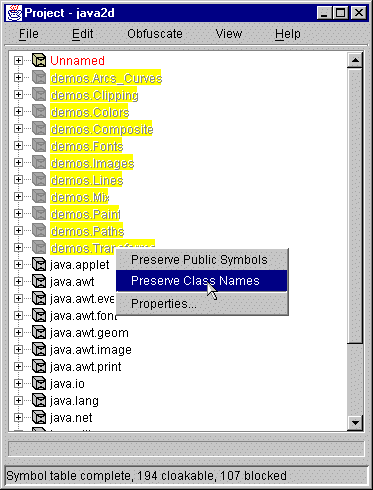
So to handle the 'implicit' reference to the classes in the 'demos' packages, select all of the demos.* packages, right click, and select the 'Preserve Class Names' option from the popup menu.
After JCloak rescans the references the demo's packages will show the referenced color (not greyed).
At this point select 'Write Output Classes' from the Obufscate menu to save your classes, and ...
You're done!
If JCloak determines your classes are incompatible with the Java 2 virtual machine classes you will see the "Reference Java VM" wizard panel. This panel ask you to locate a suitable VM to obfuscate with. You must browse for the 'classes.zip' file.
For example using the pre 'javax' package naming for Swing classes would require you to obfuscate with the Java 1 VM.
