![]()
Capture
|
|
Capture |
Getting Started With Pure Motion Analogue Capture
To familiarize yourself with Pure Motion Capture and capture some video, start the program by selecting it from the start menu and follow the steps below.
Step 1 - Connect your video and audio source
![]()
Connect your video source (VCR, camcorder etc.) to your video capture card using an appropriate cable (e.g. composite, S-video or UHF).
If you wish to capture audio into your movie file, connect your audio source (usually the same as the video source) to your capture card. If your video capture card has an audio input, use this, otherwise use your sound card line-in socket.
Step 2 - Select Analogue capture mode
Click on the drop down list at the top right of the Capture window and select "Analogue Capture".
![]()
This will set up the program for capturing from an analogue video source.
Step 3 - Choosing the video source and resolution
![]()
Click the "Video options" button and choose a resolution of 320 x 240. If the option of colour format is available, choose "15 bit RGB".
From the same button, select the source type (e.g. composite, S-video or UHF).
Step 4 - Choose the frame rate
![]()
Use the drop down list to select
Step 5 - Choose a video compressor
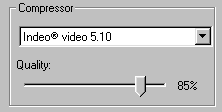
Select an Indeo version 5 filter (usually labeled "Indeo® video 5.x Compression Filter", where x is the sub version number).
Choose a quality of 85%.
Note that if your capture card has built in video compression (if you have an MJPEG capture card for example), select Full frames (uncompressed) here.
Step 6 - Choose the capture file
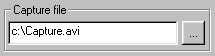
Type, or press to browse (...) button to select a file to capture to. If you have more than one drive, you should capture to a drive which has plenty of spare hard disk space.
Step 7 - Check the audio settings
Click the "Advanced..." button.
![]()
If you are not capturing audio, you can go straight to the "Compression" page and uncheck "Capture audio". Now click "OK" to close the dialog and skip to step 7.
![]()
If you wish to capture audio, go to the "Devices" page and select your audio capture device.
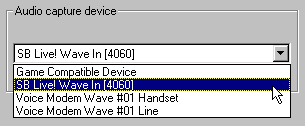
If you are capturing audio using your sound card, make sure the input is selected for recording using Windows volume control (show me how to do this).
Click "OK" to close the advanced options dialog.
Step 8 - Turning on the preview
![]()
Press the "Preview on" button to show the video in the video preview area inside the window.
Step 9 - Initializing the capture
![]()
Press the record button to initialise the capture process. Capturing will not start immediately, it will only start when you confirm the next dialog to pop up.
Step 10 - Starting to capture
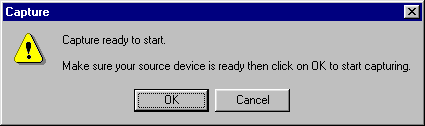
When you see the above dialog appear, start your capture source (press play on the VCR or camcorder) and click "OK" in the dialog.
Pure Motion Capture has now started capturing to the movie file.

If you see the "Capture Stopped" warning appear, this means your PC cannot capture fast enough for the chosen resolution, frame rate and compressor. Try changing the compressor, reducing the frame or reducing the resolution. See troubleshooting for possible cures.
After about 10 seconds of capturing, press the stop button.
![]()
You will now be asked to play back the captured video, click "Yes" and watch the captured video. You should now be able to see (and hear) the movie play back at full speed. Note that to play the video back at maximum speed, it may be necessary to quit Pure Motion Capture and play the file back from Windows by double clicking on the file.
See Troubleshooting if you encountered any problems.