The first step in your work with MySQL Query should be registering a database (or a number of databases), which you plan to work with.
To register a database select the Database | Register Database  menu item (Shift+Alt+R) or click the appropriate button on the toolbar.
Then set the database properties in the Register Database Dialog.

Host
A host name where the database is situated or the IP address of the server.
Port
A TCP/IP port for connecting to the database server.
User Name
User name for connecting to the database server.
Password
Password for connecting to the server.
Database Name
Select the database name to register.
Database Alias
Any database alias that is convenient for you (e.g. mysql or My Test Database). This alias will be displayed in the DB Explorer window.
Database Font Charset
Character set to display data in the grid.
 Login prompt before connection
Enables MySQL Query to prompt for user name and password each time you connect to the database.
Use SSL protocol
Enables using encrypted protocol when connecting to the database server. To use this option your MySQL server must support SSL protocols.
Use compression protocol
Enables using the compressed data protocol when connecting to the database server.
Interactive mode
Enables using the interactive_timeout variable in my.cnf file instead of wait_timeout.
Quote identifiers
Enables quoting all the identifiers by the backquote symbol `. Note that this option works only with servers that support quoting aliases.
Autoconnect on startup
Enables automatic establishing connection with the registered database on MySQL Query startup.
On the Log tab you can also set the following options:
Enable Log of SQL Editor queries
Enables logging SQL queries and error messages to the SQL log file.
SQL Editor log file
Specifies the log file name to save queries and error messages into.
You can copy all registration options from another registered database by clicking the Copy Alias from... button. It drops down with a list of already registered databases, allowing you to select one for copying its properties.
When you are done, click Test Connect to check the connection with the database. To finish the process of registering, click Register.
You can also register a number of databases, located on one host, at once. Select the Database | Register Host  menu item (Shift+Ctrl+R) or click the appropriate button on the toolbar.
The connection properties on the first step of the Register Host Wizard are the same as in the Register Database Dialog. On the second step you should select the databases for registering by moving them from the Available Databases list box to the Selected Databases.

On the third step you can select a database in the list and tune its options in the same way as it is described above.
When you are done, click Register to finish the process.
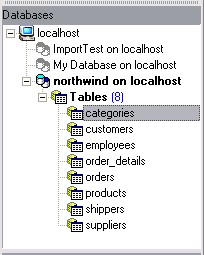
After you have registered a database or several databases, the DB Explorer panel at the left looks in the following way:

To connect to a database double-click its alias in the DB Explorer or select it and click the Connect to Database  button on the toolbar. If connection is established successfully, the database alias becomes bold and its node expands showing all the database tables.
Now you can start creating queries for this database and execute them.


