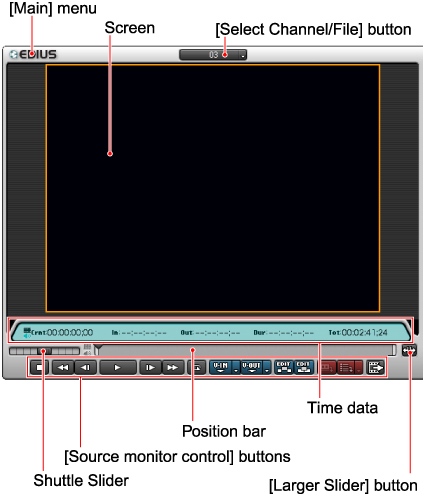
Screen
The screen shows source data being played.[Select Channel/File] button
Shows the [Select Channel/File] menu used for selecting source data for a project.The name of the currently selected source data is shown on the [Select Channel/File] button.
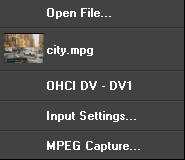
- Open File...
- Shows Windows' [Open] dialog box to allow you to select a source data file. After a file is selected, the first frame of the selected file appears on the Source monitor screen.
- History File
- Shows the names of files you have previously opened and thumbnails of their first frame. If the file you wish to open is listed here, click it.
- External Input Signal
- Shows the input signal formats available for the devices currently connected to the computer. Clicking the input signal format to be used for source data opens the [Input Settings] dialog box, which allows you to change the type and format of input signal.
- Input Settings
- Opens the [Input Settings] dialog box.
- MPEG Capture
- Opens the [MPEG capture]dialog box.
Time Data
Shows the time data for the currently playing source data.- Crnt
- Timecode of the current position.
- In
- Timecode of the In point.
- Out
- Timecode of the Out point.
- Dur
- Timecode of duration.
- Tot
- Total length of source data.
Tip
As for In, Out, and Dur, you can switch the display between video time data and audio time data by clicking the video mark and audio mark.- When the video mark is shown in black:
- The In point, Out point, and duration of the video are displayed. If they have not been set, "--:--:--:--" is shown.
- When the audio mark is shown in black:
- The In point, Out point, and duration of the audio are displayed. If they have not been set, "--:--:--:--" is shown.
- You can change Crnt, In, or Out timecode shown in the time data display area in units of hours, minutes, seconds, or frames. To do so, click the digit you wish to change and do one of the following:
- Enter a new digit directly. (Just entering "200" produces "00:00:02;00".)
- Enter the number of frames to offset with a + or - sign. (Entering +10 to "00:00:00;00" produces "00:00:00;10".)
- Drag the mouse up and down.
- Press the up and down arrow keys.
- Turn the mouse wheel.
- Timecode is shown in red when there is any conflict in the setting such as an In point being set later than an Out point.
Shuttle slider
Allows you to vary the playback speed of source data.Drag to the right to play back in the forward direction, and to the left to play back in the reverse direction. Playback speed can be set to 1/20, 1/10, 1/4, 1/2, 1, 2, 4, 8, and 16 times the normal speed.
The bar returns to the initial position (center) when you release the mouse button and the screen shows a still picture (Pause).
Position bar
Allows you to play back source data and check the current position.Drag the position slider to show any scene of your choice in the source data.
[Source monitor control] buttons
These buttons are used for selecting source data, specifying In and Out points, and capture clips. You can control external input devices as well via these buttons.[Larger Slider ] button
Expands the position bar.The range between In and Out points is expanded to the entire position bar. (Sections outside of the In and Out points are hidden.)
