[ Back | Home ]
IBM TranslationManager
Translator's Reference
Part 3.
Working with TranslationManager
components and functions
Version 2.5 - 32bit
26 Feb 1998
First Edition, May 1996
This edition applies to
IBM TranslationManager Version 2.0 (5622-999)
and to all subsequent releases and modifications until
otherwise indicated in new editions or technical
newsletters.
Order publications through your IBM representative or the IBM branch
office serving your locality.
Publications are not stocked at the
address below.
IBM welcomes your comments.
A form for readers' comments may be
provided at the back of this publication, or you may send your
comments to the following address:
- IBM Deutschland Entwicklung GmbH
- Information Development, Dept. 0446
- Postfach 1380
- 71003 Boeblingen
- Germany
When you send information to IBM, you grant IBM a nonexclusive right
to use or distribute the information in any way it believes appropriate
without incurring any obligation to you.
© Copyright International Business Machines Corporation 1994, 1996. All rights reserved.
Note to U.S. Government Users -- Documentation related to restricted rights -- Use, duplication or disclosure is subject to restrictions set forth in GSA ADP Schedule contract with IBM Corp.
In this part, you find descriptions
of what you can do
with all kinds of translation material in TranslationManager .
Each type of data, such as
documents, dictionaries, and folders,
is considered as an object
on which you can perform an action,
such as copying, changing, and deleting.
For each TranslationManager object,
you find a chapter containing:
- A general description of what the object is
- An overview of the functions and the terminology
related to the object
- Detailed descriptions
of the actions you can perform on the object
Each task is described according to the following structure:
- In an introduction, the individual task is explained
such as when and why to do it.
- How to perform the task is usually described
as follows:
- Prerequisites
- What the prerequisites are
- Calling sequence
- How to get to the windows required for performing the task
- Options and parameters
- Which options and parameters to specify and how to specify them
- Results
- What is achieved by the task
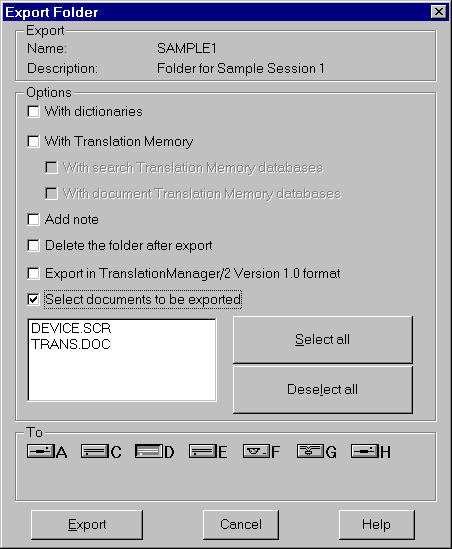
To exchange translation material
with other TranslationManager users or other programs,
TranslationManager offers functions to exporting and importing
the translation material.
To import an object, for example a folder,
is a prerequisite for working with it in TranslationManager .
You export an object to work with it outside TranslationManager .
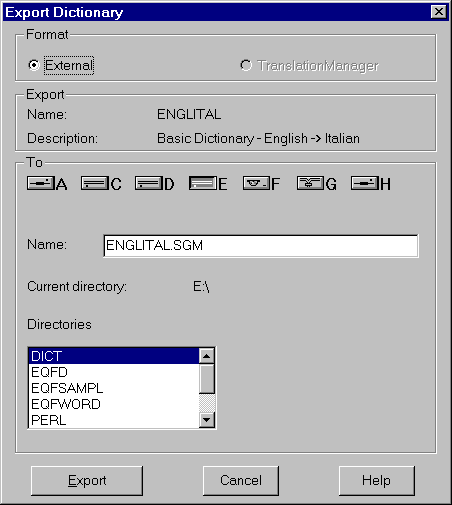
Exported objects can be in TranslationManager format or in external format.
Objects in TranslationManager format are files in a compressed format
and can be imported only by other TranslationManager users.
For files in this format,
you only have to specify the drive
where to export to, or where to import from.
These files are stored in the \EQF\EXPORT
directory of the selected drive.
Objects in external format are ASCII encoded files
that can be edited with a text editor.
They can be imported by other TranslationManager users
and processed by other systems.
For files in external format
you must specify the fully qualified DOS file name
where to export to, or where to import from.
Files in external format contain SGML tags that describe
the structure of the files and the data it contains.
For a complete description of SGML, refer to
ISO 8879, Information Processing - Text and Office
Systems - Standard Generalized Markup Language (SGML).
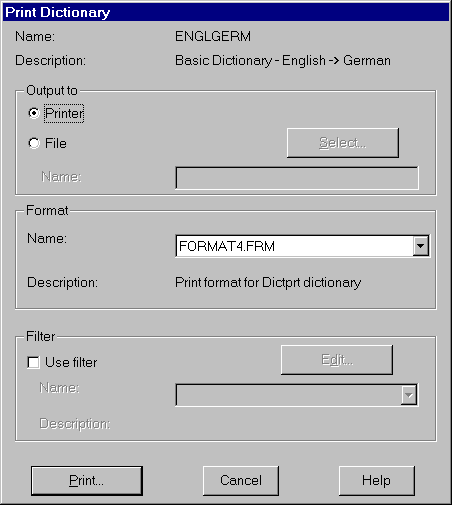
In several windows you can request to print information.
You can print:
- The details of a folder to be imported
- The terms in an exclusion list
- The terms in a new terms list or a found terms list
- The data of a dictionary entry
- A complete dictionary or selected parts of it
- A document file
- The results of counting words
- The key assignments in the Translation Environment
If you work under OS/2, the printout is sent to the printer that
is assigned to your workstation as default printer
when no other printer has been specified by you.
If you work under Windows, you are prompted with the Print
Setup window where
you can specify the destination of your printout.
To perform an action on an object in TranslationManager ,
you can specify the options and parameters
in a window specific for this action.
At the bottom of the window,
you find pushbuttons, where you can:
- Start the action (left pushbutton)
- Leave the window without any further action
(Cancel)
- Ask for information about this window
(Help)
To perform an action on a list window such as the
Translation Memory Listwindow in TranslationManager ,
you can do either of the following:
- Select the appropriate item from the TranslationManager menu bar
to access a menu of actions.
- Open a context-sensitive
popup menu where you can select the same items as from the
TranslationManager menu bar.
The menu shows only the selection of tasks that can be started
from the currently active list window.
You open the popup menu by pressing the right mouse button.
When you work with TranslationManager ,
the system prompts you with message windows if necessary.
There are several types of messages:
- Informational
- For example, to inform you that a Translation Memory was imported completely
- Error
- For example, if something critical happens
- Warning or Question
- For example, to ask whether you really want to delete a folder
All messages have a unique number and start with EQF to
identify them as TranslationManager messages.
With all message windows where you are asked to confirm actions on
an object, you can select a Yes to All button on the
first message window that pops up after an action has been requested.
When you pressed this button TranslationManager assumes the answer
Yes on all subsequent message windows that ask for a
confirmation.
For example, while analyzing documents of a folder a message asks
if you want to overwrite the target document because translation for a
document has already started.
If you answer Yes to All,
all the following messages are then
suppressed.
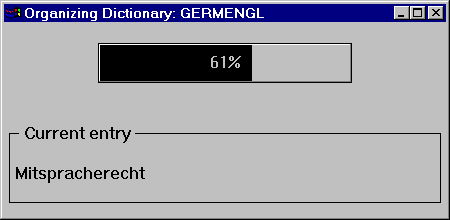
Some actions may require some time to complete,
for example:
- Organizing a dictionary
- Exporting a Translation Memory
- Analyzing all documents of a folder
The progress of such an action is indicated by a so-called progress
window (see Figure 2).
Figure 2. Organizing Dictionary sample window
This type of window can be minimized
to let you do other work in TranslationManager .
When the action is completed,
a message with the result of the action is displayed.
If you want to interrupt the action,
double-click on the system icon of the progress window.
In the following message window,
you can confirm the cancelation request.
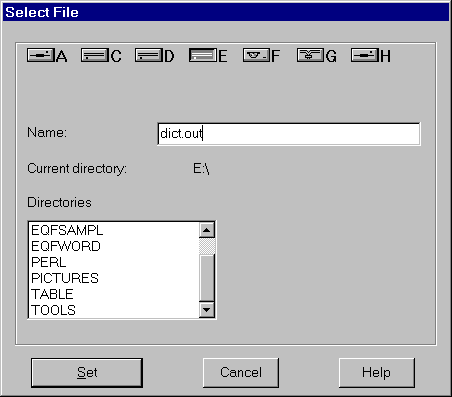
You may need to define a file
when working with one of the following windows:
When you select the output option File
and click on Select...,
the Select File window is displayed
(see Figure 3).
Figure 3. Select File window
Specify the fully qualified file name,
consisting of drive, directory and file name,
as follows:
- Select the drive where the file is to reside.
- Select the directory to hold the file by
choosing one of the directories from the list of Directories.
The Current directory displayed is changed accordingly.
- Choose the Name of the file.
You can complete this entry field with one of the following:
- Accept the default file name displayed.
- Type the file name yourself for a new or an existing file.
When you have selected the file name,
click on Set to return to the previous window.
Results
The drive, directory, and file name you select are used
by the respective function.
In the list windows, TranslationManager can show you
more information in addition to the names of the list items.
You can ask the system
to display these view details selectively
and in a sequence defined by you.
The details contain properties and statistical information
of the list items, such as the:
- Name of a document
- Source language of a Translation Memory
- Size of a new terms list
- Date when a document was analyzed
- Date when a found terms list was updated
- Drive where a folder is stored
Details can be displayed for:
- Folders
- Documents
- Dictionaries
- Translation Memory databases
- New terms lists
- Found terms lists
- Exclusion lists
To view the details,
you can switch between two display modes:
- Viewing the names only
- Viewing selected details,
usually including the name
In the Change View Details window,
you can change the details arrangement
for a specific list window
(see "Changing the details setting").
Prerequisites
The respective list window is already selected.
Calling sequence
Select Names from the Utilities menu.
Results
The list window contains only the names of the list items.
This may be useful when you need a narrow window on the screen.
Prerequisites
The respective list window is already selected.
Calling sequence
Select Details from the Utilities menu.
Results
The list window contains for each list item
the detail information as previously defined.
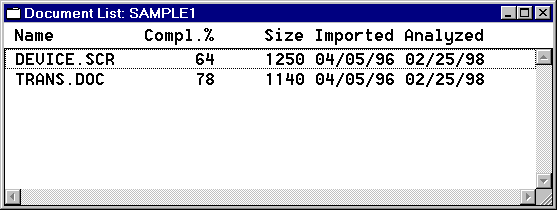
As an example, the Document List window
is shown in
Figure 4.
Figure 4. Document List window sample with selected details
As a default setting,
only the names are displayed.
You can change the details to be displayed
(see "Changing the details setting").
Once you have defined your setting of the details,
they are displayed as selected.
TranslationManager lets you to customize the view details in the respective
list window.
If not all details of a list item, for example a folder,
fit on one line in the list window,
you should set priorities.
As an example,
this window is explained for the details of documents in the
Document List window.
Prerequisites
The respective list window is already selected,
for example a Document List window.
Calling sequence
Select Change details...
from the Utilities menu.
The Change View Details window is displayed
(see Figure 5).
Figure 5. Change View Details sample window for documents
Options and parameters
- Details
- This box displays all the view details available,
for example, name, drive, dates.
Double-click on those view details
you want to be displayed in the Document List window.
- Selected
- This box displays the view details selected.
The items are displayed from left to right in the same
order you selected them from the Details list box.
To deselect an item, double-click on the entry
in the Selected box.
Click on Clear to remove all items from
the Selected box.
You can then begin to define a new sequence of details.
When you have selected the desired details,
click on Change to activate the new setting.
Click on Cancel at any time to leave the
Change View Details window.
No changes are made.
Results
The list window contains the
selected details in the newly-defined sequence.
This setting remains active throughout the current session
until you change it again.
To save the setting for the next time you start TranslationManager ,
respond with Yes to the
prompt Do you want to save the current workbench?
when you leave TranslationManager .
The current settings will then be used
the next time you start TranslationManager .
You can translate many types of document with TranslationManager ,
such as letters, brochures, booklets and manuals.
You can translate documents that were originally created with
a variety of text editors, word processors, and
publishing systems.
The types of file you can use with TranslationManager include:
- ASCII text files
- Documents from word processors and publishing systems:
- AmiPro
- BookMaster and IPF
- HTML
- Microsoft Word for Windows
- RTF
- WordPerfect
- Machine-readable information contained within:
- Assembler source code
- Help files of Windows programs
- Help and message files of OS/2
programs
- Windows resource files
- OS/2 resource files
A translation project can consist
of one file or a set of files.
In TranslationManager , each file is treated as a document.
In their original formats, documents consist of text
and layout information, called markup.
Markup defines things such as
the positioning of page breaks and paragraphs endings,
highlighting, and font sizes.
When translating a document, TranslationManager must be able to
distinguish between this markup and the text that is to be translated.
By ignoring the markup information during translation, TranslationManager
preserves the original format of the document-- although
minor changes in the translated document can be necessary,
such as adding space to
a table that is full or a translated
term that does not fit within a column.
TranslationManager uses a different markup table for each
document format type.
Each document has a number of
properties,
such as the source and target languages,
the markup table to use with the document,
and the name of the Translation Memory to use for translations.
You must specify the properties of a document
when you import it into TranslationManager .
By default, all documents in a folder have the same properties,
although you can change them for individual documents.
For further information on how to deal with document formats,
see "Dealing with specific document formats".
You must first import documents you want to translate
into TranslationManager (see "Importing a document").
This can be done by importing documents into an existing folder.
At this point, TranslationManager asks you to specify
the properties of the document.
You can either let the system assign the default properties
of the folder to which the document belongs,
or you can assign different properties to the document.
Another method for importing documents is
to import a complete folder
that contains at least one document
(see "Importing a folder").
When you go to the Translation Environment
to begin translating a new document,
TranslationManager analyzes the document
to distinguish between the text that requires translation
and markup data.
It then splits up the document
into translatable segments--which usually
correspond to individual sentences--and markup data that
is not to be translated.
TranslationManager can distinguish between abbreviations ended
by a period and the end of a sentence.
It uses an abbreviation list to correctly identify sentence
boundaries.
See "Maintaining abbreviation lists" to learn how to maintain an abbreviation list.
The TranslationManager editor displays the segments to be translated
and the markup in different colors so that you can
easily distinguish between the two.
As you move from segment to segment, the markup data is skipped.
With the TranslationManager editor, you can
check the spelling in the translated document
and see suggestions for correct spellings.
TranslationManager also includes a word count function,
which shows you the number of words and markup tags
in the original and translated documents.
Prior to translating a document,
you can check a document against
the dictionaries that are installed with TranslationManager
to compile a list of terms in the document
that are not currently in the dictionaries.
You can choose to add terms from this new terms list
to a dictionary.
When translating a new version of an existing document
that has already been translated, you should
check whether a Translation Memory for the document already exists,
or whether one can be generated.
To continue translating a document
that has been partly translated by somebody else,
you should first acquire all related translation material.
In particular, ask for the Translation Memory
and all the dictionaries that were used.
These can be passed to you in the form of an exported folder.
You can then display details of the document
in the Document List window,
such as the properties and processing status of a document,
the date of import, date of analysis, and
what percentage of the document has already been translated.
After completing a translation,
you can choose to export a document
back into its original format
to load it into the original word processing system
for a final layout review.
TranslationManager offers several processing functions for documents,
which you start by selecting:
- At least one document from the Document List window
- An action from the associated File,
View, or Utilities menu
Prerequisites
A folder containing at least one document
(except if you import a document).
Calling sequence
Select:
- The folder with your documents
from the Folder List window
- Open from the File menu
Alternatively, select the Folder List window
and double-click on the folder name in the list.
The Document List window for this folder
is displayed.
Results
The selected folder is "opened".
To perform a task on a document, select at least one
document and an action from one of the toolbar menus.
Analyzing a document means splitting it up
into translatable pieces called segments.
Segments are in most cases equivalent to sentences.
This segmentation is performed
with the help of markup tables
that contain specific information
for the type of markup used in the document.
You choose the markup table to use as one of the properties of the
document.
After the analysis of a document,
TranslationManager produces a copy of the original document
to be used for the translation, this means, the original
version of the document is kept unchanged by TranslationManager .
The system allows you to analyze documents
with different results:
- The documents are segmented (default).
- The documents are segmented,
segments can be substituted with segment translations,
or a Translation Memory can be filled with these translations.
- The documents are segmented and terminology lists are created.
To analyze all documents in a folder,
see "Analyzing all the documents in a folder".
Segmentation is the basic part of the analysis.
You activate it implicitly
when you select Open for a document that has
not yet been analyzed.
Prerequisites
The folder containing the document must be opened.
Calling sequence
Select:
- The document to analyze
from the Document List window of the folder
- Open from the File menu
Alternatively, double-click on the document
in the Document List window.
This takes you to the Translation Environment
where the analyzed document is displayed in the
Translation window.
Results
The document is segmented.
You can start to translate it (see "Translating a document").
If you have Translation Memory databases available
from previous translations,
you have several options:
- TranslationManager can search existing Translation Memory databases
for segments that match segments in the document to be analyzed.
Segments that match exactly or almost exactly can be copied
into a new document- or project-specific Translation Memory.
-
The system can perform automatic substitutions,
that is, it copies the translations of segments
that were previously made for an identical source segment
(exact match) into the translation version of the document.
-
The remaining untranslated segments
can optionally be written to a separate file,
for example for processing by a machine translation system.
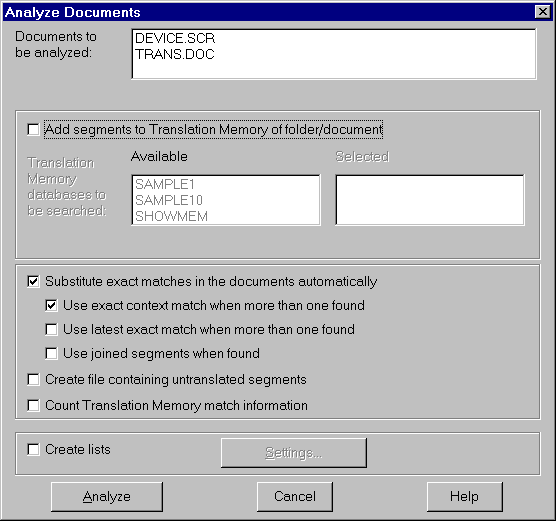
Prerequisites
- The Translation Memory databases to be searched must exist.
- The folder containing the document must be opened.
Calling sequence
Select:
- One or more documents
from the Document List window
- Analyze... from the File menu
The Analyze Documents window
(see Figure 6) is displayed.
Figure 6. Analyze Documents window
Options and parameters
- Documents to be analyzed
- This box contains the documents you selected previously.
- Add segments to Translation Memory
- Select this option if Translation Memory databases from translations
of similar documents already exist
and you want to fill a separate Translation Memory for the selected document
with matching segments from the existing Translation Memory databases.
From the Available box
select with a double-click those Translation Memory databases
from where the segments are to be copied.
The selected Translation Memory databases are displayed in the Selected box.
You must select at least one Translation Memory,
you can select a maximum of 10 Translation Memory databases.
To separate previously translated segments and new segments,
you can use the following options:
- Substitute exact matches in the documents automatically
- Select this option to automatically replace original segments
with the translations found in the Translation Memory
associated with the document.
The document is then already partially translated
when you start working with it,
enabling you to concentrate on the translation of new segments.
This option is particularly useful in conjunction
with the Add segments option.
Many Translation Memory databases can be searched in one run
for matching segments
that are copied into the document-specific Translation Memory,
and are substituted in the translation document.
- Use latest exact match when more than one is found
- Select this option
if you expect segments with more than
one exact match in the associated Translation Memory
and you want the system to choose
the most recent translation of the segment.
If this option is not selected, TranslationManager skips the automatic
substitution for this segment
whenever more than one exact translation is found for a
source segment.
- Use joined segments when found
- Select this option to join segments.
This can be useful if you want to analyze a
document that you have
worked with before and where you joined neighbouring text segments
before you translated them.
During a new analysis run these segments are treated as
separate units again. However,
in the associated Translation Memory there is a match (translation)
for the joined segments only.
To find this match more easily during
automatic substitution, this option joins neighbouring segments
in the document to be analyzed.
Note that two neighboring segments are only joined if for
the first segment in the sequence a fuzzy match has been found.
- Create file containing untranslated segments
- Select this option
if you want TranslationManager to create a separate file
containing all untranslated segments.
If you also selected
Substitute exact matches in the documents
automatically,
this file contains only the remaining untranslated segments.
A file with a format similar to an
external Translation Memory is created
(see "Untranslated segments file")
containing empty target segments.
This file can be exported for use by other systems such as
a machine translation system.
If an external system is able to add valid translations
for these untranslated segments,
the updated file can be imported into TranslationManager as a Translation Memory
for translation use.
- Create lists
- This option is described in "Analyzing documents using dictionaries".
Click on Analyze to begin with the analysis of the document.
As it can take some time to analyze the document,
a window is displayed showing the progress of the operation.
Results
The document is segmented.
Depending on the options you selected,
the document may already be partially translated,
the Translation Memory updated, or a file created containing untranslated
segments.
You can begin translating the document.
If you have dictionaries available
containing vocabulary associated with the document,
you can ask TranslationManager to generate two types of
terminology list:
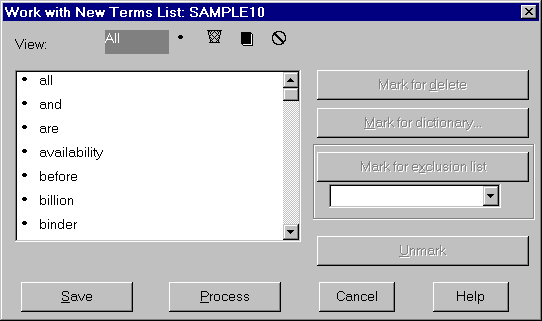
- New terms list.
This list contains all terms in your document
that are not defined in the referenced dictionaries.
You can use this list of terms to add entries to these dictionaries.
- Found terms list.
This list contains all terms in your document
that are already defined in the referenced dictionaries.
You can use this list of terms
to fill a separate dictionary related to the document.
The generated terminology lists may contain
terms that are unsuitable as terminology
for your translation.
In this case, you can create the lists again using
exclusion lists
or exclusion dictionaries
to get fewer terms in the lists.
If you are only interested in terms
that occur more than once in a document,
you can specify a minimum number
of occurrences greater than 1.
To perform the creation of terminology lists,
you specify your options and parameters in two subsequent windows.
Prerequisites
- Dictionaries and, optionally, exclusion lists must be available
- The folder containing the document must be opened
Calling sequence
Select:
- One or more documents
from the Document List window
- Analyze... from the File menu.
The Analyze Documents window is displayed
- Create lists
and click on Settings...
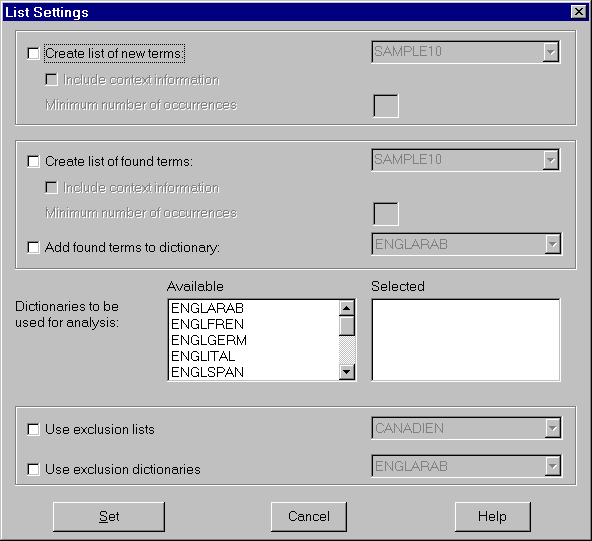
The List Settings window
(see Figure 7) is displayed.
Figure 7. List Settings window
Options and parameters
To create a new terms list, select:
- Create list of new terms
- Select this option to create a list of new terms.
The system provides the folder name as the default name
for the list to be generated.
You can specify any other name.
For this type of list, you can also select:
- Include context information
- If a new term is found,
the system can save the
original segment (containing the term)
as context information.
This option is useful if you intend to copy the new terms
to a dictionary that can contain context information.
- Minimum number of occurrences
- Specify how often a term must occur in the document so that it
is included in the list.
To create the list of all terms of a document that are also
in selected dictionaries, select:
- Create list of found terms
- Select this option to create a list of found terms.
The system provides the folder name as the default name
for the list to be generated.
You can specify any other name.
For this type of list, you can also select:
- Include context information
- If a term is found in one of the selected dictionaries,
the system can save the
original segment (containing the term)
as context information.
This option is useful if you intend to copy the new terms
to a dictionary that can contain context information.
- Minimum number of occurrences
- Specify how often a term must occur in the document so that it
is included in the list.
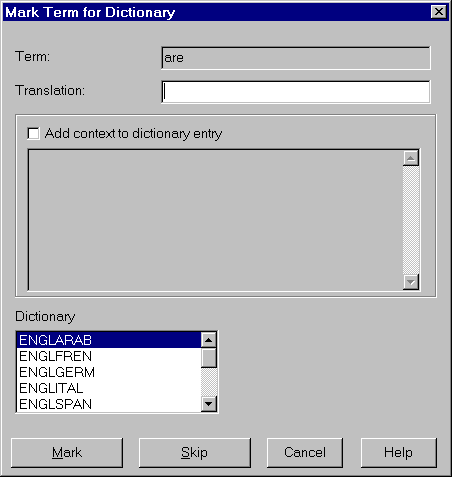
- Add found terms to dictionary
- To copy the found terms to a dictionary,
select a dictionary from this list box or type the name
of an existing dictionary.
For both new terms and found terms lists,
you must specify:
- Dictionaries to be used for analysis
-
Select the dictionaries to be used
for generating terminology lists
from the Available list box.
The dictionaries are listed in the Selected list box
in the order in which you select them,
and the dictionaries are searched in this order.
You can select up to 10 dictionaries.
If needed, you can limit the generation of terminology lists
by the following options:
- Use exclusion lists
- If you have terms
you want to exclude from the lists to be generated,
these terms must be put into an exclusion list.
For each language for which you installed the language
support, TranslationManager already provides an exclusion list.
It contains so-called noise terms.
Select the exclusion lists to be used from the list box.
- Use exclusion dictionaries
- If you have a dictionary containing well-defined terms
that you want to exclude from the terminology lists to be generated,
select it from the list box.
Click on Set to return to the
Analyze Documents window.
To begin analysis,
click on Analyze.
Results
The document is segmented.
Depending on the options you selected,
new terms lists and found terms lists are created,
and can be modified and used for dictionary updates.
For information on how to process
new terms lists and found terms lists,
see Chapter 11. "Working with terminology lists".
You can begin translating the document.
TranslationManager
uses language-specific abbreviation lists to identify correct
endings of a sentence. This prevents that the period after an
abbreviation is interpreted as the end of a sentence during analysis,
for example
in a sentence like For details see books, films, magazines,
etc. and
keep the subject in mind..
The period after
etc. is not considered to be the end of the sentence.
TranslationManager provides default abbreviation lists for each
source language supported.
You can add new abbreviations, or
delete or modify existing ones.
Prerequisites
- The Language List window must be active
(Display language list from the Utilities
menu).
- The language you want to work with must be in active state.
Calling sequence
Select:
- An active language.
- Open from the File menu
or double-click on the name of the language.
The list of abbreviations for the selected language is displayed.
For example, Edit Abbreviations for: German(national)
if you
selected this language.
You can now make your changes.
Options and parameters
- Abbreviations list
- To update an abbreviation, overtype it.
To add a new one, switch to
Insert mode and press Enter at the line before which
you want to insert it.
To delete an abbreviation, use the Backspace key.
Note that you end the abbreviation with a full stop.
- Save
- To save any changes and close this window.
- Cancel
- To close this window without saving any changes.
- Help
- To get information on how to interact with this window.
Results
The language-specific list of abbreviations is updated and will be
used for subsequent analysis runs.
Depending on the language you selected,
abbreviations have been changed, added, or removed from the
abbreviation list for this language.
To translate a document, you must open it
so that the Translation Environment for this document is displayed.
Closing a document means to stop translating a document
and to leave the Translation Environment.
Calling sequence
Select Close from the Translation Environment system menu.
This takes you back to the TranslationManager main window.
Results
The translation document, the Translation Memory, and the dictionaries used
are saved in their current status.
You can start any other TranslationManager task.
The translation of this document can be continued at any time.
TranslationManager provides a facility for counting
the number of words and markup tags
in a document at any time.
The result is shown in a window and can be saved in a file.
To count the number of words in all the documents of a folder,
see "Counting the words in all documents of a folder".
Prerequisites
At least one document must exist in the selected folder.
Calling sequence
Select:
- At least one document from the Document List window
- Count words... from the Utilities menu
The Count Words window (see Figure 8)
is displayed.
Figure 8. Count Words window
Options and parameters
- Documents
- This box contains the list of the documents you selected on the
Document List window is displayed.
- Options
- One of the following options can be selected at a time.
Select:
- Original
- To count the number of words in the document before translation.
- Translation
- To count the number of words in the translated document.
- Output to
- In this block you
define where you want the system to save the results:
- Screen
- The result of the word count is displayed on your screen.
This option is selected automatically.
- File
- Select this option to also store the count results in a file.
You can:
- Accept the proposed file name.
- Type a file name of your choice.
- Click on Select... to
display the Select File window from where
you can choose the file name without having to type it
(for a detailed description, see "Selecting a file").
Click on Count to begin counting words.
Results
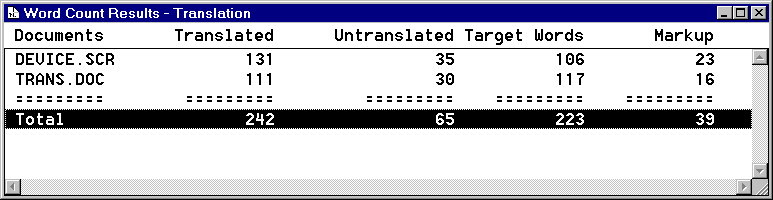
The results of the word count are shown, for example,
in the Word Count Results - Translation window
(see Figure 9).
Figure 9. Word Count Results - Translation window
If you selected Original and output to Screen,
the result is displayed in the
Word Count Results - Original window
with the following columns for each original document:
- Documents
- Name of document
- Untranslated
- Number of words
- Markup
- Number of markup tags
- Total
- Number of words and markup tags
If you selected Translation and output to Screen,
the result is displayed in the
Word Count Results - Translation window
with the following columns for each translated document:
- Documents
- Name of document
- Translated
- Number of original words already translated
- Untranslated
- Number of original words not yet translated
- Target words
- Number of translated words in the translated document
- Markup
- Number of markup tags
- Total
- Number of translated words and markup tags
If you selected the File output option,
the results are stored in the same format in the specified file.
To return to the previous window, close the
respective Word Count Result window.
TranslationManager can work with documents that originate from a variety
of word processors and formats.
Most word processors include facilities for
converting document files
from one document format to another.
If the file format of your word processor
is not explicitly supported by TranslationManager ,
you may be able to use these conversion facilities to convert your
file to a format that is supported directly by TranslationManager .
Sometimes, it can be helpful
to have a printed version of the original document available
to get a better picture of the whole document.
It is recommended that you check your document after translation
for any changes concerning the layout.
You can edit and print it with the
word processor that was used for creating the original
document.
Minor format corrections might be necessary
because translated text has not always the same length as
the corresponding original text.
TranslationManager directly supports the document format of
Ami Pro.
Import these documents
using the EQFAMI markup table.
Do not change, delete, or insert markup data outside
translatable segments.
Inline tags should be handled
carefully.
The start of highlighting like bold, italics, underline, or similar
is indicated with <+, any character
and >.
The end of this markup data is indicated with <-,
the same character as
at the start of this markup tag and >.
Tables, headers, and footers appear at the beginning of the document
for translation.
ASCII documents are text files without any formatting tags.
In most word-processors, you generate this type of document
when you save a document as DOS text file.
Import these documents using
the EQFASCII markup table.
TranslationManager allows you to translate text
contained in Assembler files, that is, information that is
enclosed by single quotes. For example:
*2.......10....16......................................................72.......

         DC    C'THIS IS A ONE LINE TEXT'

         DC    C'This is a two line text string that will be presented x

               under TranslationManager on one line'
Import these documents
into a TranslationManager folder, using the EQFASM markup table.
Text spread over more than one line
is shown on one line in the Translation window.
Translated text that does not fit into one source record
is spread into several lines.
A continuation character is placed in column 72 and the
continuation begins in column 16.
Import these documents using
the EQFBOOK markup table.
Import these documents using
the EQFHTML2 markup table (for HTML level 2.0 and level 3.0
documents).
TranslationManager directly supports the document format of
Microsoft Word for Windows Version 2.0 and Version 6.0.
If your documents were created using a different version of
Microsoft Word,
you need to save the document
in one of the versions supported by TranslationManager.
You can import these documents
into a folder using
the EQFWORD (for Word Version 2.0
documents) or
the EQFWORD6 (for Word Version 6.0 documents)
markup table.
If the document was saved as
a Rich Text Format (RTF) document,
you must specify EQFRTF as markup table.
Ensure that you have sufficient disk space available when
using one of the EQFWORD markup tables.
TranslationManager requires some
temporary space (about triple the size of the source document).
If you are working with TranslationManager under OS/2 and you use
EQFWORD6 as markup table, you must have Win-OS2 installed.
The markup table
requires a Windows program during the analysis and export
functions which cannot be started unless Win-OS2 is installed.
Files that are saved by the automatic save option
of Microsoft Word for Windows cannot be processed by TranslationManager .
You must save your document
with the Save command
from the File menu
and then close the file.
Do not use the Allow Fast Save option
in the Save category
that you can select in the Options window
of the Tools menu.
It is recommended to save your file
with the option Field Codes set to off.
Under Word for Windows 2.0
you can do this from the View menu.
When working with Word for Windows 6.0 you can
even switch it off in the View menu which you
can access by selecting
Options... from the Tools menu.
Otherwise some characters are represented in
replace form
and this can be confusing during translation.
After you have translated the document, load it into
Microsoft Word for Windows for postprocessing it.
You must rebuild the index and the table of contents
after you have loaded the translated document in
Microsoft Word for Windows.
For documents originating from Word 6.0 you must also rebuild
the table of authorities.
To use language-related functions on the
translated document in Microsoft Word for Windows,
change the language identification
by selecting Language
from the Format or Tools (when
using Word 6.0) menu.
The page numbering in headers or footers can change after
translation because the document is now longer or shorter than
the source.
TranslationManager cannot repaginate
Microsoft Word for Windows documents.
For documents originating from Word for Windows 2.0:
To get the correct
page numbers in headers or footers,
select Field Codes from
the View menu to see where codes like
NUMPAGES are inserted.
Delete and reinsert these codes where necessary.
For documents originating from Word for Windows 6.0:
To get the correct
page numbers in fields,
select Select All from
the Edit menu, locate the mouse pointer on one of the fields,
press the right mouse button, and select Update Field.
During translation the layout of the document is determined
by markup tags.
Some of the inline markup tags can be changed during translation.
This means you can insert or delete tags
like [bold],
[italics],
and [underline].
Make sure you also insert the corresponding ending tag.
In Appendix F. "Displaying markup information for Word documents", you find a list of
all markup tags used for Microsoft Word for Windows documents.
Footnote references are represented with a markup tag.
The corresponding text to the footnote is appended to the document
after the main text.
Do not change, delete, or insert tags outside
translatable segments.
The format for index entry tags in Word 2.0 documents is:
[index field][index entry]
"text"[/index entry]
The format for index entry tags in Word 6.0 documents is:
[ix fld][index entry]
"text"[/index entry]
The index string must be enclosed by double quotes.
The format for entries in the table of contents in Word 2.0 documents
is:
[toc field][toc entry]
"text"[/toc entry]
The format for entries in the table of contents in Word 6.0 documents
is:
[toc fld][toc entry]
"text"[/toc entry]
The string for the table of contents must be enclosed by double quotes.
When working with Word 2.0 documents, bookmarks
are lost after translation. Annotations are kept in the
document but are not translatable.
When working with Word 6.0 documents, bookmarks are kept
in the document. Annotations are translatable.
To avoid complications when loading the translated
document back in Microsoft Word for Windows,
treat the following tags very carefully during translation:
- [picture: xyz]
- [footnote: xyz]
- [auto footnote: xyz]
- [field: xyz] until [efield]
-
[drawn obj: xyz] (in Word 6.0 documents)
This means when you copy a segment
from the Translation Memory with these tags in it,
delete these markup tags when they cause a fuzzy match.
If the current source segment contains one
of these markup tags ensure that they remain unchanged.
If possible, do not insert one the following tags:
- [paragraph: xyz]
- [next cell: xyz]
- [row]
- [section: xyz]
If you need to insert a new paragraph, copy the
previous paragraph tag and insert it on a new line.
Import OS/2 resource files
using the EQFMRI markup table.
Rich Text Format (RTF) is a document format supported by
many word processors.
Import these documents using the EQFRTF markup table.
Select Check for changes of in-line tags
during translation
to ensure that braces ({, })
are not misplaced or deleted unintentionally.
Otherwise the translated document may no longer be accepted
by the original word processor.
These files are used to define help texts for
programs running under Windows.
They can be saved as RTF documents.
Import these documents using the EQFRTF markup table.
Windows resource files (complying with ANSI)
can be imported
using the EQFAMRI markup table.
TranslationManager supports WordPerfect document formats
that were created with WordPerfect Version 5.x, Version 6.0, and
Version 6.1.
You can import these documents into TranslationManager
using the EQFWP (for WordPerfect Version 5.x documents)
or EQFWP6 (for WordPerfect Version 6.0 and 6.1 documents)
markup table.
When you have translated the document, you can
export it in external format
and load it back into WordPerfect
to generate a new index and new table of contents,
for example, to print and review the translation.
Note: During translation,
segments spanning more than two lines
in the Translation window
are joined including a blank space.
As an exception to this rule,
a blank is not inserted if an inline tag
(such as [bold] or [italic])
is found at the end of a line.
However, if you need a blank between the tag and
the first word of the following line,
it is recommended
to join the lines such that no line ends with a tag
or to start the following line
with a blank before the first word.
When you delete a document,
you also delete the translated version of the document.
However, segments you have translated are preserved in the Translation Memory.
Prerequisites
The folder containing the document must be open.
Calling sequence
Select:
- One or more documents from the Document List window
of the appropriate folder.
To delete all documents in a folder,
choose Select all from the File menu.
- Delete from the File menu.
You must confirm that you want to delete each selected document.
Results
The documents are deleted.
Exporting documents allows you to share documents with other users.
Documents can be exported at any time: before, during, and after
translation.
Partially translated documents
can then be translated further by the recipient.
To transfer a document to another
TranslationManager user, it is recommended that you export it in
TranslationManager format, so that
the recipient receives the document in its original format.
If the recipient needs to have
the document in a specific word-processor format,
export it in external format.
You can start the export procedure from within TranslationManager ,
or you can export documents in external format
by entering the EQFCMD command and its parameters
in the command area of your operating system.
You may want to do this, for example, if you have many large
documents to export.
This command and its parameters
are explained in "Exporting documents".
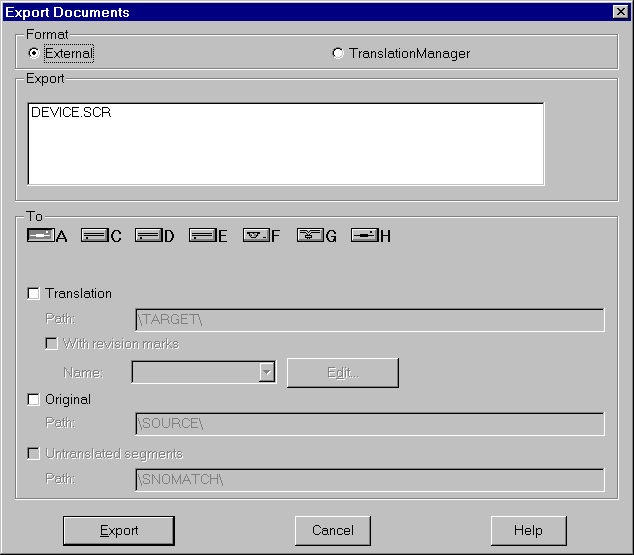
Prerequisites
The Document List window of the respective folder is active.
Calling sequence
Select:
- One or more documents from the Document List window
- Export... from the File menu
The Export Documents window
(see Figure 10)
is displayed.
Figure 10. Export Documents window for external format
Options and parameters
- Export
- This box contains a list of the documents you selected on the
Document List window.
Depending on the format you selected,
this window offers a different number of options and
parameters:
To export the document in TranslationManager format, select:
- Format
- Select TranslationManager .
- To
- Select the drive to which you want to export the document.
To export the selected document in external format,
specify the following options:
- Format
- Select External.
- To
- Specify
where to store the selected exported documents.
- Drive
- Select the drive to which you want to export the documents.
- Translation
- Select this option
to export the documents in their translated version.
- Path
- Type the path name
where you want the translated documents
to be stored on the selected drive.
Use a trailing backslash (\).
- With revision marks
- Select this option
to have the parts of the exported document
that have been newly translated marked.
Revision marks can be individually defined by you.
To specify a set of revision marks to be used, do one of the
following:
- Type the name
of an existing set of revision marks or a new name.
- Select an existing name from the list box.
To change an existing set of revision marks
or to define new revision marks,
click on Edit....
This takes you to the Edit Revision Marks
window where you define your revision marks
(see "Editing document revision marks for export").
- Original
- Select this option
to export the documents in their original version.
- Path
- Type the path name on the selected drive
where you want the original document to be stored.
Use a trailing backslash (\).
- Untranslated segments
- You can select this option only if you selected
Create file containing untranslated segments
during analysis which
generates a file containing untranslated segments.
Select this option
if you want to export this file.
This exported file is in the format of an external
Translation Memory with empty target segments.
You can transfer this file to a machine
translation system to translate these
segments automatically.
Note: The machine translation system must first be programmed to recognize
the source and target language segments in the external format of
the Translation Memory.
After the empty target segments have been completed by the
machine translation system,
you can import the file into TranslationManager as a Translation Memory and
use it to translate the rest of the document.
The proposals offered in the Translation Memory window
are then preceded by an [m]
(generated by machine).
- Path
- You must type the path name on the selected drive
where you want the untranslated segments file to be stored.
Use a trailing backslash (\).
Click on Export to start document export.
Results
The document is exported.
An exported document in external format is stored as a DOS
file in the directory under the file name you specified.
The document can then be further processed with the
corresponding word-processing system.
An exported document in TranslationManager format is stored
in TranslationManager on the selected drive on your workstation
in a separate subdirectory of
the \EQF\EXPORT\ path
under the file name you specified.
For example, if the document DEVICE.SCR
is exported from the folder SAMPLWP,
it is stored as \EQF\EXPORT\SAMPLWP.F00\DEVICE.SCR.
The document can be passed to other TranslationManager users
for further processing.
During export,
TranslationManager can insert revision marks in translated documents.
Revision marks can help reviewing a translated document.
When translating an updated version of a previously translated document,
many segments will remain unchanged.
In most cases you can simply copy the Translation Memory proposals for these
segments into the new document.
These segments usually need no further checking
because they originate from a previous translation.
The only segments that need to be reviewed are those
that are translated from scratch, and those
that are based on a proposal copied from the Translation Memory window
and subsequently changed.
You can choose which segment categories you want to mark.
Prerequisites
- The Export Documents window must be active
- The export options Translation and
With revision marks must have been selected
Calling sequence
Click on Edit...
in the Export Documents window
The Edit Revision Marks window is displayed
(see Figure 11).
Figure 11. Edit Revision Marks window
Options and parameters
- Name
- If this field is still empty, type a name for the revision marks.
- Description
- Type a text to describe the set of revision marks;
this is optional.
You can mark the following types of segments with revision marks:
- Segments that have been translated from scratch without
using a proposal from the Translation Memory
(... translated from scratch)
- Segments that have been copied from a Translation Memory
proposal and then changed
(... modified proposal)
- Segments that have been copied from a Translation Memory
proposal but not changed
(... unmodified proposal)
TranslationManager lets you choose different symbols
for marking the beginning and
the end of each type of segment
in the Begin text and End text fields.
You can type, for example:
- Tags that produce symbols when the exported document is
formatted and printed (for example, :rev and
:erev. tags in BookMaster documents).
- Control characters that change the font type when the exported
document is formatted and printed.
Control characters are only
recognized by certain word processors or printers.
- Eye-catching characters,
such as a string of asterisks (******).
Click on Save to return
to the Export Documents window.
Results
The set of revision marks is saved under the name you specified in the
Name field.
Documents exported in external format are marked accordingly.
To see the results of the revision marks, browse the exported
document file with a text editor
or, if applicable, print the document.
Note: When you have marked the translations with the revision mark, you are
recommended not to import these documents in TranslationManager again,
because the revision marks might be misinterpreted.
It is recommended to export
the revised and finalized translation
again without revision marks.
You must import a document into TranslationManager
before you can work with it.
A TranslationManager document can be in one of two formats:
- TranslationManager format
This format can be received from another
TranslationManager user who previously exported the document in
TranslationManager format.
When you import a document into TranslationManager you receive the current status
of both the original and translated version of the
documents.
- External format
This format is produced by word-processing systems,
such as WordPerfect or Microsoft Word for Windows.
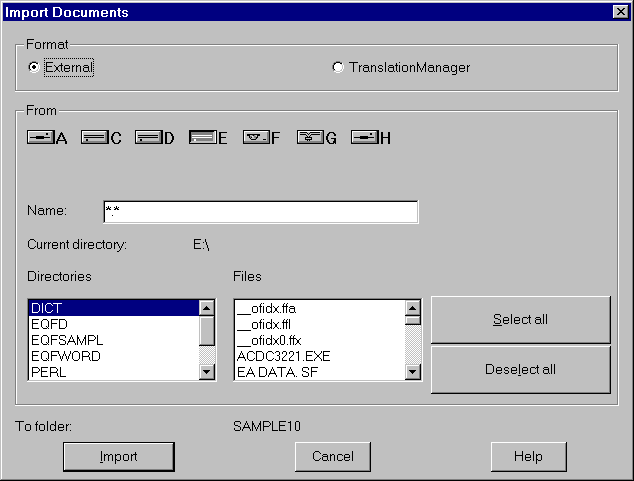
Prerequisites
The active window is the Document List window
of the folder into which the document is to be imported.
Calling sequence
Select Import... from the File menu
The Import Documents window is displayed
(see Figure 12).
Figure 12. Import Documents window for external format
Options and parameters
Depending on the format selected,
this window offers a different number of options and
parameters:
- Format
- To import a document in TranslationManager format,
select TranslationManager
- From
- To specify the current location of the documents:
- Select the drive where the document currently resides.
- Type the document name in the Name field.
Alternatively,
double-click on one or more document names in the
Documents list box.
- Double-click on the folder containing the documents to be imported
in the Folders list box.
To import all documents listed in
the Documents list box,
click on Select all.
To start a new selection of documents,
click on Deselect all.
- To folder
- Shows the name of the folder
to which you want to import the documents.
All selected files are listed in Files.
Select the documents you want to import,
then click on Import to start the import procedure.
To import documents in external format, select:
- External format.
- The drive where the documents are currently stored.
- The Name of the document to be imported.
You can use global file name characters in this field
as follows:
Type only the common part of the file name
in the Name field
to display a subset of the available files in the Files list.
Then add an asterisk (*)
to represent the part of the file names that is different.
For example, to import the files
PART01.DOC, PART02.DOC, PART03.DOC, and PART04.DOC,
type PART*.DOC
in the Name field and press Enter.
If all your document files are located in the same directory,
for example, in \PROJECT on the currently selected drive,
you can type both the path and file name
in the Name field,
for example, \PROJECT\PART*.DOC,
then press the Enter key.
- The Current directory field shows
the current specification in the following list boxes
and in the Name field.
- From the Directories list box
the directory containing the documents to be imported.
- The Files list box displays the files
in the directory shown in the Current directory field
that match the specification you have entered
in the Name field.
Select the files you want to import as documents.
To display the documents in one of the directories listed in the
Directories list, double-click on a directory.
One or more documents from the list
to import all documents listed in the Files window.
-
The To folder field shows the name of the folder
that was selected for the document list.
All selected files are listed in the Files list box.
Select the documents you want to import,
then click on Import to start the import procedure.
The Document Properties window
is displayed for the first document
(see Figure 13).
Figure 13. Document Properties window
Options and parameters
If you import documents with the same properties
as the folder, you do not specify anything in this window.
Click on Change to import the document.
If several documents are selected for importing,
you must specify the properties for each document
to be imported.
- Folder settings
- In this box, the properties are displayed
that are already defined for the folder in general:
- Translation Memory
- The name of an existing Translation Memory
- Markup
- The name of an existing markup table
- Source language
- The name of a supported source language
- Target language
- The name of a supported target language
- Document settings
-
Each document can have its own properties
and can be different from those of the folder.
Initially, the boxes in this group are empty.
If the document has the same properties as the folder,
you do not have to enter anything, and
the document inherits the folder properties.
Document properties that are different from the folder properties
can be selected from the respective list boxes:
- Translation Memory
- The name of an existing Translation Memory
- Markup
- The name of an existing markup table
- Source language
- The name of a supported source language
- Target language
- The name of a supported target language
- Use settings for remaining documents
- This option is only displayed if you want to import
more than one document.
If you want to assign the same properties to all documents,
select this option.
To save the specified properties,
click on Change.
Results
The selected document is imported and
you can start analyzing and translating.
You must open a document
before you can start translating.
If the selected document has not been analyzed,
TranslationManager automatically
analyzes the document based on the properties
of the document and the folder.
For more information on the analysis,
see "Analyzing a document".
Prerequisites
The Document List window
of the respective folder is active.
Calling sequence
Select:
- The document from the Document List window
- Open from the File menu
Alternatively, double-click on the document
in the Document List
window.
You are taken to the Translation Environment, where
the selected document is contained
in the Translation window.
Results
The document is segmented and
you can start translating it.
To leave the Translation Environment, you must close the document.
TranslationManager
provides a Global Find and Change function, which works across
all or some documents of a folder.
This function might be helpful if you are looking for a particular
piece of text whose source document
you are not sure of. Also, you may need
to change a particular wording but do not want to
type the new text manually at each occurrence.
TranslationManager can search through a series of documents to
locate the required text and change it automatically.
Any change is automatically reflected in the associated Translation
Memory to be available for future translations.
Note that TranslationManager searches and changes only
pieces of text that can be translated.
Markup tags cannot be changed.
Prerequisites
- The folder must exist and its documents must have been analyzed.
Calling sequence
You can start this function from a Folder List window
or from a Document List window. Here the start from the
Document List window is described.
Select:
- One or more documents you want to have searched through
from the Document List window
- Global find and change... from the File menu
The Global Find and Change window
is displayed.
Figure 14. Global Find and Change window
Options and parameters
- Find
- Type the text you are looking for.
- Change to
- To change the term you are searching for to another term, type the
new term in this field.
- Case
- Specify whether the search should respect or
ignore case sensitivity.
- Documents
- Displays the list of documents that are to be searched.
The document that is currently being searched is highlighted.
Documents that have already been searched
are removed from the list.
- Update Translation Memory
- Select this box if you want your changes to be reflected
in the Translation Memory.
Any changed text segment is then updated in the Translation Memory
associated to the folder.
Note that only changes in translated documents are reflected in
the Translation Memory.
- Confirm on change
- Select this box if you want TranslationManager to stop
before a text is changed. You are then prompted to confirm the
change.
- Text area
- This area shows a part of the document containing the found
piece of text. The found part is highlighted.
You are also informed about the name of the document and the number
of the segment containing the piece of text.
- Open document
- Select this button to open the document that contains the retrieved
piece of text.
The Translation Environment window is displayed.
The cursor is positioned on the found text.
- Find next
- Continues the search for the next occurrence of the specified text.
- Apply change
- Changes the found text as specified and continues the search.
- Find
- Starts the search for the specified text in the selected documents.
- Change
- Changes the retrieved text as specified.
- Cancel
- Stops the search and the
interaction with this window and returns you
to the starting point. Any changes you have made are not saved.
- Help
- Gives information to help you interact with this window.
Results
The specified piece of text is located
at every occurrence within
a document and changed where necessary.
The associated Translation Memory is updated if requested.
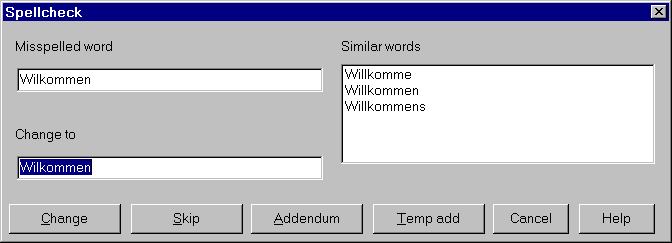
A translated document can contain typing errors or
misspelled words.
TranslationManager offers a spellchecking function
you can use at any time during translation.
Spellchecking is supported for all languages for
which language support is installed.
For each misspelled word, TranslationManager shows a correction proposal,
which you can accept, overwrite, or skip.
Note that only the spelling of translated segments is checked.
Prerequisites
The language support file for the target language of the
document must be installed.
Calling sequence
If you are not already in the Translation Environment, start it by selecting:
- A document from the Document List window
- Open from the File menu
- The Translation window
- File... from the Spellcheck menu
The Spellcheck function starts immediately
at the beginning of the translated document,
and the Spellcheck window
(see Figure 15) is displayed.
Figure 15. Spellcheck window
Options and parameters
- Misspelled word
- The first word in the document that is misspelled
or not in the language support file.
- Similar Words
- A list of correctly spelled alternatives for the
misspelled word.
Double-click on the correctly spelled word to select it.
Or, click on Skip to
continue with the next misspelled word without selecting any
of the alternatives.
For some words, this list may be empty.
- Change to
- The word selected as the correctly spelled one.
You can overtype it if you need a new spelling.
You can accept a spelling in several ways.
Select:
- Change
- To accept the spelling in the Change to field.
- Addendum
- To add a new spelling to the target language support file.
Then this spelling will not be shown as misspelled anymore.
- Temp Add
- To add the new spelling temporarily
to the target language support file.
When you leave TranslationManager , this new spelling is not saved.
When all misspelled words have been
either changed or skipped,
a message appears telling you that spellchecking is complete.
Results
The corrections you accepted are substituted for the misspelled words
in both the document and the Translation Memory.
You can add terms which have been indicated as misspelled by the
spellcheck facility
(although spelled correctly) to an addendum
for the
language-support file of the current target language.
During the next spellcheck terms of this addendum
are considered to be correct.
You can modify this addendum at any time, for example, to remove
terms that have been added by mistake.
Prerequisites
The document must be translated and you must be in the
Translation Environment.
Calling sequence
- Edit addendum terms... from the
Spellcheck menu
The Edit Addendum Terms window
is displayed.
Options and parameters
The terms in the addendum can be modified as follows:
- To change a term, overtype it.
- To add a term, press Enter and type the new term.
- To remove a term, mark it and press Enter.
Clipboard operations (cut, copy, paste) are supported.
To save your changes, select Save.
To leave the window without saving your changes,
select Cancel.
Results
The corrections you made are saved and taken into account during
subsequent spellchecks.
To prepare the translation of documents
you can generate terminology lists,
for example, to add new terms to a dictionary
or generate a Translation Memory from previous translations.
To translate the documents, the Translation Environment
offers common editor functions
and specific functions for translation, such as dictionary
lookup and copying translation proposals.
Using these functions
helps you translate documents more efficiently.
When you translate several documents on the same subject,
the Translation Memory used will grow
and the number of translation proposals will increase.
Prerequisites
- The document must have been imported.
- To begin translating a document, it must be opened.
Calling sequence
Select:
- The document to be translated
from the Document List window
- Open from the File menu
The Translation Environment is displayed.
It consists of a number of windows.
The selected document is shown
in the Translation window.
If the document you selected has already been partially translated,
the cursor is positioned on the first untranslated segment
and you can continue there.
Options and parameters
For information on how to use the editor functions,
see Chapter 4. "Working with the TranslationManager editor".
Results
You can choose the sequence in which you translate documents.
You can also translate parts of a document at a time and continue
later until the documents are completely translated.
If needed, you can export partially translated documents
and give them to other TranslationManager users who can continue the translation.
When you have completed the translation of the segments of a document,
TranslationManager automatically switches to the post-editing mode
where you can review
the translation and check the spelling.
The Translation Memory you used contains all segments and their translations
and can be used for documents containing similar texts.
You can postedit it whenever a translation needs to be
modified.
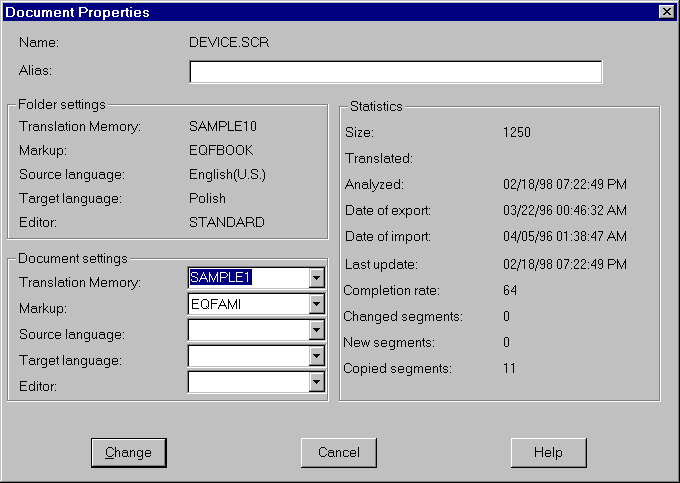
The properties of a document are:
- Translation Memory
- The Translation Memory to be used for the translation of the document
- Markup table
- The markup table
associated to the document. The markup table
is used during analysis and translation of the document.
- Source language
- The language of the original document
- Target language
- The language of the translated document
The properties must be defined individually
for each document
when you import documents in external format.
They can be changed later.
Prerequisites
The document must be in a folder.
Calling sequence
Select:
- The Document List window
- Properties... from the File menu
The Document Properties window
(see Figure 16) is displayed.
Figure 16. Document Properties window
Options and parameters
- Folder settings
- This box contains the properties
that are specified for the folder in general.
They cannot be changed in this window.
- Document settings
- This box contains the individual settings per document.
Initially these boxes are empty.
If the document has the same properties as the folder,
you do not have to enter anything, and
the document "inherits" the folder properties.
Document properties that are different from the folder properties
can be selected from the respective list boxes.
In the Translation Memory field, you can
type the name of a new Translation Memory.
- Statistics
- This box
contains information about the translation status of the document.
The data cannot be changed in this window.
- Size
- The number of bytes the document occupies on your disk.
- Translated
- The date when translation was completed.
- Analyzed
- The date when the document was analyzed.
- Date of export
- The date when the document was last exported.
- Date of import
- The date when the document was last imported.
- Last update
- The date (and optionally the time)
when the document was last updated in the Translation Environment.
- Completion rate
- The percentage to which the document is already translated.
- Changed segments
- The number of segments that were copied during the translation
from the Translation Memory and then changed.
- New segments
- The number of segments that were entered entirely new
without copying a match from the Translation Memory.
- Copied segments
- The number of segments that were copied from the Translation Memory
and saved unchanged.
To save the specified properties for this document,
click on Change.
Results
The properties are saved for this document.
You can display parts of the properties
and the current processing status of a
document in the Document List window.
This includes such details as the date of import, date of analysis,
the percentage of the document that has been translated.
Using this data you can easily show the progress of translation work.
You can display these details in the Document List window.
The details of a document are:
- Name
- The name of the document
- Translated
- The date when translation of the document was completed
- Analyzed
- The date when the document was analyzed
- Exported
- The date when the document was last exported
- Imported
- The date when the document was last imported
- Updated
- The date (and optionally the time)
that the document was last updated
- Size
- The number of bytes of the original document
- Compl%
- The percentage of the document that has already been translated
- Changed
- The number of segments that were copied from
the Translation Memory window during translation and subsequently changed
- New
- The number of segments that were created during
translation without being copied from the Translation Memory window
- Copied
- The number of segments that were copied from
the Translation Memory window
during translation and saved without change
- Markup
- The markup table used for this document
- Translation Memory
- The Translation Memory used for this document
- Source language
- The language of the original document
- Target language
- The language into which the document is translated
If nothing is specified for any of the last four items,
TranslationManager assumes these properties to be the same as for the folder.
For an imported folder, the details
in the Document List window
are defined by the sender.
You can change them if you like.
You can toggle between two display modes:
- Displaying the names only
- Displaying selected details
You can change the arrangement of the document details in the
Change Details window
described in "Viewing and changing the details of a list item".
Similar to office folders that contain paper files,
a TranslationManager folder contains a number of related documents
or document files, respectively.
A folder, for example, might contain all documents of a specific
translation project,
or any other collection of documents
that belong together.
Each folder has a number of properties,
such as the source and target language,
or references to the dictionaries and
Translation Memory databases to be used for analysis and translation
of the documents in the folder.
By default, all documents in a folder have
the same properties,
but you can specify individual properties for each document.
You can send all the documents in a folder
to another TranslationManager user.
Folders that are sent or exported
contain a number of documents,
associated dictionaries and Translation Memory databases,
and optionally an accompanying note to the recipient.
To begin working with a folder that has been exported by another user,
you must first import it into TranslationManager .
Exporting folders is also useful
to make backup copies of your translation material.
TranslationManager includes a number of processing functions for folders,
which you can access by selecting
a folder from the Folder List window and then
selecting a choice from the File,
View, or Utilities menu.
Prerequisites
At least one folder must exist, except if you import a folder.
Calling sequence
Select the Folder List window from the main window.
The Folder List window is displayed.
Results
This window displays a list of the available folders.
When you select a command from one of the menus,
you are taken to another window
where you can specify processing options.
Documents that are to be translated must first be segmented.
Segmentation is done during analysis of a document.
You can analyze all the documents in a folder at once.
Prerequisites
- The folder must contain at least one document.
- If you intend using dictionaries to perform analysis,
at least one dictionary must exist.
- If you intend using Translation Memory databases to perform analysis,
at least one Translation Memory must exist.
Calling sequence
Select:
- The folder from the Folder List window
- Analyze... from the File menu
The Analyze Documents window is displayed
(see Figure 6).
Options and parameters
- Documents to be analyzed
- This box lists all the documents in the folder.
Selecting the following options
applies to all documents in the folder:
- Add segments to Translation Memory of folder/document
- Substitute exact matches in the document automatically
- Create file containing untranslated segments
- Create lists
For a detailed description of these options,
see "Analyzing documents using Translation Memory databases",
and "Analyzing documents using dictionaries".
When you have selected the desired options,
click on Analyze to begin analysis of the documents.
Results
All documents in the folder are segmented.
Depending on the options you selected:
- Terminology lists may be created
- Dictionaries may be extended
- Translation Memory databases may be extended
- A file containing untranslated segments may be created
- Segments in the documents may be automatically substituted
You can now begin translating the documents
by opening a document,
see "Translating a document".
To start working with a document, you must first open
the folder containing the document.
Then the Document List window is displayed.
Closing a folder means to close the Document List window,
which takes you back to the Folder List window.
Prerequisites
The Document List window of the folder must be active.
Calling sequence
Select:
- The Document List window of the folder
you want to close
- Close from the system menu of this window
This takes you back to the Folder List window.
Results
You can begin working on documents in other folders
or any other tasks in TranslationManager .
TranslationManager provides a facility for counting
the number of words and markup tags
in all documents in a folder before and after translation.
You can also perform this task for
selected documents in a folder (see "Counting the number of words in a document").
Prerequisites
The folder must contain at least one document.
Calling sequence
Select:
- The folder from the Folder List window
- Count Words... from the Utilities menu
Count Words window
(see Figure 8)
is displayed.
Options and parameters
The options and parameters are the same as
described in "Counting the number of words in a document".
Click on Count to begin counting words.
Results
The results are displayed in the
Word Count Results - Original window or in the
Word Count Results - Translation window
which are explained in "Counting the number of words in a document".
When you close this window, you are returned to the
Folder List window.
If you selected the output option File,
the results are also saved in a file
with the name you choose.
Grouping documents in a folder is recommended whenever:
- A number of documents belong to the same translation project.
- You use the same Translation Memory for a number of documents.
- You use the same dictionaries for a number of documents.
A folder also makes it easier to export or import
a group of documents.
Prerequisites
- Decide for which documents, dictionaries,
and Translation Memory databases you wish to create a folder.
- At least one language support file must be installed.
Calling sequence
Select:
- The Folder List window in the main window
- New... from the File menu
The New Folder window
(see Figure 17)
is displayed.
Figure 17. New Folder window
Options and parameters
The options you specify are used
for all documents imported into this folder.
If individual documents need other
properties, you can specify these when importing the documents.
- Name
- Enter a name of up to 8 alphanumeric characters,
for the new folder.
- Description
- Enter up to 40 alphanumeric characters describing the folder.
- Disk drive
- Select the drive where the folder is to reside.
- Use existing folder as model
- Click on Yes... if the
properties of the new folder are similar to an existing one.
This takes you to the Use existing Folder as Model window,
where you can select an existing folder as a model for the
new folder.
Click on Select to return
to the New Folder window.
- Translation Memory
- Select a Translation Memory to be used for the documents in the new
folder.
To create a new Translation Memory, type in its name.
- Markup
- Select a markup table name
from the available names in the box.
- Editor
- The only possible value STANDARD is selected automatically.
- Source language
- Select the language of the original documents.
- Target language
- Select the language into which the documents are to be translated.
- Dictionaries
- This box contains all available dictionaries.
Select the dictionaries to use during translation.
The order in which you select the dictionaries determines the order
in which they are searched.
You can select up to 10 dictionaries.
- Selected
- This box lists the dictionaries in the selected order.
Click on Create to create the new folder.
Click on Cancel to leave this window
without creating a new folder.
Results
If you clicked on Create,
the folder is created,
an empty Document List window is displayed,
and the folder can be filled with documents.
If you entered a new Translation Memory name as a folder property,
you are prompted with the
New Translation Memory window,
to specify some more parameters.
When you delete a folder,
it is no longer listed in the Folder List window,
and all documents in the original and the translated version
are also deleted.
You might want to delete a folder
when you completed working on the documents in the folder,
exported it,
and no longer require it.
Also, if you have backed up the contents of the folder,
you can delete the folder to free disk space on your workstation
for other purposes.
You can also delete a folder during or after export.
For more information,
see "Exporting a folder",
and "Deleting an exported folder".
Prerequisites
The folder to be deleted must not be open
(that is, the Document List window for the folder
must not be displayed).
Calling sequence
Select:
- The folder from the Folder List window
- Delete from the File menu
Options and parameters
None.
Before deleting the selected folder,
TranslationManager prompts you to confirm that you want to delete the
folder and its contents:
- Select Yes to delete the folder.
- Select No to leave the folder unchanged.
Results
If you select Yes,
the folder and the documents in it are deleted.
The disk space it occupied is freed.
Dictionaries, markup tables,
and the Translation Memory databases associated with the
folder or its documents are not deleted.
When you export a folder, TranslationManager writes the data
to a file
in the EQF\EXPORT\ subdirectory
on the selected drive.
If you no longer need this exported folder file,
you can delete it.
Prerequisites
- The folder must have been exported.
- The exported folder must still exist on the
drive that you selected when exporting the folder.
Calling sequence
Select:
- The Folder List window in the main window
- Delete exported folder...
from the Utilities menu
The Delete Exported Folder window
(see Figure 18) is displayed.
Figure 18. Delete Exported Folder window
Options and parameters
- Delete
- In this box, select:
- The drive where the exported folder resides.
The Folder list box displays all
folders previously exported to the selected drive.
- The folder to be deleted from the Folders list box.
To see more information about the exported
folder, click on Details....
The information is displayed in the
Folder Details window
(see Figure 21).
Click on OK to return to the
previous window.
To leave the exported folder unchanged,
click on Cancel.
To delete the exported folder,
click on Delete.
For each selected exported folder,
a message window prompts you to confirm that you want to delete
the exported folder:
- Select Yes to delete the exported folder.
- Select No to leave the exported folder unchanged.
If there are no more exported folders selected to delete,
click on Cancel to return to the
Folder List window.
Results
If you confirmed to delete the exported folder
in the \EQF\EXPORT\ subdirectory,
it is deleted and cannot be re-imported.
The main purpose of exporting a folder
is to make documents available to other users or on other systems.
Other translation material,
such as dictionaries and Translation Memory databases, can also be exported,
either as part of a folder or separately.
Exporting a folder is
the easiest way of distributing translated material
from one TranslationManager user to another, and it is the recommended way.
You can also include a note for the recipient.
This note could, for example, include instructions about
which document to translate first or
when the translation is due.
The recipient can display this note when importing the folder.
When you export a folder to a diskette drive
and the folder data volume exceeds the capacity of one diskette,
the system writes the data to as many diskettes as necessary.
Prerequisites
The folder to be exported must exist.
Calling sequence
Select:
- The folder from the Folder List window
- Export... from the File menu
The Export Folder window
(see Figure 19)
is displayed.
Figure 19. Export Folder window
Options and parameters
Select from the following options:
- With dictionaries
- To export the folder
with the dictionaries associated with this folder.
- With Translation Memory
- To export the folder with the Translation Memory databases associated
with this folder or its documents.
- Add note
- To add some explanatory text for
the recipient of the folder.
You type the text in the Add Note to Folder window
that is displayed when the exporting function is started.
Your note is saved and included in the exported folder.
- Delete folder after export
- To delete the folder after it is exported.
This option can only be selected
when all documents in the folder are being exported.
After the export file is created,
the system prompts you to confirm that you
want to delete the folder.
If you selected the
Selected documents to be exported option,
not all documents are exported and the folder cannot be deleted.
- Export in TranslationManager Version 1.0 format
- Select this option only when the folder is to be
imported in TranslationManager/2 Version 1.0 format
for further processing.
For more information, see Appendix G. "Exchanging data with other TranslationManager products".
- Select documents to be exported
- To export only selected documents of this folder.
You can then select these documents from the list box.
You can extend or limit your selection by clicking on
Select all or
Deselect all respectively.
- To
- Specify the drive where you want to export your folder to.
If you selected the required options,
select Export to start the export procedure.
If you selected the Add note option,
you are prompted with the
Add Note to Folder window
to type your note for the recipient.
To save the note in the exported folder,
click on Add
to start the export of the folder.
If you selected a diskette drive
and the folder data volume exceeds the capacity of a diskette,
you are prompted to insert as many diskettes
as necessary.
Results
The folder is exported, including all material you selected.
If you exported the folder together with documents,
any markup tables used by documents are also exported.
TranslationManager stores the exported folder
in one file in the subdirectory \EQF\EXPORT
of the selected drive.
From this subdirectory it can be reimported.
The file has the folder name and the extension FXP.
If you selected the Delete folder after export option,
the folder is deleted, including all documents in it.
However, the referenced markup tables, dictionaries, and Translation Memory databases
are not deleted.
When translations are prepared centrally before being distributed
to individual translators, you are strongly recommended to use
folders as the means of distributing this material,
because all related translation material
(documents, dictionaries, and Translation Memory databases)
can be included in one folder.
Before you can start working with material
that has been exported,
you must import it in TranslationManager .
A folder exported to a diskette drive
can span more than one diskette.
The system prompts you
to insert the diskettes into the diskette drive
in the same sequence they were used during export.
Prerequisites
- Ensure there is sufficient free disk space on your system.
- The folder to be imported must reside
in the \EQF\EXPORT\ subdirectory
of a drive defined to TranslationManager .
Calling sequence
Select:
- The Folder List window from the main window
- Import... from the File menu
The Import Folder window
(see Figure 20)
is displayed.
Figure 20. Import Folder window
Options and parameters
You can import a folder from any drive that is defined to your
installation.
- From
- Select in this box:
- The drive where the folder to be imported resides.
- The folder from the Folder box.
When you have selected a drive, this box
shows the importable folders on this drive.
- Optionally the Details... pushbutton
to see the details of the folder to be imported.
This takes you to the Folder Details window
(see "Displaying the details of an exported folder") from where you return to this window.
- Options
- Select in this box:
- With dictionaries
- if you wish to import all dictionaries included in the folder.
If there are no dictionaries in the folder,
this option cannot be selected.
- With Translation Memory
- if you wish to import all Translation Memory databases included in the folder.
If there are no Translation Memory databases in the folder,
this option cannot be selected.
- To
- Select the drive where you want the imported folder to reside.
To begin importing the folder, click on
Import.
If you import the folder from a diskette drive
and the exported folder was written to more than one diskette,
you are prompted to insert the diskettes
in the sequence in which they were inserted during export.
Results
The folder is imported.
It is added in the Folder List window
and you can start using its contents,
or the imported dictionaries for document analysis.
If the imported folder contains a dictionary
with the same name as an existing one,
the Merge Dictionaries window is displayed
and you must decide whether to merge the dictionaries
and how to merge them
(see "Merging dictionaries").
If the folder contains a Translation Memory
with the same name as an existing one,
the Translation Memory in the folder to be imported
is automatically merged into the existing one.
An imported folder also contains the markup tables
of the folder and document properties.
During import, markup tables in your system
are overwritten if they have the same name
and the markup table in the folder is a more recent one.
When you open the imported folder,
the Document List window displays
the details arrangement defined by the sender.
If you select a folder in the Import Folder window
or in the Delete Exported Folder window,
and you click on Details...,
the Folder Details window
(see Figure 21)
is displayed.
Figure 21. Folder Details window
Options and parameters
The following information of the selected folder is displayed;
it cannot be changed in this window.
- Name
- The name of the folder.
- Description
- Additional information about the folder.
- Date of export
- The date and time when the folder was exported.
- Translation Memory
- The name of the Translation Memory referenced in this folder.
- Markup
- The name of the markup table used.
- Export options
- This field can contain Selected documents only
if the folder was exported with this option,
otherwise this field is empty.
- Documents
- If the folder contains documents,
their file names are displayed here.
- Dictionaries
- If the folder contains dictionaries,
their names are displayed here.
- Note
- If the folder contains a note, it is displayed here.
To print a copy of the details,
click on Print.
To return to the previous window
(Import Folder or Delete Exported Folder),
click on OK.
Results
If you clicked on Print,
the folder details are printed.
The folder contents remain unchanged.
If you clicked on OK,
you can continue specifying options in the previous window.
You open a folder to see which documents it contains.
You can then select a document to work with
from the Document List window.
Prerequisites
The folder must exist.
Calling sequence
Select:
- The folder from the Folder List window
- Open from the File menu
Alternatively, double-click on the folder to open it.
The Document List window
is displayed.
Results
A list of documents in the selected folder is displayed.
From this list, you can start document-related functions
by selecting one or more documents and
an action from one of the menus.
For further information see "What you can do with documents".
TranslationManager
provides a Global Find and Change function, which works across
all or some documents of a folder.
This function might be helpful if you are looking for a particular
piece of text whose source document
you are not sure of. Also, you may need
to change a particular wording but do not want to
type the new text manually at each occurrence.
TranslationManager can search through a series of documents to
locate the required text and change it as specified.
Any change is automatically reflected in the associated Translation
Memory to be available for future translations.
Note that TranslationManager searches and changes only
pieces of text that can be translated.
Markup tags cannot be changed.
Prerequisites
- The folder must exist and its documents must have been analyzed.
Calling sequence
You can start this function from a Folder List window
or from a Document List window. Here the start from the
Folder List window is described.
Select:
- A folder from the Folder List window
- Global find and change... from the File menu
The Global Find and Change window
is displayed.
Figure 22. Global Find and Change window
Options and parameters
- Find
- Type the text you are looking for.
- Change to
- To change the term you are searching for to another term, type the
new term in this field.
- Case
- Specify whether the search should respect or
ignore case sensitivity.
- Documents
- Displays the list of documents that are to be searched.
The document that is currently being searched is highlighted.
Documents that have already been searched
are removed from the list.
- Update Translation Memory
- Select this box if you want your changes be reflected
in the Translation Memory.
Any changed text segment is then updated in the Translation Memory
associated to the folder.
Note that only changes in translated documents are reflected in
the Translation Memory.
- Confirm on change
- Select this box if you want TranslationManager to stop
before a text is changed. You are then prompted to confirm the
change.
- Text area
- This area shows a part of the document containing the found
piece of text. The found part is highlighted.
You are also informed about the name of the document and the number
of the segment containing the piece of text.
- Open document
- Select this button to open the document that contains the retrieved
piece of text.
The Translation Environment window is displayed.
The cursor is positioned on the found text.
- Find next
- Continues the search for the next occurrence of the specified text.
- Apply change
- Changes the found text as specified and continues the search.
- Find
- Starts to search for the specified text in the selected documents.
- Change
- Changes the retrieved text as specified.
- Cancel
- Stops the search and the
interaction with this window and returns you
to the starting point. Any changes you have made are not saved.
- Help
- Gives information to help you interact with this window.
Results
The specified piece of text is located
at every occurrence within
a selection of documents and changed where necessary.
The associated Translation Memory is updated if requested.
The properties of a folder are:
- Name
- The name of the folder.
The name can be up to 8 alphanumeric characters long.
- Description
- The description of the folder.
The description can be up to 40 alphanumeric characters long,
including blanks.
This description is for your use and is not used by TranslationManager .
- Disk drive
- The disk drive where the folder resides.
- Translation Memory
- The Translation Memory associated with the folder.
This Translation Memory is searched during
segment matches and is updated
when documents in this folder are being translated.
- Markup
- The markup table to be used for the documents in the folder.
- Source language
- The language of the original documents in the folder.
A different language can be specified for individual documents in the folder.
- Target language
- The language of the translated documents in the folder.
A different language can be specified
for individual documents in the folder.
- Dictionaries
- The list of available dictionaries.
- Selected
- The list of dictionaries associated with the folder.
These dictionaries are used in conjunction with the selected
exclusion lists during analysis.
They are also used when looking up a term.
The order in which you select the dictionaries
determines the search order.
- Editor
- The text editor used (default value STANDARD).
When you create a folder, you must define
its properties before you can work with the folder.
Some of them can be changed later.
The properties defined for each folder
apply to all documents in the folder
unless individual document properties
have been set.
It is sometimes not advisable to change the properties of a folder.
In particular, you should not change the
Translation Memory associated with the folder
when you have started translating a document.
You can change the associated dictionaries, if necessary.
Prerequisites
- The folder must exist.
- If you want to change the properties of the folder,
it must not be opened.
Calling sequence
Select:
- The folder from the Folder List window
- Properties... from the File menu
The Folder Properties window
(see Figure 23) is displayed.
Figure 23. Folder Properties window
Options and parameters
The selected properties are shown in the respective fields.
The Name field and the Disk drive cannot be
changed for an existing folder.
The following fields contain the currently assigned names.
They can be changed by selecting another name from the
respective list box.
- Translation Memory
- Markup
- Editor
- Source language
- Target language
For the Translation Memory to be used,
you can also type a new name in the respective field.
The dictionaries to be used in the folder are selected as follows:
-
The Dictionaries list box lists the available
dictionaries from which you can select one or more dictionaries.
The Selected list box shows the dictionaries selected.
- To deselect an already selected dictionary
in the Selected box,
double-click on this dictionary.
To save the changes of the properties,
click on Change.
To leave the Folder Properties window
without changing the properties,
for example, if you only wanted to look at the folder properties,
click on Cancel.
Results
If you select Change,
the folder properties
are changed according to your specifications.
Otherwise, they remain unchanged.
You are returned to the previous window.
If you entered the name of new Translation Memory,
the New Translation Memory is displayed
to specify the characteristics of this Translation Memory.
If you changed a markup table name, it is strongly recommended
that you analyze the documents in the folder again.
In the Folder List window, you can display
additional information about a folder.
You can define which details you want to be displayed
and in which order.
The displayable folder details are as follows:
- Name
- The name of the folder.
- Description
- The description of the folder.
- Updated
- The date when the folder properties were last changed.
- Markup
- The markup table defined in the folder's properties.
This markup table is used for all documents in the folder unless
a different markup table
is specified in the properties of a document.
- TransMem
- The Translation Memory associated with the folder.
- Drive
- The disk drive where the folder resides.
- Dict.
- The first dictionary in the list of dictionaries
associated with the folder.
- Editor
- The text editor used (default value STANDARD).
- Source language
- The language of the original documents in the folder.
A different language can be specified
for individual documents in the folder.
- Target language
- The language of the translated documents in the folder.
A different language can be specified
for individual documents in the folder.
You can toggle between two display modes:
- Display the names only
- Display selected details
You can change the arrangement of the folder details in the
Change Details window
described in "Viewing and changing the details of a list item".
A Translation Memory is a database
that contains existing translations.
You use a Translation Memory to find and reuse these translations.
During analysis TranslationManager splits a document into translatable
segments, which usually correspond to sentences.
A Translation Memory contains pairs of such segments
consisting of an original (source) segment
and a translated (target) segment
that together make up a Translation Memory segment.
Each Translation Memory can contain
source sentences in one source language, but
translated sentences in several target languages.
Translation Memory databases are used
during translation and analysis of documents.
- During translation in the Translation Environment,
TranslationManager displays matching sentences
as translation proposals
for the current sentence.
You can then choose the translation proposal that represents
the best translation of the sentence, and copy it into
the document you currently translate.
The type of match is always evaluated by comparing
a sentence in the source document
with source sentences in the Translation Memory.
TranslationManager proposes both exact matches and
fuzzy matches.
Exact matches are found
if two source segments are completely identical.
Fuzzy matches are found
if two source segments are almost identical.
All types of fuzzy matches are indicated
by a character enclosed in brackets in front of the proposal.
For example, [f] indicates a fuzzy match.
If two source sentences
differ from each other by only a digit or a number,
TranslationManager proposes this as a fuzzy match, with the number
already replaced with the new value.
Such a fuzzy replacement match is indicated by [r].
The various types of matches are described in detail
in "Translation Memory matches".
Whenever you translate a segment, TranslationManager
automatically adds your translation to the Translation Memory associated with
the current document.
The Translation Memory is therefore being
continuously updated--the translation of one sentence
may even be offered as a translation proposal
for the next matching segment.
-
During document analysis, you can choose to have TranslationManager automatically
replace sentences with matches that already exist in the Translation Memory.
This substitution occurs only for exact matches.
-
During document analysis, TranslationManager can also extract
segments with an exact or a fuzzy match
from existing Translation Memory databases
and copy these segments into a new one.
In this way, you can "preload" a document-related
Translation Memory.
When the same original sentence appears in several places
in a document,
TranslationManager also allows you to store
several different translations of the sentence.
In this way, you can translate a segment in different ways
according to the context.
Translation Memory databases provide an efficient method of translating
whenever you deal with similar or repetitive texts
(for example revised editions of manuals).
During translation, you can select
automatic substitution.
This option automatically copies existing translated segments
into the translation document for as long as it
finds exact matches for the current source segments.
Automatic copying stops
when no exact match,
or more than one exact match, has been found for a source segment.
Now you must continue translating the segment manually.
Afterwards automatic copying can be restarted.
Translation Memory databases can be even combined with one another.
Use the merge option
to merge the contents of one Translation Memory with another.
Translation Memory databases can have two formats:
- Internal, called TranslationManager format.
The internal format is used to work with Translation Memory databases within TranslationManager .
- External.
The external format is an SGML-based data exchange format
that allows the data within Translation Memory databases to be processed outside of TranslationManager .
The data in an external Translation Memory is interspersed between SGML tags
that describe the structure of the Translation Memory as a whole
and the data elements of each segment.
This format allows you to edit a Translation Memory with a text editor,
for example to change or delete segments in a Translation Memory.
If you have translated documents
that were translated outside TranslationManager ,
you can generate an Initial Translation Memory (ITM),
this means you can fill a Translation Memory with existing translation
segments.
When you start the translation of a document
that is similar to an existing one,
you can benefit from your previous translations that are
now available in the Initial Translation Memory.
An exported Translation Memory in SGML format is also helpful
for reusing existing translations.
If you have previously saved
files or databases in another format,
you can access them with TranslationManager
by using a program to convert them to the format of an external Translation Memory.
During translation in the Translation Environment,
TranslationManager searches for matching segments,
this means it checks whether the Translation Memory
contains a previous translation of the current segment.
The system differentiates mainly between
an exact match, which is completely identical,
and a fuzzy match,
which is an almost identical match
where the fuzziness can have various degrees.
When TranslationManager displays a matching segment
in the Translation window of the Translation Environment,
the type of fuzzy match is indicated by a preceding
flag in brackets, for example [f].
Exact matches do not have such a flag.
An exact match is found when
the Translation Memory contains a segment identical to
the current segment in the document to be translated
(this means when the segments are identical
with respect to text, tagging, and punctuation)
and when the segment translation
was accepted by a human translator
during translation.
If an identical source segment is placed
in the Translation Memory by the EQFITM command or was imported
as machine-generated translation, it is not
regarded as an exact match.
It is flagged by a preceding [m].
A fuzzy match is recognized,
if the two segments overlap more than 40 %.
TranslationManager can also show combinations of these types of matches.
The following table shows
the categories of matches and the flagging
displayed in the
Translation Memory window.
| Type of match
| Flag
|
| Exact
| (not flagged)
|
| Matches with minor deviations:
|
|
| - Machine
| [m]
|
| - Replacement
| [r]
|
| - Machine and replacement
| [mr]
|
| Fuzzy matches:
|
|
| - Fuzzy
| [f]
|
| - Fuzzy and replacement
| [rf]
|
| - Fuzzy and machine
| [mf]
|
| - Fuzzy, machine, and replacement
| [mrf]
|
Most of the tasks concerning Translation Memory databases
begin from the
Translation Memory List window.
Calling sequence
Select:
- Translation Memory List window from the main window
- A Translation Memory from the window
- One of the enabled commands
from the File or View menu
This usually takes you to another window, where
you can specify the necessary options and parameters
and where you can start the requested procedure.
Before you can use a Translation Memory, it must be initialized.
To initialize a Translation Memory, you need to specify values for a
number of parameters.
The procedure described here creates an empty Translation Memory.
This can subsequently be filled
by translating in the Translation Environment,
by copying segments from other Translation Memory databases during analysis,
or by importing external Translation Memory databases.
For a description of the other methods of creating and filling
a Translation Memory, see:
Prerequisites
At least one language-support file must be installed.
Calling sequence
Select:
- The Translation Memory List window in the main window
- New... from the File menu
The New Translation Memory window
(see Figure 24)
is displayed.
Figure 24. New Translation Memory window
Options and parameters
- Name
- Type a name for the new Translation Memory.
This name can be up to 8 alphanumeric characters.
- Description
- Type a description of the new Translation Memory.
This description can be up to 40 alphanumeric characters long.
It is for your personal use and is not used by TranslationManager .
- Location of Translation Memory
- Specify where you want
the new Translation Memory to reside.
You can keep it on a local disk drive
(only you can use it)
or on a shared disk drive (several translators can work with it
simultaneously).
See to learn about the benefits of
Translation Memory databases residing on a shared disk drive.
Local is the default selection.
Note that a LAN drive is also considered as local drive.
- Disk drive
- Shows local or shared disk drives.
Select one of the available disk drives as
the drive on which you want the new Translation Memory to reside.
Remember that a Translation Memory grows in size over time,
so ensure that the drive you select has sufficient free space.
- Source language
- Select the source language from the list of languages displayed.
This list contains only those languages for which you have installed
language support files.
If you need support for another language, check whether
you can install it from your base package or from additional
language support diskettes.
If support for the language is available, you can install it
in your current system.
Click on Create to create the new Translation Memory.
Results
The Translation Memory is created, but is still empty.
You can now begin to fill it by translating text or
by actions such as import, merge, or analysis.
An external Translation Memory is a file containing
segment pairs from previous translations
and SGML tags.
The SGML tags are used to distinguish between
control information and
the original and translated segments.
SGML format is used as the TranslationManager data exchange format
for Translation Memory databases.
If you have already a translation database
in a format of your own and
want to use the information in it with TranslationManager ,
you must first convert it into a file in SGML format,
for example, by a conversion program
that understands your database format and the SGML format.
This file can then be imported into TranslationManager .
Besides generating an Initial Translation Memory (ITM),
this is another method of filling a Translation Memory
before beginning a translation.
When you export a Translation Memory,
TranslationManager creates a file in SGML format.
During import, you can also merge an external Translation Memory with
an internal Translation Memory.
A Translation Memory in SGML-based format includes,
in addition to the original and translation segments,
SGML tags that describe the data structure
of each segment.
You can also use this format to create an external Translation Memory
containing your own translation database data.
An external Translation Memory is an ASCII coded file.
It starts with <NTMemoryDb>
and ends with </NTMemoryDb>.
The starting tag is followed by a description of the Translation Memory,
enclosed between
<Description> and
</Description> tags.
The description is followed by the segment pairs.
The number of segment pairs is not limited.
The individual segment pairs are tagged in the
following format:
| Example |
|---|
..  <-*

</Control> <-*

<Source>...</Source> <-*

<Target>...</Target> <-*

</Segment> <-*
|
The symbol <-* stands for the combination of
the Carriage return and
the line feed characters.
This character combination
is usually generated when you press the Enter
key on the keyboard to return you to the beginning of the next line.
The following describes the SGML structure sequentially.
- A segment begins with the <Segment> tag.
- The segment identifier nnnnnnnnnn
must immediately follow the <Segment>
tag and must be 10 characters long.
This identifier must be unique within the Translation Memory.
- <-* must follow the identifier.
- The next tag is <Control>, and is followed by <-*.
- The next line is a sequence of numbers
representing the segment control information,
which is described in "Control information of a Translation Memory segment".
- The control information must be terminated by the
</Control> tag and be followed by <-*.
- The next tag is <Source>, followed by the source
segment.
It is ended by </Source>, followed by <-*.
If <-* appears in the source segment,
it is considered to be part of the source.
- The next tag is <Target>, followed by the target
segment.
It is ended by </Target>, followed by a <-*.
If <-* appears in the target segment,
it is considered to be part of the target.
- The last tag of a segment is </Segment>, followed
by <-*.
"The Translation Memory format" shows a small part of an external Translation Memory.
The following shows part of
of a SGML-based Translation Memory containing two segments.
The separator in the segment control information is indicated
by the symbol §.
The combination of the Carriage return
and the Line Feed characters ( <-*)
is not shown in this example.
<NTMemoryDb>
<Description>
This is a Translation Memory sample

</Description>
·
<Segment>0000000001

<Control>
000015§0§0000000668798940§English(U.S.)§German(national)§§EQFBOOK§DEMO.SCR

</Control>
<Source>The amount of data that you wish to process

</Source>
<Target>Die Datenmenge, die verarbeitet werden soll

</Target>
</Segment>
·
<Segment>0000000043

<Control>
000003§0§0000000668798783§English(U.S.)§German(national)§EVS§EQFBOOK§DEMO.SCR

</Control>
<Source>The IBM 9370 system includes a processor, I/O devices and the appropriate

software to fulfill your data processing requirements. </Source>
<Target>Das System IBM 9370 umfaßt den Prozessor, E/A Geräte sowie die

entsprechende Software, um den Ansprüchen bei der Informationsverarbeitung

gerecht zu werden. </Target>
</Segment>
·
</NTMemoryDb>
| Start tag, end tag
| Description
|
| <NTMemoryDb>, </NTMemoryDb>
| Start and end of a Translation Memory
|
| <Segment>, </Segment>
| Start and end of a Translation Memory segment
|
| <Description>, </Description>
| Start and end of a Translation Memory description
|
| <Control>, </Control>
| Start and end of the segment control information
|
| <Source>, </Source>
| Start and end of a source sentence
|
| <Target>, </Target>
| Start and end of a target sentence
|
(Ref #1.)
The control information for each segment consists of several
pieces of information, each of a specific length.
The maximum length of each data element is
contained in square brackets.
The data elements must be separated
by a character with the ASCII code 21
(X'15'), represented by the symbol §.
The control information has the following layout:
- Segment number [6]
-
The segment number forms a number
(with leading zeros if required)
representing the position of the segment
within the document file from which it originates.
If you do not know this number, specify a number
that is unique within this Translation Memory.
The segment number is used by the Translation Memory
to rank segments with an identical source.
- Translation indicator [1]
-
This character can be 0 or 1:
- 0
- Indicates that the translation is a manual translation.
- 1
- Indicates that the translation
of this segment originates from a machine translation
system and has not been post-edited by a translator.
If more than one exact translation match is available in the
Translation Memory, TranslationManager ranks the human translation higher than the machine translation.
- Time stamp [16]
- In exported Translation Memory databases, this data element contains
a time stamp in internal format.
In Translation Memory databases created outside of TranslationManager ,
use a value of 0.
- Source language [20]
- Any language from the list of supported source languages.
- Target language [20]
- Any language from the list of supported target languages.
- Author [15]
- Contains the name of the translator
as the author of the translation of this original segment.
It is the only field that is optional.
- Markup table [8]
- Any of the markup tables available.
- File name [12]
-
Contains the name of the source file
from which this segment originates.
If you do not know the
file name, put any other identification in this field.
The Translation Memory uses the file name
to rank segments originating from the same
source.
This means if a document
with the name XYZ is translated and several exact
translation matches are found for a specific segment, then the exact
translation with the file name XYZ (if available) is
ranked higher.
The file name must be immediately followed by <-*.
If you no longer need a Translation Memory,
for example, if you have specified incorrect parameters
or it has been filled with the wrong data,
you can delete it.
For learning how to
delete a shared Translation Memory, see .
Prerequisites
The Translation Memory must exist.
Calling sequence
Select:
- The Translation Memory to be deleted
- Delete from the File menu
Before TranslationManager deletes the requested Translation Memory,
a message window is displayed asking you to confirm
that you want to delete the Translation Memory.
Options and parameters
- If you select No, the Translation Memory is not deleted.
- If you select Yes, the Translation Memory is deleted.
Results
If you select Yes,
the Translation Memory is deleted, and the disk space is freed.
Otherwise, the Translation Memory remains unchanged.
References to this Translation Memory may still
exist in certain folders.
Update the folder properties so that the
deleted Translation Memory is no longer referenced.
To make a Translation Memory available to another system or user,
you can export it to create an external Translation Memory.
An external Translation Memory is in an SGML-based data exchange format
that you can use to pass your Translation Memory data to users
who do not work with TranslationManager .
Prerequisites
The Translation Memory must exist.
Calling sequence
Select:
- The Translation Memory to be exported
- Export... from the File menu
The Export Translation Memory window
is displayed:
Figure 25. Export Translation Memory window
Options and parameters
- Format
- External is selected automatically.
- To
- Specify the following parameters to define
where the exported Translation Memory is to be stored:
- Select one of the drives displayed, for example A.
- Enter a file name in the Name field.
- Select a directory from the Directories list box.
This directory is then displayed as Current directory.
Click on Export to begin exporting the Translation Memory.
If you selected a diskette drive
and the data volume of the Translation Memory
exceeds the capacity of the diskette,
TranslationManager informs you that it cannot export the Translation Memory
in this way.
You then must export the Translation Memory
in a folder.
For more information, see "Exporting a folder".
Results
The Translation Memory is exported as
a file that you can pass to other users or systems.
The default file extension is EXP.
The internal Translation Memory remains unchanged.
You can generate a Translation Memory already
before you start translating a document in TranslationManager .
In this way, you can immediately benefit from having a filled Translation Memory
when you start translating, for example, updated versions of existing
documents.
Such a Translation Memory is called an Initial Translation Memory (ITM).
TranslationManager lets you create an Initial Translation Memory based on
existing translations--both a source file,
containing the original document, and
a target file, containing the corresponding translated document,
must be available.
TranslationManager scans both files to find the corresponding
target segment for each original segment,
that is, it aligns the segments of the two files.
You are recommended to check the combinations of segments
afterwards.
When you use an Initial Translation Memory
during a translation, the proposals in the
Translation Memory window are prefixed with
[m] (created by machine).
Such machine proposals are treated as fuzzy matches,
this means they are not used during automatic substitution.
To generate an Initial Translation Memory, you can choose between
two methods. You can start generating an Initial Translation Memory:
- From the command area
In this case
you must type the EQFITM command and all required parameters
in your system's command area and press Enter.
For a complete description of the syntax of this command, see
"Creating an Initial Translation Memory".
- From the Initial Translation Memory icon
In this case you must double-click on the Initial Translation
Memory Tool icon in the IBM TranslationManager
group window.
The following sections describe how to:
- Generate an Initial Translation Memory
- Check the results of the alignment process (the process of
combining source segments with their matching target segments)
Prerequisites
- The original documents and corresponding translations
must be available as separate files.
- The Translation Memory that is subsequently to be used
as an Initial Translation Memory,
must already be initialized (see "Creating a Translation Memory").
- The markup table for the document files must be the same
for source and target documents.
- The language support for the source language
and the target language must be installed.
Calling sequence
- Type EQFITM in the command area of your system (next
to the [C:\] prompt).
- Press Enter to start the command.
or
- Double-click on the Initial Translation Memory Tool icon
in the IBM TranslationManager group window.
The Create Initial Translation Memory window
is displayed:
Figure 26. Create Initial Translation Memory window
Options and parameters
- Translation Memory
- Select an existing Translation Memory
to be filled with the matched segment pairs of existing translations
(source segments and their matching target segments).
- Markup
- Select an existing markup
table to be used for the file pairs you select.
- Selection of file pairs
- Define one file pair at a time,
then click on Add to add the file pair
to the Filelist list box.
Then specify the next file pair.
A source file is defined by the following parameters:
- Source language
- Select the language of the original document file from the list
of available languages.
- Source file
- You can:
- Type the fully qualified file name in this field
- Type only the file name but select the drive
and directory definition from the following boxes
- If you first specify the correct drive and path information
from the Directories field,
select the file name from the Files list box
- Current directory
- This field shows the drive and path currently selected.
- Directories
- To change the drive displayed
in the Current Directory field, scroll to the bottom
of the Directories list box and select another drive.
To change the path information displayed
in the Current directory field,
select a different directory from the list box.
- Files
- Contains a list of all the files in the current directory.
Select the source file.
The target file is defined similar to the source file:
- Target language
- Select the language of the target document
from the list of available languages.
- Target file
- If the Directory field
contains the correct drive and path name,
either select the source document from the Files list box
or type it directly into this field.
Otherwise, first specify the correct drive and path information
in the Directory field.
- Current directory
- This field shows the drive and path currently selected.
- Directories
- To change the drive displayed
in the Current directory field, scroll to the bottom
of the Directories list box and select another drive.
To change the path information displayed
in the Current Directory field,
select a different directory from the list box.
- Files
- Contains a list of all the files in the current directory.
Select the target file.
- Filelist
- Displays file pairs selected for subsequent processing.
All files must have the same markup.
To change the selection of file pairs, use one of the following buttons:
- Add
- To save the specified file pair,
click on this button.
The names of the source file and of the target file are added to
the Filelist list box.
- Delete/Delete all
- To remove a file pair or all file pairs from the list,
first select the file pair from the Filelist list box,
then select Delete or Delete all.
- Create...
- Starts the creation of the Initial Translation Memory
and presents its contents
on the screen for you to review.
After you saved the Initial Translation Memory,
the contained segments are treated as exact human translations
and are used during the automatic substitution process.
- Align
- When all file pairs have been added to
the Filelist list box,
click on Align to begin filling the Initial Translation Memory.
The aligning process starts and connects each source segment with
a corresponding target segment.
The matched segments are written
to the selected Translation Memory (prefixed by [m]).
Mind that these segment connections have not been checked yet.
As it can take some time to join the document file pairs together,
a window is displayed showing the progress of the operation.
- Prepare
- Same as Create... but no visual presentation of the
Initial Translation Memory
contents. The selected file pairs are prefixed by p.
You can use this option to create the Initial Translation Memory
but view it later.
- Cancel
- Stops the interaction with this window and returns you
to the starting point. Any modifications
you have made are not saved.
- Help
- Gives information to help you interact with the current window.
When the generation of the Initial Translation Memory
is completed,
a message window appears containing the number of paired segments.
If you pressed the Create... button, the contents of the
Initial Translation Memory is presented in a window on the screen.
How you work with this window is described in "Revising an Initial Translation Memory".
Results
The Initial Translation Memory is filled with
matching source and target segments,
using the file pairs you selected.
It is recommended that you check
the correctness of the matches made by TranslationManager .
You can do this before you start translation work
with this Translation Memory
as described in "Revising an Initial Translation Memory from the command area",
or online using the Initial Translation Memory specific editor
(see "Revising an Initial Translation Memory").
This editor is invoked by selecting the Create... button
in the Create Initial Translation Memory window.
If you start to use the Initial Translation Memory
without any further checking,
it is recommended to treat the
machine-generated matches,
(prefixed by [m])
in the same way as
fuzzy matches
(prefixed by [f]).
When you copy these proposals into your translation, check whether they
need to be adapted and change them where necessary.
If you choose to use automatic substitution during analysis,
machine-generated matches are not used.
If you receive an external Translation Memory,
you can import it into TranslationManager .
During import, you can also merge the data from an external Translation Memory
into a Translation Memory that already exists in TranslationManager .
Translation Memory databases can be imported only in external format.
Prerequisites
- The Translation Memory to be imported must exist.
- If you want to merge the data
from the external Translation Memory into an existing Translation Memory,
both Translation Memory databases must have the same source language.
Calling sequence
Select:
- The Translation Memory List window from the main window
- Optionally the Translation Memory into which to import the external Translation Memory
- Import... from the File menu
The Import Translation Memory window
(see Figure 27)
is displayed.
Figure 27. Import Translation Memory window
Options and parameters
- Format
- External is selected automatically.
- From
-
Specify drive, path, and file name of where the Translation Memory
to be imported is currently stored.
One way to specify this information is as follows:
- Select the drive from one of the drives displayed, for example,
D.
- Select a directory from the Directories list box.
This directory is then displayed as the Current directory.
- The Files list box displays all files
in the current directory.
Select the external Translation Memory file from this list box.
- The Name field displays the file name.
Other methods are:
- Select the drive, then enter the path and file name
in the Name field.
- Select the drive and directory, then type a file name using global
file name characters in the Name field.
- To Translation Memory
- Contains the previously selected target Translation Memory.
You can still overwrite this name.
If you specify a Translation Memory that does not exist, the
New Translation Memory window is displayed for you to create it
(see "Creating a Translation Memory").
If you specify an existing Translation Memory that is not empty,
the contents of the Translation Memory to be imported are merged into it.
When you have specified your input,
click on Import to begin importing.
For information on importing Translation Memory databases from other TranslationManager products,
see Appendix G. "Exchanging data with other TranslationManager products".
Results
The Translation Memory data is imported into the selected target Translation Memory
and you can begin to work with it.
The external Translation Memory remains unchanged.
If several translators are working on a large document,
each of them uses and updates a separate Translation Memory.
For the translation of subsequent releases of the document,
it is useful to merge these to create a single consolidated Translation Memory.
You can merge Translation Memory databases in two ways:
The merging of two Translation Memory databases is described using two sample names,
TMEM01 and TMEM02.
Prerequisites
- The two Translation Memory databases to be merged must exist.
- They must have the same source language.
Calling sequence
Select:
- The Translation Memory List window
- The Translation Memory to be merged, for example, TMEM01
- Select Merge... from the File menu
The Merge Translation Memory window
(see Figure 28)
is displayed.
Figure 28. Merge Translation Memory window
Options and parameters
The Into Translation Memory list box displays all
available Translation Memory databases.
Select the Translation Memory, for example TMEM02,
into which to merge the previously selected Translation Memory
TMEM01.
When you have selected the target Translation Memory, click on
Merge to begin merging the Translation Memory databases.
Results
The contents of TMEM01 is merged into the
target Translation Memory TMEM02.
The Translation Memory TMEM01 remains unchanged.
You can begin to use the extended Translation Memory TMEM02.
Occasionally TranslationManager prompts you to organize a Translation Memory.
A Translation Memory must be organized to delete obsolete segments,
to repair a defective Translation Memory,
or to upgrade a backlevel Translation Memory.
Prerequisites
The Translation Memory to be organized must exist.
Calling sequence
Select:
- The Translation Memory List window
- The Translation Memory to be organized
- Organize from the File menu
Organizing begins immediately.
As it may take some time to organize a large Translation Memory,
a window is displayed showing you the progress.
Options and parameters
None.
Results
The Translation Memory is now organized and
the new number of segments in the Translation Memory is displayed.
You can continue to use it.
To increase the reliability
of the automatically generated Initial
Translation Memory,
it is necessary to check the correctness of the relation between
source and target segments.
With the Initial Translation Memory
editor you can see the contents of the Initial
Translation Memory at a
glance to verify the correspondence between source and target
segments.
When a target segment does not correspond to a source
segment, you can perform the necessary changes.
The original segments are displayed in the Source
window, the corresponding translations in the Target
window.
The segment pairs are synchronized with each other.
That means that a target segment is displayed at the same level
on the screen as the source segment and with the same background color.
The following describes
how to work with the Initial Translation Memory editor.
Prerequisites
The Create
Initial Translation Memory window must be invoked and
filled in.
Calling sequence
Select:
- The Create... button from the Create
Initial Translation
Memory window.
The Edit Initial Translation Memory window
is displayed.
It consists of two windows. One window shows source segments,
the other
window shows the corresponding target segments.
Figure 29. Edit Initial Translation Memory window
Options and parameters
For information on how to work with the Initial Translation Memory
editor
see "The Initial Translation Memory editor".
Results
You are now ready to verify the correctness of the automatically
generated pairs of source segments and their translated equivalents.
When you leave the editor the segment pairs are stored in the
Translation Memory.
On the menu bar of the Edit Initial Translation Memory
window you can select the following items:
- File
- To save changes in the
Initial Translation Memory window and to exit.
- Edit
- To manipulate the relation between source and target segments.
- Options
- To change your view of source segments window and
target segments window and to modify colors and fonts.
- Cursor
- To move and change the cursor position in the source and target
windows.
- Style
- To change the display of markup information.
- Help
- To get information that helps you interact with the current window.
| Menu or key
| Function
|
| Save (F2)
| Saves the current segment connections.
If you have selected another pair of files, the segment connections
resulting from these files will be displayed next.
|
| Quit (F3)
| Quits the
Edit Initial Translation Memory window without saving
changes.
|
| End-Save (F4)
| Quits the Edit Initial Translation Memory window
and saves any changes to the selected
Translation Memory.
|
| Toggle window (Ctrl+t)
| Activates the opposite window (Source
or Target).
|
| Menu or key
| Function
|
| Connect segments (Ctrl+c)
| Relates a source segment
with a target segment.
|
| Delete connection (Ctrl+d)
| Removes a connection of a
source segment with a target segment.
|
| Ignore segment (Ctrl+i)
| Removes a marked segment which you do not
want to be connected with another segment, or that does not have
a match in the opposite file.
|
| Undo ignore (Ctrl+u)
| Makes a previously ignored
segment available for connection with a matching segment in the
opposite file.
Note that the segment must be marked before you use Undo
ignore.
|
| Join segments (Ctrl+j)
| Combines the currently active segment with the following one.
|
| Split joined segments (Ctrl+s)
| Splits a previously joined segment at the current cursor position.
|
| Add an abbreviation (Ctrl+a)
| Adds the term where the cursor is positioned to the list of
abbreviations associated to the current source language.
|
| Menu
| Function
|
| Colors...
| Lets you define
the colors for the segments in the Source and
Target windows.
|
| Fonts...
| Lets you set the font and font size
for the source and target window in the
Set Fonts window.
|
| Arrange
| Changes the arrangement of the source and target
windows.
You can arrange them vertically
(the target document is positioned
next to the source document on the right half of the screen)
or horizontally
(the target document is positioned below the source
document on the lower half of the screen).
|
| Parallel
| Positions the segments in the source window parallel to their
matches in the target window.
That means that lines may be inserted in either the source or the
target window to achieve that a segment is presented at the same
position as its counterpart.
|
| Menu
| Function
|
| Next connection (Shift+Down)
| Moves the cursor to the next connected segment pair.
|
| Previous connection (Shift+Up)
| Moves the cursor to the previous connected segment pair.
|
| Next unaligned (Alt+Down)
| Moves the cursor to the next segment for which no matching
segment has been
found. This can be either in the
same or in the opposite window.
|
| Previous unaligned (Alt+Up)
| Moves the cursor to the previous segment for which no matching
segment has been found.
This can be either in the same or in the opposite window.
|
| Synchronize (Ctrl+Enter)
| Positions the current segment and its match in the opposite window
beside one another at the same level.
|
| Mark segment (Ctrl+m)
| Marks the segment where the cursor is positioned.
A segment must be marked to connect and to remove it.
|
| Unmark segment (Ctrl+n)
| Removes the marking from a segment.
Only one segment in a window can be marked.
|
| Menu
| Function
|
| Protect
| Changes the display of markup information.
The markup tags are shown but cannot be overwritten (see the
example given in Figure 1).
|
| Shrink
| Changes the display of markup information.
All markup tags outside segments are not shown.
A replacement character is shown instead (see the example given
in Figure 1).
|
| Compact
| Changes the display of markup information.
All information that is not to be translated and all markup tags
within a segment are not shown. A replacement character is shown
instead (see the example given in Figure 1).
|
The status bar at the bottom of the window displays
the following information from left to right:
- The total number of segments in the source window
compared to the total
number of segments in the target window.
- The number of segments in the source window that
have no match in the target window
compared to
the number of segments in the target window that have no
match in the source window.
- The
number of ignored segments in the source window compared to the
number of ignored segments in the target window.
- The relation of source segments to target segments.
For example, 2:1
means that two source segments have been connected to one target
segment.
All matches placed in an Initial Translation Memory
are indicated by an [m] prefix.
It is recommended that you check
the correctness of these matches before using them
if you have
not already done this using the Initial Translation Memory editor.
An alternative
method to perform this check is
to retranslate the original document now with TranslationManager ,
and to compare the sentences in the
original document with the translation
proposals from the Initial Translation Memory.
For each sentence, you can either accept or reject the saved
translation.
If you accept the translation proposal,
the [m] flag is removed.
Translations you reject, however,
retain the [m] flag.
Finally, the EQFDMM command deletes all translations that still have the
machine translation flag.
To check the correctness of a newly-generated Initial
Translation Memory,
proceed as follows:
- Create a folder with the following properties:
- The name of the Initial Translation Memory as Translation Memory name.
- The same markup language that was used when creating the
Initial Translation Memory.
- The same source and target language you used when creating the
Initial Translation Memory.
- If you want to make changes while checking, select
the appropriate dictionaries.
- Import only the original documents into the folder,
not the target documents.
Use the same original files that you used when creating the
Initial Translation Memory.
- Open each document and perform
the following tasks for all sentences:
- When you have reached the end of all documents,
leave the Translation Environment.
- When you have checked the Initial Translation Memory based on all
the documents that were used to create it, the Initial
Translation Memory
contains exact matches (the approved proposals) and
machine-generated matches (the rejected proposals).
- To remove all the rejected machine-generated matches
from the Initial Translation Memory,
type the following command
in the command area of your operating system:
Command syntax
EQFDMM
/
MEm
=
memdb
/
TYpe
=
NOCONF
where:
- /MEm=memdb
- memdbis the name of the previously created and
checked Initial Translation Memory (without the file extension).
All segments with the [m] flag are removed
from this Translation Memory, all others remain unchanged.
- /TYpe=NOCONF
- NOCONF specifies that no confirmation message is displayed
at the end of the process.
This is useful when you do not want to be interrupted by a message.
When all machine-generated matches are removed
from the Translation Memory, this is indicated by a completion message.
The following example shows how to remove all machine-generated
matches from a Translation Memory called INTERITM:
| Example |
|---|
eqfdmm /mem=interitm
|
To improve the quality of your translations,
you may wish to check the contents of a Translation Memory
from time to time,
and modify or remove translations that are stored there.
Doing these changes directly in the Translation Memory lets you
benefit from polished translations the next time
you use this repository.
Therefore,
TranslationManager offers a Translation Memory that can be
manipulated. You can browse its contents, make changes to
existing translations, or delete complete entries from it.
You can work on a Translation Memory contents in an editor window
as if you were editing normal text.
The original segments are displayed in the Original
window, the corresponding translations in the Translation
window.
You make your changes in the Translation window.
Translation Memory files can be huge.
To make it easier for you to find a certain translation,
you have the choice to narrow down what you are looking for.
For example, you can search for a certain translation segment, or for
translations made within a certain time frame.
The following describes
how to open a Translation Memory in order to work with it.
Note: Use this function with care. A Translation Memory
that has grown over a period of time is an essential asset for all
your translations. Therefore it is good practice to avoid any
uncontrolled changes.
There is no Quit or Undo function. All changes become effective
immediately.
Prerequisites
The Translation Memory you want to work with must exist.
Calling sequence
Select:
- The Translation Memory List window from the main window
- The Translation Memory you wish to edit
- Open from the File menu or double-click on
the Translation Memory name
You are first prompted with the Look up a Translation
window
to specify what you are looking for in the selected Translation Memory.
For more information on how to work with this window see
"Searching a translation".
After you specified the search criteria,
the Edit Translation Memory window
(see Figure 30) is displayed.
It consists of two windows. The Original window lets
you view the original text, in the Translation window you
can make your changes. By pressing Ctrl+Enter you can
move from segment to segment.
Figure 30. Edit Translation Memory window
Options and parameters
For information on how to use the Translation Memory editor functions,
see "The Translation Memory editor".
Results
You open a Translation Memory to work on the translations that are
stored in it.
In the Edit Translation Memory window you can browse
the original texts
and revise the corresponding translations.
If you need to change or remove translated text, you can do this
in the Translation window where you are assisted by
an editor.
How you use this editor is explained in "The Translation Memory editor".
Translation Memory files can be huge.
You can search for a certain translation segment or for specific
translations.
In the Look up a Translation window you specify
the individual search criteria.
The Look up... button starts the search in the Translation
Memory and displays the found Translation Memory contents in the
Edit Translation Memory window.
The following describes
how to specify the search criteria.
Prerequisites
The Translation Memory you want to work with must exist.
Calling sequence
Select:
- The Translation Memory List window from the main window
- The Translation Memory you wish to edit
- Open from the File menu
The Look up a Translation window
(see Figure 31) is displayed.
Figure 31. Look up a Translation window
Options and parameters
- Text to be looked up (search string or sentence)
- Type the term or sentence you are looking for.
You can also use wildcard characters (Use '*'
and '?' for wildcard search).
For example, if you are looking for a product name beginning with
"Star" and you are not sure about the product's exact
name, you can type Star*.
- Case
- Specify whether the search for the requested text string
is to be case sensitive (respect case sensitivity) or not.
The default setting is ignore
case sensitivity.
- Language
- Specify whether the search is to be performed on the original
entries (Source)
or on the translations (Target).
The default setting is Source.
- Markup
- Specify the markup language of the text you are looking for.
- Get only matches with more than one translation
- Specify whether you want to retrieve only original segments with
more than one translation.
If there is only one translation for an original segment, this segment
will be ignored during the search in the Translation Memory and not
displayed.
Use this option to revise translation variants.
- Use date range
- Specify the period of time when translations were stored in the
Translation Memory selected.
Only the original segments of those translations that were added to
the Translation Memory during the specified
period are displayed in the
Edit Translation Memory window.
The default setting for the time span is January 1992 until
the present time.
Select Select... to alter this time span.
- Use document(s)
- Type the name of the document from which the translation is to
originate.
Select Select... to type the name of a document.
You may use * as wildcard character.
- Number of segments to load
-
The segments are loaded into the editor in stages.
Specify the number of segments that you want to be loaded into
the Translation Memory editor at one time.
The default setting is 600 at a time. You can alter this
number if you like, although the maximum is set to
10 000 segments at
a time (the minimum is 5 segments).
- Look up...
- Click on Look up... to start the search.
Results
The Translation Memory is searched according to
the search criteria specified in the Look up a Translation
window.
The found matches are loaded into the editor and displayed
in the Edit Translation Memory window where you can
revise them.
How you revise Translation Memory entries
is described in "The Translation Memory editor".
To revise the entries in a Translation Memory, you are assisted
by an editor.
The functions of this editor support you when changing the
Translation Memory entries.
The editor consists of two windows. The Original window
shows original segments, the Translation window shows
the corresponding translations.
By pressing Ctrl+Enter you can move from segment to segment.
From the menu bar of the Edit Translation Memory
window you can select the following items:
- File
- To save changes, to exit the editor, to load more segments, to
switch between Translation and Editor window.
- Edit
- To find and change, to split and join, to cut and paste, to
delete, and do other operations on the text.
- Options
- To
change colors and fonts, and to arrange the editor windows.
- Style
- To change your view of markup tags.
| Menu or key
| Function
|
| Next
| Loads another collection of segments into the editor if more
segments are found in the Translation Memory than the number set
to be loaded in the Look up a Translation window.
|
| Previous
| Unloads the segments that were loaded
from the editor previously. Opposite to Next.
|
| Save (F5)
| Saves any changes made in the Translation Memory.
Returns you to the Look up a Translation window.
|
| End-Save (F4)
| Saves any changes made in the Translation Memory.
Quits the Translation Memory editor and
returns you to the TranslationManager main window.
|
| Toggle windows (Ctrl+t)
| Activates the opposite window
(Original or Translation).
|
Many of the editor functions are tied to
the Translation window only. If a function on the
Edit menu cannot be performed in the Original
window, the function is disabled whenever the Original
window becomes active.
If a key-stroke editor function does not apply to the active window,
the system beeps.
| Menu or key
| Function
|
| Find and change...
| Locates a term and changes it as specified.
Works in Translation and
Original window.
Changes in the original text are not allowed.
|
| Cut
| Copies a marked text section to the system clipboard and
removes text afterwards.
Works in Translation window only.
|
| Copy
| Copies a marked text section to the system clipboard for later
pasting.
Works in Translation and
Original window.
Text cannot be pasted into Original window though.
|
| Paste
| Inserts text from clipboard into active segment at
current cursor position.
Works in Translation window only.
|
| Split line (Alt+s)
| Splits line at current cursor position.
Works in Translation window only.
|
| Join line (Alt+j)
| Combines current line with following line.
Works in Translation window only.
|
| Undo
| Restores the original state as it was before an action was performed.
Works in Translation window only.
|
| Unmark block (Alt+m)
| Removes marking from a text section.
Works in Translation and
Original window.
|
Delete
Current segment removes only the currently active segment
from the Translation Memory.
| All segments removes all segments from the Translation Memory
(those that were loaded in the editor).
Works in Translation and
Original window.
|
The following key combinations let you manipulate text in both
the Original window and the Translation window.
Note that the two windows are synchronized with each other.
That means, whenever you activate a segment in the Translation
window, it becomes active in the Original window too and vice versa.
The matching segment in the opposite window is presented beside the
active one at the same level.
| Keys
| Function
|
| Ctrl+Shift+Left
| Marks previous word from cursor position to beginning of word.
|
| Ctrl+Shift+Right
| Marks next word from cursor position to end of word including the
blank space.
|
| Ctrl+Insert
| Copies marked block to system clipboard.
|
| Ctrl+Delete
| Deletes all characters from current cursor position to end of
line in active segment.
Works in Translation window only.
|
| Ctrl+Home
| Moves cursor to first segment in window.
|
| Ctrl+End
| Moves cursor to last segment in window.
|
| Ctrl+left
| Moves cursor to beginning of previous word.
|
| Ctrl+right
| Moves cursor to beginning of next word.
|
| Ctrl+Enter
| Activates next segment or segment where cursor is positioned.
|
| Ctrl+t
| Toggles between Original and Translation window.
|
| Shift+left
| Extends text marking by one character to the left.
|
| Shift+right
| Extends text marking by one character to the right.
|
| Shift+Up
| Extends text marking to the previous line.
|
| Shift+Down
| Extends text marking to the next line.
|
| Shift+Insert
| Inserts text from clipboard at current cursor position in active segment.
|
| Alt+Delete
| Deletes all characters from current cursor position to
end of active segment.
Works in Translation window only.
|
| Alt+j
| Joins current line with following line.
Works in Translation window only.
|
| Alt+s
| Splits line at current cursor position.
Works in Translation window only.
|
| Alt+n
| Loads next collection of segments.
|
| Alt+p
| Loads previous collection.
|
| Alt+m
| Removes marking from a text section.
|
| Up
| Moves cursor one line up.
|
| Down
| Moves cursor one line down.
|
| Right
| Moves cursor one character right.
|
| Left
| Moves cursor one character left.
|
| Home
| Moves cursor to beginning of current line.
|
| End
| Moves cursor to end of current line.
|
| Page Up
| Moves text one page up.
|
| Page Down
| Moves text one page down.
|
| Delete
| If a text section has been marked, the marked text is removed.
If no text has been marked, the character where the cursor is
positioned is removed.
|
| Backspace
| Moves cursor back by one character in the active segment and
deletes this character.
|
| Insert
| Switches from insert mode to overtype mode and vice versa.
When you insert text in insert mode, the existing text is moved to the
right to make room for the new text. If you want to type over the
existing text, switch to overtype mode.
|
| F3
| Quits the Translation Memory editor and returns you to the workbench.
|
| F4
| Saves any changes made in the Translation Memory and returns you
to the Look up a Translation window.
|
| Enter
| Moves to next line.
|
| Double-click left mouse button
| Marks entire segment beginning from the cursor position.
|
| Double-click right mouse button
| Removes marking from a segment.
|
| Menu
| Function
|
| Colors...
| Lets you change foreground and background colors.
Note that if you change colors in the
Translation or Original
window, it will change
colors in the translation editor windows accordingly.
See also "Configuring the editor" to learn how to work
with the Set Colors window.
|
| Fonts...
| Lets you change fonts and their sizes.
Note that if you change a font or a font size in the
Translation or Original window, it will change the
font or font size in the translation editor windows accordingly.
See also "Configuring the editor" to learn how to work
with the Set Fonts window.
|
| Arrange
| Lets you arrange windows.
Horizontal positions the Translation window
below the Original window.
Vertical positions the Translation window next to the
Original window on the right half of the screen.
|
| Menu
| Function
|
| Protect
| Markup tags within a translation cannot be overwritten.
|
| Unprotect
| Markup tags within a currently active translation can be overwritten.
|
| Hide
| Markup tags within a translation are not shown (they are there, but
invisible).
|
| Compact
| Markup tags within a translation are replaced by a special
character indicating the position of the tag.
|
The status bar at the bottom of the editor window displays
the following information (from left to right):
- Current editor status
- Indicates what the system is currently doing (searching, deleting,
waiting for you to edit or to specify a new search query).
- Document name
- Displays the name of the document where the active translation
segment originates from.
- Date
- Displays the date when the translation was added to
the Translation Memory.
- Segment number
- Displays the currently active segment number.
- Total number of segments loaded
- Displays the total number of segments loaded into the editor.
- Search rate
- Shows the percentage of the Translation Memory that has been
searched.
An external Translation Memory contains segments in their original
sequence.
That is, the segments are placed in an external Translation Memory
in the sequence in which they occur in the documents.
You can edit the external Translation Memory with an editor of
your choice as follows:
- Remove all segments that have no corresponding source or target
segment.
- To show that a segment pair
has been checked for correctness by a
human translator and that it is no longer a
machine-generated match,
change the character that indicates
machine translation in the external Translation Memory.
To see where this character is located
in the segment control information of the
external Translation Memory and how to change it,
refer to "Format of an external Translation Memory".
In the Translation Memory List window, you can display
additional information about a Translation Memory.
You can define which details you want to be displayed
and in which order.
The Translation Memory details are:
- Name
- The name of the Translation Memory.
- Description
- The description of the Translation Memory.
- Size
- The size of the Translation Memory (number of bytes).
- Drive
- The drive on which the Translation Memory resides.
- Owner
- Shows who created the Translation Memory if it is a shared one.
If it is a local Translation Memory, n/a is displayed.
- Source Language
- The language of the source segments.
You can toggle between two display modes:
- Display the Translation Memory names only
- Display selected details
You can change the arrangement of the Translation Memory details in the
Change Details window
described in "Viewing and changing the details of a list item".
A dictionary is a database that contains terms,
their translations,
and other related information.
TranslationManager provides a set of
bilingual dictionaries with general vocabulary
for English, German, French,
Spanish, and Italian.
You need dictionaries to look up the translations of individual
terms or have these terms displayed
automatically in the dictionary window
during translation.
A dictionary entry contains all data
relating to a term (or headword).
The dictionary entry structure
describes which data elements
can be stored for a term in a dictionary.
TranslationManager provides a general dictionary structure
that you can use as a model
for building a dictionary
serving your own purposes.
Headword and Translation are mandatory fields.
Certain entry fields, for example Synonym and Related term,
are reserved for search
criteria available during lookup in a dictionary.
TranslationManager can handle dictionaries
with simple and complex structures.
The general dictionary entry structure in TranslationManager
is divided into four embedded levels,
to contain for example,
verb and noun entries,
different meanings (senses),
and translation variants.
In TranslationManager a dictionary can have two formats:
- An internal dictionary is a dictionary that exists in TranslationManager .
-
A dictionary in external format is an SGML-based data file.
SGML is the data exchange format required
for importing dictionary data into TranslationManager .
When a dictionary in the internal format is exported
it is automatically converted into SGML.
When you import an external dictionary
it is automatically converted to the TranslationManager format.
All dictionary data in other text-processor or database formats
needs to be converted into SGML by,
for example, a program or database macro.
You can create your own dictionaries from existing
terminology imported into TranslationManager ,
or from scratch while you are translating.
To use commercially available
online dictionaries covering special areas,
contact any one of the dictionary providers whose
addresses are given on request from IBM Germany, Department 5412,
FAX +49-(0)7031-16-6858.
For more information on the dictionary structure
and on how to construct an SGML-based file,
see:
A dictionary entry is divided into the following levels:
- Entry
- This level contains
general or administrative information,
such as the date, author, or origin of an entry,
and the headword itself.
This information applies
to all other levels of the dictionary entry.
- Homonym
- This level contains
grammatical and syntactic information, such as
which part of speech a headword is or how it is to be
abbreviated and hyphenated.
- Sense
- This level contains
semantic variations of a headword,
such as different areas of meaning and usage.
- Target
- This level contains
all information applying to one
translation variant of a headword, such as definition or usage.
For example, if a headword can be translated in two different ways
there is target level information for both translation variants.
The entry level can have any number of homonym levels.
For example, there are separate homonym levels
for the noun copy and the
verb copy.
A homonym level can also have any
number of sense levels depending on the individual definition of
a headword or contextual information.
For example, the noun bank
can mean both the river bank or a financial institution.
A sense level can have any number of target levels depending
on the individual translation variants.
For example, the German word
Schnecke has two English translations, snail and
slug.
The entry fields and how they are distributed over the four levels
is only suggested by TranslationManager .
The entry fields Headword and Translation
are mandatory.
All other predefined fields can be deleted or renamed.
You can even omit particular levels.
For example, you can omit the homonym and sense level
if you want to have only headwords and translations in your dictionary.
You can also add new fields to any of the levels.
You can do this when
creating a new dictionary in the New dictionary window by
selecting Add fields... or by including them in the SGML
dictionary file.
For the list of all predefined entry fields
and their corresponding SGML tags
see "List of dictionary-entry fields and their SGML tags".
To search for one or more dictionary entries,
the specified term can be used
as one of the following search criteria:
- Headword
- The dictionary entry for the specified term is retrieved.
- Synonyms
- All entries that have the specified term
in the synonym field of the dictionary entry are retrieved.
- Related terms
- All entries that have the specified term
in the related terms field of the dictionary entry are retrieved.
- Abbreviations
- All entries that have the specified term
in the abbreviation field of the dictionary entry are retrieved.
- Neighborhood
- If the specified term exists,
it is listed together
with terms preceding and following it
in alphabetical order.
If not, the terms that would precede and follow it are listed.
- Compounds
- All compounds that begin with the specified term
are retrieved and displayed as a list.
For example, if you search for the term data,
the possible compounds that would be retrieved are
data processing, data model,
and data processing division.
The first four entry fields can only be used as search criteria
when they exist at the entry level shown in the following table.
The entry fields are:
| Entry field
| Level
|
| Headword
| Entry
|
| Synonym
| Sense
|
| Other Related Terms
| Sense
|
| Abbrev./Fullform
| Sense
|
In the TranslationManager default entry structure,
these fields are defined at these levels.
If you are importing an SGML dictionary file and want to
use any of the above search criteria,
see "List of dictionary-entry fields and their SGML tags"
for the SGML tags required.
Dictionaries are used during analysis and translation:
-
During the analysis of a document
one or more dictionaries can be searched.
This is useful to find new terms
(terms in the document that are not in the selected dictionaries)
or to find found terms (terms in the document
that are already in the referenced dictionaries).
The new terms can be added to the dictionary
to be used during translation.
The found terms can be used to fill a dictionary
with entries extracted from other dictionaries.
-
During the translation of a document,
the Dictionary window displays
all translations that are found
in the folder dictionaries
for the terms in the current segment.
The properties of a dictionary are its main characteristics
such as the source language, the dictionary structure, information
on its location and a brief description of its contents.
You can specify them in
the Dictionary Properties window.
Parts of these properties
can also be displayed as details
(or view details)
in the
Dictionary List window.
TranslationManager offers several lookup functions for terms in dictionaries
and their data:
- You can search for terms using general search criteria and
filters defined by yourself
(Look up a Term function).
- You can display all data of a dictionary entry or parts of it
(Look up Entry function).
- You can add and change dictionary entries
(Edit an Entry function).
TranslationManager dictionaries can be printed to a printer or to a file.
You can select the entry fields to be printed
and how to arrange them in the printout.
This layout is defined in a print format file.
You can also use filters to print selected entries only.
A dictionary can be shared with other users
by means of the dictionary export function, or if it
has been defined to reside on a shared disk when it was created.
If you receive an exported dictionary,
you can import it into your system.
During import,
you can also merge the contents of one dictionary
into another.
In addition,
you can create dictionaries tailored to suit your own needs.
To create a new dictionary, you must determine the
dictionary structure,
this means which data elements
in a dictionary are important to you.
You can start using the TranslationManager default structure
or using other existing dictionary structures
that you can subsequently change.
TranslationManager dictionaries can be protected
with a password against unauthorized changes if necessary.
Most of the processing functions
TranslationManager offers for dictionaries
can be started from
the Dictionary List window.
Prerequisites
The dictionary must exist
(except if you import a dictionary).
Calling sequence
Select:
- The Dictionary List window
on the TranslationManager main window
- A dictionary with which you want to work.
Skip this step when importing or creating
- An action from the File menu
The Dictionary List window is displayed.
This window displays a list of the existing dictionaries.
When you select a command from one of the menus,
you are taken to another window
where you can specify processing options.
An SGML-based file contains dictionary data
and SGML tags describing the data structure and the relation between the
data elements.
SGML-based dictionaries can be created by:
- The TranslationManager dictionary export function
- Data conversion programs or database macros
- Editing a file (only recommended for small data volumes)
If you have dictionary data in a format other than SGML
you must convert it before you can import it.
Importing the ASCII encoded SGML-based file into TranslationManager
converts the dictionary into the
internal format recognized by TranslationManager .
An SGML-based dictionary is divided into the following:
- A header section containing general dictionary information
such as source language, target language(s), and creation date.
- A maptable section specifying the structure of a dictionary entry.
That is, all the entry fields that make up a dictionary entry and the
relation between these entry fields.
- An entry section with dictionary entries
appearing one after another.
The dictionary is enclosed
by a dictionary start tag <dict> and a
dictionary end tag </dict>.
The header section contains general information
about the dictionary such as:
- Type (for example, bilingual)
- Source language (for example, English (U.S.))
- Date when it was created
The dictionary header is marked
with a header start tag <header>
and a header end tag </header>.
The only information that you must provide
in the header section is the
source language of the dictionary.
You can specify any of the languages
for which you have a language support file installed
(if you need to specify another language,
see "What you can do for other languages").
TranslationManager needs this information for reducing terms to their stem form
when looking them up in the dictionary.
The header section can have the following tags:
| Start tag
| End tag
| Description
|
| <type>
| </type>
| Type of dictionary
| <source>
| </source>
| Source language
|
| <ltarget>
| </ltarget>
| Target language
|
| <createdate>
| </createdate>
| Date when dictionary was created
|
| Example of a header section |
|---|
<header>
<type>Bilingual</type>
<source>English(U.S.)</source>
<ltarget>German(national)</ltarget>
<createdate>31/05/94</createdate>
</header>
|
The maptable section determines how a dictionary entry is structured.
It serves as a model for the structure of an entry.
The fields you defined in the maptable section
are reflected in the dictionary entries.
The maptable contains the total of all allowed fields
(up to a maximum of 38) in a dictionary entry.
If a dictionary entry contains entry field tags
not included in the maptable section,
the information between the tags is
not imported during dictionary import
and only the entry fields listed in the maptable
are taken into account.
The information between a start tag and its end tag
contains the name you want
to give the entry field of the dictionary.
You find these names displayed
when you look up or edit a term in a dictionary.
For example, if you specify
<hdterm> Source Term <\hdterm>,
the terms you look up in
the dictionary are shown under Source Term.
If you want to use another name, rename Source Term into any
other name you would like to use instead.
The following is an example of a maptable section:
| Example of a maptable section |
|---|
 <maptable>
  <hdterm>Source term</hdterm>
   <hom>
    <epos>English category</epos>
    <sense>
     <edef>Formal English definition</edef>
     <target>
      <trans>NL term</trans>
     </target>
    </sense>
   </hom>
 </maptable>
|
The maptable begins with
the start maptable tag <maptable> and ends
with the end maptable tag </maptable>. The <hom>,
<sense> and <target> start tags
with their respective end tags
mark the homonym, sense, and target levels.
If you want to use the search criteria described
in "Searching a dictionary entry",
use the following start and end SGML tags:
| Searching for ...
| Level
| Tags
|
| Headwords
| Entry
| <hdterm> and </hdterm>
|
| Abbreviations
| Sense
| <eabbr> and </eabbr>
|
| Synonyms
| Sense
| <esyn> and </esyn>
|
| Related terms
| Sense
| <erel> and </erel>
|
If you use the tags listed above,
TranslationManager establishes a correct relation between the entry field name and
the term you want to look up in the dictionary.
If you want TranslationManager
to add date information automatically
to your dictionary entries,
add the Creation Date and Update
fields to the maptable.
You can add any number of individually defined
entry fields to any level.
The entry field names are numbered
and automatically mapped to an entry field name denoted by you
in the maptable.
Entry fields you add to the entry, homonym, or sense level
start with the tag <euser id=xxx>
and end with the tag </euser>,
where xxx is the running number.
Entry fields you add to the target level
start with <tuser id=xxx>
and end with </tuser>.
| Example of date-information fields and user-defined fields |
|---|
<maptable>
 <hdterm>...</hdterm>
    .

    .

 <ecrdate>Creation date</ecrdate>

    .

    .

 <hom>
    .

    .

 <sense>
    .

    .

 <euser id=1>Entry code</euser>

 <elupdate>Last update</elupdate>

    .

    .

 <target>
 <trans>...</trans>
 <tcrdate>Translation creation date</tcrdate>

 <tlupdate>Translation update</tlupdate>

 <tuser id=2>Related definition</tuser>

 </target>
 </sense>
 </hom>
</maptable>
|
The entry section lists the actual entries
in the dictionary one after the other.
Each entry
starts with an <entry> tag and ends with an
</entry> tag.
Each entry contains the same entry field tags as used in the maptable
section.
Whereas the maptable contains
the general description of the structure of an entry,
the entry section contains real data.
The levels below the entry level
can be repeated
as often as necessary,
for example, to contain multiple senses or translations.
For an example of an SGML-based dictionary see "Sample of an SGML-based dictionary".
The following table shows
a list of all dictionary-entry field tags
as they are predefined in
the -Master- model dictionary.
| Level
| Entry field name
| Start tag
| End tag
|
| Entry
| Headword
| <hdterm>
| </hdterm>
|
| Entry
| Reliability Code
| <erlcode>
| </erlcode>
|
| Entry
| Author
| <eauthor>
| </eauthor>
|
| Entry
| Creation Date
| <ecrdate>
| </ecrdate>
|
| Entry
| Status Code
| <estatcode>
| </estatcode>
|
| Homonym
| Part of Speech
| <epos>
| </epos>
|
| Homonym
| Morphology
| <emorph>
| </emorph>
|
| Homonym
| Hyphenation
| <ehyph>
| </ehyph>
|
| Sense
| Source of Headword
| <esrc>
| </esrc>
|
| Sense
| Abbrev./Fullform
| <eabbr>
| </eabbr>
|
| Sense
| Author of Update
| <eauthupdate>
| </eauthupdate>
|
| Sense
| Last Update
| <elupdate>
| </elupdate>
|
| Sense
| Definition
| <edef>
| </edef>
|
| Sense
| Source of Definition
| <esdef>
| </esdef>
|
| Sense
| Synonym
| <esyn>
| </esyn>
|
| Sense
| Other Related Terms
| <erel>
| </erel>
|
| Sense
| Context
| <econtext>
| </econtext>
|
| Sense
| Source of Context
| <escontext>
| </escontext>
|
| Sense
| Comments
| <comment>
| </comment>
|
| Sense
| Note on Usage
| <eusage>
| </eusage>
|
| Sense
| Idiom
| <eidiom>
| </eidiom>
|
| Target
| Language
| <tlanguage>
| </tlanguage>
|
| Target
| Translation
| <trans>
| </trans>
|
| Target
| Company/Subject Code
| <tsubjcode>
| </tsubjcode>
|
| Target
| Source of Translation
| <tsrc>
| </tsrc>
|
| Target
| Abbrev./Fullform
| <tabbr>
| </tabbr>
|
| Target
| Reliability Code
| <trlcode>
| </trlcode>
|
| Target
| Author
| <tauthor>
| </tauthor>
|
| Target
| Author of Update
| <tauthupdate>
| </tauthupdate>
|
| Target
| Creation Date
| <tcrdate>
| </tcrdate>
|
| Target
| Last Update
| <tlupdate>
| </tlupdate>
|
| Target
| Status Code
| <tstatcode>
| </tstatcode>
|
| Target
| Part of Speech
| <tpos>
| </tpos>
|
| Target
| Morphology
| <tmorph>
| </tmorph>
|
| Target
| Hyphenation
| <thyph>
| </thyph>
|
| Target
| Definition
| <tdef>
| </tdef>
|
| Target
| Source of Definition
| <tsdef>
| </tsdef>
|
| Target
| Synonym
| <tsyn>
| </tsyn>
|
| Target
| Other Related Terms
| <trel>
| </trel>
|
| Target
| Context
| <tcontext>
| </tcontext>
|
| Target
| Source of Context
| <tscontext>
| </tscontext>
|
| Target
| Comments
| <tcomment>
| </tcomment>
|
| Target
| Note on Usage
| <tusage>
| </tusage>
|
| Target
| Idiom
| <tidiom>
| </tidiom>
|
The following is an example of an SGML-based
dictionary containing a header section, a maptable, and two entries.
The text to the right of the vertical line is explanatory
information or comments
to the tags.
All explanatory information must be omitted when
you actually create an SGML-based dictionary.
<dict>                                    | start of dictionary

<header>                                  | start of header section

  <source>English (U.S.)</source>         | source language (required)

  </header>                               | end of header section

 <maptable>                               | start of maptable section

  <hdterm>Source term</hdterm>            |

  <eauthor>Created by</eauthor>           |

  <ecrdate>Term Creation Date</ecrdate>   |

  <hom>                                   |

   <epos>Category</epos>                  |

   <sense>                                |

    <edef>Definition</edef>               |

    <euser id=210>Private glossary</euser>| user-defined entry field

                                          | added to sense level

    <target>                              |

     <tsubjcode>Subject code</tsubjcode>  |

     <trans>Translation</trans>           |

     <tuser id=1>Project code</tuser>     | user-defined entry field

                                          | added to target level

    </target>                             |

   </sense>                               |

  </hom>                                  |

 </maptable>                              | end of maptable section
 <entry>                                  | start of first entry

  <hdterm>file</hdterm>                   | headword: file

  <eauthor>Fred Miller</eauthor>          | author: Fred Miller

  <ecrdate>940401</ecrdate>               | creation date: 4/01/94

  <hom>                                   | start of homonym level

   <epos>n</epos>                         | part of speech: noun

   <sense>                                | start of sense level

    <target>                              | start of target level

     <tsubjcode>EDV</tsubjcode>           | subject code

     <trans>Datei</trans>                 | translation

    </target>                             | end of target level

   </sense>                               | end of sense level

   </hom>                                 | end of homonym level

 </entry>                                 | end of first entry

 <entry>                                  | start of second entry

  <hdterm>abend</hdterm>                  | headword: abend

  <eauthor>Peter G.</eauthor>             | author: Peter G.

  <ecrdate>940501</ecrdate>               | creation date: 5/01/94

  <hom>                                   | start of homonym level

   <epos>v</epos>                         | part of speech: verb

   <sense>                                | start of sense level

    <target>                              | start of target level

     <tsubjcode>EDV</tsubjcode>           | subject code

     <trans>abnormal beenden</trans>      | translation

     <tuser id=4>AS400</tuser>            | user-defined entry field

                                          | not in maptable, field

                                          | is ignored when this

                                          | dictionary is imported

    </target>                             | end of target level

   </sense>                               | end of sense level

  </hom>                                  | end of homonym level

  <hom>                                   | start of homonym level

   <epos>n</epos>                         | part speech: noun

   <sense>                                | start of sense level

    <target>                              | start of target level

     <tsubjcode>EDV</tsubjcode>           | subject code

     <trans>abnormale Beendigung</trans>  | translation

    </target>                             | end of target level

   </sense>                               | end of sense level

  </hom>                                  | end of homonym level

 </entry>                                 | end of second entry

</dict>                                   | end of dictionary
TranslationManager offers you several ways of setting up a new dictionary.
- If you do not have any existing terminology
in machine-readable form,
you must create a completely new dictionary.
You do this by determining the dictionary properties.
In particular,
you must define a dictionary structure.
You can use a default structure offered by TranslationManager ,
or you can use the structure of an existing dictionary
in TranslationManager and change it.
A newly created dictionary is empty at first but you
can add entries
from a new terms list built during document analysis
or at any stage during the translation process.
In this way you can create dictionaries
that contain specific terms related to your translation projects.
-
During analysis, TranslationManager can generate a found terms list
that contains all terms of the document that exist
in the referenced dictionaries.
TranslationManager can also copy the entry data of these
terms into a separate dictionary.
-
If you have a terminology file in a format of your own,
you must generate an external SGML-based dictionary
and you must import it into TranslationManager .
In this case, a new dictionary is created with your terminology
and the entry structure as defined in the SGML file is taken.
If you create a new dictionary via the New Dictionary
window in TranslationManager
and you do not use the modelling option,
the following entry fields are offered as default fields:
| Entry field
| Level
|
| Headword *)
| Entry
|
| Part of Speech
| Homonym
|
| Abbrev./Fullform *)
| Sense
|
| Definition
| Sense
|
| Synonym *)
| Sense
|
| Other Related Terms *)
| Sense
|
| Context
| Sense
|
| Translation
| Target
|
| Company/Subject Code
| Target
|
The entry fields marked with *)
can be used as predefined search criteria
in the Look up a Term window
(see "Searching a dictionary entry").
If you are working with a more comprehensive structure
and require more entry fields,
select -Master- on the
Use Existing Dictionary as Model window,
which offers an extensive dictionary structure.
You can rename or delete any fields
from this set of entry fields
and you can also add new user-defined fields to it.
TranslationManager adds and updates time stamp information automatically,
provided the following date fields are selected
in the New dictionary window
from the -Master- model dictionary.
| Entry field
| Level
| Contents
|
| Creation Date
| entry
| The date when a headword was added to a dictionary.
|
| Last Update
| sense
| The date when information at the sense level
of an entry was added or modified.
|
| Creation Date
| target
| The date when a translation for a headword was added.
|
| Last Update
| target
| The date when a translation entry field was last updated.
|
Prerequisites
None.
Calling sequence
Select:
- The Dictionary List window
- New... from the File menu
The New Dictionary window is displayed
(see Figure 32).
Figure 32. New Dictionary window
Options and parameters
- Name
- Enter a name of your choice for the new dictionary.
This name can be up to 8 alphanumeric characters long.
- Description
- Type a description for the new dictionary.
The description can be up to 40 alphanumeric characters long.
- Location of dictionary
- Specify where to place the new dictionary.
It
can be on a
local disk drive (only you can use it)
or on a
shared disk drive
(several translators can use it simultaneously).
See "Sharing dictionaries" to learn about sharing dictionaries.
Select the drive on which you want the new dictionary to reside.
A dictionary grows with time, so select a drive with
enough space.
- Source Language
- Select a source language from the list of installed languages
displayed in the list box.
- Use existing dictionary as model
- If you do not want to determine
the dictionary entry structure yourself,
you can use the structure of an existing dictionary as a model by
clicking on Yes....
This takes you to the
Use Existing Dictionary as Model window
where you can select a dictionary as model.
Click on Select or Cancel to return
to the New Dictionary window.
For more information on this option see "Using an existing dictionary as model".
- Change entry fields
- If you want to change the dictionary entry structure
(add, delete, or rename entry fields),
click on Yes...
which takes you to the Change Entry Fields window
where you can define your changes.
Click on Select or Cancel to return
to the New Dictionary window.
For more information on this option see "Changing dictionary entry fields".
To avoid unauthorized modification of a dictionary,
you can protect it by clicking on Protect...
which takes you to the Protect Dictionary window
where you can type a password of your own.
Click on Protect to return
to the New Dictionary window.
From now on, the dictionary can only be modified
when the correct password is supplied.
For more information on how to protect and unprotect dictionaries
see "Protecting a dictionary".
Click on Create to create the new dictionary.
Results
The dictionary is created but still empty.
When the dictionary has been created,
its entry structure is fixed and can no longer be changed.
You can now start to fill it
by importing an SGML-based file,
by entering terms from a new terms list,
or by editing dictionary entries.
All dictionaries have a dictionary entry structure.
In TranslationManager you can use the given default structure,
use an existing dictionary structure with or without changes,
or define a new structure based on all the available entry fields.
Prerequisites
Decide on which dictionary entry fields
your dictionary is to contain.
Calling sequence
Select:
- The Dictionary List window
- New... from the File menu
- Yes... next to
the Use existing dictionary as model option on the
New Dictionary window
The Use Existing Dictionary as Model window
is displayed
(see Figure 33).
Figure 33. Use Existing Dictionary as Model window
Options and parameters
The list of existing dictionaries is displayed
in the list box.
Select a dictionary with the structure
you want to use as a model from this list
or select -Master-, which contains all the
entry fields predefined by TranslationManager .
Click on Select to return to the
New Dictionary window
where you can view and change
the selected entry structure by selecting
the Change entry fields option.
Results
You have determined which entry structure to use as a base
for the new dictionary.
Select this function to make modifications to a
dictionary entry structure.
You can delete entry fields, rename entry fields,
or add new user-defined entry fields.
You can determine the size of the entry field and
what entry field data you want to have displayed
on which panel of the Lookup Entry window.
Prerequisites
Decide on which dictionary entry fields your dictionary is to contain.
Calling sequence
Select:
- The Dictionary List window
- New... from the File menu
- Yes... next to
the Use entry fields option
on the New Dictionary window
The Change Entry Fields window is displayed
(see Figure 34).
Figure 34. Change Entry Fields window
Options and parameters
- Entry fields
- This list box contains all the entry fields defined for this
dictionary.
Select one entry field at a time
and define your settings for this field.
- Display
- If you want this entry field to be displayed in
one the panels of the Lookup Entry window,
decide on which one.
This means choose between
Panel 1 (for the most relevant data),
Panel 2,
and Panel 3.
Select Omit if you want
the entry field and its data
not to be displayed on any of the lookup panels.
The entry field is not deleted from the entry structure.
Select Aut. Lookup to display the complete entry field
information in
the window showing the found dictionary proposals during translation.
- Level
- To specify the level you want the entry field to belong to,
select a corresponding entry field
so that the required level is active.
It can be
Entry, Homonym,
Sense, or Target.
- Size
- Select one of the two choices:
- Small
- Is adequate for an entry field of about a line in length
(the maximum is 255 characters).
- Large
- Is needed for an entry field consisting of several lines of data.
For each selected entry field
you can click on one of the following:
- Change Name...
- To rename the entry field.
See "Renaming a dictionary entry field" for details.
- Add Field...
- To add a new user-defined entry field to the
list of entry fields.
For more detail see "Adding a user-defined entry field".
- Delete field
- To remove the entry field from the entry structure.
When all of the entry field settings are complete,
click on Change.
This takes you back to the New Dictionary window.
Results
The entry structure of the selected dictionary is changed
according to your specifications,
this means the dictionary can have more or fewer entry fields,
changed entry field names and sizes,
and changed lookup display options.
In TranslationManager , all entry fields are automatically assigned a name.
You can change the field name to any other name.
The changed names are used in all windows
where dictionary entry data is displayed.
For example, you may want to change
Headword to Term,
or Part of speech to Category.
You can also change the field names
to another language of your preference.
You can change the entry field names
of an existing dictionary
when you create a new dictionary.
Prerequisites
Decide which dictionary entry field names
you want to use in your dictionary.
Calling sequence
When creating a new dictionary, select:
- The Dictionary List window
- New... from the File menu
- Yes... next to the
Change entry fields option
on the New Dictionary window
- The entry field you want to rename
on the Change Entry Fields window
- Change name...
When changing the properties of an existing dictionary, select:
- The Dictionary List window
- The dictionary to which you want to make changes
- Properties... from the File menu
- The entry field you want to rename on the
Dictionary Properties window
- Change name...
The Change Entry Field Name window is displayed.
Options and parameters
Enter the new field name in the Displayed as field.
Click on Change to rename the selected field.
Results
The selected dictionary entry field is renamed.
You are returned to the
Change Entry Fields window
when you create a new dictionary or
to the Dictionary Properties window
when you change the properties of an existing dictionary.
The predefined entry fields in TranslationManager dictionaries
are only examples of possible fields
you can use
when you create a new dictionary and determine its structure.
You can add your own user-defined fields to any of the four
levels that make up the dictionary structure.
You can only add user-defined fields
when you create a new dictionary.
When the dictionary already exists,
you cannot change its structure.
Prerequisites
Decide which dictionary entry fields
you want to add to your dictionary structure.
Calling sequence
- The Dictionary List window
- New... from the File menu
- Yes... next to
the Change entry fields option
on the New Dictionary window
- An entry field belonging to the level
to which you want to add a field
- Add field...
The Add Entry Field Name window is displayed.
Options and parameters
Type a name for the entry field
you want to add in the Displayed as field.
Click on Add to add the new field to your structure.
Results
The entry field is added to the dictionary structure at the same level
as the entry field you have selected
before clicking on Add field....
You are returned to the Change Entry Fields window.
A dictionary filter is a means
by which data in a dictionary can be selected
so that only entries that meet specified conditions
are displayed or printed.
In TranslationManager filters can be used in combination with printing
(see "Printing a dictionary") or
dictionary lookup (see "Looking up a dictionary entry").
You can use an existing filter, change an existing one,
or create a new one.
In TranslationManager a filter condition consists of:
- An entry field (such as Headword, Translation)
- An operator (such as = or >)
- An operand (such as a*)
For example, the condition Headword LIKE = 'a*'
selects all (and only) the entries beginning
with the letter a.
There are two types of operators:
- (=, <>,
<,
>,
<=,
>=,
LIKE,
BETWEEN,
and IN
form expressions
(for example, Headword = 'Test').
- AND,
OR,
(, ),
and NOT),
join valid expressions to form a larger expression (for example,
Headword = 'Test' AND Translation = 'Test').
The operators have the following meanings:
- =
- The field must contain exactly the value specified.
- <>
- The field must not contain the value specified.
- <
- The field can contain only values that are less than the value
specified,
for example, preceding the specified value in alphabetical sequence.
- >
- The field can contain only values that are greater than
the value specified,
for example, following the specified value in alphabetical sequence.
- <=
- The field can contain only values that are less than or equal
to the value specified.
- >=
- The field can contain only values that are greater than or equal
to the value specified.
- LIKE
- The field can contain values that are similar to the value
specified,
for example, they start with the specified value.
- BETWEEN
- The field can contain values that are in a range between one value
and another.
- IN
- The field can contain values that match up to six different values.
- AND
- This operator joins two expressions so that both expressions must
match in order to let the entry pass the filter.
- OR
- This operator joins two expressions so that one or both
expressions must match in order to let the entry pass the filter.
- NOT
- This operator finds everything except what follows the operator.
- ( and )
- These operators are used to group conditions in an expression.
Expressions
in the parentheses are processed
before expressions outside parentheses.
Note: All filters depend on the dictionary entry
structure.
This means that a filter created for a one dictionary
possibly refers to entry fields that are not
contained in another dictionary.
In such cases, it is recommended to create
a new filter for each dictionary.
Prerequisites
Either the Look up a Term window
or the Print Dictionary window is active.
Calling sequences
- Select the Use filter option
- Click on Edit...
The Edit Dictionary Filter window is displayed
(see Figure 35).
Figure 35. Edit Dictionary Filter window
Options and parameters
The dictionary-filter parameters are as follows:
- Name
- Lists the name of the filter you entered
before you called this window.
The list box also lists the names
of all the other filters that are
currently available.
You can choose a name from this list box if you want to use an existing
filter as a model.
Type a new filter name in the Save to
box before saving your changes.
Otherwise the existing filter is overwritten.
- Description
- Displays the description of a filter if one was entered.
For a new filter, type a descriptive text.
- Available fields
- Lists the entry fields defined for the selected dictionary.
When you double-click on a field name in this list box,
the field name is put in the
SELECT field.
When you select a field name from the list box (single click)
and double-click on an operator,
the Set Dictionary Condition window
is displayed, where the condition can be set.
The resulting condition is displayed in the WHERE field.
- Operators
- Lists the available operators
that can be used combined with an entry field
to specify a filter condition.
- Condition
- Displays the defined filter condition:
- Select
- Lists the field names selected
for the filter output.
If you want to include all the fields, type * or
leave the field blank.
- WHERE
- Contains the conditions you specified.
You can type the condition directly into the field
(leave a blank between field names, operators, and operands)
or select an entry field and
double-click on an operator.
This activates the Set Dictionary Condition window
where the condition can be set.
The resulting condition is displayed
in the WHERE field.
A condition expression requires a field name,
an operator, and a value.
The Boolean operators AND
and OR join expressions,
NOT negates an expression.
Use parentheses to clarify complex expressions.
- Save To
- Displays the name of the filter.
You can enter a new name, or select an existing name.
If you select an existing filter name,
the existing filter is overwritten.
- Delete
- Deletes the selected filter.
Select Save to create the new or changed filter.
For example, if you want to create a filter
that selects only those entries in the dictionary that begin
with the letter a,
define the filter as follows:
- Click on the field name Headword in the
Available fields list box to mark it.
- Double-click on the LIKE operator in the
Operators list box.
The Set Dictionary Condition window appears.
- Type a* or A*
at the cursor position and click on Set.
The input can be in uppercase, lowercase,
or mixed case characters.
- The condition is displayed in the WHERE field.
- Enter a name for the filter (for example, ONLYA) in
the Save to combination box.
- Click on Save to create the filter.
Results
The changed or new filter is saved and can be used for
dictionary lookup or printing.
You are returned to the previous window.
Deleting a dictionary can be useful,
when you have exported it or archived it outside of TranslationManager and
no longer need it,
and you require free space on your disk.
For deleting a shared dictionary, see "Deleting a shared dictionary".
Prerequisites
Make sure that you have a backup copy
of the dictionary before deleting it
if it contains data of importance.
Calling sequence
Select:
- Dictionary List window
- The dictionary you want to delete
- Delete from the File menu
Options and parameters
A confirmation message appears
before the dictionary is deleted.
If you select No, the delete function is canceled.
If you select Yes, the dictionary is deleted.
Results
If you selected Yes, the dictionary is deleted.
References to this dictionary may still
exist in certain folders.
Update the folder properties so that the
deleted dictionary is not referenced anymore.
Individual dictionary entries can be changed,
for example, a new translation can be added
or an existing obsolete translation deleted.
You can edit a dictionary entry at any time
before, after, or during translation.
Prerequisites
The dictionary must exist.
Calling sequence
There are several ways to get to the
Edit Entry in Dictionary window:
- To add, change, or delete a dictionary entry
outside the Translation Environment, select:
- The Dictionary List window
- The dictionary you want to open
- Open from the File menu
- The term to enter on the Look up a Term window
- Headword search type and click on Edit...
- To add, change, or delete a dictionary entry
in the Translation Environment, select:
- The document for translation in the Document List window
- Open from the File menu
- The term in the document to add or modify by marking it
- Edit a term... in the Translate menu
- Or select:
- The term in the Dictionary window and double-click on it
- Edit... on the Lookup Entry window
In all cases,
the Edit Entry in Dictionary window is displayed
(see Figure 36).
Figure 36. Edit Entry in Dictionary window
Options and parameters
The entry displayed in the
Edit Entry in Dictionary window is
split up into templates.
A template is the complete dictionary entry information
related to one translation.
This window shows one template at a time.
If the term does not exist,
only one empty template is displayed.
If, on the other hand, the term exists,
the first template (translation) is displayed.
- Template 1 of 3
- The term in the sample window has 3 translations.
This box displays all data related to one translation,
this means each entry field with its name and its contents.
- Template
- The following options let you scroll
through all templates of the entry
or change complete templates.
Select:
- Next
- To select the following template.
- Previous
- To select the previous template.
- Add
- To add an empty template for a new translation variant.
- Copy
- To copy the contents of the currently displayed template
into a new one where you can type over the contents
to add the new translation.
You would use Copy instead of
Add in cases where only
minor changes need to be made
to a translation variant.
- Delete
- To delete the currently displayed template.
- Clipboard
- By selecting options in this box, you can
move data from the current template to the clipboard
and vice versa,
for example, you can insert context information from
the document in the Translation Environment.
- Copy
- To copy a marked text to the clipboard.
- Paste
- To copy a previously saved text from the clipboard
to the current cursor position.
To delete the entire entry from the dictionary,
click on Delete at the bottom of the window.
Click on Save
to save your changes to the dictionary
displayed in the Save to dictionary list box.
In the Translation Environment,
you can choose between
any of the dictionaries opened for translation
(defined as a folder property).
Outside the Translation Environment,
you can only save the data
to the dictionary you explicitly selected.
Results
A new term is added to the dictionary,
or an existing term is changed or deleted.
There are two ways to export dictionary data,
within a folder in the internal TranslationManager format
or as an external dictionary in SGML format.
Export a dictionary
if you want to pass the dictionary on to other TranslationManager users
or to create a backup copy of a dictionary.
Protected dictionaries must be exported in
a folder.
For more information on folder export, see "Exporting a folder".
Exporting a dictionary into an SGML-based file
is required if you want to use
the dictionary data in environments other than TranslationManager .
Prerequisites
Sufficient disk space for the exported dictionary is available.
Calling sequence
Select:
- The Dictionary List window
- The dictionary you want to export
- Export... from the File menu
The Export dictionary window is displayed
(see Figure 37).
Figure 37. Export Dictionary window
Options and parameters
- Format
- External is selected automatically.
- Export
- This box displays the Name and Description
of the selected dictionary.
- To
- You must specify the fully qualified name
under which to store the external dictionary file.
Select the drive to which
you want to export the dictionary.
Ensure that you have sufficient space on this drive.
- Name
- Enter the name you want to give the external dictionary.
You can also type the path name and the file name.
- Current Directory
- This field displays the currently selected
drive and path information.
- Directories
- Select the directory into which you want to export the file
from the list of existing directories.
Click on Export to begin the dictionary export.
If you specified a new directory name you are prompted
to confirm whether you want to create this new directory.
Results
An SGML-based dictionary file is created at the specified location
and can be given to other users or programs for further
usage.
You can import a dictionary
as an external dictionary (SGML-based)
or within a folder in the TranslationManager format.
If you want to work with terminology created outside TranslationManager ,
create an SGML-based file
(for more details, see "Creating an SGML-based dictionary")
and import this file into TranslationManager .
You can either import the file into a new dictionary or
merge the data into an existing dictionary.
Dictionaries imported in a folder are in TranslationManager format.
If the dictionary does not exist, a new dictionary is created;
if it does exist, the folder dictionary is merged into the existing one.
For more information on folder import, see "Importing a folder".
When merging two dictionaries,
the dictionary structure of the destination
dictionary is maintained.
Data in entry fields that exist only
in the source dictionary
and not in the destination dictionary
will not be regarded and data may be lost.
Entry fields not contained in the external dictionary
will be empty in the dictionary after importing.
If you select to import an external dictionary
under a new dictionary name,
the New Dictionary window is displayed
where all the properties are shown
as they are coded in the SGML-based file.
You can change certain properties if you want to,
although this is not always advisable
as the changed properties
may be different from
what is specified in the SGML file.
Prerequisites
The SGML-based file for import
must have been created according to the description
in "Creating an SGML-based dictionary".
Calling sequence
Select:
- The Dictionary List window
- A dictionary if you want to merge dictionaries
- Import... from the File menu
The Import Dictionary window is displayed
(see Figure 38).
Figure 38. Import Dictionary window
Options and parameters
- Format
- External is selected automatically.
- From
- You must specify where the dictionary to be
imported resides.
Select the drive where the file is stored.
- Name
- Type the file name of the external dictionary
or select it later from the Files list box.
- Current directory
- Displays the currently selected drive and path information.
- Directories
- Select the directory containing the external dictionary
from the list of directories on the selected drive.
- Files
- Select the file name of the external dictionary from
the list of file names in the currently selected path.
- To dictionary
- Select a dictionary from this list-box if you
want to merge your file into an existing dictionary
or type a new dictionary name if you want to create a new one.
Click on Import to begin the import function.
If TranslationManager detects an incorrect SGML tag in the
SGML-based file, a message is displayed,
asking you if you want to skip
the entry containing the error
or to cancel the import process.
If you selected to import an external dictionary
under a new dictionary name,
the New Dictionary window is displayed
where all the properties are shown
as they are coded in the SGML-based file.
For more information, see "Creating a new dictionary in TranslationManager".
If you selected to merge the external dictionary
into an existing dictionary in TranslationManager ,
remember that the dictionary structures may differ
and that there may be identical terms.
In case of conflicts you are prompted
to specify additional options for merging dictionaries
in the Merge Dictionary Entries window.
For more information, see "Merging dictionaries".
Results
The external dictionary data is imported either under a new name
or merged with an existing dictionary.
You can begin to use it in TranslationManager .
The external dictionary is unchanged.
There are several ways to look up dictionary entries
in TranslationManager :
-
During translation,TranslationManager automatically
displays the translation of all terms
in the currently active segment
for which entries are found in the dictionaries
selected for search in the folder.
The dictionaries are searched
in the order defined in the folder properties
(see "Viewing and changing the properties of a folder"),
and the first entry found is displayed in the dictionary window.
-
To view the complete dictionary entry or to check
if there are any further entries in other dictionaries,
you can double-click on the term, and
the Lookup Entry window for this term is displayed,
which allows you to select the dictionary
(if the entry occurs in more than one of the folder dictionaries)
and the lookup panel you want to see.
-
You can also
mark a term or a multi-word term
in the Translation window
and select Look up a term...
from the Translate menu.
If the term is not found in the dictionaries,
the Look up a Term window is displayed.
If the term is found in the dictionaries,
the Lookup Entry window is displayed
containing the data for this term.
Outside the Translation Environment you can look up entries
only in one dictionary at a time.
How to search for terms in a dictionary
is described in "Searching a dictionary entry".
How to edit an existing entry in a dictionary
after you have retrieved it,
is described in "Editing a dictionary entry".
Prerequisites
- The dictionary must exist.
- The term you want to look up must exist in the dictionary.
Calling sequence
Outside the Translation Environment,
follow this procedure to look up a dictionary entry:
- Select the Dictionary List window.
- Double-click on the dictionary you want to open.
The Look up a Term window is displayed,
where you can type the term,
select your search type
and define a filter if you want to restrict your search.
For more detail on defining a filter, see "Defining a dictionary filter".
- Type the term you want to look up in the Term field.
You can use an asterisk (*) as wildcard at any position, for example,
data* or *data.
- Select the Headword search option.
- If the term exists in the dictionary,
click on Look up in the
Look up a Term window.
Otherwise TranslationManager offers you to add the term to the dictionary
(see also "Editing a dictionary entry").
During translation in the Translation Environment,
there are several ways
to look up a dictionary entry:
- Using a displayed term in the Dictionary window,
double-click on the term you want to look up.
The Lookup Entry window is displayed
(see Figure 39).
- Using a term in the Translation window:
- Mark the term, possibly a multiword term.
- Select Look up a term... from the
Translate menu.
If the specified term does not exist in the selected dictionary,
the Look up a Term window is displayed
(see Figure 42)
showing existing terms preceding and following the
marked term in alphabetical sequence.
For more information on searching,
see "Searching a dictionary entry".
In all cases,
if the specified term exists in the dictionary,
the Lookup Entry window is displayed
(see Figure 39).
Figure 39. Lookup Entry window
Options and parameters
- Dictionary
- This field contains the name of the first dictionary
where the term and its entry data are found.
If the lookup function was called from the Translation Environment
and the folder properties contain more than one dictionary,
you can switch between the different dictionaries
to see whether the same term is in more than one dictionary.
- Display
- In this field, you can switch between
the lookup panels 1, 2, and 3
to display entry data of this term
as defined in the dictionary structure.
The large center box contains entries
for the found term in the displayed dictionary
according to the panel selection.
Click on Print to print the data of the term
on your workstation printer.
Click on Edit... if you want to edit
the entry data of the found term
in the Edit Entry in Dictionary window.
For more information on editing,
see "Editing a dictionary entry".
Click on Copy to copy a marked text to the clipboard.
Click on Cancel to leave the window.
Results
The entries for the selected term are displayed.
The entries are changed,
printed, or copied to the clipboard
depending on the options you selected on this window.
Merging two dictionaries is only supported when
you import an external dictionary into an
existing one in TranslationManager .
When you do this,
remember that the dictionary structure
of the destination dictionary has precedence.
You are warned if the dictionary structures differ,
and TranslationManager allows you create a new dictionary
instead, to prevent any loss of data.
If, during dictionary merge,
the same term exists in both dictionaries,
the
Merge Dictionary Entries window is displayed
(see Figure 40).
Figure 40. Merge Dictionary Entries window
Options and parameters
- Term
- Displays the term that exists in both dictionaries.
- Merge from SGML dictionary
- Contains the entries in the external dictionary for this term.
- Merge into target dictionary
- Contains the entries in the existing dictionary for this term.
- Options
- Depending on how you want to process the
entries for the current term
(displayed in the two boxes),
select one of the following options or click on
Cancel to stop the merging:
- Replace target entry with source entry
- This option only takes the source dictionary entry
into consideration.
The destination dictionary entry is overwritten.
- Ignore source entry
- This option only takes the destination dictionary entry
into consideration.
The source dictionary entry is discarded.
- Combine entries
- This option takes both the source dictionary and the destination
dictionary entries into consideration,
combining them to form one entry.
Provided that the dictionary structures do not differ,
no data is discarded or overwritten.
- Use the selected option for all entries
- Select this option,
if you do not want the Merge Dictionary Entries window
to appear every time the same term is found
in both dictionaries and you are sure that
your selected merge option applies for all entries.
Click on Merge to begin or to continue
the merging.
Click on Cancel to
leave the merging and importing program.
Results
The external dictionary data is merged with the existing dictionary
according to the specified options.
The external dictionary is unchanged.
To look at dictionary data, you must open it.
In a dictionary,
you can search for specified terms,
you can look up the data of an existing term,
you can change the entry data of an existing term
and you can add entries for new terms.
Opening a dictionary can be done in several ways
outside the Translation Environment
and during translation in the Translation Environment.
Opening a dictionary is automatically done,
when you use one of the following functions:
Organizing makes the dictionary compact and increases performance.
Dictionaries to which you frequently make changes
should be organized periodically.
If an error occurs during dictionary processing, you are prompted to
organize the dictionary
because organizing often rectifies the error.
Prerequisites
The dictionary must exist.
Calling sequence
Select:
- The Dictionary List window
- The dictionary you want to organize
- Organize from the File menu
The organize procedure starts immediately.
Options and parameters
None.
Results
The dictionary is organized and you can continue using it.
You can choose to print a complete dictionary
or parts of it.
If you only want to print part of a dictionary,
for example all entries with a headword
starting with the letter a,
or only some of the entry fields,
or only the headwords and the translations,
you can define a filter for the print function.
You must define the layout of your print output
in format files that you edit with a text editor.
In the print format file you define
the entry fields to be printed and
how they are arranged in the printout.
You can send your printout to an attached workstation
printer or have the printout data sent to a file.
Before printing a dictionary or part of a dictionary,
the output file structure must be determined.
If you decide not to use one of the format
files provided by TranslationManager
you must create this file in the
subdirectory \EQF\PRTFORM.
For more information on how to use
the sample format print files, see "Defining the printout format".
For a detailed description
of the structure and syntax of a print
format file see "Defining your own format file".
Prerequisites
- The dictionary must exist.
- The format file for the specific printout layout must exist.
Calling sequence
Select:
- The Dictionary List window
- The dictionary you want to print
- Print... from the File menu
The Print Dictionary window
(see Figure 41) is displayed.
Figure 41. Print Dictionary window
Options and parameters
- Name
- The selected dictionary name.
- Description
- The dictionary description text.
- Output to
- In this box, select
where you want to send your printout to:
- Printer
- If you want the printout on your attached workstation printer.
- File
- If you want the printout on file.
Enter the complete file name specification--consisting
of drive, path, file name--in
the Name field yourself
or click on Select...,
which takes you to the
Select File window
assisting you in selecting the drive, directory and file name
(see "Selecting a file").
- Format
- Specify the print format file to be used:
- Name
- Select a format file from the list of available files.
If you created
a new format file, it should appears in this list.
- Description
- Type a text to describe
the contents of the selected format file.
- Filter
- Specify whether to use a filter.
You can use an existing filter or change it or create a new filter.
- Use filter
- To use a filter, select this option and specify
which filter to use:
- Name
- Lists all available filters.
To use or change an existing filter, select it.
To define a new filter,
type the name in the list box.
- Description
- The description of the selected filter.
Click on Edit... to define the
new filter or to change an existing one,
which takes you to the Edit Dictionary Filter window.
For more information
on how to define filter conditions,
see "Defining a dictionary filter".
Click on Print to start the printing function.
Results
If you selected the Printer option,
the dictionary printout is sent to your attached printer.
If you selected the File option,
the dictionary printout is stored in the specified file.
TranslationManager provides sample print-format files
that you can use to print dictionary data
or as a basis for defining your own print output format.
To become acquainted with format files,
use the FORMAT1.FRM print format file
for printing
one of the sample dictionaries provided in a sample folder
(for example SAMPLE2).
When you change a format file or create one of your own,
make sure you follow the required syntax of the format file.
All print-format files are located in the
subdirectory \EQF\PRTFORM.
The following sample files are provided by TranslationManager :
- File name
- Description
- format1.frm
- Prints each headword and its translation.
- format2.frm
- Prints all templates for each entry without formatting.
- format3.frm
- For this format file, it is recommended
to select the File output option
because it generates a BookMaster source file
(containing all templates for each entry).
This file must be processed by BookMaster outside TranslationManager
to obtain a formatted dictionary printout.
- format4.frm
- Prints a dictionary extract consisting of cover page, body part,
header section, and current page number for each page.
All the print-format files provided by TranslationManager are described in
detail in "Sample format files".
For a complete and detailed description
of the structure and syntax of print-format
files see "Defining your own format file".
Experienced users can use the print function also for
generating new external dictionaries, which again can be
imported and used in TranslationManager .
For example, you can:
- Generate a reverse dictionary from an existing one
(this means generate a German to English dictionary from
an English to German dictionary).
- Generate a new dictionary containing
selected entries from another dictionary.
This can be useful
for example, when you have a dictionary
containing translations into several languages
and want to extract the entry data
related to translations into one of the languages.
To avoid uncontrolled modification, you can protect dictionaries,
that is, everyone can browse these dictionaries, but
only authorized persons responsible for updating dictionaries
(for example, a terminologist) can make changes to them.
You protect them by assigning a password to them.
You can protect dictionaries on the
New Dictionary window
when creating a new dictionary
or on the Dictionary Properties window
when viewing its properties
by pressing the Protect... button.
If you are not authorized to edit a protected dictionary but
want to make changes to existing entries or add new entries,
you can do this by creating a new dictionary
using the protected dictionary as a model.
For more details see "Creating a new dictionary in TranslationManager".
You can then use the new dictionary
as an addendum dictionary to the protected one.
Redefine any dictionary search sequence so that
this addendum dictionary precedes the protected dictionary.
You can send this addendum dictionary to a person who is authorized to
edit protected dictionaries
and can update these dictionaries on the basis of
the modifications and additions made in your addendum dictionary.
When you start creating a new dictionary, the unprotected mode is the
default setting.
This mode allows you to carry out any
modifications to that dictionary.
The following table shows you which tasks
you can perform with unprotected
and protected dictionaries:
| Dictionary task
| Unprotected
| Protected
|
| Export to SGML-based dictionary
| Yes
| No
|
| Delete a dictionary
| Yes
| Yes
|
| Export folder with dictionary
| Yes
| Yes
|
| Look up a dictionary entry
| Yes
| Yes
|
| Edit a dictionary entry
| Yes
| No
|
| Organize a dictionary
| Yes
| Password
|
The following table shows the merge options
that are available:
| Dictionary merge from
| To unprotected dictionary
| To protected dictionary
|
| SGML-based dictionary
| Yes
| Password
|
| Unprotected folder dictionary
| Yes
| No
|
| Protected folder dictionary
| No
| No
|
Calling sequence
To protect an existing dictionary, select:
- The Dictionary List window
- The dictionary you want to protect
- Properties... from the File menu
- Protect... on the Dictionary
Properties window
To protect a new dictionary, select:
- The Dictionary List window
- New from the File menu
- Protect...
on the New Dictionary window
The Protect Dictionary window is displayed.
Enter your new password twice and
confirm by clicking on Protect.
Results
The dictionary is protected,
for example, only those that know the password have
read-write access to the dictionary.
Those who do not know the password
have read-only access.
The protection status of a dictionary
can be revoked if the password assigned to the
respective dictionary is known.
Calling sequence
Select:
- The Dictionary List window
- The dictionary you want to unprotect
- Properties... from the File menu
- Click on Unprotect...
The Query Password for Dictionary window
is displayed.
This window is also displayed,
when you try to perform an action that
makes changes to the dictionary.
In this window
you can enter the dictionary password and confirm by pressing the
OK button.
Results
The dictionary is unprotected and everyone can change it.
If you want to know whether a certain term is
included in a dictionary,
you can search for this term in several ways,
this means with a:
- Complete or incomplete term
- Predefined search type
- Dictionary filter defined by you
- Combination of these
Searching for a term can be done outside the Translation Environment
and during translation in the Translation Environment.
To search for a term,
you specify the term and the search parameters
in the Look up a Term window.
If more than one term matches with the specified search criteria,
you can select the term you are currently interested in
to display its data.
If the term is found in the dictionary,
you can display and edit the complete entry
in subsequent windows (Look up Entry
and Edit Entry in Dictionary).
If the specified term is not found in the dictionary,
you can add a new entry for this term.
What you can do on the following windows,
is described in
"Looking up a dictionary entry", and "Editing a dictionary entry".
Prerequisites
The dictionary must exist.
Calling sequence
To search for a term outside the Translation Environment, select:
- The Dictionary List window
- The dictionary you want to open
- Open... from the File menu
Alternatively, double-click on the dictionary
in the Dictionary List window
in the main window.
To search for a term in the Translation Environment, select:
- A term or a multiword term in
the Translation window by marking it
- Look up a term...
from the Translate menu
If the term exists in the dictionary,
the Look up Entry window for this term is displayed.
For more information, see "Looking up a dictionary entry".
If the term does not exist in the dictionary,
TranslationManager starts searching for the term
as if you specified the Neighborhood search option.
The Look up a Term window is displayed
(see Figure 42).
Figure 42. Look up a Term window
Options and parameters
- Term
- Enter the term (single term or multiword term)
you want to search for.
You can use an asterisk (*) to get a list
of all terms in the dictionary,
or use the asterisk as part of a term to get a list of terms.
For example, enter app* to get a list of all terms
starting with the letters app.
You can enter the term
in uppercase, lowercase, or mixed case characters.
- Type of search
- The synonym, related term and abbreviation
search types are greyed out
if the corresponding entry field
does not exist in the dictionary.
Select one of the following search types:
- Neighborhood
- To display the 30 terms preceding and the 30 terms following
the specified term.
- Compound terms
- To retrieve all compound terms
that start with the specified term.
For example, if the term data is looked up, the possible compound
terms that would be retrieved are:
- Data processing
- Data processing network
- Data processor
The displayed list is empty if no matches are found in the dictionary.
- Synonym
- To retrieve all terms where the specified term is in the synonym
entry field of the respective term.
For example, if you specified the term stream with the
Synonym search option,
you would get brook and rivulet,
if stream is contained in their dictionary entries.
The displayed list is empty if no matches are found in the dictionary.
- Related Term
- To display all terms related to the selected term.
For example, if you specified the term forest with the
Related Term search option,
you would get forestry commission
and forester as related terms if forest was entered in
the related term entry field of their dictionary entries.
The displayed list is empty if no matches are found in the dictionary.
- Abbreviation
- To display all terms that have an abbreviation.
For example, if you specified the term appl. with the
Abbreviation search option,
you would get application
if appl. was entered
in the abbreviation entry field of its dictionary entry.
The displayed list is empty if no matches are found in the dictionary.
- Headword
- To search only for the specified term.
This is the default search option.
- Dictionaries
- This box displays the name of the selected dictionary.
- Filter
- Specify whether to use a filter
to restrict the number of terms to be found.
You can use an existing filter, change it, or create a new filter.
- Use filter
- To use a filter, select this option and specify
which filter to use:
- Name
- Lists all available filters.
If you want to use or change an existing filter, select it.
If you want to define a new filter,
enter a name in the list box.
- Description
- The description of the selected filter.
Click on Edit... to define the
new filter or to change an existing one,
which takes you to the Edit Dictionary Filter window.
For more detail on how to define filters,
see "Defining a dictionary filter".
Click on Look up...
to start the search.
Click on Edit...
if you expect that an entry exists for the specified term
and you want to edit it.
Results
If you selected the Headword search type
and an entry for the specified term is found in the dictionary,
the Lookup Entry window is automatically displayed
containing the data for this entry.
For more information, see "Looking up a dictionary entry".
If you selected the Headword search type
and the term is not found in the dictionary
and you clicked on Look up...,
a message appears asking if you want
to add the term to the dictionary.
If you add the term,
you are automatically taken to the
Edit Entry in Dictionary window.
For more information, see "Editing a dictionary entry".
If you selected Neighborhood search,
and the term is not found in the dictionary,
a list of up to 60 terms is displayed in alphabetical order
where the specified term would appear in the middle.
If more than one term satisfies the specified search criteria,
a list of up to 60 terms is displayed
from which you can select a term and use it for
a Headword search request.
If the specified term exists in the selected dictionary
and you selected Edit...,
the Edit Entry in Dictionary windows is displayed
For more information, see "Editing a dictionary entry".
Sharing dictionaries
with other translators
in a LAN system
helps you keep your own used disk space small and you can work with
a dictionary even if another translator is using
it at the same time. You may find this
especially convenient when you work
with fellow translators on the same project.
For example, if you must translate a term that
a fellow translator has added to the shared dictionary only recently,
you can instantly use your
colleague's translation by copying it from the shared dictionary.
If you wish to work with shared dictionaries,
you must note the following
prerequisites:
- Install the LAN software.
The appropriate LAN software must be installed (see "Software requirements" for the supported software).
- Log on to the LAN.
You must be logged on to the LAN.
- Define a shared disk.
At least one of your disks must be defined as shared disk.
In Windows for Workgroups you do this using the FileManager.
In NOVELL Netware and IBM LAN Manager LANs you use the NET USE command.
It is recommended to share the entire disk because TranslationManager
creates its own subdirectory structure on this disk.
- Specify a dictionary as shared.
The dictionary you want to share must be
defined to reside on a shared disk.
This can only
be done when a new dictionary is created.
See "Creating a new dictionary in TranslationManager" for learning how to create a dictionary that can
be shared.
Note that it is not possible to redefine a local dictionary as shared
at a later time. It must be done when it is created.
If you created the dictionary,
you can now start working with it.
If you want to use a dictionary created
by someone else, see the next step.
- Connect the shared dictionary.
To use a dictionary that is defined as shared
and not created by you,
you must add it
to your Dictionary List.
See "Accessing or disconnecting a shared dictionary" to learn how to do this.
To use a dictionary that is shared by many
translators you must include it in your list of local dictionaries.
To remove it from this list you must disconnect it.
Prerequisites
The shared dictionary must exist.
Calling sequence
Select:
- The Dictionary List window
from the TranslationManager workbench
- Connect shared resources... from the Utilities
menu
The Connect Shared Dictionaries window
is displayed.
Options and parameters
- Available
- Lists all dictionaries available on shared disks.
- Add -->>
- Adds the selected dictionary name to the Selected box.
- <<-- Remove
- Removes the selected dictionary name from the
Selected box but does not delete the dictionary.
- Selected
- Lists all dictionaries selected.
When you select Connect the listed dictionaries will be
connected.
Dictionaries removed from this list are disconnected.
Select Connect to update your list window.
Results
The selected dictionary has been added to your local list window and
can now be used like any other dictionary.
If you disconnected it, it is no longer shown in the list window.
If you no longer need a dictionary,
you can delete it.
When you delete a dictionary that
is shared by others, the following conditions apply:
- If you
created the shared dictionary,
you can delete it at any time. Keep in mind that other users in
the network can no longer use the deleted dictionary because
it has been physically deleted.
- If you did not create the
dictionary but just share it, you can delete it at any
time. Keep in mind that this will remove the dictionary from
your
list of dictionaries. The deleted
dictionary is no longer available for you.
All other users who share this resource can still
continue working with it
because it is still available on the shared disk.
In case you need to work with the deleted dictionary again, you can
access it by connecting it once more to add it to your list of
dictionaries.
Prerequisites
The dictionary must exist.
Calling sequence
Select:
- The dictionary to be deleted
- Delete from the File menu
Before TranslationManager deletes the selected file,
you are prompted to confirm
that you want to delete the file.
Options and parameters
- Yes
- The dictionary is deleted.
- No
- The dictionary is not deleted.
Results
If you are the owner of the deleted dictionary,
it is deleted physically, the disk space is freed, and it can no
longer be used by any other translator in the network.
If the dictionary was created by someone else and you just shared it,
it is removed from the respective list window and you can no longer
access it. However, it is still available on the shared disk to be
used by other translators.
In the Translation Memory List and Dictionary List
window, you can display
additional information about a shared Translation Memory or dictionary.
The Owner column shows the user ID of the person who created
the shared resource.
The properties of a dictionary are its individual characteristics.
Some properties, for example the dictionary structure and the size of an
entry field, can not be changed when the dictionary has been created.
Others, for example which lookup panels are to display which data, can
be changed.
Prerequisites
The dictionary must exist.
Calling sequence
Select:
- The Dictionary List window
- The dictionary from the list of dictionaries
- Properties... from the File menu
This takes you to the
Dictionary Properties window
(see Figure 43).
Figure 43. Dictionary Properties window
Options and parameters
The Dictionary Properties window
lists the characteristics of
the selected dictionary.
For an existing dictionary,
only the following properties can be changed:
- The dictionary description
- The lookup display panel of an entry field
- The name of an entry field
- Name
- The name of the dictionary.
It cannot be changed for an existing dictionary.
- Description
- The description of the dictionary.
It can be up to 40 characters long.
As the name of a dictionary can only be 8 characters long,
use this field to clearly differentiate between
dictionaries with similar names.
- Location
- Can be local (only one translator at a time can use it)
or shared (several translators can use it simultaneously).
- Disk drive
- The drive where the dictionary resides.
It cannot be changed for an existing dictionary.
- Source language
- The source of the dictionary,
this means the language of the terms (headwords).
It cannot be changed for an existing dictionary.
- Entry fields
- Contains the entry fields
that make up the dictionary structure.
For an existing dictionary you can only change
the name of a field and the lookup panel number.
- Display
- Click on the Panel number
on which you want this entry field displayed in the
Look up Entry window.
Omit means you do not want
this entry field to be displayed at all.
The entry field is not deleted from the entry structure.
Aut. Lookup displays the complete entry field information in
the window showing the found dictionary proposals during translation.
- Level
- Shows the level of the selected entry field.
It cannot be changed for an existing entry.
- Size
- Shows the size of the selected entry field.
It cannot be changed for an existing entry.
To change the name given to an entry field
click on Change name....
For example, you can change the name of the
Headword entry field to Term.
For more information on
renaming entry fields see "Renaming a dictionary entry field".
To avoid unauthorized modification of a dictionary,
you can protect it by clicking on Protect
and typing a password on the Protect Dictionary window.
Then the dictionary can only be modified
when the correct password is entered.
For more detail on how to protect and unprotect dictionaries
see "Protecting a dictionary".
Click on Change to change dictionary properties.
Results
The dictionary properties
are changed according to your specifications.
In its simplest form,
the Dictionary List window
lists all of the available dictionaries.
However,
if you want to see more specific details of each dictionary,
you can change your view of the Dictionary
List window to have it display individual properties,
such as the source language,
location, or description of a dictionary.
The details selectable for a dictionary are:
- Name
- The name of the dictionary
- Description
- The description of the dictionary
- Drive
- The drive on which the dictionary resides
- Owner
- Shows who created the dictionary (if it is a shared one).
If it is a local dictionary, n/a is displayed.
- Source language
- The source language of the dictionary,
this means the language of the headwords
You can toggle between two display modes:
- Display the dictionay names only
- Display the names and details
You can change the arrangement of the dictionary details in the
Change Details window.
For a general description see "Viewing and changing the details of a list item".
You use terminology lists to tell
TranslationManager to look for or ignore specific terms
when checking a document.
TranslationManager creates terminology lists during
document analysis.
The lists are compiled by comparing terms in a document
with selected dictionaries.
In TranslationManager , you can generate and work with
the following types of terminology lists:
- New terms lists
- New terms are terms in a document
that are not contained in specified dictionaries.
You can use new terms lists
to create a project-specific dictionary,
to create your personal dictionary with terms that are often
used for specific terminology,
or to extend an existing dictionary.
- Found terms lists
- Found terms are terms in a document
that are also contained in specified dictionaries.
You can use found terms lists to copy existing entries from
one dictionary to another or to check the used terminology
in a dictionary
before you use the dictionary for translation.
- Exclusion lists
- Exclusion lists contain terms
that TranslationManager can ignore when searching for new
and found terms.
Exclusion lists can be generated by copying
selected new terms and found terms,
or by editing in TranslationManager or outside the system.
By using such an exclusion list,
you can reduce the number of terms to be included
the next time you create a new terms list or a found terms list.
Exclusion lists usually contain so-called noise words.
For each installed language support,
TranslationManager already provides such a list.
A terminology list usually contains terms of only one language.
When you copy a term from a terminology list
to a dictionary, the source language of the dictionary
must be the same.
All types of terminology lists can be exported,
this means they are converted to an external
format that is SGML based.
A file with this format
can be used to exchange the data of a list
with other users or applications.
External terminology lists can be edited or created
by other systems; to use them in TranslationManager , you
import them.
A description of the external format is given in
"Creating an external terminology list".
You can start
most of the functions related to
terminology lists from the related list window,
as shown in the following example.
Prerequisites
None.
Calling sequence
Select:
- Utilities from the action bar
- Display terminology lists from the menu
- One of the list types offered in the cascaded window:
Exclusion Lists,
Found Terms Lists, or
New Terms Lists
One of the list windows is displayed,
for example the New Terms Lists window.
The list window contains the list of existing terminology lists,
in this example all new terms lists.
Actions on a terminology list can be started
by selecting a list name and an action
from the File menu.
Depending on the type of terminology list to be created,
there are different ways to do this:
Another general way is to create an external terminology list
outside of TranslationManager , which can be imported.
This is explained in "Creating an external terminology list".
New terms lists and found terms lists
are created during analysis of a document.
Prerequisites
- At least one document must exist.
- At least one dictionary must exist.
Calling sequence
Select:
- The document in the Document List window
- Analyze... from the File menu
- Create lists
in the Analyze Documents window
- Create list of new terms
or Create list of found terms
in the List Settings window
- Any dictionaries to be used
- Set to return to the previous window
- Analyze to begin the analysis
and the creation of the selected terminology lists
Options and parameters
For a detailed description of the options
see "Analyzing a document".
Results
The terminology lists are created
according to your specifications.
You can create an exclusion list from an existing
new terms list or found terms list.
This procedure is explained in "Opening and changing a terminology list".
You can also create an exclusion list from
the New Exclusion List window or
the Edit Exclusion List window.
Prerequisites
The Exclusion Lists window is active.
Calling sequence
Select New... from the File menu
The New Exclusion List window is displayed.
Options and parameters
The upper list box is empty.
Here you can define the terms for the new exclusion list:
- To add a term, press Enter
and type a term in the empty line.
- To delete a term already entered,
mark it with the mouse and press Enter.
- To change a term already entered, overtype it.
Pasting from the clipboard is also supported.
- Name
- Type the name of the new exclusion list.
To save the terms in the new exclusion list,
select the Create button.
If you do not want to create the exclusion list anymore,
select the Cancel button.
Results
If you selected the Create button,
the exclusion list is created with the terms entered and
you can use it in the analysis of a document.
If you selected the Cancel button,
no new exclusion list is created.
Although TranslationManager offers functions
for the creation of terminology lists
where you only specify some parameters in a window,
you can also create them outside of TranslationManager .
This can be useful when you already have terminology lists
available in a format of your own,
which you must only convert to the format you can import
in TranslationManager .
External new terms lists and external found terms lists
must be created in an SGML format to import them.
External exclusion lists are created without SGML tags.
If you want to create an exclusion list outside of TranslationManager you
can write a list of terms in an editor of your choice, where
each line contains one term, and then import it in external format.
The list can have any number of terms.
For details on importing terminology lists see "Importing a terminology list".
A new terms list requires as first tag in the first line
<NTLIST> and as the very last tag in the last line of
the list the tag </NTLIST>.
The same applies to a found terms list,
except that you must use the tags <FTLIST>
and </FTLIST>.
The description of an entry always starts with the start
tag <TERM> and ends with the corresponding
end tag </TERM>.
The term itself is between the start tag
<LEMMA> and the end tag </LEMMA>.
To add context information to a term, the
context information must have the start tag <CONTEXT>,
and the end tag </CONTEXT>.
Adding context information is optional;
you can include more than one context.
To insert the term address to a terminology
list without context information, your entry would look as follows:
<TERM>
  <LEMMA>address</LEMMA>
</TERM>
When you want to insert the term hardware to a terminology
list with information about two contexts,
your entry would look as follows:
<TERM>
 <LEMMA>hardware</LEMMA>
 <CONTEXT>However, before selecting your hardware devices,

 you should understand your data processing requirements. </CONTEXT>
 <CONTEXT>This publication assists you in selecting

 a hardware configuration. </CONTEXT>
</TERM>
You can insert as much context information as you want,
but each piece of context information needs the start and the end tag.
A new terms list with the entries
hardware,
software,
term,
context
and with some context information
for the first and last entry would have the following layout:
<NTLIST>
 <TERM>
  <LEMMA>hardware</LEMMA>
  <CONTEXT>Your hardware requirements are as follows:</CONTEXT>
 </TERM>
 <TERM>
  <LEMMA>software</LEMMA>
 </TERM>
 <TERM>
  <LEMMA>term</LEMMA>
 </TERM>
 <TERM>
  <LEMMA>context</LEMMA>
  <CONTEXT>The context information must be stored between a start

  and end tag.</CONTEXT>
 </TERM>
</NTLIST>
You do not have to sort your entries in alphabetical order.
This is done during importing.
How to import the new list is described in "Importing a terminology list".
Prerequisites
The list window that contains the terminology list
to be deleted is active.
Calling sequence
Select:
- The terminology list to be deleted
- Delete from the File menu
Options and parameters
Before the system deletes the selected list,
it asks you to confirm whether you really want it:
- If you select No, you can leave the delete function.
- If you select Yes, the list is deleted.
Results
If you selected Yes, the list is deleted;
otherwise it remains unchanged.
You can export a terminology list to give it to another user,
for example, another translator who needs
it for the translation of another document.
You can choose to export the list
in TranslationManager or external format.
In order to exchange the data with other TranslationManager users,
select the TranslationManager format.
If you want to pass the
list to another program you should select external format.
When you export in external format the found terms lists
and the new terms lists are exported in SGML format.
You can find a description of this format in
"Creating an external terminology list".
When you export an exclusion list in external format,
it is written as an ASCII coded file.
Prerequisites
The list window that contains the terminology list
to be exported is active.
Calling sequence
Select:
- The terminology list to be exported
- Export... from the File menu
For an exclusion list,
the Export Exclusion List window is displayed
(see Figure 44).
Figure 44. Export Exclusion List window
Options and parameters
Depending on the format selected,
this window offers a different number of options and
parameters:
For exporting in TranslationManager format, specify the following:
- Format
- Select TranslationManager
- To
- Select the drive to which you want to export
the terminology list.
For exporting in external format, specify the following:
- Format
- Select External
- To
- Specify the needed parameters where to store the
terminology list and
select the drive to which you want to export the list.
- Name
- Define the file name for the exported list.
- Current directory
- Displays the directory selected
from the Directories list box.
- Directories
- Contains all available directories on the drive selected.
Select the directory where to store the exported list.
To start the exporting function,
select Export.
Results
The selected terminology list is now exported in the selected format.
The file in the internal format can only be used by TranslationManager users.
The file in the external format can be used or changed
by other applications.
In "Creating an external terminology list" you find a description
of how to work with external lists.
If a terminology list has been created by another TranslationManager user,
you must import it to make it available in TranslationManager .
Prerequisites
- To import a new terms list, the
New Terms Lists window must be active.
- To import a found terms list, the
Found Terms Lists window must be active.
- To import an exclusion list, the
Exclusion Lists window must be active.
Calling sequence
Select Import... from the File menu
For an exclusion list,
the Import Exclusion List window is displayed
(see Figure 45).
Figure 45. Import Exclusion List window
Options and parameters
Depending on the format selected,
this window offers a different number of options and
parameters:
For importing in TranslationManager format, specify the following:
- Format
- Select TranslationManager .
- From
- Select the drive from which you want to import
the terminology list.
When you have selected a drive
the terminology lists are
automatically displayed in the list box.
Select the list you want to import.
- To list
- Type the name under which you want the data stored in TranslationManager .
For importing in external format, specify the following:
- Format
- Select External.
- From
- TranslationManager needs information where the terminology list
to be imported currently resides:
Select the drive where the external list is stored.
- Name
- Type the name of the external list.
- Current directory
- Displays the directory selected
from the Directories list box.
- Directories
- Select the directory containing the external terminology list
from the list of directories on the selected drive.
- Files
- Select the file name of the external terminology list
from the list of names in the currently selected path.
- To list
- Type the name under which you want the data stored in TranslationManager .
To start the importing function,
select the Import button.
Results
The terminology list is stored in TranslationManager and can be
used for further processing.
You open a list to work with it,
for example, to copy entries from the terminology list
to a dictionary or to another list.
Prerequisites
The list window that contains the terminology list
to be opened is active.
Calling sequence
Select:
- The terminology list to be opened
- Open from the File menu
One of the following windows is displayed,
depending on the type of list selected:
- Work with Found Terms List
- Work with New Terms List
- Edit Exclusion List
See Figure 46,
the Work with New Terms List window,
as an example.
The Edit Exclusion List window
is explained in "Editing an exclusion list".
Figure 46. Work with New Terms List window
Options and parameters
In the list box you see the terms contained in
the opened new or found terms list.
- View
- The meaning of the processing symbols in this row is
as follows:
- All
- Shows all terms in the list.
- Dot
- Shows all terms not marked for any processing.
- Trash can
- Shows all terms marked for delete.
- Dictionary
- Shows all terms marked for dictionary.
- No Entry
- Shows all terms marked for the exclusion list.
The contents of the list box depends
on the processing selected for the terms
and the processing symbol selected in this row.
You can select and mark one or more terms in order to
specify the processing:
- Mark for delete
- Select this button to remove this term from the lists.
- Mark for dictionary...
- Select this button to add this term to a dictionary.
This takes you to the
Mark Term for Dictionary window
where you specify further parameters
and then return to this window
(see "Marking a term for a dictionary").
- Mark for exclusion list
- Select this button to add this term to an exclusion list.
You can select the exclusion list to be filled from the list box,
which contains all available exclusion lists.
You can also enter a new name for an exclusion list
in order to create a new one.
- Unmark
- Click on this option to unmark a previously
marked term.
The view symbol preceding a term represents
the processing you have selected for it.
To begin the processing of the selected terms,
you click on Process.
If you marked any term to add to a dictionary,
you can specify more options in the
Mark Term for Dictionary window
(see "Editing a dictionary entry").
When the processing is completed,
the list contains the remaining terms for which no
processing was specified.
The marked terms need not be processed immediately.
To save the list in its current status of marking,
click on Save.
To leave the terms list in its original status,
click on Cancel.
Results
If you selected Process,
the terminology list is changed depending on your selections.
If you made changes to any dictionary or exclusion list,
they are active during the next analysis or translation
of a document.
If you selected Save,
the terminology list is saved including the new processing marks.
If you selected the Cancel button,
the terminology list remains unchanged.
You can mark new terms and found terms to add them to a dictionary.
You do this by clicking on
Mark for dictionary... and
Process
in one of the following windows:
- Work with New Terms List
- Work with Found Terms List
The Mark Term for Dictionary window is displayed
(see Figure 47).
Figure 47. Mark Term for Dictionary window
Options and parameters
- Term
- The current term from the terminology list is displayed.
- Translation
- Optionally, enter the translation for the term
to be copied to the dictionary.
- Add context information to dictionary entry
-
If you have created the terminology list with context
information, this information is copied to this field.
You can also enter your own context information.
To save the context information to the
dictionary, mark the checkbox.
- Dictionary
- The list box contains all available dictionaries.
Select the dictionary where you want the term to be added.
To save the processing information for this term,
click on Mark.
To skip the current term,
select the Skip button.
If several terms are marked for the dictionary, the next term
is displayed in the Term field.
If all marked terms were displayed, you are returned to the
previous window.
Results
The selected term is prepared for addition to a dictionary.
When all terms marked for dictionary are processed,
you can add more information, depending on the
structure of the selected dictionary in the
Edit Entry in Dictionary window.
You can find more information about editing entries in dictionaries in
"Editing a dictionary entry".
When you have opened an exclusion list,
the Edit Exclusion List window is displayed.
Options and parameters
The list box contains terms from the selected exclusion list.
- To change a term, overtype it.
- To add a term, press Enter
and type a term in the empty line.
- To delete a term, mark it and press Enter.
Clipboard operations (cut, copy, paste) are supported.
- Save to
- Displays all the exclusion lists to which terms
can be saved. Select an existing exclusion list
or overtype it with another name (to create a new list).
To save the terms in the selected exclusion list,
select the Save button.
To leave the exclusion list in its original status,
select Cancel.
Results
If you selected Save,
the exclusion list is changed depending on your selections.
If you made changes to the exclusion list, they are
active during the next analysis of a document.
If you selected Cancel,
the exclusion list remains unchanged.
To do paperwork on terminology lists,
you can print them on the printer attached to your workstation.
Prerequisites
The respective list window that contains the terminology list
to be printed is active.
Calling sequence
Select:
- The terminology list to be printed
- Print... from the File menu
The printing function is started immediately.
The respective list window remains displayed.
Options and parameters
None.
Results
The selected terminology list is directly routed to
your attached printer.
The first line of the printout contains the type of
terminology list and the list name.
Then the contents of the list follow.
Each entry is printed in a separate line.
If your list contains context information it is also printed.
For all types of terminology lists, the system keeps
some view details that can be displayed
in the corresponding list window.
These details are:
- Name
- The name of the list.
- Drive
- The drive the list resides on.
- Last Update (Date)
- The date when the list was last changed.
- Last Update (Date + Time)
- The date and time when the list was last changed.
- Size
- The number of bytes that the list occupies on your disk.
You can toggle between two display modes:
- Display the names only
- Display selected details
You can change the arrangement of the details
of terminology lists
in the Change Details window
described in "Viewing and changing the details of a list item".
TranslationManager can handle documents created by the most
popular word-processing systems and a wide
range of other document types.
Documents usually are a mixture of text and layout information,
which describes the formatting of the document.
This layout information is called markup data.
It defines for example,
the start of a new page,
the start of a paragraph,
or character layout
like boldness, italics, or underline.
In most of the word-processing systems
that display a text in WYSIWYG mode
(What You See Is What You Get),
you usually do not see this markup
but only its effects.
Some systems allow you to display and check
the markup data,
for example in WordPerfect with the Reveal codes option.
In other systems that generate the formatting printout
in a separate step,
you usually edit the markups yourself.
The table that stores the description of the markup data
is called markup table in TranslationManager .
TranslationManager needs this markup table to differentiate
between the text to be translated and the markup data.
Markup tables are used
- During analysis to divide the document
into translatable and non-translatable parts
- During translation to protect the markup
information, so that translators are warned if they
try to overtype it
It is important for you to know which markup table is
to be used for which type of document.
You must tell
TranslationManager what kind of markup table should be associated
with a folder or a document.
For more information on associating
a markup table with a document see either
"Viewing and changing the properties of a document",
or "Importing a document".
For information on associating a folder with a markup table,
see "Creating a folder", or "Viewing and changing the properties of a folder".
The association of a document or folder with a markup table
is essential because the different word processors have
different layout descriptions.
All these layout descriptions are understood by TranslationManager
and processed in a general way.
The following table shows
the available markup table names
and the supported document types.
| Markup table
| Type of document
|
| EQFAMI
| AmiPro texts (AmiPro for
Windows, Version 2.0)
|
| EQFAMRI
| Windows resource texts (format complying with ANSI)
|
| EQFASCII
| ASCII texts
|
| EQFASM
| Assembler documents
|
| EQFBOOK
| BookMaster and Information Presentation Facility (IPF) texts
|
| EQFHTML2
| HTML texts (level 2.0)
|
| EQFMRI
| OS/2 resource texts
|
| EQFRTF
| Rich Text Format (RTF) files coming
from Word for Windows, AmiPro, or other word processors
|
| EQFWORD
| Word for Windows texts (Version 2.0)
|
| EQFWORD6
| Word for Windows texts (Version 6.0)
|
| EQFWP
| WordPerfect texts (Version 5.0)
|
| EQFWP6
| WordPerfect texts (Version 6.0 and 6.1)
|
TranslationManager allows you to add more formats.
For detailed information on creating external markup tables
see "Creating a markup table", and
Appendix E. "What you can do with external markup tables".
For information on how to use the markup tables
and how to prepare the different document types for translation,
see "Dealing with specific document formats".
Markup tables can be exchanged with other users or applications.
This may be necessary, when you have changed a markup table
for your special translation needs and another translator may
want to share your changes for similar translation environments.
To give the markup table to someone else you must transfer
it out of TranslationManager .
This process is called export.
The recipient must import the exported markup table
into TranslationManager again.
Markup tables can also be exchanged via exported folders.
When you export a folder with a document using a specific
markup table, this markup table is included in
the exported folder and can be loaded implicitly during folder import
in the recipient's system.
If you want to change an existing markup table,
you have to export it.
The exported file can be changed with any text editor.
The changed file can be imported into TranslationManager ,
either under the old name or a new name of your choice.
If you want to create a new markup table you must do this outside
the TranslationManager program and use the specific format for
markup tables.
Once you have generated the table, you can import it into
TranslationManager and start using it for your translations.
Start the functions related to
markup tables from the Markup Table List window.
Prerequisites
None.
Calling sequence
Select Utilities from the
Display markup table list menu
The Markup Table List window
is displayed.
The window contains all existing markup tables in your system.
Most of the actions related to markup tables can be started
by selecting a list name and an action
from the File menu, such as
Delete,
Export...,
or Import....
A markup table can only be changed in external format.
If you change a markup table,
make sure you are familiar with the
SGML format of markup tables.
See Appendix E. "What you can do with external markup tables"
for the format of markup tables.
Before you change a markup table provided by TranslationManager ,
it is recommended to make a backup copy of the original version
because the original markup tables cannot be reinstalled.
A markup table can only be created in external format.
If you change a markup table,
make sure you are familiar with the
SGML format for markup tables.
See Appendix E. "What you can do with external markup tables"
for the syntax and semantics of markup tables.
You can also base a new markup table on an existing one.
To do this, export an existing markup table
that already contains a correct SGML syntax,
then change the markup data in this file with
any text editor.
The changed file can be imported into TranslationManager .
TranslationManager detects syntactical errors during import.
The external markup table can be imported
either under the old name or a new name.
As the original markup tables provided by TranslationManager
cannot be reinstalled,
it is recommended to make a backup copy
before you change them.
If you no longer need a markup table,
you can delete it.
For markup tables provided by TranslationManager ,
it is recommended to create a backup copy by exporting the table,
because it cannot be reinstalled separately
but only by a system reinstallation.
Prerequisites
- The Markup Table List window must be active.
- The markup table to be deleted must be selected.
Calling sequence
Select File from Delete menu
Options and parameters
Before the system deletes the selected markup table,
it asks you to confirm whether you really want to delete it.
If you select No, you will leave the delete function.
If you select Yes, the markup table will be deleted.
Results
If you selected Yes, the markup table is deleted.
Otherwise it remains unchanged.
References to this markup table may still
exist in certain folders.
Update the folder properties so that the
deleted markup table is no longer associated with a folder.
You can export a markup table to give it to other
users, for example, other translators who must use the same
modified markup table in their translation environment.
Markup tables can only be exported in external format.
Each markup tag described in the markup table
is exported together with its nondefault data.
You can find a table containing the definition of markup
table SGML tags and the data defaults that are used for TranslationManager
in Appendix E. "What you can do with external markup tables".
Prerequisites
- The Markup Table List window must be active.
- The markup table to be exported must be selected.
Calling sequence
Select Export... from the File menu.
The
Export Markup Table window is displayed.
Figure 48. Export Markup Table window
Options and parameters
- Format
- External is selected automatically.
- To
- Enter the required parameters where to store the exported
markup table:
Select the drive to which you want to export the markup table.
- Name
- Define the file name for the exported markup table.
- Current directory
- Displays the directory selected
from the Directories list box.
- Directories
- This list box contains all available directories
on the selected drive.
Select the directory where to store the markup table.
To start the exporting function,
select the Export button.
Results
The selected markup table is exported to the specified
file and saved on the selected drive and directory.
If another user has prepared a markup table for
your translation environment, you must import it
in order to be able to use it in TranslationManager .
Markup tables can only be imported in
external format.
Prerequisites
The Markup Table List window must be active.
Calling sequence
Select Import... from the File the menu
The Import Markup Table window is displayed
(see Figure 49).
Figure 49. Import Markup Table window
Options and parameters
- Format:
- External is selected automatically.
- From
- Specify where the markup table
to be imported currently resides and
select the drive where the external markup table is stored.
- Name
- Type the name of the external markup table or select the name
from the following list boxes.
- Current directory
- Displays the directory selected
from the Directories list box.
- Directories
- Select the directory containing the external markup table
from the list of directories on the selected drive.
- Files
- Select the file name of the external markup table
from the list of names in the currently selected path.
-
- To markup table
- Type the name under which you want the data stored in TranslationManager .
To start the importing function,
select the Import button.
Results
The markup table is now available in TranslationManager ,
you can start to associate it with documents or folders.
Language-support files are monolingual morphological data files.
With TranslationManager they are used to perform:
- Stem reduction
during dictionary lookup of terms in original documents.
When an original document contains the English
word bought, for example, TranslationManager actually looks up the
infinitive form of the verb, buy, in the dictionary.
The English (U.S.) language-support file contains the information
necessary to associate bought with buy.
- Compound separation
during dictionary lookup of terms in original documents
for all Germanic languages.
When an original document contains the German word
Autoradio (car radio), TranslationManager looks up
Autoradio.
If it does not find this compound, it decomposes it
and looks up its parts Auto and Radio.
- Text segmentation
into sentences, including
recognizing abbreviations in the original documents.
A paragraph of text is divided into sentences during
analysis to allow a sentence-by-sentence translation.
- Spellchecking
of translated documents.
For translations from a given source language, you must
install the corresponding language-support file.
For translations into a target language, the installation of the
language-support file is optional
unless you need to check the spelling
of the target file.
The Language List window contains
lists of all the language-support files available in TranslationManager
and their current installation status.
Prerequisites
None.
Calling sequence
Select
Display language list from the Utilities menu
The Language List window
is displayed.
Options and parameters
None.
Results
The Language List
window shows all available languages and their current status.
The State column indicates
whether the language-support file
for the respective language is installed (indicated by
active or inactive).
There are several reasons for a language being shown as inactive:
- It is not included in your base package.
- It is included in your base package, but you did not install it.
- It is included in your base package and you installed it, but you
subsequently deleted it because you had no need for it at that time.
If you need a language-support file
for any of the languages supported
by TranslationManager , you can install it on top of your current installation.
If you translate into languages for which
language support is not available, such as Hungarian,
you cannot check the spelling of the translated documents.
Language-support files can be installed, extended, or deleted.
For a list of supported source languages see "What you get from IBM".
You can delete a language-support file when you no longer need it.
You may want to do this, for example, if you no longer translate
from or into this language.
Prerequisites
None.
Calling sequence
Select:
- Display language list from the Utilities menu
- The language-support file to delete
- Delete from the File menu
Options and parameters
Before TranslationManager deletes the selected language-support file, you
are asked to confirm your request:
- Select Yes to delete the language-support file.
- Select No to cancel the delete request.
Results
If you select Yes, the language-support file is
deleted.
Otherwise, it remains unchanged.
A reference to this source language may still exist
in certain folders, dictionaries, and Translation Memory databases.
Update the respective properties so that
the deleted language-support file is no longer referred to.
Occasionally, documents contain words
with a spelling not recognized by TranslationManager
although you consider them spelled correctly.
Such words can be added to an addendum
of the respective language support and are then accepted
by the spellchecking function.
For more information, see "Spellchecking a document".
Select the language-support files for the
languages you normally work in during the initial
installation of TranslationManager .
If you subsequently need to install additional language-support files,
refer to "Installing more language-support files" for details of how to do so.
If you need to translate from a language that is
not included in the list of currently supported languages,
contact your local IBM representative
and ask about the availability
of new language-support files.
The list of target languages includes all languages for which
language-support files exist, and certain other languages
that are supported by OS/2 or Windows.
If you want to translate into other languages, select Other
Languages from the list of languages.
TranslationManager comes with sample translation material
that you can use for practising.
The samples are contained in folders
to help you become familiar
with the concepts
of file organization
and navigation in TranslationManager .
The installation of the sample folders is a selectable
component in the installation procedure (Samples).
You can use these folders in addition to the
folders referred to
in A Quick Tour and the
Translator's Workbook.
The following table
lists the sample folders you can
select when installing TranslationManager.
| Folder
| Format
| Original
| Translation
|
| SAMPLAMI
| Ami Pro
| English(U.S.)
| Spanish
|
| SAMPLPRT
| OS/2 resource file
| English(U.S.)
| German(national)
|
| SAMPLRTF
| RTF
| English(U.S.)
| Spanish
|
| SAMPLWP
| WordPerfect
| English(U.S.)
| Spanish
|
| SAMPLW4W
| Word 2.0
| English(U.S.)
| German(national)
|
| SAMPLE1
| BookMaster
| English(U.S.)
| German(national)
|
| SAMPLE2
| OS/2 program file
| English(U.S.)
| German(national)
|
| SAMPLE3
| BookMaster
| English(U.S.)
| Italian
|
| SAMPLE4
| BookMaster
| English(U.S.)
| Spanish
|
| SAMPLE5
| BookMaster
| English(U.S.)
| French(national)
|
| SAMPLE6
| BookMaster
| German(national)
| English(U.S.)
|
| SAMPLE7
| BookMaster
| English(U.S.)
| Japanese
|
| SAMPLE8
| BookMaster
| English(U.S.)
| Russian
|
| SAMPLE9
| BookMaster
| English(U.S.)
| Arabic
|
| SAMPLE10
| BookMaster
| English(U.S.)
| Polish
|
Each sample folder contains several documents, a
dictionary, and a Translation
Memory specially prepared for demonstration purposes.
The SAMPLE1 folder, for example, contains:
- Two small documents called DEVICE.SCR and TRANS.SCR
- A small English(U.S.) to German(national) dictionary called SAMPLE1
- A small Translation Memory SAMPLE1
The text of the sample documents is the same for all formats,
except:
- SAMPLE2 contains OS/2 program files
- SAMPLPRT contains a sample dictionary for printing
The document DEVICE.SCR is already analyzed,
the document TRANS.DOC is not analyzed.
To install the sample folders, select the
Samples option during installation.
The installation procedure prepares the folders
for subsequent import and use.
TranslationManager
performs a morphological stem reduction
so that you can look up terms in the
original document
and check the spelling
in translated documents.
To use these features with the material in a sample folder,
you must first install the appropriate language-support files
for the source and target languages.
For example, to use folder SAMPLWP you
must install the English(U.S.) language-support file because
the original sample documents are in English.
To check which language-support files have been installed,
select Display language list from the
Utilities menu of the TranslationManager workbench.
State active tells you that a language has been installed.
To have TranslationManager
check the spelling of a translated document,
you must install the language-support file for the
target language.
For example, for SAMPLWP the Spanish language-support file
must be installed.
To study the material in one of the sample folders, import
it first.
You can then open a document.
The Translation Environment is displayed and you can start to
translate the document.
From the Dictionary window you can also look up terms in the
supplied sample dictionary, and from the Translation Memory
window you can copy entire sentences.
During translation, sentences you translate are added to the
sample Translation Memory.
To return a sample folder to its
initial status, delete the associated dictionary,
Translation Memory, and folder.
Then import the folder again,
as described in "Installing a sample folder".
Otherwise, if you only import the folder again,
the contents of the initial
and updated folders are merged.
To see samples of SGML-based files for data exchange,
you can export a sample dictionary or a sample Translation Memory
in external format.
The following describes a number of tasks related to
working with the sample material.
They contain short overviews of how to proceed and references to the
detailed task descriptions to be found elsewhere in this book.
If you no longer need any of the sample material, for example,
because you are
translating other document types or because you are
now sufficiently familiar with it,
you can delete selected sample folders.
For details of how to delete parts of the samples, see:
To remove the sample folders from your disk entirely, see
"Deleting an exported folder".
To import a sample folder and to start a translation exercise
is described using the folder SAMPLE1 as an example.
Prerequisites
- The samples must have been installed.
- The language support file for English (U.S.)
must have been installed.
Calling sequence
- Select the Folder List window.
- Select Import...
from the File menu.
The Import Folder window is displayed.
- Select the drive where TranslationManager is installed, for example,
C.
The Folder list box displays all folders that can be
imported.
- Select SAMPLE1 from the Folder list box.
- Click on Details....
This displays the note that is attached to SAMPLE1.
- Click on OK
to leave the Folder Details window.
- Click on the destination drive where you want to store
SAMPLE1.
- Click on Import to begin importing the folder.
Several windows are displayed
showing the progress of the import procedure.
- Click on OK
when you have read the completion message.
This takes you back to the TranslationManager main window.
- Double-click on folder SAMPLE1
in the Folder List window.
The Document List window is displayed.
- Double-click on DEVICE.SCR in the
Document List window.
The Translation Environment is displayed
and the document appears
in the Translation window ready for translation.
Results
The folder SAMPLE1 is imported into TranslationManager .
The analyzed document DEVICE.SCR is opened.
You can start translating it.
Usually, the sample material is installed during the initial
installation of TranslationManager .
If you want to install the sample material later,
refer to "Reinstalling TranslationManager".
Before documents can be translated, TranslationManager analyzes them to
prepare them for translation.
The DEVICE.SCR documents have already been analyzed.
The TRANS.DOC documents are analyzed automatically
when you open them, or you can explicitly select one of
the analysis functions.
After importing and opening a document, you are taken to the
Translation Environment, where the following windows are displayed:
- The Translation window
- The Translation Memory window
- The Dictionary window
The document DEVICE.SCR contains one chapter of a complete
book.
Other document files of the book have been translated already, that
is, a Translation Memory exists for them.
When you translate a sample document, remember that you can stop at
any point in the session by:
- Double-clicking on the system menu icon of the Translation Environment
- Selecting Close from the system menu
To copy a proposal from the Translation Memory into the
Translation
window, press and hold down the Ctrl key and
type the number of
the required proposal.
To copy a proposal from the Dictionary window into the
Translation window, press
and hold down the Ctrl key and
type the letter of the required proposal.
You can edit the translation document file in either
insert or replace mode.
If the suggested translation contains special characters that are not
available on your keyboard, ignore them or type other
characters instead.
�