Custom folder views are only available if
you've set your browse windows to work in Web-style Integration Mode. Click here for
details on setting Web-style integration mode.
|
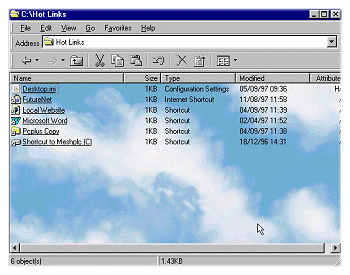
| Giving a folder a custom
background image. 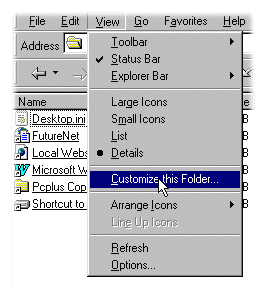 To customise a folder, browse your way to it
in a browse window or Windows Explorer, then choose Customise this Folder from the
window's View menu. (Note - the customisation you set applies only to the current
folder). To customise a folder, browse your way to it
in a browse window or Windows Explorer, then choose Customise this Folder from the
window's View menu. (Note - the customisation you set applies only to the current
folder).
|
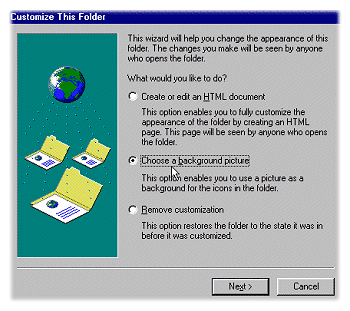 This opens the Customize this Folder Wizard. To add
a background image, click the Choose a background picture button and press Next
>. This opens the Customize this Folder Wizard. To add
a background image, click the Choose a background picture button and press Next
>. |
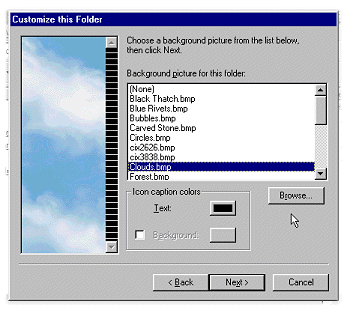 The next page of the Wizard offers you a list of BMP
(bitmap) images to use as backgrounds for this folder (it's the same list as you're
offered for choosing Windows wallpaper). The next page of the Wizard offers you a list of BMP
(bitmap) images to use as backgrounds for this folder (it's the same list as you're
offered for choosing Windows wallpaper).Alternatively, press Browse
to search for other pictures. You can choose JPEG and GIF images as well as BMPs.
|
 Press Next> then Finish, and the Wizard
closes. Your folder now displays the background image whenever you open it. Press Next> then Finish, and the Wizard
closes. Your folder now displays the background image whenever you open it.Remember that only this folder has been customised - if you want to customise
other folders, you have to repeat the process in each one.
If you want to change the background image for a folder, just choose
Customise this Folder from the browse window's View menu and follow the Customize
this Folder Wizard through.
|
 You can remove all customisation from a folder by opening
the Customize this Folder wizard then choosing Remove customization. You can remove all customisation from a folder by opening
the Customize this Folder wizard then choosing Remove customization. |
|
| Creating an HTML Web page document to act as a folder's
display template |
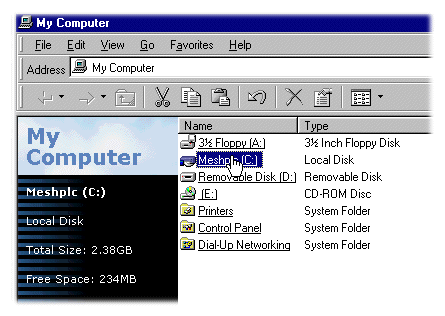 If you've set your desktop to run in Web-style
integration mode, then clicking on the My Computer desktop icon will produce
this new style of display. It's active - as you move the mouse pointer over an item, the
left-hand panel displays information about it, such as the capacity and free space on a
disk drive, or the purpose of the Control Panel folder. If you've set your desktop to run in Web-style
integration mode, then clicking on the My Computer desktop icon will produce
this new style of display. It's active - as you move the mouse pointer over an item, the
left-hand panel displays information about it, such as the capacity and free space on a
disk drive, or the purpose of the Control Panel folder. |
| The
new My Computer display is built into the IE-enhanced Win 95 desktop, but you can do
something similar to your own disk folders by creating HTML files which act as display
templates. When you open a template-equipped folder, the browser reads the HTML file
and displays that alongside the regular view.
 Because the file contains applet code to retrieve the names and details of
the files in the current folder, it's able to display information about them as well as
whatever custom content (text, images etc) that you've 'authored in' in the normal way.
The file information is displayed dynamically in an area on the left of the display,
showing size and other information about the currently selected item within the folder. Because the file contains applet code to retrieve the names and details of
the files in the current folder, it's able to display information about them as well as
whatever custom content (text, images etc) that you've 'authored in' in the normal way.
The file information is displayed dynamically in an area on the left of the display,
showing size and other information about the currently selected item within the folder.
If all that sounds horribly complicated, don't worry - IE 4
generates the basic HTML for you, including the file information applet code. It even
loads the FrontPage Express Web page editor for you with the new file in place. All you
have to do is add your custom content.
|
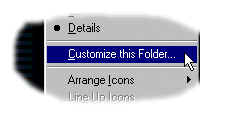 To customise a folder with an HTML file, browse your way
to the folder then choose View...Customize this folder... from the menu bar. To customise a folder with an HTML file, browse your way
to the folder then choose View...Customize this folder... from the menu bar.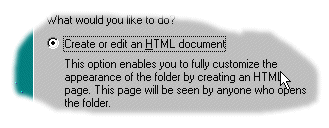 This
opens the Customize this r Wizard. This time choose Create or edit an HTML
document. This
opens the Customize this r Wizard. This time choose Create or edit an HTML
document.
|
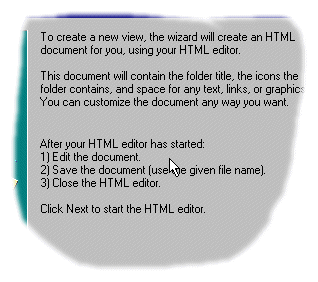 Click Next>, and the Wizard shows you an
information page describing the HTML page editing process. Basically it's simple - the
Wizard will load the FrontPage Express editor with the skeleton page in place, you make
whatever changes to it you want, then save it and exit FrontPage Express. Click Next>, and the Wizard shows you an
information page describing the HTML page editing process. Basically it's simple - the
Wizard will load the FrontPage Express editor with the skeleton page in place, you make
whatever changes to it you want, then save it and exit FrontPage Express.(Note - if you have a different application installed as your default HTML
editor, the Wizard may load that instead of FrontPage Express. Make sure your program
handles HTML extension code for JavaScript and object linking correctly. |
 This is FrontPage Express with a sample HTML file loaded.
You should only make changes within the upper portion of the rectangle on the left (you
won't be able to change anything outside the rectangle anyway). You can, however, enlarge
the upper portion by putting the cursor in it and pressing [Enter]. This is FrontPage Express with a sample HTML file loaded.
You should only make changes within the upper portion of the rectangle on the left (you
won't be able to change anything outside the rectangle anyway). You can, however, enlarge
the upper portion by putting the cursor in it and pressing [Enter].You can add text, images and even hyperlinks to the page.
When you've finished editing, choose File... Save from
FrontPage's menu bar. Don't change the file's name by choosing Save As instead.
Then exit FrontPage (File..Exit from the menu bar), and press Finish to
close the Customize this Folder Wizard. |
| 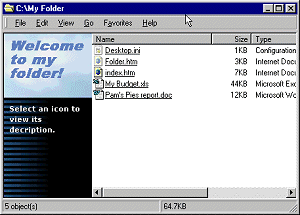 Your folder is now
customised! To edit the HTML file, just follow the Customize this Folder Wizard as
you did to create it - FrontPage Express will be loaded with the latest version of the
file ready for you to edit. Your folder is now
customised! To edit the HTML file, just follow the Customize this Folder Wizard as
you did to create it - FrontPage Express will be loaded with the latest version of the
file ready for you to edit.
Like a background image, the HTML file applies to the current folder
only.
|
|
| You can remove all customisation from a folder by opening
the Customize this Folder wizard then choosing the Remove customization radio
button. |
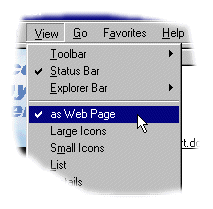 You can switch off the HTML file for a folder (without
affecting any other folders) by browsing to it, then unchecking as Web page on the
browse window's View menu. Check the option to turn the HTML view back on again. You can switch off the HTML file for a folder (without
affecting any other folders) by browsing to it, then unchecking as Web page on the
browse window's View menu. Check the option to turn the HTML view back on again. |
And finally.....
..... Something Completely Unexpected! |
| The IE 4-enhanced desktop has one more
trick up its sleeve, called Thumbnail view. It's ideal for viewing folders which
contain lots of images and HTML Web page sources. |
 Like the other custom views, Thumbnail view is set on a
per-folder basis (when you see it in action, you'll soon see why!) Like the other custom views, Thumbnail view is set on a
per-folder basis (when you see it in action, you'll soon see why!)To use the view, right-click on the folder name in a browser window, and
choose Properties from the pop-up menu. |
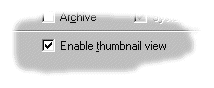 On the folder's Properties dialog, check the Enable
thumbnail view option. On the folder's Properties dialog, check the Enable
thumbnail view option. 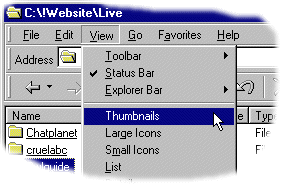 Now open the folder and choose View...
Thumbnails from the menu bar. Now open the folder and choose View...
Thumbnails from the menu bar.
|
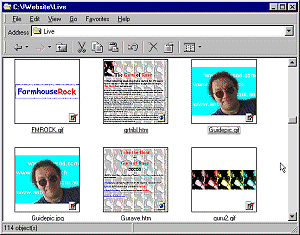 The result is this extraordinary view of the folder's
contents, with not only GIF and JPG images displayed in thumbnail form, but HTML Web page
documents reproduced in miniature too. The result is this extraordinary view of the folder's
contents, with not only GIF and JPG images displayed in thumbnail form, but HTML Web page
documents reproduced in miniature too.The thumbnails work
like icons - click on one to open the file or folder, right-click on it to open its pop-up
menu.
Displaying a folder like this takes time, and everything is redrawn
each time you refresh the view or move in and out of the folder. However for folders where
you keep Web source material, it's a brilliant idea. |
|


 Internet Explorer 4 enables you to customise the views of your disk folders
presented by browse windows and Windows Explorer.
Internet Explorer 4 enables you to customise the views of your disk folders
presented by browse windows and Windows Explorer.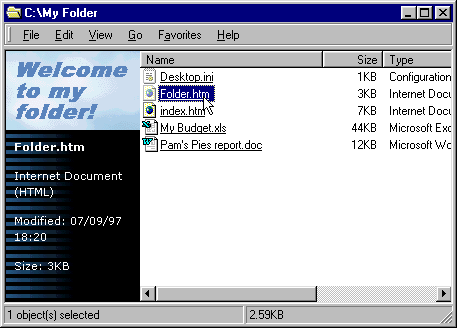
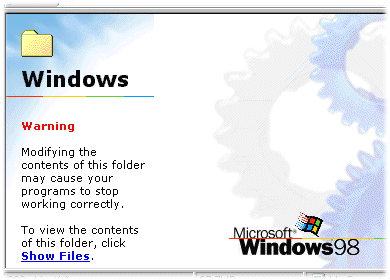
 If you are comfortable with making changes within the Windows
folder and don't have other users who may tamper, then you can stop this page from
appearing every time by un-checking the As Web page icon in the Views drop down menu. This
will only affect the folder that you change, so if you change the Windows folder from
being viewed as a web page and want to change the System folder too, then go to that and
change the view option there.
If you are comfortable with making changes within the Windows
folder and don't have other users who may tamper, then you can stop this page from
appearing every time by un-checking the As Web page icon in the Views drop down menu. This
will only affect the folder that you change, so if you change the Windows folder from
being viewed as a web page and want to change the System folder too, then go to that and
change the view option there.