Visual SourceSafe - Help is Here
By Neil C. Obremski | 03 JUN 2002
The current documentation for Visual SourceSafe is terribly meager, especially as it pertains to playing well with Visual InterDev. After much struggling, trial and error, and reading of particularly vague and useless documents I have written one of my own.
Table of Contents
Remoting
Try to find any mention of remoting to a VSS database over the internet and you'll come up with scraps. If you search on the net you'll come up with many references to the SourceOffsite (SOS) products by SourceGear. Visual SourceSafe's connectivity is very rudimentary (as far as I can tell) and works through standard file system API's (presumably those in the Win32 API). As such it can handle any path that Windows understands, but is also limited in the same regard. In order for you to connect to a VSS database remotely you must be able to see the SRCSAFE.INI file through the standard file system (e.g. through explorer).
I'm currently trying out SourceOffsite to see how well it works, but please note that the Windows 95/98 server program destroys the network-ability of a Windows ME machine after a client from Windows XP attempts to get the database structure. I don't know if the problems are limited to this situation or broader, but it is pretty irritating to say the least.
As for wishful thinking, it'd be cool if there was a program that sat on both a server and clients which emulated a normal windows drive. That way programs such as VSS could enjoy network connectivity transparently. Not to mention how cool it would be to have a secure drive that has been mapped to your home computer from work. Maybe there is such a thing (please note I mentioned the word secure intentionally!) and if there is, let me know!
Interfacing with InterDev
You would've thought they'd tackle this with some simpler approach or at least documented how this works. I've searched the internet for scraps on "InterDev with Visual SourceSafe" and come up with less than satisfying results. I can't guarantee that after you have InterDev and SourceSafe "working" that you won't have problems, but that's your own fault for using InterHell ... er, InterDev in the first place.
InterDev accesses Visual SourceSafe "automatically" through FrontPage Server Extensions which interacts with IIS and then VSS using it's COM API. Supposedly this whole setup is for "robustness", a word I'm sure they felt clever for using as most do. This means that to actually be able to use Microsoft InterDev with source control for any Web Project, you must have Internet Information Services (IIS) installed, FrontPage Server Extensions must be installed, and FrontPage Server Extensions must be configured correctly.
This section assumes you'll be working on a development machine that is different from the one where the actual Visual SourceSafe database is located; and that you want to use InterDev to edit and test files locally before checking them in to that remote server. You may take creative freedoms with my instructions to better suite your needs, but I won't guarantee they'll work. Heck, I can't even guarantee these will work for you if you have the correct situation.
I must also put in a note here on using multiple Visual SourceSafe databases. If you want to use multiple (more than uno) Visual SourceSafe databases with InterDev web projects on a single machine then you're fully screwed. If you have one SourceSafe database for web projects and one or more that you want to access without using InterDev web projects, you should be okay. In this latter case you'll just have to use the normal Visual SourceSafe client program to switch between and utilize the other databases. IIS, FP Server Extensions, and InterDev are too lame to use anything but a single Visual SourceSafe database.
-
Step 1. Configure Visual SourceSafe
Before anything else you'll need to have your local machine's Visual SourceSafe configured so that it points to the correct Visual SourceSafe database. The typical installation for Visual SourceSafe installs both the server and client components and that's what I'm basing this step on. If you installed Visual SourceSafe from the files on a VSS server (NETSETUP.EXE or something like that), you may have less steps to complete (it may have already done this stuff for you, for all I know).
The first thing you have to do is strip your client's server identity. The API for Visual SourceSafe will not attempt to connect to a remote server by default unless it is configured to do so. Luckily the people who designed this program did not make any configuration utility so you get to do it by hand (yay!) by editing the SRCSAFE.INI file in your Visual SourceSafe directory.
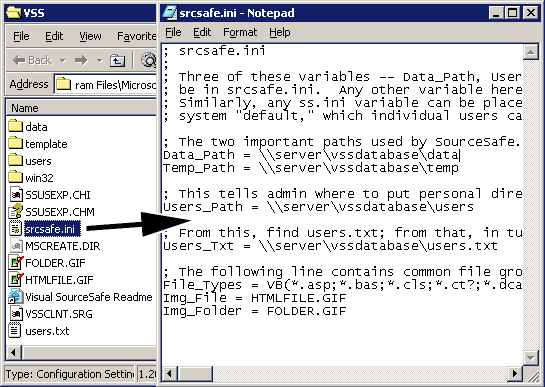
Open this file up and change the Data_Path, Temp_Path, Users_Path, and Users_Txt to point to the correct places on your remote server using UNC paths. For example:
		Data_Path = \\server\vssdatabase\data

		Temp_Path = \\server\vssdatabase\temp

		Users_Path = \\server\vssdatabase\users

		Users_Txt = \\server\vssdatabase\users.txt
Technical Note: From reading the knowledge base docs (see References) there is at least one other way to configure VSS to connect to a remote server. What you do is point the "SSCServerPath" value in the registry (under "HKEY_LOCAL_MACHINE > SOFTWARE > Microsoft > SourceSafe") to the location of the "SSSCC.DLL" file on the server (using a UNC path). The API then realizes it's a remote server and accesses the "srcsafe.ini" in the parent directory of that path. Note that the "API Current Database" and "Current Database" values aren't consulted for this matter ... I've tried. I also wasn't able to test and verify this method because it requires direct access to the server on which the VSS database lives (and I didn't have that when writing this doc).
Step 2. Create Your Local Root
Copy the files in the Visual SourceSafe database to your local machine somewhere. You can do this through whatever file management software (Explorer) you want or use Visual SourceSafe: create a root folder somewhere, open Visual SourceSafe, connect to the server's database (should be able to by default), right click on the main project node in the database, select "Set Working Folder...", choose the folder you created, and lastly right-click and select "Get Latest Version" (make sure "recursive" and "build tree" options are checked).
Step 2. Configure Internet Information Services (IIS)
Open up the properties for the Default Web Site. You can do this by right-clicking on it and selecting "Properties" from the context menu.
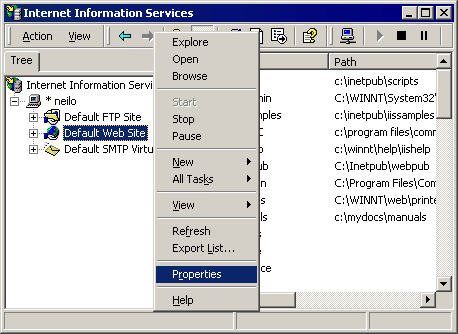
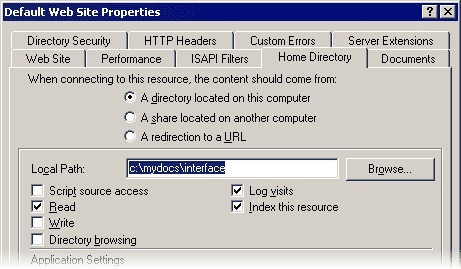
There are three things you now need to set here. First you need to set the home directory to the folder you put all of your web project files in (from the server's Visual SourceSafe database or shadow directory).
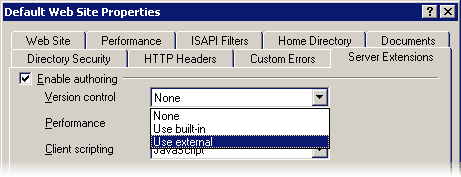
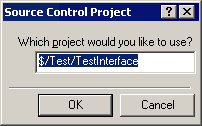
The second thing you need to do is select the "Server Extensions" tab. Here you will find a drop down for "Source control" which you should select "Use External..." from. If you do not see "Use External..." on the list then you haven't properly configured or installed Visual SourceSafe. After selecting this you will be prompted for a VSS path to specify the root project node.
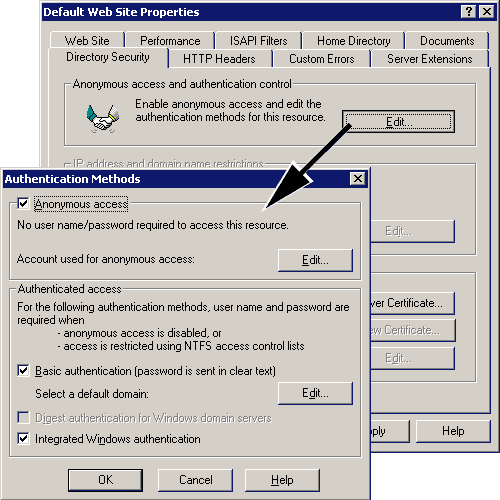
The last thing you need to do is enable Anonymous Access, Basic Authentication, and Integrated Windows authentication. These are check boxes that can be found by selecting the "Directory Security" tab and then clicking the "Edit..." button.
Step 3. Create a Web Project in InterDev
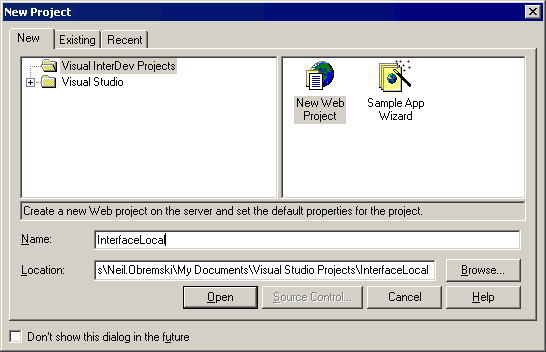
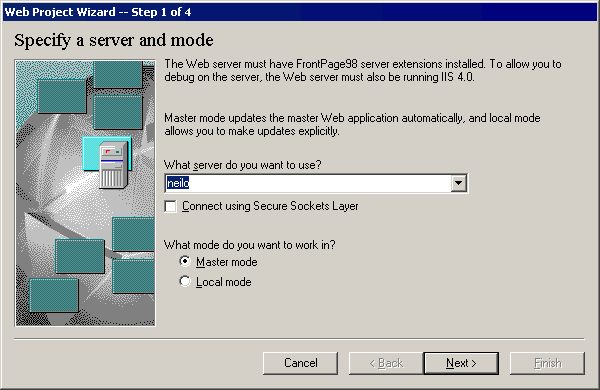
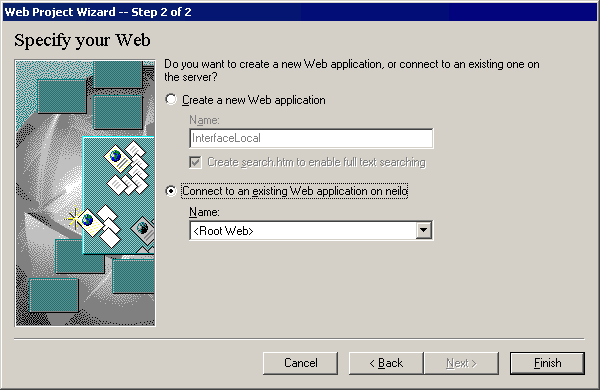
Open InterDev and create a new web project. Name it whatever you want. When prompted for the location of the web project, use your computer's name (since IIS should be running on it). Also select "Master Mode" and connect to the existing project "Root Web". After clicking "Finish" go grab something to drink because it sometimes takes a while to figure out which shoe is on which foot.




Step 4. Clean Up Mess
After the project is all opened up you are practically done. The first time you do all of these steps it will check out all the files under your name and yet won't let you edit them. If this happens open your VSS client and go to the project's root node and do an "Undo Checkout" with the "Recursive" option checked. After that you need to do a "Recalulate Links" in InterDev by right clicking the project node and selecting that option. That also takes a while so go grab yourself another cup of joe.
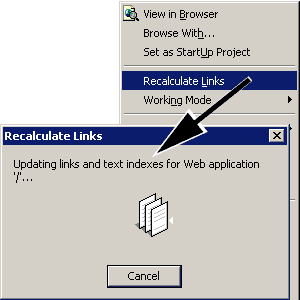
Lastly, I must warn you that InterDev caches a lot of things so what you're working with might not be exactly what's in the Visual SourceSafe database. Things you can do to update/refresh InterDev are running "Recalculate Links" and "Get Latest Version" from the context menu that pops up in InterDev when you right-click a web project.
Appendix I. IIS on Windows 2000
Installing
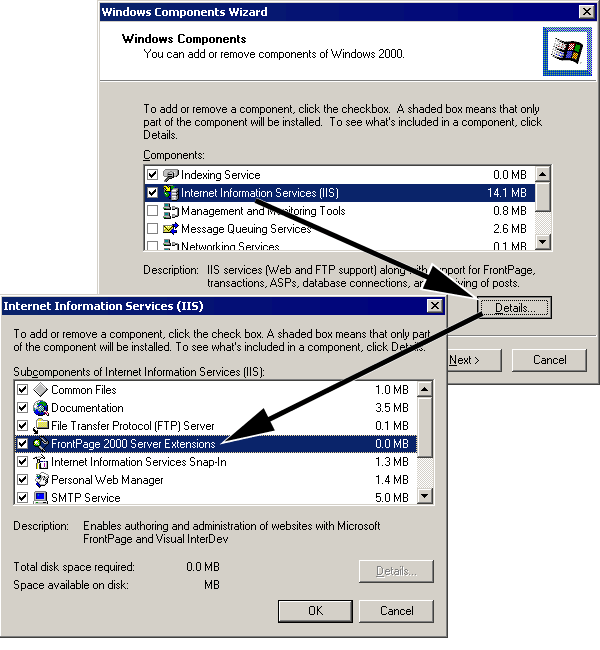
Internet Information Services (IIS) is a Windows Component and thus is not installed via a normal setup program, but through using the "Add/Remove Windows Components":
When installing for using with Visual SourceSafe and Visual InterDev, you must make sure that FrontPage Server Extensions is installed as well:
After installing IIS you can download updates for it from Windows Update.
Configuring IIS
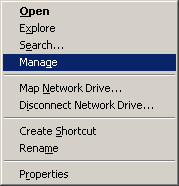
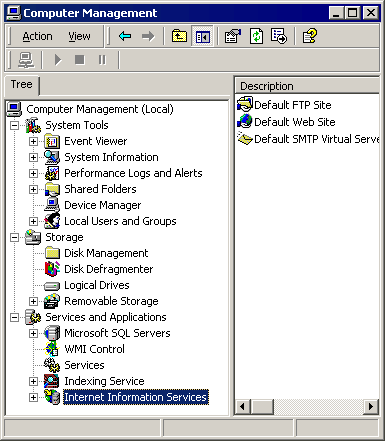
IIS is configured using the Computer Management Console which you can access from the "Computer Management" short-cut in the "Administrative Tools" folder, or by right-clicking "My Computer" and selecting "Manage":
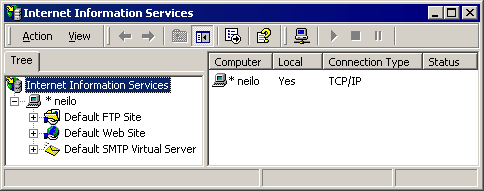
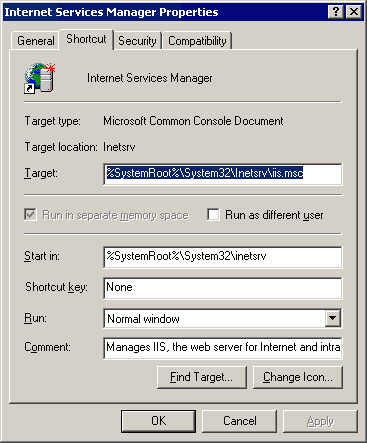
There is also usually a short-cut in the "Administrative Tools" folder which opens up the console with only Internet Information Services and not all the other stuff:


If you don't have this short-cut and wish to create one, just use the following data:
References
- Daniel Holder ... Long term victim of FPSE.
- Microsoft Knowledge Base, Article Q171116: HOWTO: Enable VSS Integration with FrontPage and Visual InterDev
- Microsoft Knowledge Base, Article Q166259: INFO: Visual InterDev/Visual SourceSafe Integration Discussion
Send feedback on this article to webmaster@neilstuff.com. If you want to link to this page, please use the URL "http://www.neilstuff.com/vss/".


