Layers were introduced in Photoshop 3.0. This totally revolutionized Photoshop. For the first time you could do complex compositions easily without having to be a channels guru. I remember before layers, if a client wanted to make changes to a composition, or even change a font you were in big trouble.
There is a lot to layers and they will take some time to master. But they are not that difficult once you understand how they work. In this tutorial I will explain the concept of layers, describe the features and walk you through a simple tutorial. Along the way I will throw in a few cool tips to help you work faster and easier.
Part 1. What is a Layer?
A layer is simply one image stacked on top of another. Imagine I have a piece of paper and I paint it red. Then I take a peice of clear celophaine and paint a yellow circle, and lay it over the paper. Now I take another peice of cellophane and paint some blue type and lay that on top of the yellow circle. I now have a background (red) and 2 layers (yellow and blue.) Just like in the picture below.
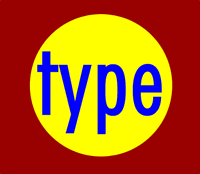
A background with 2 layers.
This is how your image with would look on the screen or when printed.
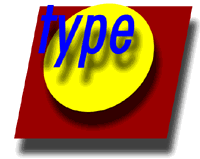
Broken apart so you can see how the layers work
Each layer stacks on top of the previous one.
That is it! The concept of layers is that simple. Photoshop uses the Layers Pallete to allow you to do this with your images. More than one layer is called a composition.
Photoshop's layers Pallete is a powerful tool that allows you do many special things to your layed compositions. Next we will look at the Photoshop 6 layers pallete.