New Column By Colin Smith
Photoshop Nuts 'n Bolts
This week:
Color Modes Demystified


Quick Tips
Want to use RGB Filters while working in CMYK?
As you know some filters like the render filters are disabled in CMYK. Here is a neat tip, work in RGB mode with CMYK preview turned on. CTRL/CMD+Y build your file as normal then when you are finised, convert it to CMYK. This will allow all the filters to work, give you a smaller file size to work on (used 1/4 less memory) and you won't "lose" your colors when you convert it. Only use CMYK for going to a commercial printing press.

Quick Fills -
To fill a layer or selection with foreground color press Alt/Option+delete To fill a layer or selection with background color press Command/Ctrl+delete

Now to get really cool: To fill just the area with pixels hold down the shift key as well as above. This toggles the preserve transparency option.

And press Shift+Backspace to open the fill dialog box

Custom Gradients Made Easy
When you are making a new color gradient and you want to use the same color more than once, don't recreate it. Just hold down the option/Alt key and drag a copy of the slider.

Quick Color Change


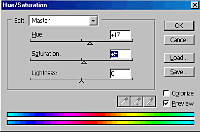
To change the color of an image: press Cmd/Ctrl+U this will open the hue/saturation dialog box, slide the hue slider to change the color. Use the saturation to adjust color intensity. Brightness, to adjust... well the brightness. Click on colorize to add color to a grayscale image or to add a "duotone effect to a RGB/CMYK image. I also like to use the hue/saturation to restore some luster to an image after converting for RGB to CMYK


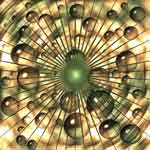
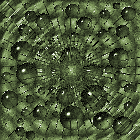
(L) Before and (R) after using the colorize box.


Web Tips

JPEG (Joint Photographic Expert Group) or GIF?
If the image contains large areas of solid color or simple repeating patterns, use GIF

If the image is more complex in color, like a photograph use the JPEG compression. When saving as a JPEG, as a generalization never use more than 40 compression.

Did you know if you apply a Gaussian blur to the image you can reduce the file size further. (I don't recommend more than 1.2 or it will affect image quality too much. Even .8 should suffice)
  Keyboard Shortcuts
Press the [ ] keys to change the brush size. If you hold the shift key down and go [ the brush will get softer and ] harder to a total of 5 different levels of softness. Try it, it rocks. Works for a bunch of tools.
Bring up the Free Transform tool - Ctrl/Cmd +T. Scale and rotate by dragging the handles. Right click (Cmd Clk Mac) and now you can do lots of cool things like skew and distort.
To hide the selection - "marching ants" press Ctrl+H (Command+H) This also works to hide the highlight on the text on 6.0. Now you can preview the color of the text.

To select all pixels on a layer: In the layers Palette click on the layer thumbnail while holding down the Cmd/Ctrl key
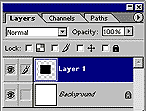

To move a selection to its own layer press CMD+J (Win Ctrl+J) This will copy it.

To cut and move a selection press Shift+Cmd+J (PC Shift+Ctrl+J)

Sucking out all the color
Press Shift+Cmd/Ctrl+U to remove all the color (Desaturate) and make your image grayscale while still in RGB mode.

To auto-select a layer Hold down the Cmd/Ctrl key while clicking on it in the main image window

Selection Tips
To constrain a selection to a perfect circle or square hold down the shift key.

To start drawing from the center hold the Alt/Option key

Ever find that you started drawing a selection and you need to nudge it over while you are drawing it? No problem, just hold the spacebar.

Reset Preferences
To fix most problems with the Photoshop Application you simply delete the preference file and restart Photoshop. They have been moved in V6 and can now be found: Windows 98: Windows\Application Data\Adobe\Photoshop\6.0\Adobe Photoshop 6 Settings
Mac: They are in the Adobe folder in System.

Note - you can now reset them on startup by holding down Shift+Alt+Ctrl. And of course on the Mac with Shift+Option+Command

Reducing file sizes and speeding up large images,
Even what you can't see, is effecting your file sizes. If you have imported an image that is larger than your canvas size. Select all and crop. You will be surprised how much you can save. Also delete unwanted layers, they can add up a lot too.

Cloning Vat
Whenever you want to duplicate an image on a layer, (eg. you are putting star-bursts everywhere) Just hold the Alt/Option key and drag.. zap, a duplicate. To keep it aligned, also hold down the shift key as you drag.

Color Modes and formats
For the web use RGB and save as a jpeg if its a photo. If you want tranparency, use gif or png. If you need animation save as a gif. For print use CMYK and save as either a tiff or an eps. For most print purposes 300dpi. To print to an inkjet only, RGB and 150 dpi.

LEGEND
*when you see /use Mac or PC key depending on your platform e.g.. Alt/Option
+ key means hold down more than on key at a time

Always save at 72dpi for the web

When doing text for the web, either use no anti alising or sharp in 6.0. If you use very small type make sure you have wide kerning (space between letters) This will make it a lot easier to read. No point in having a beautiful website if no-one can read it.

One more warning. Be careful with those fancy textured backgrounds. While they may look pretty, they can make your page impossible to read, or at best difficult, and if its too much work, the surfers will go elsewhere (unless you have the formula for turning lead into gold.)


To switch from Photoshop to ImageReady just click the button at the bottom of the tools palette.

In V 6.0 you don't have to save the image, its all automatic. Slick!

When saving in Photoshop use the Save for web option
Photoshop Nuts 'n Bolts.
by Colin Smith
Color Modes Demystified
A simple, real world approach

Welcome to my new column. Here we will be looking at the things that make Photoshop tick. The things that we see in the menus all the time and may not understand what they do. This will be the "Techie column for non Techies." Enjoy

I have had many people ask me, "What are all the different color modes for in Photoshop?" Rather than try and be too technical I will attempt to describe then in a usable way. If you like this article, let me know and I will write one on different file formats.

Bitmap: I would use for some line art in low end situations, doesn't support color on a printing press but background shows through as transparent. Also used for wallpaper on PC computers.

Grayscale: For black, white and shades of gray., When you use this mode all color information is lost. However you must convert to grayscale before you make it a duotone. This mode doesn't support alpha channels.

Duotone: This is when you want to add some depth or color to a b&W image, or just get a trendy effect. A duo tone lets you choose 2 ink colors on your image and will print as a 2 color job on the press. There is also a Tri-tone -which has 3 colors and a quad-tone that has 4. You can produce some very sharp black and white (Grayscale) images with this and it is used in photography books all the time.

RGB: Uses the computers colors (Red, Green, Blue) and is the best option for the web or electronic publishing. Also called additive colors.

CMYK: Color printing presses print with 4 ink colors Cyan, Magenta, yellow and black. If you look at a magazine close up you will see tiny patterns of dots, these dots are arranged in different patterns and sizes to fool the eye into seeing colors that are not really there, e.g. brown etc. This method is used in most full color printing. I would only use this if you are going to a press. The disadvantages are, the image is a third larger than RGB, and you will lose some brightness as CMYK does not support as wide a tonal range as RGB. Also called subtractive colors.

Lab: This is a mode that produces consistent colors across different devices. Used where you need to keep exact colors.


LEGEND
*when you see /use Mac or PC key depending on your platform e.g.. Alt/Option
+ key means hold down more than one key at a time