REFERENCE
 |
GIF Construction Set Professional embodies a great deal of functionality for creating and manipulating transparent and animated GIF files. It's unlikely that you'll find uses for absolutely everything GIF Construction Set knows how to do. It's more unlikely still that you'll want to try to learn everything there is to know about GIF Construction Set in a single session. This document is an encyclopedic reference for all the functions of GIF Construction Set Professional. If you have not already done so, please read the Tutorial and Quick Start documents installed with GIF Construction Set. They will walk you through the basic operation of the software and provide you with step by step procedures for performing the most common tasks that GIF Construction Set is called upon to do. Note that throughout this document you will encounter references to configuring GIF Construction Set and using the Setup dialog. The configuration options and the Setup dialog are discussed in detail elsewhere in this document.
Select About from the Help menu to see the About dialog for GIF Construction Set. If you're evaluating an unregistered copy of GIF Construction Set, you will no doubt be familiar with this dialog. It's worth noting that it will not appear when you exit a registered copy of GIF Construction Set, nor will it talk. The About dialog will tell you which version of GIF Construction Set you're presently using, including the patch number if there is one. This information is important if you have cause to contact us with a bug report or a question about the software.
The Animation Wizard function of GIF Construction Set will build animated GIF files for you without troubling you unduly with the unpleasant internal details of GIF files. It can be accessed by selecting Animation Wizard from the GIF Construction Set File menu, or by clicking on the Animation Wizard magic wand button in the tool bar. Animation Wizard will ask you a few things about how you want your animation to work and where the source images are, and it will then assemble your frames into a GIF file. In creating an animation "from scratch," it’s best to think of yourself as the animation artist, and of GIF Construction Set Professional as the animation camera. It’s your responsibility to create the source images which will form the action in your animation. GIF Construction Set Professional will put them together into a completed animation for you. The Animation Wizard dialog works like a conventional Windows wizard - you can move back and forth through its screens by clicking on the Back and Next buttons. Each screen is set to a default value which will usually be correct. For the curious, the fellow with excessive hair who seems to be looking for a lost contact lens at the left side of the Animation Wizard dialog is from a painting by William Blake entitled "Ancient of Days." When the Animation Wizard dialog appears, click on Next to get started. The first Animation Wizard screen will ask if you want to create a GIF file for use on a World Wide Web page. This actually gives Animation Wizard some guidance about how to choose a colour palette for your GIF file. The second Animation Wizard screen will ask you if your want your GIF file to loop indefinitely or animate once and stop on the last frame. You can change this after you have built your animation if you like. The third Animation Wizard screen will ask you how you want to handle the colour palette for your GIF file. This is easily Animation Wizard’s sneakiest trick question. There's a discussion of palettes in the Tutorial document installed with GIF Construction Set. Here’s what these options mean:
Unless you have a good reason to do otherwise, leave this screen set to Matched to Superpalette. The fourth Animation Wizard screen will let you choose the delay between frames for your animation. This represents the time each image will appear before it’s replaced by the subsequent image in the sequence. For historical reasons - which no one can quite recall the history of any longer - GIF files represent delay times hundredths of a second. A setting of 100, then, represents one second. The delay times of individual images or of your entire animation can be changed after Animation Wizard has created your animation. See the discussion of the Manage function elsewhere in this document. The fifth Animation Wizard screen will let you select the source images for your animation. Click on the Select button to open a File Open dialog. You can select multiple source files at once. When you click on Open, the files you have selected will be added to the file list in Animation Wizard and the File Open dialog will appear again. Click on Cancel when you’re done selecting files. Note that you must select at least two source images to create an animation. You can click and drag selections around the Animation Wizard list box. If you hold down the Shift key when you drop a file name, the name will be duplicated at the dropped location, rather than moved. The final screen of Animation Wizard will appear when you're ready to build your animation. Click on Done. Animation Wizard will load each of your source files and construct your animation. This may take a minute or two. It will display its progress in the status bar at the bottom of the GIF Construction Set Professional application window. When it’s done, it will open a document with your animation in it. You can view your new animation by clicking on the View button. It can be saved to disk through the Save As item of the File menu. It’s likely that the animations you create with Animation Wizard will require some post-production fine tuning. You might want to add transparent elements, move some images around, make some images display for different amounts of time and so on. Once an animation has been opened in a GIF Construction Set Professional document window - whether it got there through the Open item of the File menu, the Animation Wizard or any of the other ways to create animations yet to be discussed - it’s ready for you to work on using the many tools available in GIF Construction Set Professional
Several of the functions in GIF Construction Set – most notably the Banners and Transitions features – have optional anti-aliasing. A term as widely misunderstood as "responsible government" or "bumper-to-bumper warrantee," anti-aliasing can improve the appearance of your graphics if you use it correctly. Alternately, it can just make 'em look out of focus. By default, the pixels used to form images on your monitor are square. They're relatively small, but being square, they render hard lines and the edges of things in a series of steps if the lines in question are not perfectly horizontal or perfectly vertical. These "jaggy" edges look less than wholly professional in some situations. Anti-aliasing improves on the appearance of lines and edges by blending them with whatever they’ve been drawn against, as shown here. 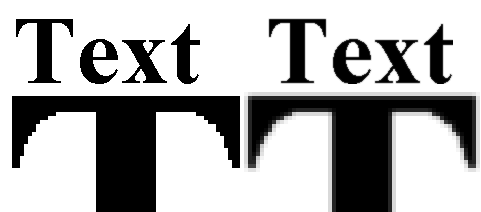 While anti-aliasing will often improve the appearance of graphics with hard lines in them, it does have several notable drawbacks. Because it generates pixels in colours which were not present prior to anti-aliasing, it will typically reduce the effectiveness of the GIF format's already less than stellar compression, creating slightly larger files. It can also reduce the resolution of hard lines, causing them to appear slightly blurred. GIF Construction Set Professional allows for a variable degree of anti-aliasing. You can configure it through the Setup dialog.
The Banners function in the Edit menu of GIF Construction Set creates sophisticated text banners, which can be either still or animated. If you’re interested in creating complex banner advertisements, have at look at the Build Banner Ads that Rock article at our web page. To create a banner, select the Banner item from the Edit menu of GIF Construction Set Professional. The Banner dialog will appear. The tabs at the top of the Banner dialog select the type of special effects to be added to your text. These are:

With the exception of Teletype, Scanners and Wave, all the Banner effects can be used either to create single lines of still text or to create text that rolls in from the right. The Teletype and Scanners effects are always animated. There are a number of parameters to adjust for each of the banner effects. Here’s what they do. Note that not all these parameters are applicable to all the effects - they won’t appear on the tabs where they’re not needed.
You’ll probably want to experiment with the Banner function at length to really get a feel for what it’s capable of. When you’ve entered some text, chosen a banner type and set up its parameters, click on Test to see how your banner will look as an animated GIF file. Click on OK when you’re happy with the banner you’ve created. Your banner will open in a GIF Construction Set Professional document window. You can save it to disk by selecting Save As from the File menu.
The Buttons function in the Edit menu of GIF Construction Set creates beveled button graphics. It can generate these both as GIF files, which will open in GIF Construction Set document windows, and as 24-bit JPG, PNG, PCX, BMP and TGA files through its Export function. GIF Construction Set's buttons can be of any colour you like, using any font in your system.
You can create buttons with either round or square corners. GIF Construction Set will create suitable dark and light colours to simulate the three-dimensional contours of the buttons you specify. Here's what the Button controls do:
A few words about derivative colours: To begin with, you need not read this next bit, and you might be happier if you didn't. Should you do so despite this warning and find that your head hurts, be comforted in knowing that the discomfort will pass as soon as you turn off your computer. In creating buttons, GIF Construction Set will create four new colours to draw with based on the Button Colour and Text Colour values you have specified. The four new colours are called Bright, Dark, Text Shadow and Text Highlight. They're defined as:
Dark = Button Colour * 0.60 Text Shadow = Text Colour * 0.50 Text Highlight = Text Colour * 2.00 That is, the Bright colour is 25 percent brighter than the Button Colour, the Dark colour is 60 percent as bright as the Button Colour and so on. The highlighted areas of a button are drawn in the Bright colour and the shaded areas in the Dark colour. If you find that you don't like these derivative colour values, you can change them. To do so, you must edit the file \WINDOWS\GCSPRO.INI. Use Windows Notepad to open this file, and be sure GIF Construction Set is not running when you do so. Locate the following four lines: ButtonDarkFactor = 60ButtonBrightFactor = 125ButtonTextHighFactor = 200ButtonTextShadowFactor = 50These numbers represent the percentage of brightness for each of the four derivative colours, multiplied by 100. As such, the factor by which the Button Colour is multiplied to derive the Bright colour, 1.25, is represented here as 125. You can experiment with these values – if you choose radically nonsensical values, GIF Construction Set may draw some very strange buttons indeed. Creating clickable buttons: You can include buttons in your web pages which animate when they're clicked. This actually involves creating two button graphics – one for the button at rest, and a second one that displayed when the button is being clicked on. The latter is referred to as the "depressed" button image. Prozak may be required in some cases. 
This example of a clickable button will take you to the graphics tutorial document for GIF Construction Set if you click on it. If you don't see a button here, or if it doesn't animate correctly, your browser either has JavaScript problems or its JavaScript interpreter has been switched off. The graphics below illustrate the two components of a clickable button. The second image was created by copying the first image and then editing out its bevel with the Paint function in the GIF Construction Set Image block editor. The text in the depressed image was moved down and to the right by a few pixels.
You'll also need a bit of JavaScript code to make the button work. It's important to keep in mind that bugs and JavaScript limitations in both Netscape and Internet Explorer prior to version 4.0 may prevent this script from working for users of these older browsers. In addition, some very paranoid users turn off both JavaScript and Java functionality in their browsers for fear of Java viruses. It's a good idea to provide a text link alternative for clickable buttons. The following should appear at the top of your web page:
<script language="JavaScript">
<!--
var RDY=false;
image1=new Image();
image1.src="HTML0043.GIF";
image1on=new Image();
image1on.src="HTML0044.GIF";

function onready(name)   {
        document[name].src=eval(name+"on.src");
}
function offready(name)  {
        document[name].src=eval(name+".src");
}

RDY = true;
function on(name)  {
        if(RDY)onready(name);
}
function off(name)  {
        if(RDY)offready(name);
}
//-->
</script>
It's not necessary to know what all this does. The names of your two GIF button graphics should replace HTML0043.GIF and HTML0044.GIF, above. If you'll be using more than one clickable button on your web page, you can add multiple images, for example: image2=new Image(); image2.src="BUTTON2.GIF"; image2on=new Image(); image2on.src="BUTTON2D.GIF"; Keep in mind that while these examples use upper-case file names, most web pages are designed with lower-case names. File names are not case-sensitive under Windows or DOS – they are under Unix, which is probably what will be running your web page on the web. Here's the HTML code to add a button to your web page:
<a href="GRAPHICS.HTM" onmousedown="on('image1');"
onmouseup="off('image1');" onmouseout="off('image1')">
<img src="HTML0043.GIF" border="0" name="image1"
align="right" hspace=20></a>
Once again, you can change the URL – GRAPHICS.HTM in this case – to point to anything you like, but make sure you use the correct case. Finally, JavaScript programming is a large and fairly complex subject. The code provided here is offered "as is" - while we're pretty sure it's solid, we are unable to provide you with assistance in applying it or modifying it for your requirements.
You can close the current document window in GIF Construction Set by selecting Close from the File menu. If the GIF file about to be closed has had changes wrought upon it since it was last saved, you will be prompted to save the changes. If you exit GIF Construction Set with one or more document windows still open, each one will be automatically closed. This process will also prompt you to save any changed GIF files.
The Colour and Balance function in the GIF Construction Set Block menu will allow you to fine-tune the colour, brightness and contrast of your GIF files. It applies to all the colours in all the images in a file – it always makes global changes to the colours of an animated graphic. The Preview button can be used to preview what you've done. The Reset button will return all the controls to their default positions. In this position, the Colour and Balance function will have no visible effect on your graphics.
To create a blank GIF file, select New from the File menu. A blank GIF file always includes a header block. You can add blocks to a new GIF file with the Insert and Merge functions. The palette for new GIF files is set by the Default Palette item of the Setup dialog.
The Crop function in the GIF Construction Set Block menu will remove the area outside a selected rectangle for some or all of the images in a GIF file. When the Crop window opens, use the left button of your mouse to drag a rectangle around the area you wish to crop. Select Preview from the File menu in the Crop window to see what your cropped animation will look like. Click with the right button of your mouse to abort the Crop function, or select Done from the File menu in the Crop window to accept the cropped area you have defined. To help you better position the crop rectangle for small images, the Crop function will display most images scaled up somewhat in the Crop window. This will not affect your final cropped image, which will appear at its correct scale. In using the Crop function, the Crop dialog will show you the first selected image in the GIF animation being cropped. You can have it show you subsequent selected image by moving the scroll bar at the right side of the Crop window. Be careful in using the crop function – it's fairly easy to crop the first of several frames correctly only to find that subsequent frames used to have things that extended outside the crop area, but don't any longer. Once an image has been cropped, the cropped-off areas are gone for good.
Copying, Cutting and Pasting Blocks You can cut or copy the current block of a GIF file to the Windows clipboard using the appropriate items of the Edit menu. A block copied to the Windows clipboard will have its block structure stored as hexadecimal data defined in OEM text. Plain text and comment blocks will have their text stored as conventional Windows text. Image blocks will have their image information stored as conventional Windows device-independent bitmaps. It's a really bad idea to mess with the OEM text objects copied from GIF Construction Set and then paste them back into GIF files. You can copy a bitmap from another application onto the clipboard as a device-independent bitmap and paste it into a GIF file through GIF Construction Set. It will be given an image block on the way in, which you can subsequently edit if you like. The block copied or cut by the Copy and Cut menu items will always be the one with the insertion caret. Pasted blocks are always inserted after the block with the insertion caret.
You can delete any block except the Header from a GIF file. Click on the block in question to select it and click on the minus button in the tool bar, select Delete Block from the Edit menu or hit the Del key on your keyboard. Note that all the selected blocks in the GIF file in the uppermost document window will be deleted by the Delete function. The number of currently selected blocks is displayed in the status bar at the bottom of the GIF Construction Set Professional application window. If you delete a block and then change your mind, you can bring it back to life through the Undo function of the Edit menu. Undo only undoes the most recent change to a GIF file. By default, GIF Construction Set Professional will warn you if you’re about to delete more than one block.
The document windows of GIF Construction Set Professional support drag and drop. Specifically, you can:
Items dragged to a GIF Construction Set document window will be inserted after the current position of the insertion caret. If you drag images or image blocks into a GIF Construction Set document window, the Palette dialog will appear to let you choose a colour management strategy, should the palettes of your new images not match the palette of the GIF file into which you have dropped them. See the discussion of Inserting Blocks for more about this dialog.
You can drag GIF, JPEG, PNG, PCX, BMP and TGA images to a GIF Construction Set document window from any other suitable Windows drag source application, such as Graphic Workshop Professional. GIF Construction Set will complain if you attempt to drag files of any other format into one of its document windows, and ignore the dropped files. You can drag Image, Comment and Plain Text blocks between document windows within GIF Construction Set Professional. Dragged Header blocks will be ignored. GIF Construction Set Professional is not a drag source, and as such you cannot drag items from it to another application. You can actually build a complete animated GIF file from scratch by creating a new document window in GIF Construction Set Professional and dragging images into it. This approach does not, however, allow GIF Construction Set to create a superpalette, and unless you have kept track of the palettes of your source images, you might not arrive at the most attractive animation. You will usually enjoy more attractive results with Animation Wizard.
The Extract function in the GIF Construction Set Block will allow you to select one or more blocks in an existing GIF file and have them written out to a new GIF file. If you select more than one Image block and enable the Numbered option, the Extract function will create multiple numbered files, each with one image in it. The file names will consist of your destination file name with sequential numbers appended to it.
The Flip and Rotate function in the GIF Construction Set Block menu will allow you to rotate some or all of the blocks in a GIF file in 90-degree increments, free-rotate them by any angle you like and flip them horizontally and vertically. Note that free-rotating a bitmap will usually impose some rotation artifacts on it – you might find that your image is slightly degraded at some rotation angles. This will be a lot more apparent if you use dithered source images. The Background colour button is used to define the colour of the revealed areas for free-rotated images.
Hardware and Software Requirements GIF Construction Set Professional requires a Pentium or better processor to run. If you attempt to run it on a system with an 80386 or 80486 processor, it may refuse to boot. A minimum of sixteen megabytes of memory are required to run GIF Construction Set Professional reliably, with 32 megabytes strongly recommended. Its performance will improve with increased memory. Note that if you run GIF Construction Set Professional on a system with numerous other large applications running concurrently - such that much of your system's memory is in use by other software - its performance may be degraded. GIF Construction Set Professional can be used on systems with 256-colour Windows screen drivers, but doing so will typically not allow you to view some GIF files with their correct colours. GIF Construction Set Professional will perform some functions noticeably slower on such systems. A high-colour or true-colour Windows screen driver is strongly recommended. See the Drivers document for a complete discussion of screen drivers and how to correctly configure yours. If you have a system with a sixteen-colour Windows screen driver installed, do not attempt to run GIF Construction Set Professional on it. GIF Construction Set Professional may become so horrified by sixteen-colour Windows screen drivers as to run screaming from the room and require eleven to fifteen weeks of intense therapy and post-traumatic counseling. You have been warned. GIF Construction Set Professional occupies approximately eight megabytes of hard drive space - you can recover about three megabytes by deleting all the help, documentation and example files. This is not recommended unless you store them elsewhere or you have a breathtaking understanding of the software before you do so. You can run GIF Construction Set professional under Windows 95, Windows 98 and Windows NT 4.0. It has not been tested under Windows NT 3.51 and it will not run under Windows 3.1 or Windows 3.11 with WIN32S even if you ask it really, really nicely. GIF Construction Set Professional does not require any other specific software to be installed, with the exception of the Paint application which comes with Windows.
The Image Strip function in the GIF Construction Set Block menu will export a multiple-image GIF file to a single image GIF file image strip. This will result in each of the images of your source GIF file being arranged one after the other in a long, narrow GIF file, much like the frames on a strip of movie film. When the size of an image strip is calculated, GIF Construction Set will allow a space equal to the largest frame in the source file for each image. In a file with images of varying sizes, smaller images in the resultant image strip will be centered in a frame of the background colour of the file, as derived from the background colour of the source GIF file. This feature is useful for creating Java applets which display images. Here's what the options do:
Because of the large image dimensions which usually result from creating Image strips, GIF Construction Set document windows which display them may run in Text Only mode, and not show you a preview image. This is normal, and does not indicate a problem with your image strip. See the discussion of the Tool Bar elsewhere in this document.
There are instances in which you might want to add blocks to a GIF file by hand. You can use GIF Construction Set Professional’s block insertion functions to add still more images to an animation, and to add Comment and Plain Text blocks to a GIF file. Note that Plain Text blocks are not supported by all web browsers, and should not be used if you’re creating GIF files for use on the web. When you see text in a GIF file, you’re really looking at a graphic which looks like characters. If you click on any block in a document window, you’ll find that a blue or red line will appear along the bottom of the block. This is the insertion caret. Think of it as having the same function as the flashing text cursor in a word processor. Whenever you insert a new block into a GIF file with GIF Construction Set Professional, the new block will appear after the block which currently has the insertion caret. The insertion caret will appear on the block you’ve most recently clicked on. With the insertion caret currently positioned, you can insert a by:
or
In either case, a menu will appear. Select the type of the new block to be inserted. If you insert a Comment or Plain Text block, a new block will be inserted immediately. You can subsequently double-click on the block in question to edit its contents. A Comment block contains text which will not be visible when your GIF file is displayed. It can only be viewed with an application which looks for text in the block structure of a GIF file, such as GIF Construction Set or Graphic Workshop. Comment blocks are useful for including copyright statements and other background information about your GIF files. Plain Text blocks include text which is displayed as part of your GIF file – but not by all web browsers. You can define the foreground and background colours of plain text, as well as assigning Control block attributes such as transparency. However, as Plain Text blocks are not useful on the web, you probably won't have much recourse to this feature of GIF Construction Set. If you insert a new Image block, GIF Construction Set will prompt you for the name of one or more files to insert images from. You can select more than one source image at a time. Each will be created as a new Image block and inserted after the insertion caret. If the palette of your inserted images differ from that of the GIF file you're inserting them into, you'll see a Palette dialog. The Palette dialog will allow you to tell GIF Construction Set how to deal with the disparity in colour palettes. Note that if your source images are in fact true-colour graphics, you'll always see the Palette dialog. Here's what the Palette dialog options do:
The Use this Selection for Subsequent Images option at the bottom of the Palette dialog will allow you to skip the Palette dialog for subsequent images if you insert more than one image at a time. NOTE: While you can build a GIF file entirely by inserting Image blocks, this process does not allow you to create and match to a superpalette, as Animation Wizard does. Unless you've dealt with the palette considerations of your source images prior to inserting them into the GIF file you're building, you'll get better results with the Animation Wizard.
The LED Sign function in the GIF Construction Set Edit menu will allow you to create scrolling banners which resemble the LED signs found in subways, video stores, airports and many up-market churches. You can program GIF Construction Set's signs for colour changes, adjustable playback speed and varying sign dimensions. The text for an LED sign is displayed in white LEDs by default. Technical sorts will observe that there's no such thing as white LEDs – we would note that this is only true in the real world, with which GIF Construction Set's LED signs have as little contact as possible. You can change the display colour at any point in the text by embedding a colour code. Colour codes consist of the @ sign followed by a letter. Here are the legal colour codes:
Here's some example coded text: This text is @Rred, @Ggreen, @Bblue, @Ccyan, @Mmagenta, @Yyellow, @Wand white. This is what the colours would appear as in the LED sign function:
You can include as many colour changes as you like in a sign, as long as the total text length including the colour codes is no greater than 260 characters. LED signs can generate a large number of individual images, and hence potentially large GIF files. Mitigating this to some extent is the nature of the individual images in a sign. They're sixteen-colour graphics, and use simple, predictable shapes that compress well. As such, it's possible to create fairly complex signs without necessarily making them unworkably long to download. Note the observations about file size below. Here's what the controls in the LED Sign function do:
The text in a sign can consist of any printable ASCII characters between ASCII 32, a space, and ASCII 126, a tilde. Any other characters will be displayed as a double dagger symbol.
The Manage function in the GIF Construction Set Block menu will let you globally change the Image and Control block attributes in your GIF files. It's useful for enabling lots of Control blocks at one time, disabling lots of Control blocks without wearing your mouse down to a puddle of molten plastic and for changing the display characteristics of multiple images.
Depending on the options you select, the Manage function's file selector will deal with Image or Control attributes. Specifically:
The Merge feature in GIF Construction Set Block menu will allow you to import all the blocks in a GIF file except for the header block into the current document window. They will be inserted starting just after the block with the insertion caret. Image blocks will be handled using the same logic discussed for inserting individual image blocks – a dialog may appear prompting you to choose a strategy for handling palette conflicts. See the section of this document dealing with Inserting Blocks for more about this. You can also merge blocks by opening the file to be merged, selecting the blocks you're interested in and dragging them to the document window they're to be merged into.
GIF Construction Set will convert AVI digitized video files into animated GIF files, and animated GIF files to AVI files. It also includes an AVI preview function to help you check out your AVI files prior to converting them. Converting AVI files to GIF files is relatively uncomplicated. There are, however, two possible catches to using this feature - GIF files so created can get very large, and may take a while to create. The latter will be especially true if your source AVI file has a lot of frames, or frames with relatively large pixel dimensions. Ten-megabyte AVI files aren't uncommon - ten megabyte GIF files are not well regarded as adjuncts to web pages. To convert an AVI file to GIF, select Convert Movie to GIF from the Movie item of the File menu of GIF Construction Set. Select a source AVI file. A dialog will appear to let you choose a colour management strategy for your GIF file. Here are the choices and what they mean. The discussion of palettes elsewhere in this document will help you sort some of these out, if a quick read of them leaves you thinking that you should have studied remedial Martian in high school.
Plan to experiment with this to get the best results. Keep in mind that squeezing a true-colour movie into a 256-colour GIF file will always introduce some image degradation into the images therein. You can convert animated GIF files to AVI files through the GIF to Movie option of the Movie item of the File menu. For the most part, this will be a fairly transparent process - there are a few things to keep in mind, however.
The Preview Movie function of the Movie item of the File menu will let you see what an AVI movie looks like before you convert it to GIF, and check the results of converting to AVI files. It uses the standard Windows AVI functions to play AVI movies.
Any GIF 87a or 89a file can be opened into GIF Construction Set. Files created with GIF 87a headers will be converted internally to GIF 89a files. You can open a GIF file either by selecting the Open item from the File menu of GIF Construction Set or by clicking on the Open button in the tool bar. NOTE: GIF Construction Set will import images from several popular image file formats, but its Open function will only open GIF files. For reasons which escape most people who don't live entirely in cyberspace, some graphics on the web are named using the wrong extensions. For example, you might find files named with the extension GIF, when they're really JPG files. If you attempt to open such a file with GIF Construction Set, nothing useful will happen. We recommend that you have a look at the Identify Mystery Files function of our Graphic Workshop Professional software to sort these files out. The Save and Save As functions of the File menu will save your current GIF file to disk. All GIF files written by GIF Construction Set for Windows will have GIF 89a headers. GIF Construction Set Professional may append one or more comment blocks to the GIF files it writes. While these are discussed in greater detail elsewhere in the documentation for the software, there are two specific Comment blocks you might want to keep in mind:
In addition to this entry, please see Palettes and Why you Should Fear Them in the Tutorial document. GIF Construction Set offers a selection of default palettes, to be used when it creates GIF files. These palettes will appear if you use the New function of the File menu, and in functions like Banners and Transitions. The default palette for the New function is defined in the Setup dialog. The other functions of GIF Construction Set which offer default palettes include selection controls for them. Here's what the default palettes do:
In a technical sense, you should always build GIF files for use on the web using the 216-colour Netscape safe palette. For reasons discussed in Palettes and Why you Should Fear Them, however, you probably will not wish to do so much of the time. Here's a bit more palette lore. Some functions of GIF Construction Set refer to superpalettes. A superpalette is one in which all the source images destined for inclusion in an animated GIF file are surveyed, and a palette is derived for them based on how they all use colour. Animations built to a superpalette typically look a lot better than those built to one of the aforementioned canned palettes. Some of the effects in the Banners function of GIF Construction Set offer smooth palettes. These are custom palettes which include the greatest range of colours likely to be used in effects which involve gradations of colour. For example, in creating a soft shadow, the shadow will require a lot of slight variations on the shadow colour. Smooth palettes will typically provide the most attractive results for those situations where they're applicable.
The Overlay function will allow you to create animated GIF files in which one frame appears to float over the movement in some or all of the other frames. The Overlay function is extremely effective, but it does require some forethought to use correctly. It also helps to understand what it's really up to. While the example overlay shown here seems to have its text appearing above the wave animation, all that this graphic really consists of is the text painted over every frame. As the text doesn't move and it's never overwritten, it appears to remain motionless and unchanging while the wave moves. You can use this technique with any still image and a suitable animated background. To create an overlay:
There's an important catch in the foregoing. The image to be overlaid should have its background made transparent before you create the overlay. In the case of the small example overlay shown here, this has allowed the text to appear without a rectangular background, which would otherwise have obscured the animated wave. If you fail to do this, the Overlay function will warn you that there's no transparency enabled in your overlay image. The Overlay function cannot be used with GIF files having local palettes. It's worth noting that Overlay only affects those animated frames which are selected. Any frames which are not selected will be copied un-overlaid to the new GIF file being created. You can use this feature to overlay more than one image, or to create overlays which appear and disappear over the course of the complete animation.
The free and open nature of the web can often see your graphics being passed around cyberspace like drugs in a Frontline documentary. Because it's exceedingly easy to copy pictures from a web page, the pictures you create might effectively wind up in the public domain even if they're your intellectual property. A lot of lawyers are going to get new BMWs one day soon for sorting this out. There's no way to prevent the duplication of your web page graphics entirely, but the GIF Construction Set Professional Protection Matrix function will help discourage it. It breaks a single-image GIF file into a matrix of small tiles. If you include these tiles in your page using the HTML code created by the Protection Matrix generator, the tiles will appear to form a seamless graphic. However, when someone uses the Save Image As function of their web browser to copy your graphic, they'll only get one tile, not the whole image. A protection matrix can be defeated by someone who's sufficiently determined, of course -- one could, for example, just screen-capture your image to a new file. However, using a protection matrix increases the difficulty in swiping your pictures considerably, and will help discourage casual image collectors. There are several catches to the Protection Matrix feature. Because it creates multiple small GIF files to replace one original GIF file, it will increase the total downloadable file size involved. This will be considerably more apparent for files processed with an unregistered copy of GIF Construction Set Professional. Secondly, the Protection Matrix function can only work with single, non-animated GIF files. If you ask it to process a GIF file with multiple images, it will create a protection matrix from the first selected image and ignore the others. Finally, a protection matrix graphic will require that you keep track of a fair number of GIF files, where once there was but a single file. This is, of course, why a protection matrix is effective at protecting your pictures. To create a protection matrix:
Click on Save when you're ready to create a protection matrix. The Save As dialog that appears will point to the location and base name for your protection matrix files. The base name will be used to generate your tile files by appending numbers to it. As such, if you select a base file name of PICTURE.GIF, the Protection Matrix function will create new files called PICTURE_1.GIF, PICTURE_2.GIF, PICTURE_3.GIF and so on. The Protection Matrix function will also create an HTML document using the base file name you select. In this case, it would be called PICTURE.HTML.
Once Protection Matrix is finished writing tiles, click on Done. You can now add the matrix code from the HTML document it created to your web page. Note that this is actually an HTML table. You'll need to be able to edit the HTML document for your web page directly to do this. If you created a your protection matrix with the Include HTML Headers switch on, be sure to delete the headers before you add this code to your web page.
The GIF Construction Set Supercompressor function – and several other GIF optimizers – reduce the size of GIF files by removing image information which is redundant from one block to the next. In effect, they prune away parts of your image frames which duplicate pixels in previous images. While this allows for smaller files, it makes such supercompressed animations decidedly tricky to edit, resize or otherwise manipulate. The Reconstruct feature will un-supercompress animations, restoring them to a sequence of complete frames of identical pixel dimensions. It will remove transparency and un-prune frames which have been reduced. The resulting animation will be effectively what the GIF Construction Set Animation Wizard would have created for you from an initial sequence of still frames. In using Reconstruct, note that:
Once you have modified a reconstructed animation, you can run it through the Supercompressor function of GIF Construction Set to reduce its file size again.
The Resize function in the GIF Construction Set Block menu will allow you to change the size of one or more images in a GIF file. You can resize images by size or factor – that is, you can resize them to specific pixel dimensions or you can resize them by a percentage. Note that resizing to a factor of 100 percent has no effect. Resizing to a factor of 50 percent will result in a graphic which is half the size of the original. Resizing to a factor of 200 percent will result in a graphic which is twice the size of the original. In resizing down, the Resize function throws away some of the pixels in your source image. In resizing up, it duplicates some of the pixels. As such, resizing always introduces some image degradation into your graphics. Use it carefully.
The Reverse function will reverse the order of the Image and Plain Text blocks in a GIF file. It does not affect the position of Comment and Application blocks, which will retain their original order.
Note: the Scripting feature of GIF Construction Set is quite technical and is in no way part of the primary function of the software. Unless you specifically need to have another program create GIF files automatically by calling GIF Construction Set, you are strongly advised to be nice to your mind and skip this section. The scripting feature of GIF Construction Set allows another application to use GIF Construction Set as a GIF-building engine. In its script mode, GIF Construction Set will not display anything unless you ask it to. It reads a list of instructions from a text file, its "script", and builds a GIF file accordingly. When it's done, it terminates. The script interpreter can't access the advanced features of GIF Construction Set, such as the supercompressor, the banner generator, the transition generator and so on, nor is it likely to in the future. Unregistered users of GIF Construction Set will see the GIF Construction Set shareware beg notice when the script mode terminates. No notice will appear for registered users. To run GIF Construction Set in script mode, you must pass it a path to your script file and append /S to the file name. For example, here's how you would run GIF Construction Set and have it execute the script called MYSCRIPT.SCR in the directory \TEXT. C:\GIFConstructionSetProfessional\GCSPRO.EXE C:\TEXT\MYSCRIPT.SCR/S A script file consists of commands for GIF Construction Set, with one command per line. Most commands generate GIF blocks. Commands usually have arguments which set parameters in the GIF blocks being created. An argument consists of the argument name, an equal sign and the argument data. For example, this argument defines a file path: PATH=C:\PICTURES\VENUS.GIF Here are the legal commands for a script file and their arguments. The commands and arguments shown in bold are mandatory – if they're not present, your script will not execute. If you omit the optional arguments, default values will be used. If a script fails to execute, no GIF file will be created and GIF Construction Set will return a non-zero error code. Script arguments which include spaces must be surrounded by quotation marks, like this: TEXT="This is a comment block" Comment lines can be added to a script by preceding them with a semicolon. These lines will be ignored by GIF Construction Set. STATUS The STATUS command does not create a block in your GIF file. It's used to help you work out the problems in scripts that don't seem to be behaving themselves. It can be added to a script to create a log of what's happening when your script executes. It recognizes the following arguments: PATH The PATH argument should define a path to a text file which GIF Construction Set will create and write its log to. The log will include each of the script lines processed until the script is complete or until an error occurs. In the latter case, an error message will be the last entry in the log. SHOWERROR The SHOWERROR argument can be either TRUE or FALSE. If it's TRUE, a message window will appear when GIF Construction Set finishes processing a script or encounters an error. FILENAME The FILENAME command defines the file name and path for the file to be created by the script. It recognizes the following argument: PATH The PATH argument defines the destination file name. HEADER The HEADER command creates a Header block. The must be one HEADER command in every script file, and it must precede all other commands with the exception of STATUS and FILENAME. It recognizes the following arguments: PATH The PATH argument defines a file from which the global palette of the GIF file should be extracted. This can be either a GIF Construction Set CMP colour map file or an image file in any supported format. If PATH specifies a 24-bit image, the 256-colour orthogonal palette will be used. The PATH argument should not be used if the PALETTE argument is present. If neither PATH nor PALETTE are used, the default palette type as set in GIF Construction Set's Setup dialog will be used. BACKGROUND The BACKGROUND argument defines the colour index number of the background colour for the file. Its argument can be a number between zero and 255. Make sure that you don't specify a background value larger than the size of the global palette. PALETTE The PALETTE argument will select one of GIF Construction Set's default palette types. Its value must be one of the following: PALETTE16 – Sixteen-colour Windows reserved PALETTE32 – 32-colour orthogonal PALETTE64 – 64-colour orthogonal PALETTE128 – 128-colour orthogonal PALETTE216 – 216-colour Netscape PALETTE256 – 256-colour orthogonal PALETTE256G – 256-colour orthogonal with 32 greys PALETTE256GREY – 256-level grey scale LOCAL – No palette The PALETTE argument should not be used if the PATH argument is present. If neither PATH nor PALETTE are used, the default palette type as set in GIF Construction Set's Setup dialog will be used. IMAGE The IMAGE command adds an Image block to your GIF file. It recognizes the following arguments: PATH The PATH argument defines a path to the source file for the Image block being created. The source image can be in any of the graphic file formats supported by GIF Construction Set. MODE The MODE argument tells GIF Construction Set how to manage the palette of this image if it doesn't match the global palette. The values for the MODE argument can be: REMAP – Remap to the global palette LOCAL – Use a local palette LEFT The LEFT argument defines the left position of the image. This value can be any positive number. TOP The TOP argument defines the left position of the image. This value can be any positive number. COMMENT The COMMENT command adds a comment block to your GIF files. It recognizes the following arguments: TEXT The TEXT argument defines the literal text to be used in the Comment block being created. It should be fairly short – command lines in Script mode are limited to 256 characters. The TEXT argument should not be used if the PATH command is present. PATH The PATH argument specifies a path to a plain ASCII text file from which text for a larger Comment block can be read. Formatted word processing documents and other sorts of files are not suitable. Up to 32767 characters can be included in a comment block, although few users of your GIF files will thank you if you include anything like this much text in them. The PATH argument should not be used if the TEXT command is present. LOOP The LOOP command adds a LOOP block. For proper operation, this command must appear immediately after the HEADER command. It recognizes the following argument: ITERATIONS The ITERATIONS argument defines the number of times your GIF file will loop. It must have a value between zero and 32767. CONTROL The CONTROL command adds a Control block to your GIF file. A GIF file should have one Control block before each Image block. The CONTROL command recognizes the following arguments: DELAY The DELAY argument specifies the number of 1/100ths of a second for the following image to be visible before it's removed. This number can range between zero and 32767. TRANSPARENT The TRANSPARENT argument specifies a transparent colour index. It must range between zero and 255. Make sure you don't specify a colour beyond the range of your image palette. WAITFORINPUT The WAITFORINPUT argument can be either TRUE or FALSE. It defines whether the Wait for User Input flag will be enabled in this Control block. Note that at present most web browsers ignore this flag. REMOVEBY The REMOVEBY argument defines the method by which your image will be removed from the screen when the delay period has expired. It can be one of the following values: ASIS – The image is left unremoved PREVIOUS – The image is replaced by the previous image BACKGROUND – The image is replaced by the background Note that under most web browsers, only NOTHING and BACKGROUND are recognized. Here's an example script file: ; EXAMPLE SCRIPT ; STATUS PATH="c:\test.txt" SHOWERROR=TRUE LOOP ITERATIONS=10000 FILENAME PATH="c:\test.gif" HEADER BITS=8 PATH="C:\GIF\APR89.GIF" CONTROL INTERLACE=TRUE IMAGE PATH="C:\GIF\APR89.GIF" MODE=DITHER COMMENT TEXT="This is an example comment block." COMMENT PATH="c:\text\textfile.txt" CONTROL DELAY=1000 REMOVEBY=PREVIOUS IMAGE PATH="C:\GIF\WINGS.GIF" MODE=DITHER INTERLACE=TRUE ; ;END OF SCRIPT ; Keep in mind that the script mode has fairly limited sanity checking – if you fill its brain with monkey dandruff, you'll probably find monkey dandruff in your GIF file.
The Setup dialog can be accessed by selecting Setup from the File menu, or by clicking on the Setup button in the tool bar.
The Single Image function in the GIF Construction Set Block menu will create a new, single-image GIF document which contains all the display elements of a multiple image GIF file. It will export what you would see on your screen if you were to click on View. Note that it will ignore image blocks which would be removed to the background image or removed by the background.
The Spin function in the Edit menu will rotate an existing image in two dimensions. It can be used to create animated GIF animations which look like a spinning wheel or other revolving object seen face-on.
Here's what the Spin dialog's controls do:
Note that rotating a bitmap will usually impose some rotation artifacts on it – you might find that your image is slightly degraded at some rotation angles. This will be a lot more apparent if you use dithered source images.
In creating GIF animations for the web, it’s important to make the final GIF files that are referenced by your HTML documents as small as possible. The unspeakable, breathtaking excellence of your animations won’t impress anyone if they lapse into comas while waiting for your GIF files to download. In some cases, it’s possible for sufficiently sneaky software to squeeze some unnecessary pixels out of your animations and in so doing create smaller GIF files. The sufficiently sneaky software is the supercompressor function in GIF Construction Set Professional. It’s important to keep in mind what the supercompressor is really up to. All GIF files are compressed. The supercompressor attempts to meddle with the blocks in your GIF files to make them more compressible. In some cases it can do quite a bit in this respect, and in others it’s wholly ineffective. If there’s nothing to squeeze out of your GIF file, the supercompressor will not make it any smaller. The supercompressor makes GIF files smaller by doing one or more of the following to them:
The supercompressor will not change the way your animation appears, but it might well change what the individual frames look like. It’s a profoundly good idea to save your original source images under a different file name when you use the supercompressor. Once an animation has been supercompressed, it’s will often be very, very difficult to edit. The supercompressor will not perform pruning or redundancy compression on GIF files which have one or more Image blocks with transparency enabled. To use the supercompressor, open a GIF file in GIF Construction Set Professional and select Supercompressor from the File menu. Note that you can disable any compression types you don’t want to use, and the supercompressor will disable any compression types it decides are inappropriate for your GIF file. Click on Start to begin compressing. The OK button will be enabled when the supercompressor is done. When you click on OK, your supercompressed graphic will open in a new document window. If the supercompressor can’t find anything to squeeze out of your GIF file, it will tell you so and the OK button will not be enabled.
The System Information dialog will provide you with an overview of the configuration of your computer. This can be useful in unraveling configuration issues. It includes the following:
The GIF Construction Set tool bar provides access to the most commonly used functions supported by the software. All its buttons duplicate functions available in the main menu, but buttons are easier to get at than menus. The tool bar buttons have associated tip windows - if you forget what a button does, place your mouse cursor over it for a moment and a window will appear to explain its function. The functions dispatched by the tool bar always pertain to the topmost document window if you have multiple documents open. The tool bar buttons which process blocks will be disabled if no files are selected in the topmost document window. Here are all the tool bar buttons. Each of these functions is explained in detail elsewhere in this document.
The View Mode combo box at the left side of the tool bar selects the degree of zoom used to display the preview images in the current document window. The default view mode, 100 Percent, will display the images in a GIF file at their natural size. There's a limit to the dimensions of a Windows list box item, and GIF Construction Set will not allow you to select a view mode that will exceed this. If you attempt to do it, it will reset the View Mode combo box to a lower value. The Text Only view mode will display just the descriptive block captions for a GIF file, and no preview images. GIF Construction Set will automatically select this mode if you attempt to view a really enormous GIF image.
The Transitions function in the Edit menu will create animated transitions between multiple still images. These can range from simple wipes and dissolves to complex special effects. You can add as many images as you like to the Transition function and have it create a final animated GIF file which contains all the frames of the effects you've chosen. Here are a few examples of the Transition function at work – the permutations available to move between pictures are diverse.
To create a transition, select Transitions from the Edit menu of GIF Construction Set. Click on the Add button. A File Open dialog will appear to select source image files. You can build a transition from any combination of the file types GIF Construction Set recognizes, including GIF, JPG and BMP. You can click and drag selections around the Transitions list box. Once you have added the source images for your transition, select a default transition. Here's what the transition types do:
There are several other controls in the Transitions dialog:
The Undo item of the Edit menu will undo the most recent change you've made to the GIF file in the uppermost document window. This item will be disabled if there's nothing to undo.
The View function of the GIF Construction Set Block menu can also be accessed through the View button in the tool bar. Select View to view a still or animated GIF file. The View mode will display all the animated elements of your GIF files, including transparency. Click with your right mouse button to exit a View window.
The Wide Palette GIF function in GIF Construction Set's Edit menu will let you create GIF files which can display more than 256 colours. This probably sounds much more useful than it really is – while it genuinely works, it embodies some serious catches. Before you use this feature, please take a moment to understand what it's up to so you don't wind up bashing your head against a wall in frustration. Alchemy Mindworks will not be responsible for any damage you do to your head or your walls should you fail to heed this advice. A GIF image can only store a maximum of 256 colours. However, a GIF file can store any number of images. If each image has its own local palette, it's possible to have more than 256 different colours stored in the file. This is what wide palette GIF files do. If the source image you wish to store in one has 510 distinct colours, GIF Construction Set will create a GIF file with two Image blocks. The first Image block will have a local palette with the first 255 colours of your source image in it. The second Image block will have a local palette with the second 255 colours from your source image. Each palette will also have one colour which does not appear anywhere in your source image, to be used as a transparent colour. In discussing wide palette GIF files, the Image blocks that your source image will be split into are called "panes". The actual images will be constructed such that those pixels of your source image which appeared in their palettes will appear in the images in question, and the transparent colour will appear everywhere else. When such a GIF file is displayed, the first Image block will take care of the first 255 colours, and the second Image block will take care of the second 255 colours. Because the "unused" pixels are transparent, the two frames will essentially be merged when the display is completely updated, with the result that 510 distinct colours will be displayed. In practical terms, a 24-bit source image must be "quantized" to derive a suitable list of colours, that is, a large palette must be derived from it based on the dispersal of source colours. The Wide Palette GIF function lets you select how large this palette can get. Wide palette GIF files allow you to enjoy lossless images having lots of colours in a format which is compatible with existing web browsers. However, they embody some important catches, as follows:
Here's what the controls in the Wide Palette GIF dialog do:
By default, the background colour of a wide palette GIF file will be white – you can change this by editing its Header block. This doesn't matter to a web browser, which ignores the background colour values in GIF files. Select the maximum colour size carefully. More colours will produce much better looking final images, but they'll also create much larger final GIF files.
This document and all the other documentation included with GIF Construction Set Professional is copyright © 1995, 1996, 1997, 1998 Alchemy Mindworks Inc. It may not be reproduced in whole or in part or transmitted in any form save as a component part of the GIF Construction Set Professional software without the explicit written permission of the copyright holder. Unauthorized use of this document or any portion thereof may result in severe criminal and civil penalties. Alchemy Mindworks Inc. accepts no responsibility for any loss, damage or expense caused by your use of the information in this document, however it occurs.
|
|


 Open:
Open:  Save:
Save:  View:
View:  Animation Wizard: Activates the
  Insert Block:
  Delete Block:
  Select All: Selects all the blocks in the current document window.
 Unselect All: Unselects all the blocks in the current document window.
 Manage:
  Manual: Opens the top page of the GIF Construction Set manual document.
 Help: Displays the contents of the Help for GIF Construction Set.
 Setup: Accesses the
  Exit: Exits GIF Construction Set.