


|
| Volume Number: | 5 | ||
| Issue Number: | 11 | ||
| Column Tag: | The Electrical Mac | ||
Related Info: ADB Manager
Repairing the ADB 
By Eric Schlienger, Champaign, IL
ADB Repairs
[Eric Schlienger received a BSEE at the University of Colorado at Boulder in 1979. He was in charge of the both the control system design group and the software group of Retech Inc. of Ukiah CA. He has worked primarily with Hewlett Packard computers until he went back to school at the University of Illinois at Champaign-Urbana. He is currently working towards a Ph.D. in Materials Science and Engineering.]
Several months back I was doing some work on my brand new Mac II and started experiencing a “scritchy” mouse. Considering myself a clever fellow, I decided to clean it during a particularly lengthy recompilation of all my code. Since I was being clever I decided I might be lazy as well and so I did not unplug my mouse. Similarly I used whatever implement was at hand for the cleaning operation; in this case a pair of metal microscopy tweezers. Well to make a long story “short” I slipped....OOPS! Both keyboard and mouse took an immediate trip to Lala land, terminating my programming session rather abruptly. Terminal ADB failure.
While reading February ’88 MacTutor, I noticed that several other folks have experienced the same ADB symptoms, and although their method of generating an ADB failure would appear to be less certain than mine, I am convinced that they may be able to repair the situation with a $0.79 fuse in 15 minutes. ( or have their service man do it) As a new motherboard is probably more expensive and less readily available, I believe that some people might find the repair procedure interesting.
Before attempting a repair, do be certain that you have checked all cabling and preferably tried a different mouse and keyboard. If you have verified that the problem is indeed with the ADB, you are then ready to Open The Box.
The Tools
First off, you will need a few tools. These are an ohm meter, a Phillips screwdriver, small needlenose pliers, small diagonal cutters, a small soldering iron with solder, a felt pen, a container for screws, and 1 ounce of ethanol (you may choose the flavor). It is also best to buy the fuses you need before you open the box. These fuses are referred to as PICOFUSES, and they are rated 1A 125V. They are roughly the size of a 1/4 watt resistor. The manufacturer of the ones I bought is Littlefuse Tracor.
Finding The Fuses
To begin, clear a large area for storage of the Monitor, Keyboard, Mac II top cover, the Drive platform (drives still attached) and the cables. Please note that the floor does not qualify as a storage area; neither tennis shoes nor carpet fuzz are items that are regularly found in properly functioning computers. As such it is best to avoid circumstances where they might be introduced.
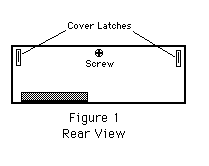
If necessary park the heads on your hard disc. Unplug the CPU and remove all cables. Move the keyboard, mouse, monitor and cabling to the designated Storage-Area-Not-On-The-Floor. Pick up the CPU and turn it 180° such that the back is facing you. Remove the screw located in the top center of the back panel (Fig 1.).
Then turn the CPU back around. Reach around back and depress the two cover latches and swing the top up. Continue to swing the top up and give it a jiggle to free it from the front of the CPU case.
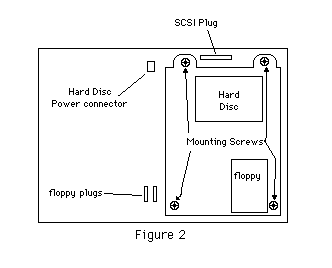
Behold the inner workings of the Mac II. If you become nervous, sit down and consume the ethanol while reminding yourself not to touch any of those neat chips. With the felt pen, mark the outside of the floppy disc cable where it plugs into the mother board. (This is so you are confident which way it goes back in.) Write down the number of the socket that the cable is plugged in to on the cable itself. Gently grasp the plug where it goes into the socket and pull it out; DO NOT PULL ON THE CABLE! If you have a hard disc (you probably do), mark the power plug and the SCSI ribbon cable and remove them in a similar fashion. Verify that all devices on the drive platform have been disconnected from the motherboard.
Remove the four platform mounting screws and lift out the Drive platform (Fig. 2). Place it gently in the Storage-Area-Not-On-The-Floor.
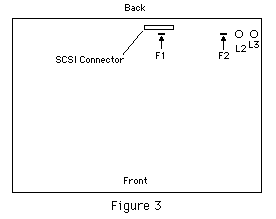
OK. Now look at Figure 3. With the aid of this drawing you should be able to locate the devices labeled F1 & F2. The “F” stands for fuse. (Clever these Apple folks, huh.) In my case, F2 was blown.
It may be that F2 is the ADB fuse, and F1 is the fuse for the Serial Ports, but I haven’t verified this one way or the other. With your ohm meter you should be able to test the fuses. The basic procedure is to measure the resistance of the fuse. If the resistance is greater than one ohm, it is bad. (Actually it should be zero.) If both fuses test good, put everything back together, obtain more ethanol and prepare to pay big bucks for a motherboard.
Fixing The Fuse
If a fuse is bad you have two options. The first is to find a static free workstation and remove the motherboard to replace the fuse. In this case you desolder the old fuse and install the new one. The second method is something of a kludge, but functional, safer and easier. Basically what you are going to do is to piggyback the new fuse on top of the old fuse. Since a blown fuse is an open circuit piggybacking is the functional equivalent of replacing it. However for those who regularly give tours of the inside of their computer, it should be noted that this repair may be esthetically deficient. The procedure is fairly simple:
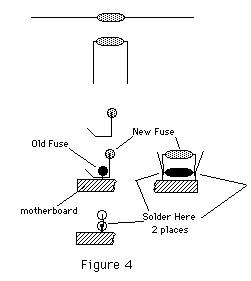
Take one of your new fuses (they come in a box of 5) and using the needlenose pliers, bend the leads 90° on either side of the fuse body. About 1/4 inch below the fuse body bend the leads 90° such that the leads are now at a right angle to the fuse body (Fig 4).
Trim the leads so that the distance to the last bend to the end is about 1/4 inch. Slide the leads under the old fuse at either end, and grasping each lead in turn with the pliers, pull it through until the new fuse is over top of the old one. Bend the leads up and solder them into place on the old fuse. When soldering don’t use too much heat as you do not want to remove the old fuse from the mother board. When the new fuse is securely fastened to either end of the old fuse trim off the excess leads.
Reposition the drive platform, replace the 4 mounting screws, replace the drive cabling. Put the front of the cover in place and swing down. A gentle tap may be required to get the front to seat properly. Replace the rear screw and the cables. Your ADB should be repaired.
Please note that the presence of a piggy backed fuse will almost certainly void your warranty, so if your computer is fairly new consider having an authorized service man do the repair. If it is out of warranty and the alternative is a new motherboard, you might give it a look see. Please remember that while the box is made to be opened, the circuitry is not hardened against standard computer room contaminants such as coffee, donut crumbs or peanut butter sandwiches. So don’t leave the computer disassembled so that everyone can see your handiwork and comment on how clever you are.
As a general rule, do not mess with the ADB or associated devices when the power is on. This should hopefully eliminate the need for ADB repairs.


- SPREAD THE WORD:

- Slashdot

- Digg

- Del.icio.us


- Newsvine
