Last updated 16 Jul 1999
Signs are propably the most important part in Jerboa. The function of Jerboa is that user draws a figure with mouse holding down right mouse button, and Jerboa tries to recognise that figure. These figures are called signs. Word "sign" is used referring to both the figure user draws and the figure Jerboa holds in memory. Drawing a sign means that user draw a sign with mouse. To make a sign or to create a sign means that you define a sign so that it then can be drawn and Jerboa can recognize it. Defined sign is a sign Jerboa holds in its memory and uses when it tries to recognise user drawn sign.
This chapter is mostly about signs Jerboa holds in memory. Signs that user draw are just series of points connected to each other. Defined signs are more complex. In this chapter sign means a defined sign if not otherwise said.
A sign consists of marks and restriction marks. We will first talk about marks. A mark is just a line (more precisely start and end point). Marks in sign have always order. When user draws a sign, Jerboa checks that the sign drawn intersects every mark in order. In other words, Jerboa follows the drawn sign until it intersects the first mark. Then continues following the drawn until it intersects the second mark and so on till the end of the drawn sign. If the drawn sign doesn't intersect all marks in order, Jerboa presumes that the sign drawn does not match the defined sign and then checks if the drawn sign matches the next defined sign.
Marks (and restriction marks) may be one or two sided. Marks are usually one sided. This means that intersection with the drawn sign only counts if the drawn sign intersects the mark by going the right way. For example we could have a horizontal mark that is defined so that the drawn track must go from down to up. If it goes from up to down, the intersection is not counted and Jerboa does not move to wait next intersection with next mark.
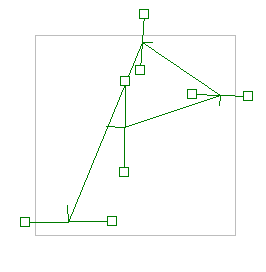
Now let's clear up things a bit. Enclosed picture shows sign representing letter P. Lines between boxes are marks (this sign has four marks). In this case every mark has a normal line indicating that that mark is one sided and the sign must be drawn so that it goes the way the normal shows. So this letter P must be started from bottom. Lines connecting marks are there just to show the order of the marks.
The gray box shows the box the drawn sign will be stretched into. This means that if any mark is entirely outside the gray box, the sign cannot be drawn properly because the drawn sign will never intersect that mark.
As you can see from the picture, marks in a sign only need to cover key parts of the figure (in this case letter P).
Even if the drawn signs intersects all marks in order it won't necessarily match the defined sign. Restriction marks are marks that the drawn sign must not intersect. Restriction marks can also be one or two sided. If a restriction mark is one sided, the drawn track can intersect the restriction sign the wrong way but cannot intersect the right way. Restriction signs are binded to regular marks. This means that the drawn sign can intersect restriction marks that are not binded to the sign that should be intersected next. If the drawn sign intersects (the right way) a restriction sign that is binded to the mark next in turn, Jerboa immediately considers the defined sign a non-match with the drawn sign and moves to next defined sign. A restriction mark can also be bound to a virtual end mark, which is not a mark but is considerd to be in turn after all marks have been intersected in order.
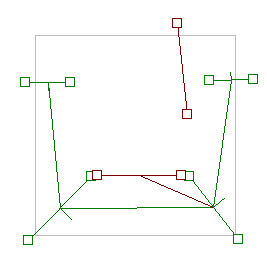
At right is a picture of a sign representing the letter U. Those green lines are again regular marks. Red lines between red boxes are restriction marks. We can see that both restriction marks are two sided (there is no normal line in them). The lower restriction mark is bound to the lower right regular mark (indicated by the other red line). The upper restriction mark is binded to the virtual end mark (there is no red line indicating binding to any other mark). The function of the lower restriction mark is to filter out letter W. In W you move up where the lower restriction mark is, so Jerboa notices that it cannot be letter U. The upper restriction mark is there to filter out letter O where you would continue moving left. In letter U you must end the sign (release the right mouse button) in the upper right corner.
When designing signs you should know how Jerboa recognises signs. When Jerboa tries to recoginse a drawn sign, it compares it to every defined sign and gives a score to each. Then the higest score is the sign Jerboa uses to determine the script to run. If the drawn sign does not intersect all marks in defined sign in order or intersects a restriction mark, the score is immediately dropped to zero. A defined sign gets score for each mark it has and the angles the drawn sign interesected marks with (if all angles are 90 degrees it gets highest scores it can from angles). The length of drawn sign before first mark and after last mark decrease the score.
If you are going to create your own signs you must understand how signs are defined (read Understanding signs). This chapter tells you how to use the sign editing tool in Jerboa and also discusses about how signs should be designed. In this chapter "mark" usually refers to both regular mark and restriction mark.
Note that sign designing tool will most likely be changed in next version. I will try to make it a bit more easy to use and make something to allow filter out restriction marks which will make the sign look like a complete mess.
To create a new sign press the "new sign" button in signs tab. Jerboa will then ask for filename for the sign. The path and extension will be added by Jerboa so don't include them. Then enter name of the sign in the "sign name" edit box and then design the sign and press "ok". To edit existing sign press the "edit sign" button in signs tab. To delete sign press the "delete sign" button. The filename cannot be edited within Jerboa. To do this just open windows explorer or MS-DOS and rename the file.
You select a mark by clicking on one of its end points (boxes) and deselect it by clicking on a place that doesn't have any box. When a mark is selected it will be drawn with a brighter color. When a sign is selected, you can set it twosided by clicking the "twosided" checkbox. To move a mark, drag the end point of the mark to desired location.
Press the "mark" button to create a new regular mark. If no mark is selected, the new mark is placed at the end in order. If a mark is selected, the new mark is placed befor the selected mark in order. If a restriction mark is selected, the new mark will be inserted befor the mark the restriction mark is bound to.
To delete a mark first select existing mark and then hit "delete". If you delete regular mark, you will also delete all restriction marks assigned to it.
Press the "restriction" button to create new restriction mark. It will be bound to the mark currently selected, or if no mark is selected it will be bound to the virtual end mark.
Press the "show figure" check box to see how will the sign appear in sign view windows. This figure is automatically created by Jerboa and you cannot affect to it by any other means than changing the postion of marks in sign. The appearance of the figure does not have any effect when Jerboa tries to recognize sign so don't bother if it doesn't look the way you think your sign should be drawn. However the figure can often be changed much with only slight changes in sign which won't practically have any effect. The blue boxes are bezier control points used with the figure. You cannot drag them but they are shown to help you make the figure the way you want. Restriction marks do not have any effect on the figure.
When in "signs" tab, you use the "test mode" check box to enable test mode. In test mode you can test how Jerboa recognizes your new sign. In this mode Jerboa runs exactly the same way as in normal mode but does not execute the script binded with the sign.
When making a sign, keep all the time in mind what will the sign look like. Let's call this figure track. So track is the figure user should follow when drawing your sign. In this chapter a mark refers to a regular mark.
When making a sign, don't place marks too close to each other. Thumb rule when placing sign is to place them only in those parts of track where track has turned something like 90 degrees. In addition place a mark at the beginning and at the end of the track. Don't place mark in corners of the track. Place them a bit after the corner. This way you'll get the user drawn sign intersect the mark in an angle close to 90 degrees.
Next try to think different ways of drawing the sign. In number 2 some people draw a circle at the lower left corner and some people don't. So you could try to make the sign so that both styles are recognized.
Another problem is stretching. Let's take the letter D for example. You would normally think that the straight part at the left is always the leftmost part in the sign. The user might accidentally however draw the end part (where the curve comes down and intersects the straight part) a bit too long. Now when the sign is stretched the straight part isn't that close to the left border of the sign. So you must make the marks at that part a bit longer so that they allmost reach the center of the sign. Take a look at the sign D by going to the sign tab, selecting sign D and pressing edit sign. Same problem is with letter Z. It is very hard to draw Z so that upper and lower horizontal lines are same length.
Then you should place restriction marks. It is often a good idea to place restriction marks around starting and ending points of the sign if you know the exact place of these points. In the letter O for example you don't know exact place but you do know that the track won't come back after the last mark so you can restrict the end point a little. Then place restriction marks to places where it is obvious that the track won't be. In letter L for example we know that the track won't go in the upper right part of the sign.
Then you must place restriction marks so that the sign won't get mized up with other signs. Press OK in the sign editing tool and check the "test mode" in signs tab. Now draw every sign in your sign library and if any is recognized wrong, add a few restriction marks. It may be some times hard to find the right place for the restriction marks. Then you should be ready.