


Spring Clean your RiscPC
Dave Holden removes the fluff...
The idea for this article was prompted by a couple of people who have contacted me recently with rather aging machines which were starting to become somewhat unreliable and unstable. The symptoms were non specific and non repeatable; strange disc errors which vanished when the drive was verified, programs which normally run perfectly crashing unpredictably, computers sometimes not starting up properly but then seemingly OK on the second or third try.
In each case the owner felt that this was just due to old age and approached me with a view to purchasing a "new" secondhand machine to replace their ailing one. Rather foolishly (from my bank manager's point of view) in each case I suggested that before deciding that the machine was in its death throes they give it a much needed overhaul. After I'd explained what they should do, they followed my advice and the computers were one more returned to youthful good health. This resulted in happy customers but a distinct lack of transfer of large amounts of cash from them to me which would have been the case if I'd been a more predatory and ruthless businessman and helps to explain why Bill Gates has ceased to worry about competition from APDL.
The problems
There are three main areas that can benefit from a clean up. These are -
- Dust and fluff. This involves stripping the computer and cleaning all the accumulated muck and dirt.
- Contacts. Corrosion can occur on plugs and sockets resulting in poor electrical contact.
- Software. It's amazing how much rubbish can mysteriously appear on your computer, especially in !Boot. A ruthless culling can work wonders, but that will be another article!
The first two of these require disassembling the computer and the procedure for this will be described in detail. The recent spate of hot, humid weather will have exasperated this problem and explains why I'm writing this article now towards the end of the summer rather than in the spring as the title suggests would be more appropriate.
First one important thing. In the instructions below I may use technical terms like left, right, front and back. For some reason people get confused by these. The front of the computer is always the front, even if you have it turned around with it's back towards you, and it's the left and right sides of the computer that I'm referring to, not your left or right side, and this doesn't vary no matter how you are standing in relation to it.
Safety precautions
To clean the computer you will need to completely disassemble it. Don't be alarmed, it's really very easy and takes only a few minutes. The only tool you will need is a medium sized phillips screwdriver although a pair of thin nosed pliers may also be useful.
First a note about safety and static electricity. From the point of view of safety you should always ensure that the computer is unplugged from the mains supply (Note; unplugged means the mains lead removed from the socket, not just switched off) and all connections to external equipment disconnected. The exception to this is described below for discharging static electricity.
All electronic components are sensitive to static electricity. With the exception of the Strong ARM processor card (if you have one of these) none of the components used in a RiscPC are particularly sensitive to static, but you should take reasonable precautions. The main "don'ts" are to make sure you aren't wearing nylon clothing (shirt, overall, etc.) or standing on a nylon carpet (which is why home computers weren't popular in the 70's - ED). The important point is to discharge any static in your body to earth before touching any of the computer's internal parts. Ideally to do this you should use a special mains lead in which the live and neutral are disconnected and only the earth lead is used and wear a wrist strap connected to earth. Assuming you don't have one of these you can discharge any static by plugging in the normal mains lead with the power switched off at the socket, remove the computer's top cover as described below and then touch the metal top of the power supply, which is connected to earth. You can now unplug the mains lead.
If you have a Strong ARM processor then, as this is the most static sensitive part of the computer, this should be the first item removed. ideally it should be stored in an anti-static bag, but if you don't have one of these handy a piece of kitchen foil is just as good. Under no circumstances put it in an ordinary plastic bag.
Getting at the works
All RiscPCs used to be supplied with a Welcome Guide which described how to disassemble the case and replace the ROMs, VRAM, and other "user upgradable" components. Since many people don't have these, especially if they purchased their machine secondhand, much of what follows is a step by step guide to disassembling your computer and you can skip over it if you are familiar with this procedure.
Remove the lid by turning the two clips at the rear corners at the top of the case so they are pointing outwards. These are the rear case retaining pins and go all the way down to the base of the computer and lock all the case components together. There are two more of these at the front, concealed under the lid. With the pins turned outward the back of the lid is unlocked and can now lifted up and as you lift it the front will come clear of the lip which retains it. Now, keeping the top of the retaining pins pointing outwards from the case, pull them completely out.
At either side at the front of the case there are two similar pins. The main difference is that these don't have the locking lever on top like the rear ones, just a small projection on the side of a rounded top. Turn them so that this projection is pointing inwards, at right angles to the sides of the case, and pull them out. These pins are often quite stiff and as there isn't much to get hold of it may be necessary to use something like a screwdriver to lever them up slightly. Once you have lifted them a fraction they will slide out easily the rest of the way.
It's probably best to remove the processor (or processors if you have a PC card) first. These are the vertical PCB(s) at the left hand side of the computer and just pull out upwards. Try not to twist them sideways as you extract them or you might bend some of the pins. If there are two cards the rear one is the PC card, and because it is bigger you should remove it first to make it easier to grip the ARM processor card. If the main processor is a Strong ARM be sure you follow the anti static precautions described above.
Some processor cards may have cooling fans attached and the power leads for these will need to be unplugged. These are normally plugged into the CD ROM drive power socket with a "daisy chain" power connector. Sometimes it can be difficult to remove the power connector from a CD ROM or hard drive, and as there isn't much space between the rear of the CD ROM drive and the processor card it's best to remove the processors before you try to unplug the power connectors so that you can grip it properly and so that if it does require a bit of force to remove it you don't wack the processor card if it comes loose suddenly.
If you have any expansion cards fitted these will need to be removed. Unless they are "short" cards like the APDL or Simtec IDE interfaces you will need to undo the small screw at either end of the plate on the rear of the computer and extract them through the rear of the case. You may find it useful to rock the card slightly from side to side to "unstick" it from its socket on the backplane. If a card has leads attached to it, such as an IDE or SCSI interface, you will need to unplug these before removing it. Make a note of where these leads are plugged in and which way around. All ribbon cables have an identifying "stripe" along one edge, and if you're in any doubt put a sticky label on the end of the cable noting which socket it was plugged into and its orientation.
If you have more than one expansion card note the order in which they are fitted. Sometimes there can be clashes between different expansion cards if they are installed in a particular order, so if it was all working before you pulled the computer apart make sure you put it back the same way.
When all the cards have been removed you can extract the backplane, the vertical circuit board they plug into. This just pulls out vertically. Now you can remove the top "slice" of the computer, but first you will have to unplug any leads from any drives mounted in it. Hard drives, floppy drives and CD ROM drives all have two main connections, a power cable and a flat ribbon data cable. In addition a CD ROM drive may have a small audio lead. Be careful when removing these, they often have a small retaining clip which needs to be pressed in to release them. Once the leads have all been unplugged lift off the slice and repeat for any others until you have stripped the computer down to the bottom "tray".
The next item you will need to remove is the power supply. There will probably be two leads still connected, one to the hard drive and the main power lead to the motherboard. The motherboard connector has a retaining latch on either side and these need to be squeezed between finger and thumb to release them before you can unplug it. Next remove the main power switch button. This just pulls off, but you will probably need to grip its shaft (gently) with a pair of pliers to pull it off the actual switch. Be careful not to twist it or you might break the switch. Once this is removed you can undo the single screw at the front of the power supply and remove it by lifting the front upwards and sliding it slightly forwards to release the catch at the rear.
Some machines have an aluminium spacer under the front of the power supply and this just lifts out.
You should now have something like the picture below.
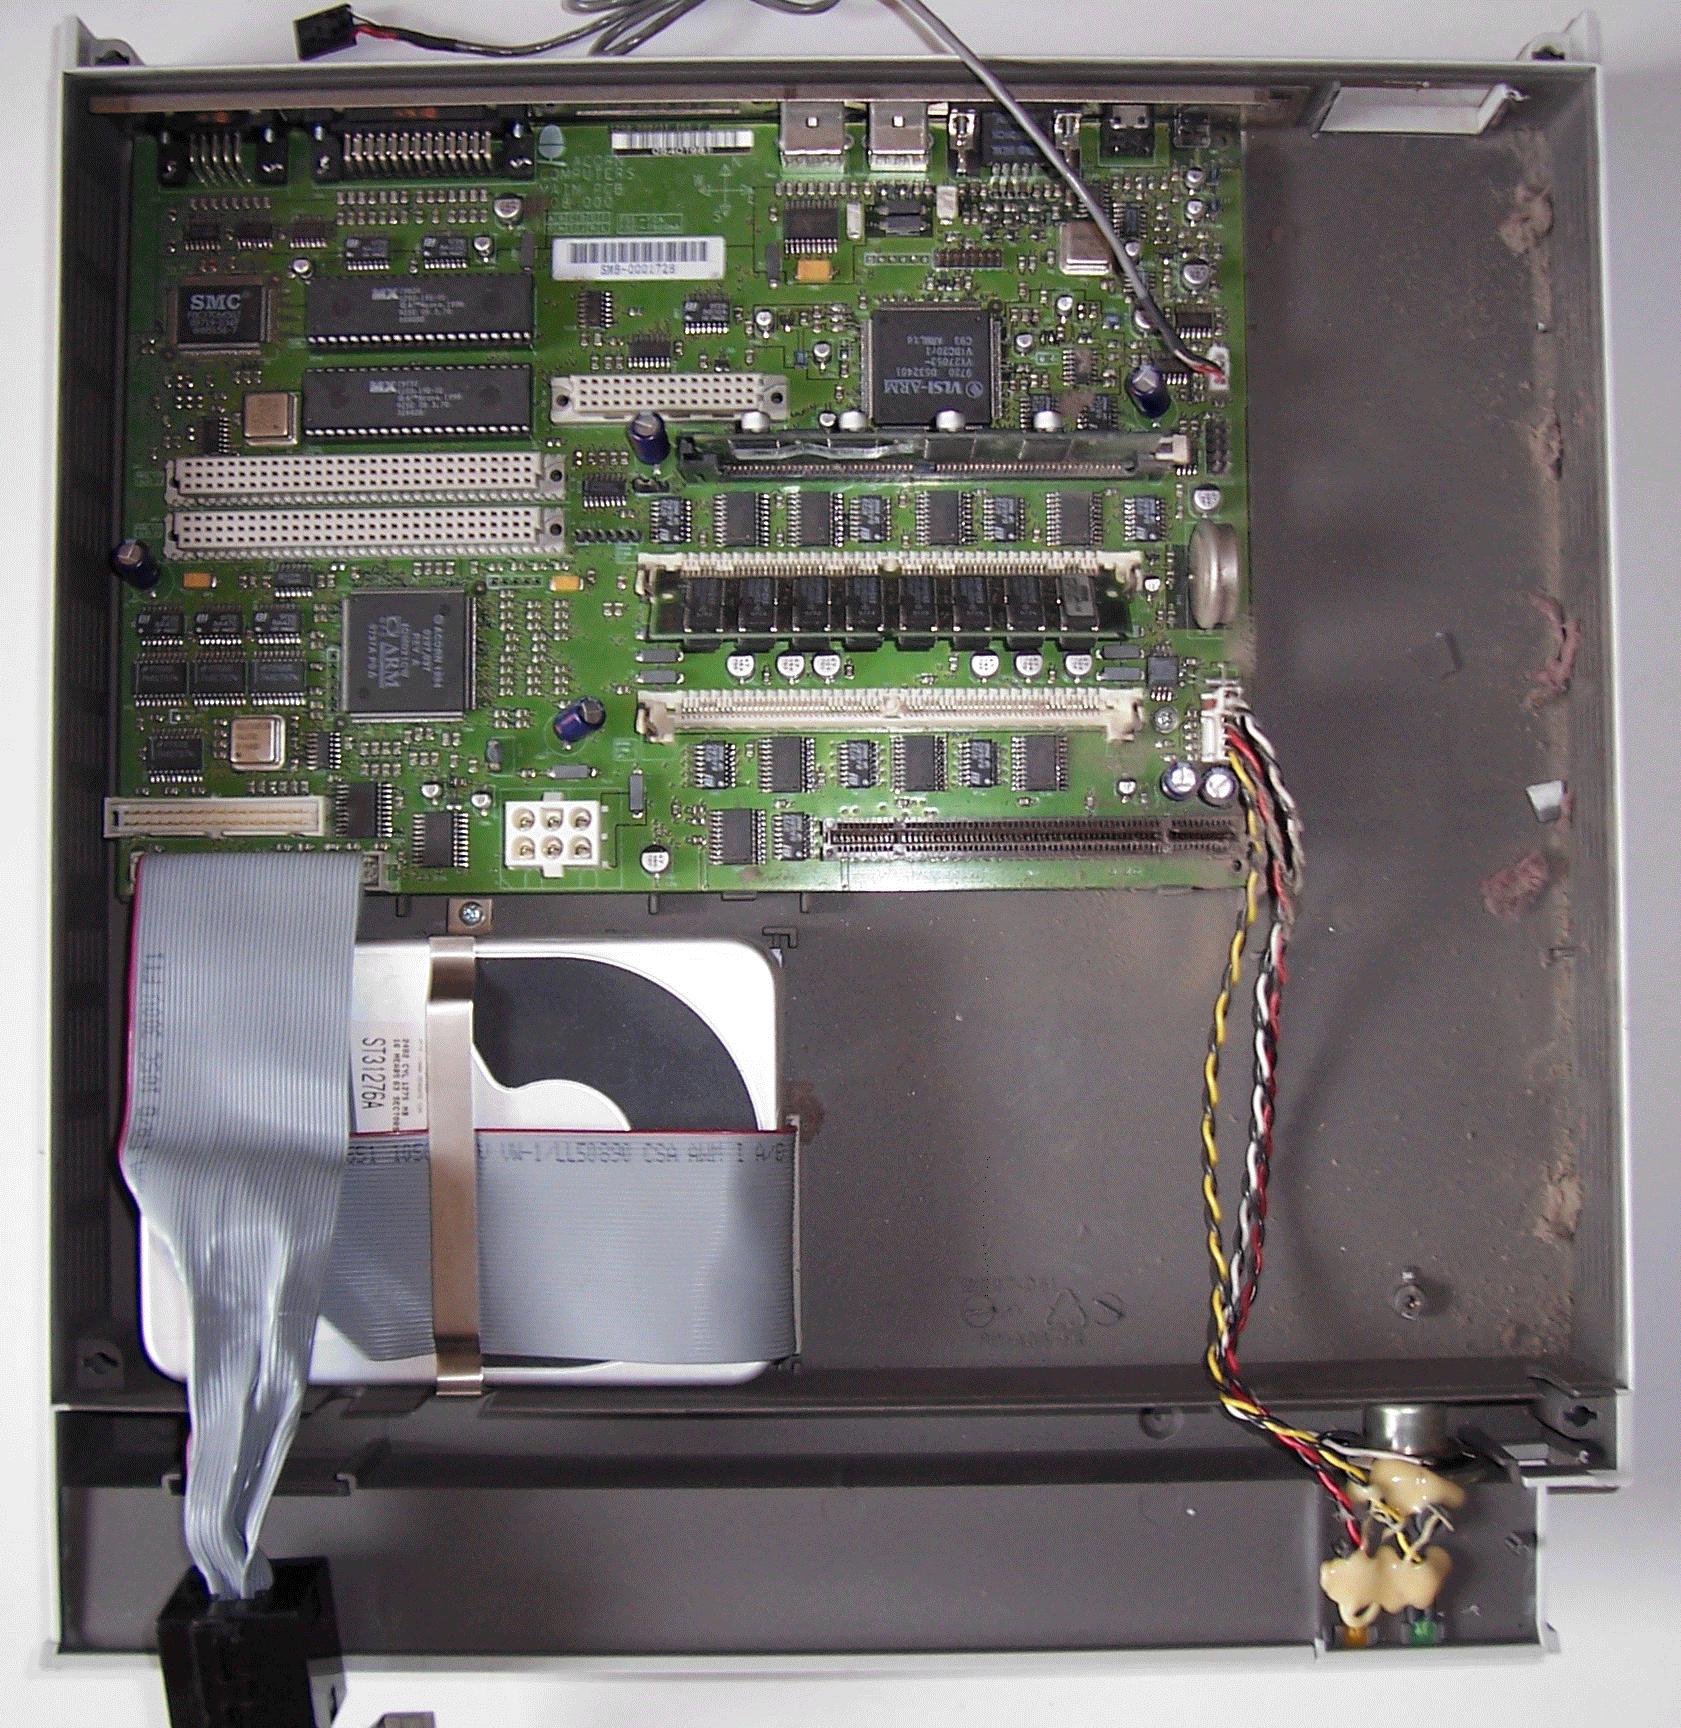
Click on picture for larger image.
Dust and fluff - the insidious enemy
All the time the computer is running the fan is turning, drawing air from outside and blowing it over the components inside to cool them before exiting through the numerous small slots in the case. During the life of the computer millions of cubic feet of air will pass through its insides, and inevitably this air will contain dust particles. As the dusty air swirls around the nooks and crannies inside the computer these particles get left behind and form a fine coating over (and under) the electronic components and printed circuit boards.
You might think that a fine coating of dust wouldn't do much harm to encapsulated electronic components and printed circuit boards, but think what this dust is probably made of. Some of it will be organic material, minute flakes of skin and hair, the bodies of some of the tiny creatures that share our homes and offices, etc. This accumulated gunge can cause interference with the high speed signals travelling on the PCB tracks, especially where it congregates in the narrow space between the pins of the surface mounted integrated circuits. The deposits may, depending upon their composition, retain moisture, which makes things even worse.
The larger version of the picture of the motherboard (above) illustrates this. This picture and the others in this article were taken from a secondhand RiscPC 700 and are typical of the sort of thing I normally find when I disassemble a machine, so they probably represent what you might expect to find inside your own if it's a few years old. The grey-brown dust can be clearly seen near the edge at the bottom right of the board and also over the leads connecting to the power and hard drive LEDs and the speaker. Further up are similar deposits just behind the VRAM module (also on the right hand end of the VRAM module itself, although that is not very clear in this picture) and around the pins of the VIDC chip. These areas are, of course, right in the path of the air from the power supply fan and so are exactly where you would expect to find the worst accumulation of fine dust and dirt.
Being naturally gregarious these particles of dust also tend to group together and form fluffy deposits which not only cause the same problems as the fine dust but also block the air intake and outlet holes and so restrict airflow. The next picture shows the air inlet on the side of the power supply. This is actually only a part of the debris. If you look at the previous picture above you will see that there is another lot of fluff along the right hand side and this is what fell down as the case was taken apart. Since all of this is sandwiched in the narrow gap between the side of the case and the power supply it can seriously restrict the airflow into the computer and may, in extreme cases, lead to overheating and eventual failure of the power supply.
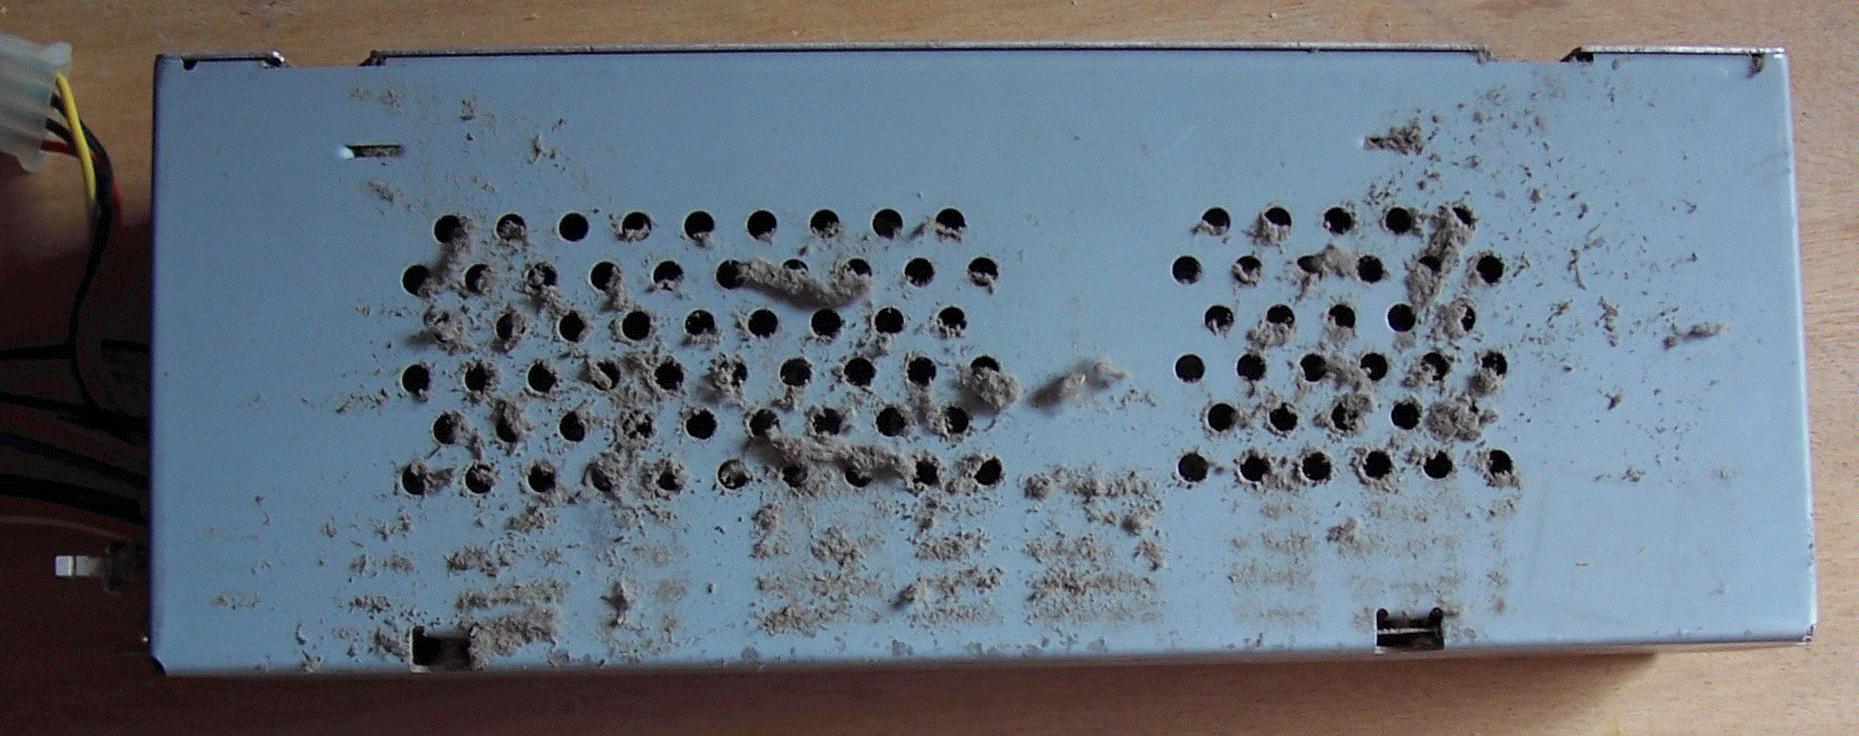
Click on picture for larger image.
As you may imagine the inside of the power supply will be equally filthy, and if the outside or fan (see later) looks grubby you will need to open it up and clean it. There are two small screws on the top of the power supply and when these are removed it opens by hinging along the bottom edge. A small vacuum cleaner is probably the best tool for this, but if you don't have one then take it outside and use a brush and a lot of lungpower to remove the muck.
A useful tool for blowing dust out of areas like this is an aerosol of compressed air. These can be obtained from most electronic suppliers (such as Maplin) and are not very expensive. They look just like any other aerosol container but just blast a fine jet of compressed air which is ideal for dislodging dust from under and around components.
I was intending to include a picture of the inside of the power supply but unfortunately it was so horrific that had I done so this entire article would probably have required some sort of health warning or perhaps a PG rating. I'm sure that by looking at the outside of the casing you will be able to imagine what the inside looked like, though it may be better not to.
You will probably need to use some sort of brush to remove the dirt from many of the computer's parts as even a vacuum cleaner won't remove the more solid accumulations. The ideal tool for this is a small paintbrush, about 3 cm wide. Make sure it's a natural bristle brush, not artificial fibres, as otherwise vigorous brushing and poking will almost certainly generate potentially harmful static electricity.
Turning to the other side of the power supply the fan will almost certainly be filthy. The picture below shows the fan and you can see that the blades and the inside of the housing are coated with muck. This quite often forms a sticky deposit, not like normal dust at all, and in extreme cases you may need to use something like an old toothbrush rather than a soft bristled brush to dislodge it.
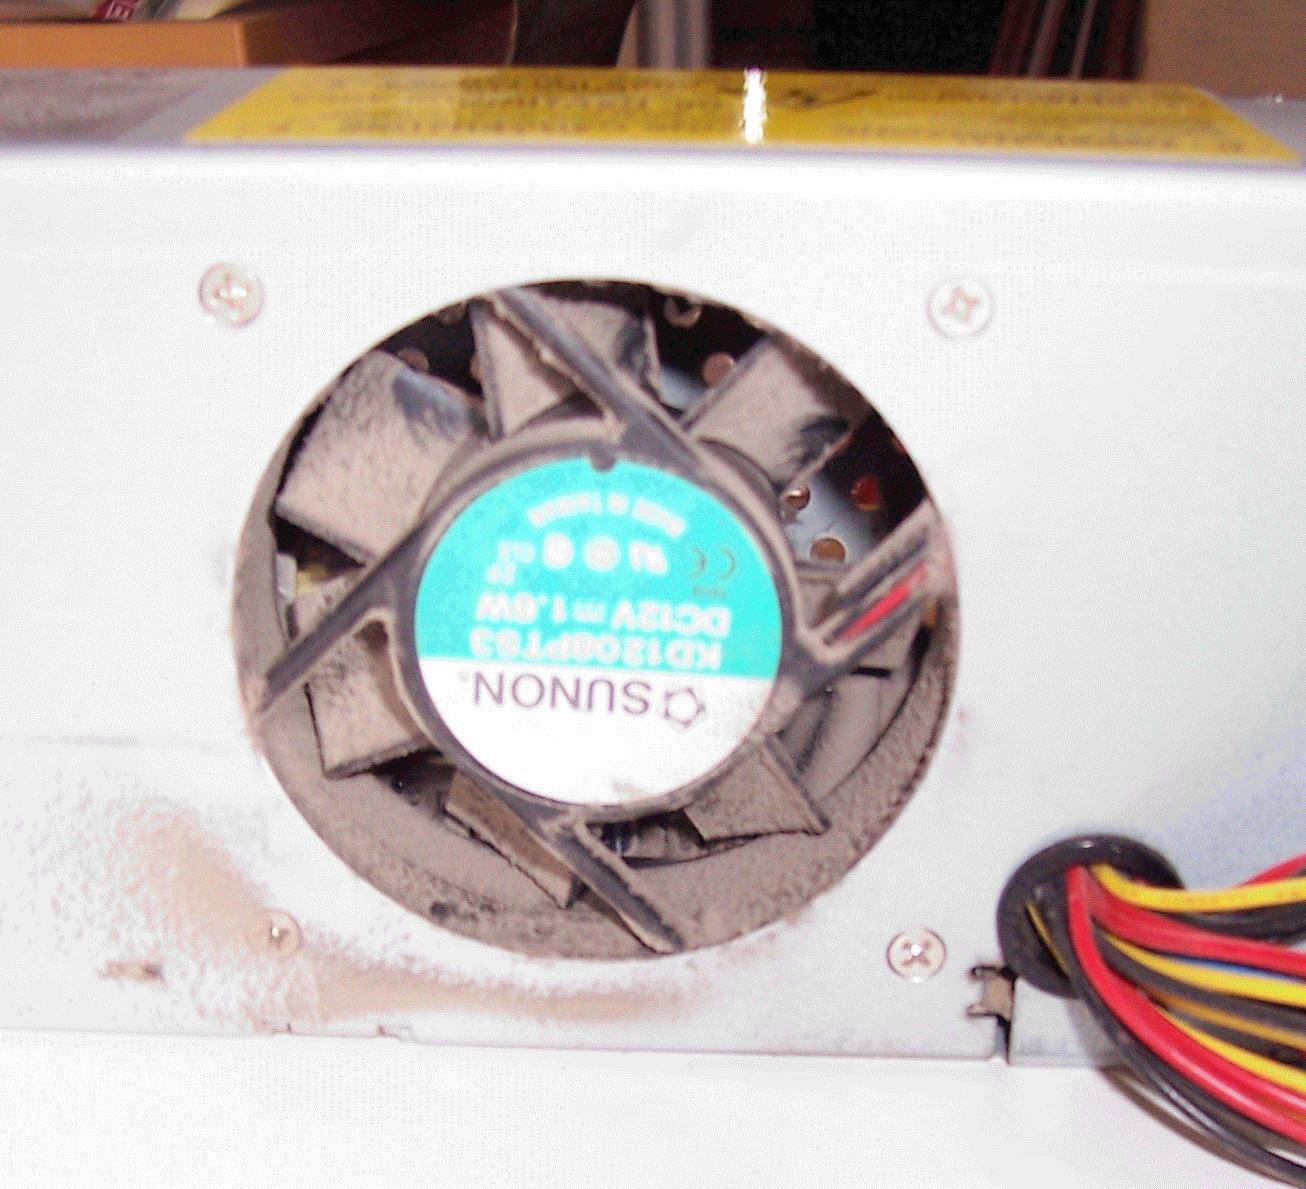
Click on picture for larger image.
If the fan blades are dirty then the fan will not be working at maximum efficiency and the air passing over the dirty blades will make a lot more noise than if they were clean and polished. Also the dirt may unbalance the fan, leading to more noise and increased friction and wear of the fan bearings.
When you have cleaned the power supply it's a good opportunity to lubricate the fan. If you peal back the label you will see a small black rubber plug, about 1 cm in diameter, in the centre of the fan. Remove this carefully and below it is the fan bearing. Apply just one drop of light machine oil and replace the plug and label. Don't use more oil and, if there already seems to be plenty there don't apply any. If you use too much then any excess will find its way into the airflow and will be blown into the computer.
Finally use a brush to clean away any dirt from the inside and outside of the case parts, in particular making sure that all the small slots that are so essential for proper air flow are clean.
Dirty contacts
While the motherboard is still held firmly on the base it is a good idea to remove and replace the RAM and VRAM chips a couple of times. This action cleans the contacts and removes any minor surface corrosion. The VRAM (the rearmost module) is removed by pulling it vertically out of its socket. Make sure that you don't damage the four cylindrical capacitors as any sideways force exerted on these can break the solder joint and pull them off the board, so be careful how you grip it. The VRAM needs quite a bit of force to extract it, and you must be careful not to twist it as you remove it or you may snap one of the side pillars. Don't panic if you do accidentally break one of these, it won't affect the function, but it's best not to do it. The best way to remove the VRAM is to firmly grasp each end of the PCB between forefinger and thumb and then brace the middle finder of each hand on the motherboard (making sure the fingers are on a piece of actual PCB and not on a component) and you can then exert the necessary force to pull out the VRAM in a controlled way without jerking or twisting.
You may have one or two main RAM modules. These are mounted in slanted sockets and have a small metal retaining clip at each end. Push the two clips outwards and you will find that the RAM module can be moved upright and then removed from its socket. The easiest way to do this is push the clips with your index fingers and, when they're released, you can use your thumbs to push the module upright. Unlike the VRAM this should not require any force, so if it doesn't move easily something is wrong.
Removing the hard drive and PCB
It is not essential to remove either the hard drive or the motherboard. However, if you have found a lot of dust and dirt it might be best to do so. The photo below shows the debris I found under the motherboard in another computer I was cleaning, Remember that although the RiscPC case is a plastic material the brown coating on the inside is actually electrically conductive to form a radio frequency screen. Lumps of fluff sandwiched in the narrow space between this (earthed) coating and the motherboard might well cause problems, especially where humidity is high.
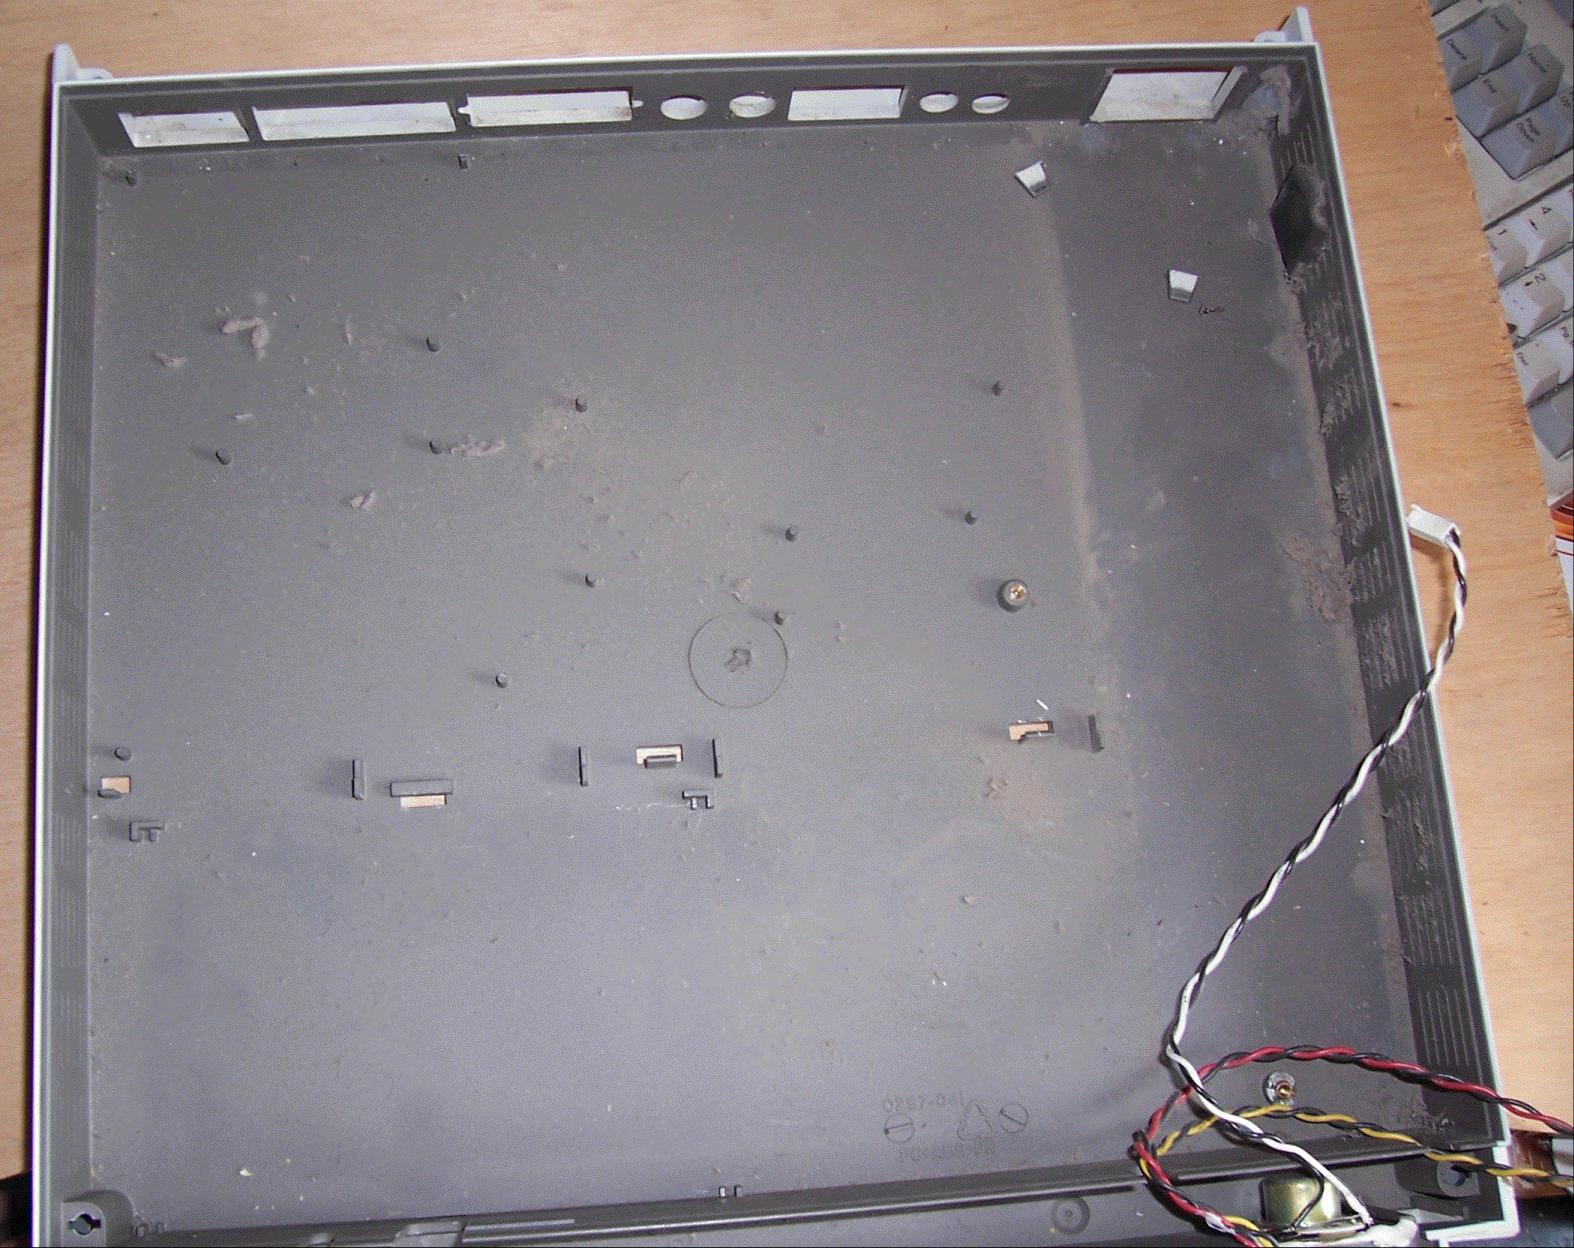
Click on picture for larger image.
To remove the hard drive first unplug the data cable from its socket on the motherboard. Even if you don't intend to remove these components it's still a good idea to unplug and refit both ends of the cable a few times to clean the contacts. The drive bracket is retained by a single phillips screw between the drive and the motherboard. Once this is undone the bracket can be removed.
Some early RiscPCs didn't have this screw. Instead the rear of the bracket slotted into a socket in the base moulding. It is easily released with a wide bladed screwdriver. This method was used with the base unit illustrated above.
If your computer is fitted with a network card this must be removed before the motherboard. It is retained by two small screws which pass through the back of the computer case. Once these are undone you can pull up the front edge of the card to release it from its socket and then remove it.
There is only one screw holding the motherboard. This can be found at the right hand end of the frontmost RAM socket and can be clearly seen in the earlier photo of the motherboard, just to the left of the connectors for the speaker and power and hard drive LEDs. Obviously you will need to unplug these leads before you remove the motherboard. note that they can only be replaced one way.
There are three plastic clips along the front edge of the motherboard. These can be released either by levering gently with a small screwdriver or pushing the clip with your thumb while pulling the PCB upwards gently. The latter method is safer as it is possible to damage the motherboard if you are careless with the screwdriver.
Once the front edge of the motherboard is unclipped you can lift it up slightly and work the rear section free. With the front of the PCB lifted up slightly the rear needs to be simultaneously lifted and pulled forwards. Don't use force or you will bend the steel backplate, it needs to be at just the right angle and then it will slide free.
If you don't want to remove the motherboard then you can use the aforementioned compressed air spray to blow the dust out from under it.
Putting it back together
Reassembly is the reverse of disassembly. The order of assembly should be to fit the motherboard, hard drive and power supply into the base. Once the motherboard has been fitted and is firmly held in the base you can insert the RAM and VRAM. When all the cables have been connected fit the first case slice with the floppy dive and (usually) CD ROM drive, again connecting the data and power cables. Look out for the floppy drive data cable. It is possible for this to be trapped and damaged so make sure this doesn't happen. You can now repeat this for a second slice, but it's normally easiest to fit the processor card or cards after fitting the first slice.
The ARM processor card goes into the front motherboard socket with the side of the PCB with the components on it towards the front. If you have a PC card this goes into the rear socket with the components facing towards the rear.
When you have assembled all the slices you can fit the backplane. Slide this down its guide slots, first making sure that there are no cables running over the socket. In particular the floppy drive power cable or the CD ROM sound lead. The board should slide easily down until it reaches the socket and then it will need a final, firm push to seat it in its socket.
Depending upon what (if any) expansion cards you have you may need to fit them one at a time, connecting data leads as you go.
When all the slices have been installed you can fit the retaining pins.
There are a couple of points to watch out for. All the RAM cards have a small notch cut out at the bottom of one end, as shown below.

Whichever side of the RAM card the chips are (they may be on both) this notch goes to the right hand side of the computer, towards the power supply.
You should not need to use any force when inserting the main RAM modules. Place them in the socket vertically and then, when they are seated properly in the bottom of the socket, just lean them towards the front of the computer until they click into place.
The VRAM is rather different. This slides into the the socket guided by the rails at each end. Make sure you insert it carefully, keeping it level. When it reaches the bottom of the guide rails and it doesn't seem to want to go any further you will need to use force to push it right into the socket. The best way to do this is to push firmly in the centre of the module. You'll know when it's seated correctly, there will be a distinct "crunch" feel as it seats itself in the socket.
Disc drive power cables can only be inserted one way. You will see that two of the corners of the plug are chamfered and the socket is similarly shaped. Almost always the chamfered side goes upwards, but this is not universally the case, notably with a few CD ROM drives, so do check. It is possible (though not easy) to force the plug in the wrong way round, and if you do manage to do so then you may damage the drive.
The data cables are a different matter. It is now common for there to be no locating lugs which means they can be fitted either way. However, all ribbon cables have an identifying "stripe" on one edge, normally red although it may be blue. This is actually pin number 1. In the early days of IDE drives pin 1 could be at either end of the socket, but the location is now always the same. Where both IDE and floppy drive cables plug into the motherboard this stripe should go to the left, in the end of the socket close to the edge of the PCB.
The data cable to the hard drive mounted in the bottom of the case has to do a 90 degree turn before plugging into the drive. You can see this in the first picture above. The cable plugs into the drive with the identifying stripe towards the rear of the computer. As there isn't a lot of space here you might find it easiest to plug the data cable into the drive first and also connect the power cable before you mount the drive. You will also see that the data cable normally passes under the raised centre section of the drive retaining bracket. This isn't essential, and some brackets may not have this raised section so you may need to put the data cable over the top of the bracket.
All current IDE interfaces and most SCSI interfaces have the data cable sockets running from side to side of the card, and in this case pin 1 is the left hand end of the socket. Castle SCSI interfaces have the data cable connector on the left hand side of the PCB running from front to rear and pin 1 is at the back. You need to be particularly careful with these interfaces as the cable connector has no plastic shroud so it is possible to connect the cable onto only one line of pins, and if you do this you can blow the small surface mount fuse on the card.
Unless you have a very strange machine any IDE or SCSI drives, both hard drives and CD ROMS, will be mounted right way up and with the front of the drive towards the front of the computer. In this case pin 1 will be towards the left and so the data cable will plug in with the identifying stripe on the left hand side of the computer.
The exception to this is the floppy drive. With a very few exceptions all floppy drives are the other way around, so the stripe will go at the right hand side.
Fitting the lid can be a bit fiddly if you've not done it before. Fit the front edge into its groove with the rear edge raised about 15 cm. Now lower the back of the lid, making sure the front edge remains properly located. If the back of the lid doesn't seem to want to fit properly into its place then you can be fairly certain that the problem is that the front isn't properly located, so lift it up and start again.
Problems
If you've fitted it all back together properly then everything should spring back into life when you switch on. If it doesn't, then there are a couple of common problems.
If a hard drive doesn't seem to be working check the connections. It's easy to forget something. Even I have been known to assemble a machine and then, when the hard drive doesn't seem to be working, discover that I'd forgotten to plug in its power lead. Similarly since the processor card is often the last thing that's installed it's not unknown to find yourself staring at a completely dead computer and then realise that the processor is still sitting on the shelf where you placed it for safety.
Possible the most common problem is a missing floppy drive icon. Look at the drive light. If it's staying on then the cause is almost certainly the data cable. It will either be plugged into the drive the wrong way around or located on just one set of pins, which is possible because most floppy drives don't have shrouds around the cable connector.
The final problem that can arise is with CMOS RAM. During the cleaning process this might become corrupted, so if your computer does weird things or doesn't seem to want to start up properly this might be the cause. First try switching on with the Shift key held down. This will stop the computer running !Boot and so you are more likely to get to the desktop. You may need to try switching on with the Delete key held down to reset CMOS RAM it to the factory default. You'll then have to use Configure to alter some of the settings but it should get the computer working again.
Giving your RiscPC a good spring clean in this way can give it a new lease of life. In the next issue I'll be taking a look at various ways you can improve the cooling and airflow in your machine which not only helps improve reliability but can also prolong its life.
Dave Holden