


Rhapsody3
RISCWorld
Chapter 13
Introduction
This chapter contains a number of features which did not find a place elsewhere together with a number of hints and tips on how to get the best out of Rhapsody.
13.1 Using MIDI
If you have a MIDI keyboard, the normal way to connect it to your computer is as follows:
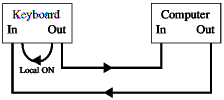
This will work fine in most cases. Obviously the keyboard can send data to the computer and the computer can send data to the keyboard. In addition, the keyboard can play itself in the usual way through an internal connection labelled Local ON in the above diagram.
A problem can occur, however, with certain keyboards (which may not have a separate socket called MIDI-thru). What happens is that any data which the keyboard receives from the computer is passed on to the 'Out' socket. This only causes problems when capturing notes. While the computer is merrily playing the original tracks, these are being relayed back through the keyboard and are being captured again - probably to be transcribed on to another stave! If you find this happening to you, try the following suggestion.
Open the main Rhapsody menu on the icon bar and choose the MIDI thru item.
This item will now appear ticked as above. In addition, you must now disconnect the link between the 'In' and 'Out' sockets on your keyboard. This is done by changing one of the settings in your keyboard (usually called Local) to off. To do this you will have to consult the manual that is supplied with your keyboard. Your setup now looks like this:

Now, whenever you play a note on the keyboard, it is transmitted to the computer and passed back again in order to be played. With Local OFF , you should find that when capturing notes, the MIDI data coming in is no longer duplicated and sent out again and all will be well.
Another, more important, use of the MIDI thru facility mentioned above is when connecting three or more MIDI instruments together. A typical setup contains a MIDI keyboard, a computer and an expander which can often provide many more simultaneous high quality instruments. The way to connect these is shown below:
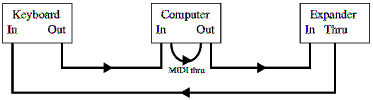
The keyboard must be set to Local off . In this way, the keyboard can send data to both the computer and the expander and the computer can send data to both the expander and the keyboard.
In theory, any number of expanders may be daisy-chained in this way but in practice, time delays will become noticable. It must be admitted too that Rhapsody's MIDI-thru facility is not fast and if the computer is very busy, notes may be delayed considerably. Do not worry. They should transcribe in the right places.
13.2 Entering notes and rests
While it is possible to enter all symbols using the mouse alone and most of the symbols using the keyboard, a combination of the two is best. My personal preference is to select the symbols from the main panel using the mouse while using the <Space> bar and other action and cursor movement keys on the keyboard.
As you get to know the keyboard shortcuts better, you will find yourself using them more and more, partucularly the function keys (which select notes) and Ctrl-L (which inserts a bar line after the cursor).
When using the action keys <, Space >. and ?/ , don't forget that pressing <Shift> at the same time has the same effect as clicking on the equivalent icon with the Adjust button. For example, when entering a note, <Space> on its own inserts an upstem note while <Shift><Space> will insert a downstem note. Likewise, when the icon selected has two alternative forms (eg pedal on and pedal off) <Space> on its own inserts the upper alternative, <Shift><Space>, the lower one.
If you add a note to another note to make a chord, the note length is unchanged. For example, if you add a crotchet to an already existing minim, the resulting cluster will remain a minim in length. It is not possible to have two different note lengths in the same cluster. In fact this is true of all the note qualifiers - dots, ties, triplets etc. All these things must apply to every note in the cluster.
As a general rule, if you do not position the cursor exactly over one of the notes, Rhapsody will apply the selected symbol to the nearest note. Similarly when deleting. However, when deleting notes where there is ambiguity, Rhapsody requires the cursor to be placed exactly over the desired note.
To delete all the notes and rests under the cursor use the <Delete> key. To delete everything under the cursor (including, for example text and phrase marks etc.) use <Shift><Delete> and to delete the whole slot containing the cursor from the top to the bottom of the score use <Ctrl><Delete>.
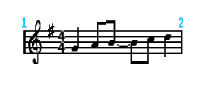
13.3 Missing rests
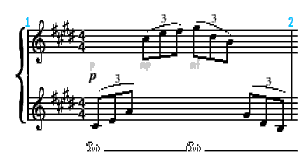
This version of Rhapsody is much more tolerant of missing rests than previous versions when it comes to playing a score. For example, the following bar is will play correctly but, though perfectly acceptable musically, it will still generate a warning message as, strictly speaking, both staves are incomplete.
13.4 Blank bars
It is perfectly permissible to leave complete bars blank. Indeed, when producing performing parts for an orchestra, it is advisable to do so. Completely blank bars are lumped together as so many bars rest when the score is formatted. On the other hand, if you want the bars to be written out for the player to follow, put in a semi-breve rest. (In accordance with the usual practice, a semi-breve rest counts for a whole bar even when there are more or less than 4 crotchets in the bar)
13.5 Ties
Ties are handled differently in this version of Rhapsody. In order to determine which note the tie belongs to, Rhapsody scans ahead to the end of the bar plus one note to find a note which is of the same pitch and of the same stem direction . If it cannot find one, it looks again to find a note of the same pitch with a different stem. (If it can't find that either, it prints a tie but plays the note as normal.). In this way the following score will play correctly:
So will this:
but this will not:
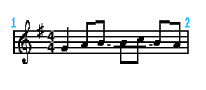
It looks wrong anyway because Rhapsody is telling you that the first B is tied to the wrong note. Swapping the stems of the two middle quavers will solve the problem.
13.6 Slurs and phrase marks
Slurs and phrase marks are used in various ways in a musical score and it is not always possible to say which is which. As a general rule, phrase marks are placed over a large group of notes which constitute a single musical phrase whereas slurs are placed over a small number of notes to indicated that the notes are run together, ie legato. In vocal music, a slur may indicate that several notes are to be sung on one syllable while in string music, it may mean that several notes are to be played in one bow. There is, however, nothing to stop you using a slur to indicate a phrase, or a phrase mark to indicate a slur - they look exactly the same on the printed page and entering slurs is easier than entering phrase marks because Rhapsody positions them automatically.
There is one difference between the two as far as Rhapsody is concerned. When Rhapsody plays a slurred note, it actually holds it on for a bit longer than the actual length. Normally this has no noticable effect. If, however, you have a MIDI instrument which has a Portamento feature, the Note off command will come after the next Note on command. With portamento switched on, this is a signal to slide between the two notes without starting a new one . Usually you can adjust the rate of slide and if you set it to its fastest setting, the effect is a smooth transition from one note to the next - ie a slur. The effectiveness of this trick depends very much on the instrument being played. It works very well for solo orchestral instruments which often have a characteristic transient at the beginning of a new note which is absent when the note is slurred. On the other hand, it will have little effect when the instrument has no transient (eg many organ voices) and will sound very strange with a piano where the transient is an essential part of the quality of the note!
It is also worth remembering that Rhapsody will not slur across a bar line. If you need to indicate such a slur, you will have to use a phrase mark instead.
13.7 Bar lines and repeats
It is very important to remember that there are two sorts of bar line in Rhapsody. The standard bar line, the 1st time and the 2nd time bar lines are all referred to as proper bar lines. All the others are supplementary bar lines. All proper bar lines are distinguished by a blue bar number printed over the top in the editing score. Supplementary bar lines are usually superimposed over proper bar lines but this is not essential. If, however, you put a start repeat bar line in the middle of a bar, you must make sure that the end repeat bar line is in the same corresponding position otherwise the score will not play correctly. Remember, 1st and 2nd time symbols may not be placed in the middle of a bar.
The Da Capo , Dal Segno and Coda signs may need some further explanation. Da Capo (D.C.) means 'go back to the beginning'. If you put a Da Capo sign in the middle of a piece, Rhapsody ignores the sign the second time round.
Dal Segno (D.S.) is exactly the same except that the music goes back to the Segno signv instead of the beginning. If, during the repeat, the Fine sign is encountered, the music stops. As far as Rhapsody is concerned Da Capo al fine and Dal Segno al fine are identical but it would be usual to put these latter terms if the Fine sign is being used.
The Coda wheel is different. The sign is ignored the first time it is encountered but when it is found a second time (presumably due to some kind of repeat) the music skips ahead to the Coda sign.
Here is a simple piece which incorporates a repeated section, a Da Capo and a Coda.

This is the correct way to deal with first and second time bars:

(the 2nd time can be omitted if you prefer.)
13.8 Capturing
It may be difficult at first to know which method of capturing data from the keyboard is best. It very much depends upon your skill as a pianist and the type of music you are transcribing. If you can play the piano a bit and you have a simple melody or an orchestral part to transcribe, real time capture is the best. Remember that you can slow down the tempo to suit your skill and that you can increase the number of beats in the bar by (temporarily) changing the time signature.
If the part has a lot of chords in it and you are uncertain of your ability to get them all right, semi-real time capture has a lot to commend it. You can play the notes of each chord as slowly as you like and play the last note of the chord exactly the right length. This mode is also useful in cases where the notes are constantly changing in length.
Step time capture is the simplest mode to work with but it does mean being able to operate the keyboard and the computer at the same time. Remember that you can select a dotted note (eg a crotchet) with two presses of F5, a triplet note with three presses and a tied note with four .
13.9 Transcribing
Transcribing can be a frustrating business if you are not very good at keeping strict time. This is just as true of the experienced musician, who will instinctively modulate the tempo of his or her playing, as for the beginner whose skill is lacking. One obvious remedy is to set the tempo really slow but this has the disadvantage that one can lose track of the beat. To get over this problem, set the time signature to one with more beats in it. For example, when transcribing a piece in 4/4 time, set the time signature temporarily to 8/8. This will give you twice as many beats in a bar.
Rhapsody does not provide a separate 'count in' bar. When transcribing a new piece, simply use the first bar's worth of beats to help establish the tempo. When you transcribe the notes, you will find an extra bar line at the beginning of the piece. Leave it there until you have entered all the staves, then simply delete it.
When transcribing into the middle of a score, put the cursor one bar before the place where you want to start and begin to play at the beginning of the second bar.
If, having transcribed a few bars, you are not satisfied and want to transcribe them again, for example, using a new option setting, move the cursor up one bar to the beginning of the transcribed notes, choose the Stave ç Clear option from the main score menu or use <Ctrl> D to clear the stave from the cursor to the end. Do not forget to move the cursor back to where it was before transcribing again! Note that you do not have to play the notes again, the data can be transcribed as many times as you wish. It is only lost when you capture something else.
RISCWorld