


Rhapsody3
RISCWorld
Chapter 11
Introduction
Certain features in Rhapsody3 can be switched off or changed in some way. To do this, select the Preferences... item on the main iconbar menu. This brings up the Preferences window.
On the right is a panel with three icons - OK, SAVE and CANCEL. When you have made any changes you want, clicking on OK will cause all the open scores to be redrawn with the changes implemented. SAVE will do the same, and it will also save the changes in the !Rhapsody directory so that next time you load Rhapsody, the changes will be used again. If on the other hand, you decide not to go ahead with the changes you have made, CANCEL closes the window.
Note that it is not possible to apply changes to scores individually - all the options apply to all the scores.
11.1 Beams, Guides and Spots
In the first panel are three option icons which control certain features of the main score windows. Beams refers to the way that quavers and shorter notes are joined together. Drawing beams is quite complex and time consuming. If this option is switched off, screen redrawing can be speeded up. Note that beams are always drawn when the score is printed, however.
You will have noticed that the score is divided up into little boxes (called slots). These boxes have very little to do with the way the score is finally printed, but they do help you to position the pointer accurately, especially when dragging symbols around the score. If you find them annoying, the Guides option enables you to switch them off. You can also change the colour of the guidelines. (see below)
Slurs and hairpins are edited by dragging their end points and control spots around. Too many spots can be confusing so the Spots option allows you to turn them off. Note that this does not prevent you from editing the symbol, it only suppresses the printing of the spots. You can also change the colour of the spots. (see below)
11.2 Display size
The Normal display size is designed to give the best compromise between size and clarity when editing a score. If you have a high resolution monitor, you may find it possible to use the Small or even Tiny sizes. If, on the other hand, you have difficulty seeing or editing the notes, or if you want to show a score to a large audience, the Large or Huge settings could come in handy.
11.3 Colours
Several features used when editing a score can be changed in colour; for example, the colour of the marked block, the bar numbers printed along the score and the colour of the shaded (ie non printing) dynamics. To change any colour, click on the arrow icon to the right and select the appropriate colour from the menu which presents itself. Note that, since none of these features are actually printed, changing these colours does not change the printed score in any way.
11.4 Auto-save
When working on an important score, it is wise to make sure that you take regular backups of the work completed so far. When the Auto-save option is selected, any score which has been modified will be saved automatically at the end of a time period set by the second icon in the panel. If you select the with prompt icon as well a window will appear when it is time to save the score.
You can choose at this stage whether to go ahead with the save, postpone it for a couple of minutes, cancel auto-save (for that score alone) or turn off auto-save completely. You can also, if you wish, simply ignore the window while you finish what you are doing and save the score later.
11.5 Auto-check
Whenever you edit a bar or move the cursor into a new bar, Rhapsody makes certain automatic checks, namely to see a) whether any stave contains too few notes or rests, b) whether any stave contains too many notes or rests, and finally c) whether the bar is correctly aligned. That is to say, whether all the notes which are to be played simultaneously line up one above the other. It can be very irritating when editing a score to have these warning boxes popping up all the time. Any or all of the warnings can be switched off by deselecting them in the preferences window. An easier way is to close the warning box the first time it appears using its close icon. To reinstate the warnings, use the preferences window.
11.6 Dynamics
By default, the 15 dynamic levels from ppp to fff are allocated the levels 1 through 15 (0 being silent). However, volume levels below about 4 are almost inaudible when using the Archimedes' internal voices. If you find that you cannot usefully use dynamic levels below p , you may want to change the default settings. Four control points are provided and Rhapsody will calculate intermediate values for you. For example, if you set the numbers in the panel as follows:

you will map the dynamic levels on to the volume numbers actually used in the following way:
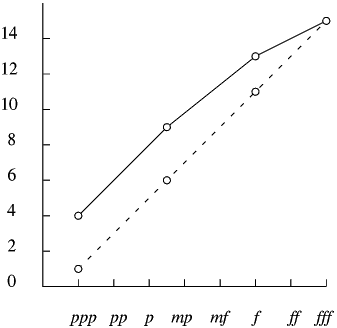
(The dotted line shows the default settings which are 1, 6 11 and 15)
If you want to be really perverse, you can define ppp to be loud and fff to be soft!
11.7 Capturing rests
When using step time or semi-real time capture, it is convenient to be able to put in rests without having to turn back to the computer all the time. To achieve this, simply define one of the notes on your keyboard (usually right at the top or bottom) to stand for a rest. C4 is middle C. Many MIDI keyboards stretch from C2 at the bottom to C7 at the top. Alter the note in the usual way by clicking on the icon.
11.8 Sound notes
When editing a score, Rhapsody will play the notes being edited in two ways:
a)on dragging - ie when you drag a note around the score, the note will play every time the pitch changes.
b)on inserting - ie the note will play whenever you insert a note into the score.
Either or both of these features can be switched on or off as you prefer.
Note that the pitch takes into account the clef and key signature at the position of the cursor but it does not take into account any accidentals which may have occurred previously in that bar, and if you drag a note into another area of the score where the clef or key signature is different, the notes sounded when dragging will not be the same as the note sounded when inserting.
Finally, do not forget that in order to implement any changes you have made to your preferences, you must click on either IMPLEMENT or SAVE.
11.9 Saving your Preferences
When you click on the SAVE icon, all your preferences are saved in a special file in the !Rhapsody directory called 'Prefers'. This file is read whenever Rhapsody is loaded again so that your preferences are used again. In addition, any guitar chords which you may have edited or defined are also saved in the same file.
RISCWorld