


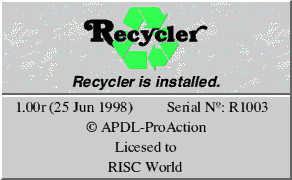
Recycler
APDL/ProAction
Recycler is � APDL/ProAction 2000. All rights reserved
No part of this product may be reproduced in whole or part by any means without written permission of the publisher. Unauthorised hiring, renting, lending, public performance or broadcasting of this product or its parts is prohibited.
Recycler is supplied under licence for use on one computer at a time. The user may copy the program for backup purposes only. Please contact APDL for details of site and network licences.
This version of Recycler is supplied with RISCWorld and is Licensed for use only by RISCWorld subscribers.
While every care is taken, the publisher cannot be held responsible for any errors in either this product or documentation for this product, nor for the loss of any data or consequential effects from the use of this package.
If you discover a problem with this product, please contact APDL, preferably by phone or email, explaining the problem as briefly as possible, but including all relevant information, e.g. system configuration, hardware add-ons, version of operating system. Please do not return your disc or packaging until requested to do so. Always remember to quote the version number and serial number of the application.
39 Knighton Park Road
Sydenham
London
SE26 5RN
Telephone: 020 8778 2659
Fax: 020 8488 0487
Email: info@apdl.co.uk
Web: www.apdl.co.uk
Installation & Getting Started
Installing RecyclerJust copy the !Recycler application to wherever on your hard disc you wish to install it, but see the following section if you want Recycler to be run automatically when you start your machine.
Getting started
Once the installation process is complete you should run the Recycler application by double clicking on its icon from your hard drive. The start-up banner will appear in the centre of the screen while loading is taking place and the Recycler icon will appear on the left-hand side of the icon bar, to the right of the floppy disc icon.
To ensure Recycler is always installed it is best to have set it up as part of your boot sequence.
This can be done in several ways :
- RISCOS 3.5 and upwards:- Put the application in your Tasks directory inside !Boot.Choices.Boot.
- Up to RISCOS 3.5:- in the !Boot file add the line :
Filer_Run <path to Recycler>.!Recycler
Please see the RISC OS User Guide for more information.
How to use Recycler
The main window
The main window controls many of Recycler's features. It shows the files that have been deleted along with all their information.
To open the main window click SELECT on the Recycler icon on the icon bar
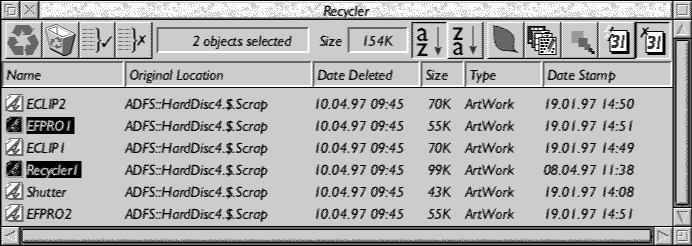
Recycler's features are controlled via the main menu or the button bar along the top of the window.
You can alter the width of each of the display columns in the main window by dragging the edge of the column heading icon either left or right.
To select a file click SELECT over it and it will become highlighted. When an operation is carried out this file will now be included.
The Button bar

Recycle
Click SELECT on this and the currently selected files will be returned to the location from which they were originally deleted. If they cannot be put back for some reason, e.g. not enough disc space, then they will be left in Recycler.
Note : Files are restored in deleted date order, ie the oldest first.
Empty Bin
Click SELECT on this and the current selection of files will be removed completely from Recycler. Use this option with care, files cannot be recovered once the bin has been emptied.
Select all
Click SELECT on this and all files inside Recycler will be selected.
Deselect all
Click on this and all the objects will become deselected.

Ascending order
Click SELECT on this and the files will be displayed in ascending order ie. 'A' would be at the top and 'Z' would be at the bottom.
Descending order
Click SELECT on this and the files will be displayed in descending order ie. 'Z' would be at the top and 'A' would be at the bottom.
Leaf
Click SELECT on this and the files will be sorted by leafname.
Type
Click SELECT on this and the files will be sorted on filetype.
Size
Click SELECT on this and the files will be sorted on size.
Datestamp
Click SELECT on this and the files will be sorted by the date they were created or last modified.
Deleted date
Click SELECT on this and the objects will be sorted by the date that they were deleted.
The first icon as shown above normally shows the total number of files in Recycler. If any files are selected then it shows how many.
The second icon shows the size of the files in Recycler. This is their original size when uncompressed. Again, if any files are selected then it shows the total uncompressed size of the selection.
The total size of the files in Recycler is also shown underneath the Recycler icon on the icon bar.
The main menu
Clicking MENU over the main window opens the main menu.
Display
Moving to the right over the Display item in the main menu opens the Display sub-menu.
Disc name only
This will display just the disc name in the original location column and omit the filing system name.
Disc name & FS
This will display both the disc name and the filing system in the original location column.
Ascending/Descending
Does the same as the Ascending and Descending buttons.
Sort by
Click SELECT to choose which field to sort by.
File
Moving to the right over File on the main menu opens the File sub-menu shown below.
Copy
Move to the right over this menu item and you will be able to copy the file out to your hard drive. This will not remove the file from Recycler.
Restore
Click select on restore and the currently selected files will be returned to the location from which they were originally deleted.
If the restore is successful then the files will be removed from Recycler. If they cannot be restored for some reason, e.g. not enough disc space, then they will be left in Recycler.
Delete
Click select on this item and the object will be deleted from the Recycler Bin.
This operation cannot be undone.
Select all/Clear selection
This will either select all the files in Recycler or deselect them all respectively. The current number of files selected will be shown at the top of the Recycler window.
Deleting without Recycler
Sometimes you may need to delete a file or group of files without using recycler. To do this you should hold down the Shift key and start the deleting process in the usual way. This causes Recycler to temporarily stop grabbing deleted files.
Files deleted in this way are not recoverable.
Preferences
The icon bar menu
Recycler can be set up in a number of different ways to suit you. Files or directories can be protected against deletion and Recycler can be told not to grab files or directories associated with certain tasks.
Info
This gives information about Recycler including your licence and serial number.
Quit
Will quit Recycler and stop grabbing deleted files.
Files deleted after Recycler is quit can not be recovered.
Files...
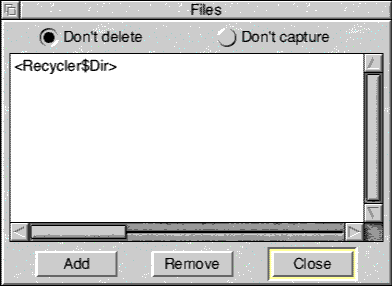
The files window allows you to set up which files or directories are protected, and which ones are not to be captured if deleted.
Protecting against deletion
To protect a file or directory against deletion select Don't Delete at the top of the files window and click on Add to open the window shown.
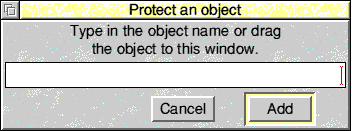
Drag a file or directory to the window or type in the full pathname of an existing file or directory. If you choose to protect a directory then its contents are also protected and cannot be deleted whilst Recycler is running.
Clicking SELECT on Cancel will close the window and not change the list of protected files.
You may, if you wish, use a System variable such as <MyObj$Dir> in the window. This will work as long as the variable MyObj$Dir is defined when you click on Add.
Removing the protection
Click SELECT on an item in the files window and click on Remove to remove that file or directory from the list of protected files.
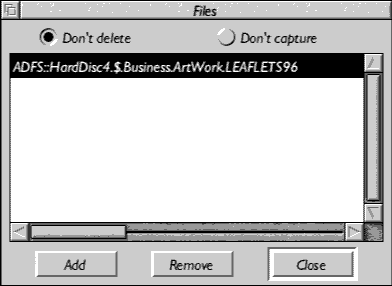
Excluding files
To exclude a file from capture by Recycler select the Don't Capture option at the top of the Files window and click select on the Add option to open the window below.
Anything within <Wimp$ScrapDir> will not be captured.
Files or directories are added and removed in the same way as they are in section 4.3. By default there will be some files or directories already set up in the Don't Capture section.
Close
Click select on Close and the files window will be closed.
Choices...
Select Choices... from the icon bar menu to open the window below.
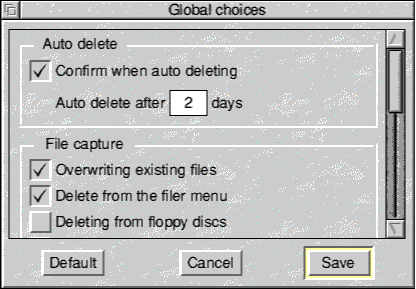
Confirm when auto-deleting
You can specify how long to keep deleted files before they are removed from Recycler. This option prompts you for confirmation when the specified time has elapsed and there are files about to be removed.
Overwrite existing files
With this option ticked any file that is about to be overwritten will be captured. This is very useful if you are continually modifying the same document, as it provides you with a way of returning to an old document.
Delete from the filer menu
With this option ticked any attempts to delete a file by using the filer menu will result in the file being captured.
Delete from floppy discs
With this option ticked any files being deleted from floppy discs will be captured and stored on your hard disc.
Compression
You can choose to compress the files in the 'Bin' either when Recycler starts up or as it is closing. Untick both and files inside the 'Bin' will not be compressed at all.
Remove Recycler module on exit
With this option ticked the module which captures all your files will be removed when the Recycler application is quit.
If it is not ticked then you can quit the Recycler application and the Recycler module will carry on capturing your files.
Confirm when deleting
With this option ticked you will be prompted every time you delete a file in order to confirm the action.
Bin Location
Drag the folder out to set a new location for the 'Bin'. You can only do this when the 'Bin' is empty.
Default
Click select on Default and all the choices will be set to their default values. This will only set the default location for the 'Bin' if it is empty.
Cancel
Click select on Cancel and no changes are made and the window is closed.
Save
Click select on Save and the options you have chosen will be saved to disc.
APDL/ProAction