


Adding and replacing floppy disc drives
David Holden explains how to modify PC floppy disc drives in Part 2 of an article originally published in Archive.
Last month, I dealt with replacing drives, and this month I shall consider fitting additional drives. This article very much follows on from last month, so if you missed that, you are advised to read it (Vol 2 Issue 6) before trying to make use of anything printed here, or you may lack some important information included last month.
Fitting extra drives
Most people don't need more than one floppy drive, but there are good reasons why you might want more. For example, you may:
- require a different type of drive, e.g. a 5¼" drive.
- find it useful for keeping !System and other files, because you can't afford a hard disc.
- want to put your computer elsewhere than on top of the desk, making it difficult to get at the main floppy drive.
- have a bulk disc copier which appears to the computer like a second drive.
- copy from one floppy to another a lot.
(1) is a common requirement for people who want to transfer files from an old BBC or Master computer. Sometimes this is only a temporary requirement, but a more permanent setup may be needed.
(2) is less common now that hard discs are so much cheaper, but not everyone can afford one, and there are often 'spare' floppy drives about.
(3) and (4) apply to me as my A5000 lives on a shelf in the kneehole of my desk and is difficult to get to, and also it drives an auto-copier, and my RiscPC sits on the floor beside the desk where, although it's more accessible than the A5000, it would soon become tiring if I had to reach across to it every time I needed to look at a floppy disc.
(5) is really a red herring. When copying files from one floppy to another it is quicker to copy the files from the first disc to a RAM disc, then insert the second disc and copy them to that.
Extra internal drives
These aren't very often needed, and some models of computers don't have space for them anyway, but as the methods used are similar to what is needed to fit an external drive, it is a good place to start.
I'm not going to go into detail describing the mechanical fitting of the drive and layout of the cables. This would require specific instructions for each individual model, and it's not too complicated to work it out for yourself.
Obviously, not all models have room for a second drive. The A5000 and any RiscPC fitted with a second slice do, and A310 and A400 machines have room, provided there's no internal hard disc (but then if you had a hard disc, you probably wouldn't want a second internal floppy). Only the RiscPC can have a 5¼" drive fitted internally, although I think it unlikely that anyone would want to do that, so I shall only consider 3½" drives at this stage.
With the machines fitted with HD (i.e. 1.6Mb) drives (A5000, RiscPC 700, and see last month for my definition of a RiscPC 600), you will only need to make a new data cable. The original drive will be set to ID 0, (unless it's been changed) and as any new 3½" drive you buy will probably have its ID set to 1 you just require a cable with three 34 way connectors, spaced to suit the drive positions.
All the parts to make up cables are available from Maplin Electronics. You might be able to get them cheaper elsewhere, but there are plenty of Maplin shops around and, unlike trade suppliers, they sell the cable cut to length. If you do have difficulty, I might be prepared to supply parts or ready-made cables.
Although I previously described twisting a data cable at the end to switch the DS lines, this can also be done in the centre so the drive closest to the computer end has the DS lines changed. Just slit the cable between lines 9 and 10, and 12 and 13, about 4 cm either side of where you want to fit the first drive connector, twist the three cables, and fit the connector. As the wires are twisted before the first connector but go back to their normal position immediately after it, the first drive will have its DS lines reversed but the second will be 'normal'. You won't need to do this if you intend to retain the original Acorn drive, but you might if it has been changed and both drives have their ID set to 1.
The A310, A400 and A5000 all have ready prepared power leads for a second floppy. The RiscPC doesn't, but it does have plenty of spare connectors for hard drives. You can just release the 5v and 0v lead from one of these, and solder on an extension lead with a connector for the new floppy drive, but an easier method is to buy a 5¼" to 3½" power lead adaptor. These are readily available and just plug in to any of the spare hard disc power leads to convert it to the correct connector for a 3½" floppy.
Some A5000s seem to have the data cable ready prepared for two floppy drives, so all you need do is fit it. The holes are even pre-drilled in the bottom of the case. You need four 25mm M3.5 bolts (most floppy drives are tapped M3.5) and four 20mm spacers. Maplin don't sell 20mm spacers, but they do sell ¼ inch and ½ inch, and one each of these is equivalent to 20mm.
The single drive only problem
The 3010 family, RiscPC 600 and A7000 were designed to have only a single drive, so although the hardware and software exists to support more, only the DS 0 line is connected. It is possible to solder a lead directly from the FDC chip to the DS 1 pin on the socket, but there's no need to do this because there's a simpler way.
Although only the DS 0 line is connected, this can be in two states, 0v for DS 0, and 5v for NOT DS 0. We can use this to select another drive, because if we have two drives fitted and the controller isn't addressing drive 0 it must be addressing drive 1.
This can be done with logic gates and a small PCB, but again it can be simplified. All you really need is two transistors and two resistors, total cost around 50p, and you can solder them directly to the data lead or the drive PCB.
The circuit shown uses BC182L transistors and 56K resistors. The transistors can be just about any NPN small signal device, and the resistor value is not critical, anything between about 47K and 100K will do, I have shown a BC182L because they are so common that anyone who messes about with electronics will probably have several in their junk box, and most suppliers will have them or a direct equivalent. Note that the lead-outs shown are for the 'L' suffix device.
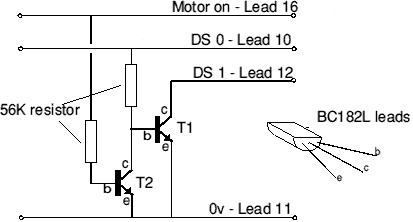
The base of T1 is connected to the DS 0 line, so when this is high (NOT DS 0) the collector of T1 pulls DS 1 low. This would mean that drive 1 was selected whenever drive 0 wasn't, which would be most of the time, so T2 is connected to the MOTOR ON line, and when this is high (motor off) it turns on and switches T2 off, ensuring that drive 1 is only selected when drive 1 is OFF and the motor is ON. This is rather crude, but it seems to work perfectly.
One way of constructing this is to solder the components directly to the data cable. Pick a convenient location where the cable isn't likely to be twisted and won't come into contact with anything else, although your choice will be rather limited in some models. It doesn't matter whether this is before or after the first drive connector. Locate leads 10 (DS 0), 12 (DS 1), and an earth. Lead 11 is an earth, so we might as well use that. You will also need lead 16 (Motor ON). Separate these four wires from the rest and each other by slitting between them for about 5cm.
You will need to strip a short piece of insulation, about 3mm, from leads 10, 11 and 16 to enable you to solder to the cable. You can cut lead 12 and cut it back on the side that goes to the main PCB because you only need to connect to the end of the lead that goes to the drive. Stagger the points where you strip the wires so that the bare sections can't touch. Exactly where you strip them will depend on how you arrange the components.
Solder the emitter leads of both transistors to lead 10 (0v), and join the base lead of T1 to the collector lead of T2. Solder one of the resistors between here and lead 10 (DS 0) and the other between lead 16 (Motor ON) and the base of T2. Now solder the end of lead 16 (DS1) to the collector of T1.
Exactly how you arrange everything will depend on your skill and experience, and if you use different transistors from the ones I suggest, the lead-outs may well be different. It is possible to do it quite neatly with the components laid flat against the cable. You can then cover everything with tape to make sure that the bare wires can't come into contact with anything, and to hold the components securely against the cable. However, the layout isn't important electrically, so it doesn't matter how it looks; it should still work. As long as you can use a soldering iron, you should be able to make a functioning circuit, and the very worst you can do is ruin a length of cable.
An alternative way of arranging things is to solder the components directly to the PCB on the second floppy drive. This might be neater, but the disadvantage is that you will have to do it all again if you ever change the drive, and there may not be room between the bottom of the drive and the case. If you do mount the components on the drive you should also cut lead 12 at some point in the cable.
One final point. As I have explained, the OS will put up drive icons for all drives it detects, up to the maximum configured number. If you had two drives and configured three you would still only get two icons. Using this system, the second drive will appear as all IDs except ID 0, so don't configure more than two drives.
A310 and A400 second drives
In theory, fitting a second drive in one of these machines should be easy - they were designed for it - but there are a few practical problems.
The first is obtaining a suitable drive. You could modify an HD drive as previously described, but if you do this the READY line will be set when there is a disc in the second drive, and although this isn't likely to cause serious problems, it could be annoying because if there's a disc in the second drive, the computer will be unable to detect when the first drive is empty. If you decide to go ahead anyway, put a resistor of about 270R in the lead between pin 34 and the Disc Detect switch.
The second problem is that you will need a 'cradle' to hold the drive because it's fitted at an angle. The good news is that you already have one to use as a pattern (the existing drive) and it doesn't need to be a complete cradle, two 'L' shaped brackets made from sheet aluminium will do just as well and are much easier to make.
External 3½" drives
From what has been said so far, you should be able to see that fitting an external 3½" floppy drive to an A3010 does not really require any special circuitry other than the simple addition already described. What you will need is a box to put it in and some sort of power supply, and I'll come to that later.
Getting a lead outside the computer can be a problem, especially with the 'single box' models (A3000, A3010, A3020). If you don't have any internal expansion cards you could remove the blanking plate from the rear of the machine, and lead the cable out through the hole. Another method is to cut a slot along the join between the top and bottom of the case.
If you want to be able to separate the external drive from the computer you will need some sort of plug and socket. Although 34 way IDC DIL male plugs to connect to the ones used on drive cables are made, they are not easy to obtain, and are also rather expensive (as much as £5). They can normally only be obtained through trade outlets, although Radiospares do list them. Most component suppliers have connectors intended to be soldered to a PCB, and you could use one of these, but it would mean soldering all 34 leads to the connector.
Buffering
When an external drive is fitted, the data lead should be buffered to protect the computer from possible overload. It is possible for the cable to act like an aerial and feed radio frequency signals into the computer which could cause problems or even, in extreme cases, damage. The latter is very unlikely, so unless you have a very powerful amateur radio transmitter next door, I don't think you need worry. I live less than a mile from the Crystal Palace transmitter and have never had any problems at all with a variety of machines, but you have been warned.
However, it is always good practice to keep leads as short as possible. If the external drive is going to be placed beside your computer on the desk, it could be quite short, but if, like me, you want to put the computer under or beside the desk, it might need to be much longer. I have used an unbuffered lead around 1m long with a RiscPC 700 without difficulties, but I have now fitted a buffer to this machine as I have extended the lead to about 1½m. My A5000 has a similar length of lead, but the external drives on the A5000 are already buffered, so again there shouldn't be a problem. It is not likely that you will have trouble with leads up to about 1m.
The buffer that I use in my RiscPC is a very old one originally fitted to an A310. It's a small PCB that plugs into the socket on the motherboard and has a socket for the cable to the internal drive and another for the cable to external drives. When I obtained it, it was not suitable for use with HD drives because line 2 was buffered the 'wrong way', that is, it was an input line from the drive to the FDC and not, as it should be with HD drives, an output line from the FDC to the drive. A few minutes work with a soldering iron put things right, and it now works perfectly with every type of drive.
Some of these buffers deliberately 'shifted' the drive ID. This was done so that people could attach 5¼" drives taken from a BBC or Master to their new Archimedes. By shifting the external IDs one number 'up', a pair of external drives set to 0 and 1 would be seen by the computer as 1 and 2. This meant that the IDs didn't have to be changed, so the drives could still be used with the original machine. Watch out for this if you get hold of one of these boards. Sometimes this feature could be set and disabled by a jumper, but some had it 'hard wired'.
I'm not going to give any instructions for modifying older disc buffers, there are so many different types that it would get too complicated. However, I have given a few pointers, and it should be fairly easy for anyone to check the circuitry and make any necessary changes.
5¼" drives
These would normally only be used temporarily to transfer files from a BBC or Master, but some years ago I used a pair of 80 track drives with my A5000, and they operated perfectly (if a bit more noisily than 3½" drives) with discs formatted to 800Kb. In fact, the old 5¼" discs seem to retain data much longer than 3½". While preparing this article I played around with discs I had last used nearly five years ago and which had not been stored carefully in the interim. Every one of them was still perfect, and they were all cheap, unbranded, bulk discs. Experience shows that 3½" discs can't be trusted much more than a couple of years, so there might be a case for using 5¼" discs for long term storage of valuable data. Perhaps I'll try them again in another five years! (I suspect this might simply be physical - tracks on the larger disc are wider and further apart and the plastic is thicker so there's less chance of 'print through' from side to side and between tracks.)
There are plenty of PD programs to read DFS format, and any Archimedes can use 640Kb ADFS discs as used on the Master. If you still have your old Beeb, you will be able to 'borrow' its drive for the transfer, but if you don't, you will need to get a drive from somewhere. 80 track 5¼" drives are something of a rarity now, but there are thousands of old PC 360Kb drives around, and these are the same as the 40 track double-sided drives often used with the BBC computer. Every time there's an N.C.S. charity stall at a show, both 40 and 80 track drives seem to turn up, with and without power supplies.
There are two problems with 5¼" drives. They put a much greater loading on the data lines than modern 3½" drives, and this is especially significant with the DD family machines. These machines should be fitted with a buffer if you intend to use them with 5¼" drives, and although these buffers are no longer made, once again, they turn up regularly on the charity stall. However, if you just want to connect a single drive for a short period to copy a few discs then, although it's not recommended, I have never heard of anyone overloading their FDC chip by connecting a 5¼" drive without a buffer.
Many users won't have any experience with 5¼" drives, so there are a couple of points worth mentioning. These drives don't use the more modern connectors but have a PCB edge connector. There is a small slot cut in the PCB and there is supposed to be a matching insert in the edge connector so you can't put it on the wrong way round. However, most don't have this insert, so make sure that lead 1 of the data cable goes to the same end of the connector as the slot in the PCB. If you put it on the wrong way round, and this applies to all floppy drive cables, the symptoms are that the drive won't be recognised and it will spin and its light stay on all the time.
You will need an appropriate data lead. If the 5¼" drive doesn't have a power supply, you could connect it to the hard disc supply inside the computer, using a power supply splitter cable if you have a hard drive. You can't do this, even temporarily, with any of the single box models because they don't have a 12v power rail, and 5¼&Quot; drives need 12v as well as 5v.
The drive should have a terminating resistor block fitted, but if you want to eliminate the (small) possibility of overloading the FDC chip you could try it without. Although 5¼" drives are supposed to be fitted with pull-up resistors, some later ones will work happily without, especially if the leads are short.
So far, I've only discussed fitting a 5¼" drive to one of the earlier machines with an 800Kb drive. It is possible to fit them to those with HD drives, but you will have to make a couple of minor alterations. If you read the earlier section on modifying HD drives to fit older models, you will probably be able to see what these will be.
What follows applies to all machines normally fitted with HD drives except the A5000. I will deal with that separately.
Most of these drives don't have any connection to lead 2, but some do, so check and, if necessary, cut either the track on the drive PCB or snip through leads 1 and 2 (easier than cutting just lead 2, and lead 1 isn't used anyway).
You will need to disconnect lead 34 because this is the READY signal on older drives, and the Disc Change signal on HD drives. As the controller fitted to these models only expects an HD drive to be fitted, it will get confused by this and will think that the drive is empty. Luckily, it can cope if this line is simply disconnected, so you can either cut the track on the drive PCB or, probably more conveniently, cut lead 34 on the data cable.
All 5¼" drives can have their ID changed between 0 and 3, and you will almost certainly see some jumpers on the PCB to do this. They will be marked DS0, DS1, DS2 and DS3 or something similar.
1.2Mb 5¼" drives
So far I have only dealt with double density 5¼" drives, but there are also HD 1.2Mb drives. These, like all 5¼" drives, are now obsolete, and were never 'officially' used on any Acorn equipment. They were fitted to the original AT PCs, the 286 series, and by the time the 386 appeared, they had been replaced by the 1.44Mb 3½" drive.
Although a 5¼" drive, they behave like and have the same connections as, an HD 3½", so you can fit one to any computer fitted with an HD drive (not DD machines). They can also read 360Kb DOS discs, but unless the machine you are transferring data to also has a 1.2Mb drive, you should not use them to write to a 360Kb disc because the heads are only half the width of a true 360Kb drive.
There are still plenty of these drives about, but there are some disadvantages. You must use the proper 5¼" HD discs, and these tend to be rather expensive, up to twice the price of a 3½" HD. On the other hand, you can often pick them up very cheaply, even for nothing, at an office clear-out, and I've seen boxes of them dumped in skips.
The main disadvantage is that there is no 'native' Acorn format for them. You can't even use 5¼" DD 80 track discs formatted to 800Kb. Luckily, Acorn machines do support the DOS 1.2Mb format, but you will have to put up with all upper case filenames, and not more than eight characters.
In view of my recent discovery regarding the longevity of 5¼" discs, I might transfer some of my old records to 1.2Mb discs.
The A5000
This machine is unique in that it has two separate connectors for floppy drives. One is for internal drives, and this is intended to be used with HD 3½". The other is for two external drives, and this is much more versatile. By altering various jumpers, it can be made to work with almost any type of floppy drive.
Because the two connectors are driven separately, the drive IDs on each don't need to be different. The OS first checks the internal connector and assigns numbers to any drives. It then checks the external connector and assigns drive numbers to any connected there, so internal drives will always have lower drive numbers than external, whatever the actual drive IDs.
The diagram shows the layout of the front RH corner of the PCB, accessible through the aperture in the drive carrier frame between the hard disc and the floppy drive.
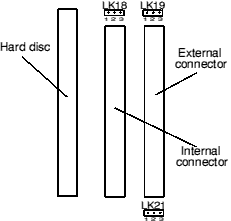
Link 18 should normally have the jumper set to link pins 2 and 3 (towards the right). When set 1-2, it reverses the polarity of the Density Select line on pin 2 of the connector. The only drives that I know of that require this are HD 3½" fitted to IBM PS2 machines.
For all HD drives, and newer 3½" DD drives, link 19 should be set 2-3. For some older 1Mb drives it may need to be 1-2, and for DD 5¼" drives it should be removed.
For all HD drives, and newer 3½" DD drives, link 21 should be 1-2. For older DD drives, and all 5¼" DD drives, it should be 2-3.
External cases and power supplies
It is a fact that a case and power supply for a floppy drive can cost three or four times the price of the drive itself. If you want to fit one because you can't afford a hard disc, this makes the exercise rather pointless. There are lots of boxes available from electronic component suppliers, but none of them fit properly or look right.
There is a source of material that will let you make very cheap boxes for 3½" drives, and the finished product looks as if it was made for the job, and not just a drive put into a convenient box. Most DIY stores sell 100mm × 50mm plastic trunking for use as exhaust ducting for cooker hoods. This is often dark brown but can also be obtained in white or light grey, and is almost exactly the right size to fit two drives, or it can be trimmed to fit one.
Cut a length of trunking a bit longer than the drive. How much longer depends upon what you use for a power supply and will become obvious later. If you want a case for a single drive, you will need to cut it in two along the centre of each side, and then cut about 3mm out of the centre of the 'bottom' half. You will find that you can cut it with a sharp Stanley knife and a straight edge. Now cut a rectangular section of plastic from the remaining trunking about 95mm wide and the same length as the previous section. This is then glued inside the bottom of the case to hold the two halves together. You should now have a 'top' and a 'bottom', and the bottom should fit neatly inside the top and be exactly the right width for the drive.
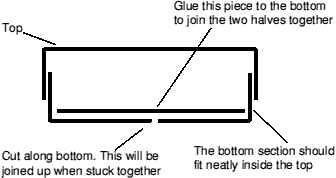
There are two ways you can join the two halves together. You can drill two holes in each side, passing through both halves, and lining up with the holes in the drive. Bolting through these holes and into the drive holds the case together and also secures the drive.
A simpler method is to glue the halves together and just push the drive in. To make sure it's 'just right', put some adhesive on the inside on the sides of the top section, place the drive in the bottom and put the top on. Hold the case together with rubber bands until the glue has set. You should find that you will have a nice, neat, case with no external screws, and the drive should fit tightly enough so that it's firmly held, but it should be possible to push it out if necessary.
When the case is finished, you can stick four self adhesive feet onto the bottom.
If you want to make a case to take two drives, you will find that the trunking is exactly the right height, but slightly too wide. You can correct this by cutting two pieces of plastic and gluing them to the inner surface of the sides. When this is done, you should find that two drives are a tight push fit, but again you may prefer to secure them with a couple of screws.
You should now have a case for one or two drives, closed at the front by the drive bezel, but open at the rear. Because it's open, there's no need to have a socket for the cable, you can plug it directly in to the drive, but you might want to secure the cable to make sure that it can't work loose. This can be done by cutting another strip of plastic, about 1cm wide and 6.5cm long. Fasten this to the bottom of the case with a small nut and bolt at each end and you can use it to clamp the ribbon cable.
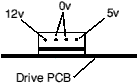
You will now need to get power to the drive. Most 3½" drives require 5v at not more than 250mA. This is not very much, so you could connect it to the computer's power supply. The extra load would be negligible for all two box models, and not excessive for the others, especially if not fitted with a hard drive. The diagram shows the power connections for the drive. Although there are four pins, the centre two are both 0v and although one is marked 12v only a very few early DD drives required 12v, so you can ignore it. Once again these connectors are available from Maplin.
It is preferable to give the drive its own supply so it is self-contained, and because the requirements are so modest, this isn't difficult. The cheapest solution is to use a plug-in power supply of the type used for portable radios and cassette recorders and which plug into a 13 amp socket. If you want to use a ready-made unit make sure it has a regulated 5v supply. With an unregulated unit, the voltage could rise high enough to damage the electronics when the drive motor is off.
Like most people, I have collected a few of these over the years, belonging to items long since dead, and most of them seem to be unregulated, between 6 and 9v. You can use one of these if you include a voltage regulator (a 7805 is ideal), and this can be fitted inside the rear of the case.
Yet again, Maplin can supply ready-made regulated units. They list one with an output of 300mA, suitable for a single drive, at £9.99. This is actually rated at 4.5v, not 5v, but it will work. A better source is Greenweld Electronics. Their catalogue shows a 5v 300mA unit for £6.50, and a 5v 650mA unit, suitable for two drives, for £7.95. All of these have switched output voltages, and a lead terminating in a concentric plug. You can either cut this off and solder the lead directly to the drive power connector, or fit a matching concentric socket to the rear of the case. Whichever you do, check the polarity.
I don't know of any similar way of making a case for a 5¼" drive, and they need a lot more power. They require both 12v and 5v, sometimes as much as 1A. It isn't too difficult to construct a linear power supply to provide this, but beware if you try to use a surplus switch mode PSU. The current drawn can fall to very little when the drive is not in use, and with some switch mode PSUs, the output voltage can rise considerably with light loads, perhaps enough to damage the drive.
Useful sources of components
I have mentioned Maplin Electronics (often), mainly because they have lots of branches and sell most of the items you will need. Because they are retail shops they have helpful, if not always particularly knowledgeable, staff who will do their best to assist you even if you are only spending a couple of pounds. For more information phone 01702-552911.
A real Alladin's Cave is Greenweld Electronics. They are in Southampton, so most readers will need to deal by mail order, but it is worth getting a copy of their catalogue and 'bargain lists'. They supply cables, connectors, plugs and sockets, and all types of power supplies and electronic components, at very reasonable prices. They also deal in all kinds of surplus electronic equipment, and often have second hand drives and other computer-related items. Their phone number is 01703-236363.
Finally, if you can't get any of the components you require, I normally have most of them and might be able to help. Provided I'm not inundated with requests, I might also be prepared to make cables for you if you don't feel able to do it yourself. You can contact me at the APDL address at the back of the magazine.
Dave Holden