


FontFiend
The complete manual for them most advanced Font Editor for RISC OS.
FontFiend Tutorial
At this point it would be worthwhile running through an example of using FontFiend to complete a half finished font.
Supplied with FontFiend is a directory called Examples. This contains various files including a directory called QuickStart. Inside this directory is a font called Example. You can use FontFiend to finish this font in a matter of minutes.
Loading the Example font
Load the Example font into FontFiend by dragging the fonts Outlines file to the FontFiend icon on the icon bar. The hourglass will appear and the font will then load.

As you can see the font has upper and lower case letters, and some numbers/symbols. Also if you have a look at any of the Outline Windows for this font you will see that the font does hot have scaffolds or skeletons.
The font does not have any accents or characters above ASCII 127. Also a number of symbols are missing from the third row down, and all brackets and bars are missing.
Adding the missing letters
FontFiend can add all of the missing letters in this font. FontFiend can do this by combing parts of existing letters to make new ones, or by drawing new letter shapes itself from scratch.
Most of the time FontFiends letters will be exactly right. Occasionally some further work may be required, for example if the font does not have proper lower case letters FontFiend will not be able to make some symbols such as thorn (�) correctly.
To add the missing letters simply press MENU over the main table and then go to the CharBuild option. Click on CharBuild and a window will open.
This window (below) is called the Character Builder. It is designed to make adding missing letters to a font very easy.
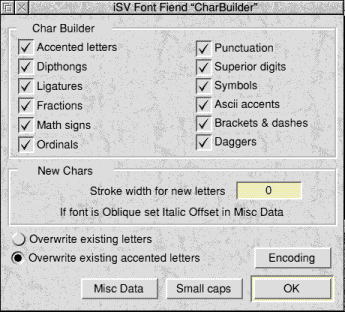
Leave all the buttons set as they are and simply click on the OK button in the bottom right corner. FontFiend will now start checking the font and adding any missing letters. Almost immediately a confirmation window will open asking if you want to load an accent file. FontFiend has checked the font and found missing accents. Click on Continue.
The hourglass will appear and after a short time the main table will redraw. You can now see that all of the missing letters have been added to the font.
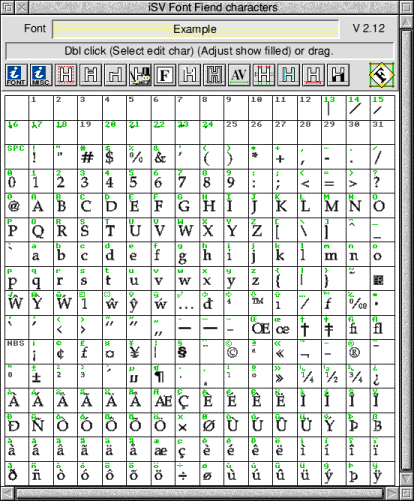
As you can see FontFiend has managed to add every single missing letter to the font, including fractions, accented letters and symbols. Now we need to apply hinting to the font. This is done in two parts, firstly you need to add skeletons, then add scaffolds.
Adding Skeletons
Skeletons are very easy to add. FontFiend supports a number of different skeleton models, these allow skeletons to be added easily and quickly.
Press the MENU button over the main table and go to the Skeletons option. Then click on the Automatic option in the submenu. The automatic skeleton window will now open.
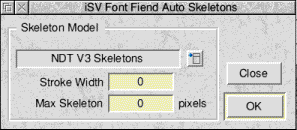
As you can see there is a menu button in this window. Click on this to open a list of the skeleton models supported. Choose "NDT V3 Skeletons" from the list.
Leave the Stroke Width and Max Skeleton values at 0 and click on the OK button. FontFiend will now add skeletons to the font. The "NDT V3 Skeletons" option places skeletons along one side of each stroke in the character.
All that remains now is to add scaffolds to the font.
Adding Scaffolds
Adding scaffolds is a little bit more complex, however FontFiend can still save many hours of work. Before scaffolding an entire font we first need to check the scaffolding on a couple of letters.
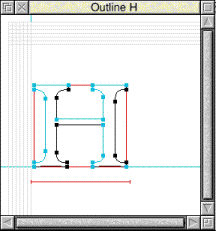
Double click on the H character in the main table with SELECT. The Outline Window for H will open. At this point you will be able to see the outlines for the letter (in black) and the skeletons (in light blue).
Press MENU over this window and go to the Scaffolds entry in the menu. Go past this and click on Automatic to open the Automatic Scaffold window.
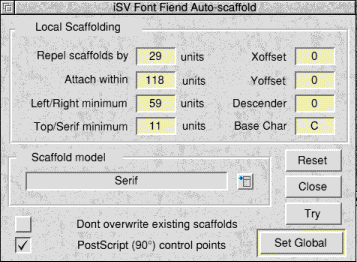
As you can see the Auto-Scaffolder looks quite complicated, but with a bit of practice it is very easy to use. Under the scaffold model section click on the menu button to open the list of supported scaffold models. Choose Serif from the list and click on it. (We are going to use Serif since our example font has serifs).
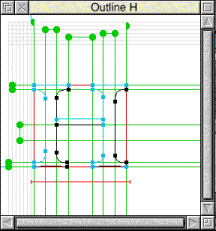
Now click on the Try button. Scaffolds will then appear in the outline window for character H. As you can see FontFiend has got most of the scaffolds correct, however the cross bar of the H is not scaffolded correctly. This is because the Y Offset in the scaffold window was not set correctly. We need to alter this value for the scaffolding to work.
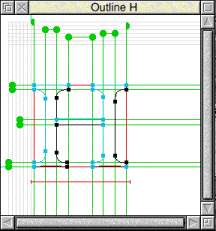
Click in the writable icon next to Yoffset in the auto-scaffolder window and then change the value to 25. This will alter where FontFiend considers the centre of the characters height will be. Now click on Try again.
FontFiend will now apply scaffolds to the font again. This time the cross bar of H will be correctly scaffolded. You can now try these settings on other individual characters in the font. To do this keep the Auto-Scaffold window on screen and simply close the outline window for character H. Now go back to the main table and double click on another character thumbnail to open its outline window.
The FontFiend automatic serif scaffolder can scaffold a font in under 15 seconds with over 95% accuracy. Some manual tweaking of the resulting scaffolds may be required. However this is still much quicker than trying to scaffold a font by hand with FontED, which can take many days!
Scaffolding the entire font
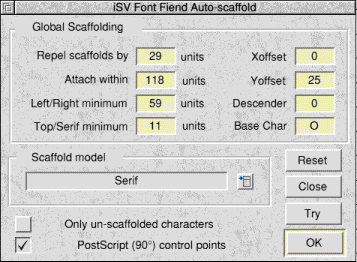
You are now ready to scaffold the entire font, firstly the values from the local character auto-scaffolder need to be copied to the global automatic scaffolder. Click on the Set Global button to copy these values over.
Now click MENU over the main table, go to the Scaffolds option and click on the Automatic entry from the submenu. This will open the global automatic scaffolder. This is very similar to the local version except it does not have a Set Global button. Click on the OK button and the hourglass will appear while the font is scaffolded.
Saving the finished font
The font is now completed, it has a full character set, scaffolds and skeletons. You can now save this font to disk. Click MENU over the main table, go to the Save option, go to the sub menu and click on Font.
The hourglass will appear for a couple of seconds while FontFiend converts the font from its own format to Acorn format. A save dialogue box will then appear.
Drag the file (called Outlines) from this box to a filer window. Two files will be saved, one called Outlines and one called Intmetrics. The finished font is now saved.
Making a bolder version
You can also make a bolder version of this font quickly and easily. Press MENU over the main table. Go past the Outlines option, then past FX/Process and click on Special FX. A window will open.
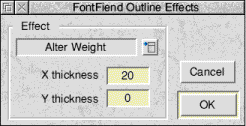
Leave the settings as they are and click on the OK button. FontFiend will now increase the weight of the font in the X direction. The hourglass will appear for a few seconds while this is happening. Once FontFiend has finished this you can change the name of the font to Example.Bold and save it.
That's it for the FontFiend tutorial. The rest of the manual will cover FontFiend in greater detail. However remember that Fontfiend has an on-line help system which is available all the time and provides a lot of useful information. In fact the on-line help system contains almost 400 messages. By moving the mouse pointer over FontFiend windows you can discover a great deal about how to use FontFiend.
APDL and Foundation RISCWorld