![[Intel Navigation Header]](/file/36737/PCU_APR_97.ISO/offline/software/april_97/intel/header.gif)

OverDrive® Processor Sockets
Jumpers or Switches
Troubleshooting
Depending on the type of OverDrive® processor socket in your system,
there may be some special steps you need to take when installing
the Intel OverDrive processor. Here are some things you need to
look for:
Handle or No Handle?
Two common types of OverDrive processor sockets are those with a
handle (Zero Insertion Force socket) and those without a handle
(Low Insertion Force socket).
If your system’s processor socket has a
handle, removing and replacing processors is easy. Most Pentium® processor-based systems have
sockets with handles.
To open the socket, lift the handle to a 90°
upright position, then remove or insert the processor. To close
the socket, lower the socket handle.

If your system’s processor socket does not have a handle
(see Figure 1), removing and replacing processors requires
additional steps. Check your system manufacturer manual and the
OverDrive processor installation manual for instructions.
If your Pentium processor-based system has a
socket without a handle, Intel recommends you have the Pentium
OverDrive processor upgrade installed by a dealer or qualified
professional.
How many pinholes? (Intel486™ processor-based
systems only)
Sockets in Intel486™
processor-based systems are different sizes. If your system has a
socket with 17 pinholes per side (168- or 169-pinhole socket),
you cannot upgrade with the Pentium OverDrive processor for
Intel486 processor-based systems. For this upgrade, the OverDrive
socket must have 19 pinholes per side (237- or 238-pinhole
socket). An easy way to tell if you can install a Pentium
OverDrive processor in your system is to look at the original
Intel486 processor. If the processor is installed in the upgrade
socket and there is an extra row of pinholes around the
processor, you have a 237- or 238-pinhole socket.
Is there a special socket just for the
OverDrive processor? (Intel486 upgrades only)
Some Intel486 processor-based systems have a special socket for
the OverDrive processor upgrade. To do the upgrade, you need to
install the OverDrive processor in the empty socket.
In some cases, the original processor is
soldered to the motherboard and you install the OverDrive
processor in a nearby empty upgrade socket.
However, if the original processor is
soldered to the motherboard and there is no upgrade socket, your
system is not upgradable. Do not attempt to remove the original
processor.
Depending on your system, there may be some
special steps you need to take to configure your motherboard when
installing the Intel OverDrive processor.
What are jumpers?
Jumpers are very small multiple pins fastened to the motherboard
in various locations, depending on your system’s particular
layout. If you look closely, you can see that each jumper is
labeled with a number or letter that typically is printed on the
motherboard.
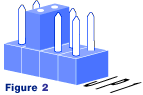 The pins
are connected (ON) when a tiny plastic connector covers two pins.
The connector has a metal piece embedded in the plastic that
allows current to pass between the pins. (See Figure 2.)
The pins
are connected (ON) when a tiny plastic connector covers two pins.
The connector has a metal piece embedded in the plastic that
allows current to pass between the pins. (See Figure 2.)
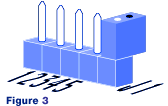 To turn the
connection OFF, remove the jumper connector from the pins. You
can also place the connector over only one of the pins for
safekeeping. (See Figure 3.)
To turn the
connection OFF, remove the jumper connector from the pins. You
can also place the connector over only one of the pins for
safekeeping. (See Figure 3.)
To turn the connection ON, place the
connector over the two indicated pins. While some jumpers appear
in pairs; others may appear in sets of four or more.
What are switches?
Switches are small devices fastened to a system motherboard that
allow you to specify a configuration based on the processor you
intend to use. To set, you move the “pointer” to the
correct specification. For example, a switch may list processor
speeds, voltage, or OverDrive processor names. Depending on the
specifications of the OverDrive processor, you select the
appropriate setting.
Check with your computer owner’s
manual for more details about your system.
The majority of Intel OverDrive
processor installations are simple and straightforward. However,
if you experience difficulty, review the following checklist:
Legal stuff