 Help
Help
Select an Existing Style to
Edit
You edit style sheets through the Edit Style dialogue. Usage
of this dialogue is covered in the "Edit
a Style" section below, but to get to it, you
go through the following steps.

 Bring up the Edit Style dialogue for an existing style:
Styles Sheet dialogue

- Choose Format->Style Sheet to start the Styles Sheet
dialogue.
- To select a style sheet to edit, either:
- Highlight a style sheet in the Style Sheets list.
- Click the Browse... button to search the directories or servers
and locate and select the file.
- Click the Edit menu item to start the dialogue in.
- Continue with the steps in the "Edit a Style"
section below.
Whether you are editing an existing style or creating a new style,
you work through the Edit Style dialogue below.
Edit Style dialogue
You access the Style Types pull-down menu with the scroll arrow
to the right of the Style Types box. Choices are Paragraphs,
Type Styles, Lists, and Horizontal Rule.
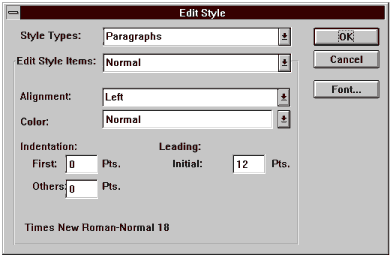
Edit styles for Paragraphs:
Edit Style dialogue with Paragraph option
"Paragraphs" include the various kinds of text that appear between carriage
returns. These include normal paragraphs, headings, etc.
- Choose Paragraphs from the Style Types pull-down menu
in the Edit Style dialogue to start the dialogue that allows you to
determine the appearance of the various paragraph formats.
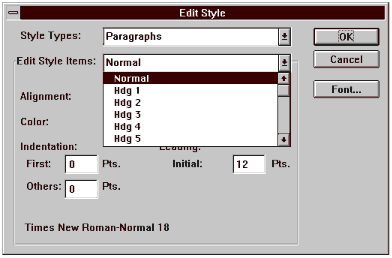
- Select a paragraph type from the Edit Style Items pull-down
menu. Choices are Normal, Hdg 1 through Hdg 6,
BlockQuote, Preformatted, Lineprinter Listing, and
Address.
- Normal is the normal paragraph, the default when none of the other
paragraph types are specified.
- Hdg 1 through Hdg 6 are six hierarchical levels of headings
- BlockQuote
- Preformatted
- Lineprinter Listing
- Address
- Choose the Alignment: Left, Center,
Right, or Filled.
- Left makes the paragraph left justified.
- Center centers each line in the paragraph.
- Right makes the paragraph right justified.
- Filled justifies the paragraph on the left and right (except for
the last line of the paragraph).
- Choose the Color: red, green, blue,
cyan, magenta, yellow, black, darkgray,
gray, lightgray, or white, or type in an "rgb"
(red-green-blue) color, like "128 128 128" for gray.
- Set the Indentation (in points) of the First line and
subsequent lines (Others) of the paragraph. 1 inch = 72 points.
- First indicates the number of points the first line of the
paragraph is indented
- Others indicates the number of points all lines after the first
line of the paragraph are indented.
- Enter a value for Leading at the Initial box.
Leading (pronounced "ledding") is the vertical blank space above the
first line of the paragraph. Values are in points. Default is 12.
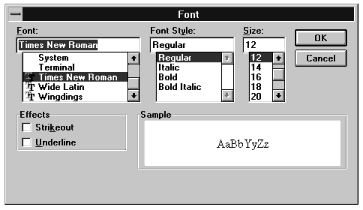
- Click on the Font... button to
select a Font, Style, and Size. For any choice, the selected font appears
in the Sample Text box. The Fonts and their dialogue boxes vary between
platforms.
- Select a font from the choices in the Font box.
- Select a style from the choices in the Style box. The available
choices are in black; unavailable choices are in light gray.
- Select a size (points) from the choices in the Size box. The available
choices are in black; unavailable choices are in light gray.
- Select special effects (underline or strikeout) if desired.
- If desired, choose another paragraph format to be edited from Edit
Style Items or choose another Style Type.
- Click OK to effect the changes in the style sheet and return to
the Styles Sheet dialogue.
Font window in the Edit Style dialogue
Edit Type Style:
Edit Style dialogue with Type Styles option
"Type Styles" include text and special kinds of text, like anchors, links,
etc.
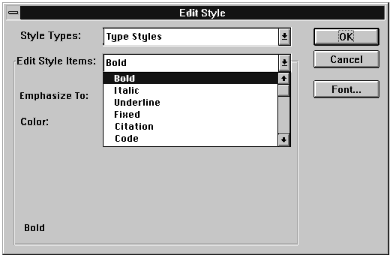
- Choose Type Styles from the Style Types pull-down menu
in the Edit Style dialogue to start the dialogue that allows you to
determine the appearance of the various type styles.
- Select a type style from the Edit Style Items pull-down menu.
Choices are Bold, Italic, Underlined, Fixed
Pitch, Superscript, Subscript, Citation,
Code, Definition, Emphasis, Keyboard,
Sample, Strong, Variable, Link Anchors, Link
Cached Anchors, and Anchors.
- Choose the appearance of the selected type style from the Emphasize
To list. Choices are Normal, Bold, Italic,
Underline, Underdash, Bold Italic, Bold Under,
Bold Dash, Italic Under, Italic Dash, Bold Italic
Under, Bold Italic Dash, Subscript, or Superscript.
- Choose the color from the Color list-red, green,
blue, cyan, magenta, yellow, black, dark
gray, gray, light gray, or white.
- Choose a font from the Font list.
- If desired, choose another Type Style from Edit Style Items or
choose another Style Type to be edited.
- If desired, click the Font... button to start the Font
Selection dialogue.
- Click OK to effect the changes in the style sheet and return to
the Styles Sheet dialogue.
Edit styles for Lists:
Edit Style dialogue with Lists
option
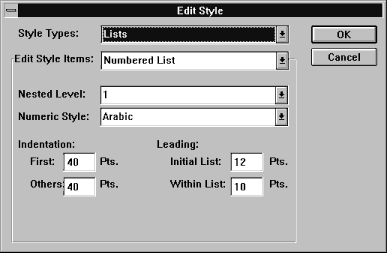
"Lists" include unnumbered (bulleted) and numbered lists. Each
nested level (1-4) of numbered and unnumbered lists can be edited separately.
- Choose Lists from the Style Types pull-down menu in
the Edit Style dialogue to start the dialogue that allows you to determine
the appearance of lists.
- Select a list type from the Edit Style dialogue. Choices are
Numbered List and Unnumbered List.
- Choose the Nested Level you wish to edit. Choices are 1,
2, 3, or 4.
- If you selected Numbered List in step 2, choose the Numeric
Style for the chosen Nested Level. Choices are Arabic,
Lower case Roman, Upper case Roman, Lower case Letters,
and Upper case Letters.
- If you selected Unnumbered List in step 2, choose the Bullet
Style for the chosen Nested Level. Choices are Filled Circle,
Filled Square, Open Circle, and Open Square.
- Set the Indentation (in points) of the First list item
and the subsequent list items (Others) for the chosen nested level
and list type. 1 inch = 72 points.
- Set the Leading values for the Initial List-the vertical
space between the first list item and the line above it-and for Within
List, the vertical space between items in the list, for the chosen nested
level and list type.
- If desired, choose another Nested Level, another list type from
Edit Style Items, or another Style Type.
- Click OK to effect the changes in the style sheet and return to
the Styles Sheet dialogue.
Edit style for Horizontal Rule:
Edit Style dialogue with Horizontal Rule
option
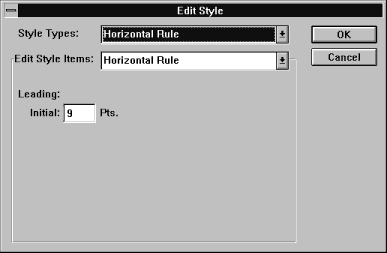
You insert a horizontal rule with the Element->Horizontal Rule
menu. Here we describe how the Style Sheet determines the spacing of horizontal
rules.
- Choose Horizontal Rule from the Style Types pull-down
menu in the Edit Style dialogue to start the dialogue that allows
you to determine the appearance of horizontal rules.
- Select Horizontal Rule from the Edit Style pull-down menu.
This is the only option.
- Set the Leading value (in points) for Initial. This determines
the size of the blank vertical space between a horizontal rule and the line
above it.
- If desired, choose another Style Type to be edited.
- Click OK to effect the changes in the style sheet and return to
the Styles Sheet dialogue.
You apply Style Sheets to the page with the Styles Sheet dialogue
after closing the Edit Style dialogue in the Format->Style
Sheet menu. When the desired style is selected from the Style box, it
always applies to the page where it was created. When default is selected,
that particular style applies to everything new viewed, that does not have
a style bound to it, even in different MiniWebs.
Apply Styles:
- Select a style sheet from the Style Sheets list.
- Click the Use As Default Style box so that it is filled.
- Click the Apply button.
The Style Sheets dialogue closes and the selected style sheet is
applied to the page.