
Modify panel > Make a selection. > Modifier List > Subdivision Surfaces > MeshSmooth
Make a selection. > Modifiers menu > Subdivision Surfaces > MeshSmooth
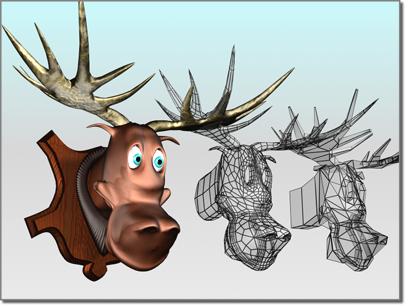
Angular model (shown on the right) changed to a smooth model with MeshSmooth
The MeshSmooth modifier smoothes geometry in your scene by adding faces at corners and along edges. The effect of MeshSmooth is to round over corners and edges as if they had been filed or planed smooth. When you apply MeshSmooth, an extra face is added for every vertex and edge. Use MeshSmooth parameters to control the size and number of new faces, and how they affect the surface of the object.
You can use MeshSmooth to produce a Non-Uniform Rational MeshSmooth object (NURMS for short). You can further control the object's shape by changing edge weights.
MeshSmooth's effect is most dramatic on sharp corners and least visible on rounded surfaces. Use MeshSmooth on boxes and geometry with crisp angles. Avoid using it on spheres and similar objects.
Tip: To better understand MeshSmooth, create a sphere and a cube and apply MeshSmooth to both. The cube's sharp corners become rounded, while the sphere's geometry becomes more complex without changing shape significantly.
Note: Having an animated deformer placed before a MeshSmoothed object that has had control level editing can result in the MeshSmoothed object becoming distorted. It's recommended that deforming modifiers be placed after the MeshSmooth modifier in the stack if you're using the deformers for animation.
Procedures
To apply MeshSmooth to an object:
Select an angular object.
Apply the MeshSmooth modifier.
Set MeshSmooth parameters.
To apply MeshSmooth to sub-objects:
Select an object.
Apply a Mesh Select modifier.
Select a group of vertices or faces.
Apply MeshSmooth.
In the Subdivision Method rollout, turn off Apply To Whole Mesh.
This lets MeshSmooth work only on the sub-object selection.
Set MeshSmooth parameters.
Interface
Modifier Stack
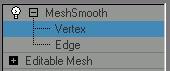
Vertex: At this sub-object level you can transform or edit vertices in the smoothed mesh.
Edge: At this sub-object level you can transform or edit face edges in the smoothed mesh.
See the Local Control rollout, described below.
For more information on the stack display, see Modifier Stack.
Subdivision Method rollout
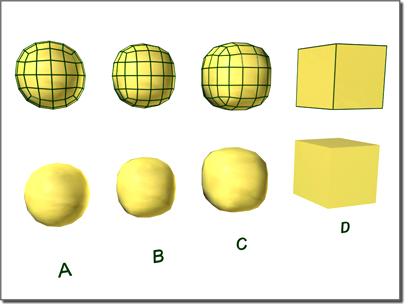
Effect of MeshSmooth with two iterations on a cube and different iteration method:
A: NURMS
B: Quad
C: Classic
D: Original object with no MeshSmooth
Subdivision Method list: Choose one of the following to determine the output of the MeshSmooth operation:
NURMS: Produces Non-Uniform Rational MeshSmooth object (NURMS for short). The only smoothing parameter available with the NURMS type is Sharpness.
You can further control the object's shape by changing edge weights. See Display/Weighting group, following, for further information on changing weights.
Classic: Produces three- and four-sided facets.
Quad Output: Produces only four-sided facets (assuming you don't look at the hidden edges, since the object is still made up of triangular faces). If you apply this with default parameters to a whole object, like a box, it's topologically exactly the same as Tessellate, edge-style. However, rather than using tension to project face and edge vertices out of the mesh, use the MeshSmooth Strength to relax the original vertices and the new edge vertices into the mesh.
Apply To Whole Mesh: When turned on, any sub-object selection passed up the stack is ignored and MeshSmooth is applied to the entire object. Note that the sub-object selection is still passed up the stack to any subsequent modifiers.
Old Style Mapping: Uses the 3ds max 3 algorithm to apply MeshSmooth to the mapping coordinates. This technique tends to distort the underlying mapping coordinates as it creates new faces and as texture coordinates shift.
Subdivision Amount rollout
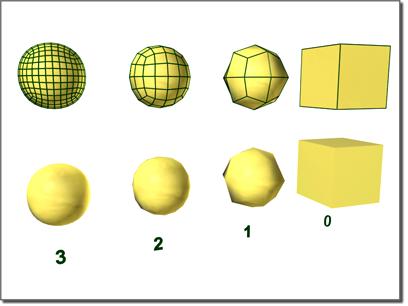
From right to left, effect of increasing the number of iterations
Sets how many times to apply MeshSmooth.
Iterations: Sets the number of iterations used to smooth the mesh. Each iteration generates new faces using the vertices created from the previous iteration. The spinner value range is 0 to 10. The default of 0 iterations allows you to modify any setting or parameter, such as the type of MeshSmooth or the update options, before the program starts doing any smoothing.
Note: Be cautious when increasing the number of iterations. The number of vertices and faces in an object (and thus the calculation time) can increase as much as four times for each iteration. Applying four iterations to even a moderately complex object can take a long time to calculate. You can press ESC to stop calculation and revert to your previous iteration setting.
Smoothness: Determines how sharp a corner must be before faces are added to smooth it. Smoothness is calculated as the average angle of all edges connected to a vertex. A value of 0.0 prevents the creation of any faces. A value of 1.0 adds faces to all vertices even if they lie on a plane.
Local Control rollout
Sub-object Level: Turns Edge or Vertex level on or off. When both levels are off, you're working at the object level. Information about the selected edges or vertices is displayed in the message area under the Ignore Backfacing checkbox.
Ignore Backfacing: When on, selection of sub-objects selects only those sub-objects whose normals make them visible in the viewport. When off (the default), selection includes all sub-objects, regardless of the direction of their normals.
Control Level: Allows you to see the control mesh after one or more iterations and to edit sub-object points and edges at that level. Transform controls and the Weight setting are available for all sub-objects at all levels. The Crease setting is available only at the Edge sub-object level.
Crease: Creates a discontinuity on a surface so you get a hard edge, such as a wrinkle or lip. You select one or more edge sub-objects and adjust the Crease setting; the crease appears in the surfaces associated with the selected edges. Available only at the Edge sub-object level.
Weight: Sets the weight of selected vertices or edges. Increasing a vertex weight "pulls" the smoothed result towards that vertex. Edge weights are more complex and behave in an opposite manner in some respects. They aren't really "weights" as such, but "knot intervals”. Consequently, increasing an edge weight tends to push the smoothed result away. Kinks will form in the result if weights of 0 are used.
Display Control Mesh: Displays an orange wireframe gizmo that shows what the control mesh looks like after it's been converted to polygons (if applicable) and before the smoothing occurs.
Soft Selection rollout
Soft Selection controls affect the action of sub-object Move, Rotate, and Scale functions. When these are on, gmax applies a spline curve deformation to unselected vertices surrounding the transformed selected sub-object. This provides a magnet-like effect with a sphere of influence around the transformation.
For more information, see Soft Selection Rollout.
Parameters rollout
Smoothing Parameters group
These settings are available only when MeshSmooth Type is set to Classic or Quad Output. Also, Project To Limit Surface is available only in Classic mode.
Strength: Sets the size of the added faces using a range from 0.0 to 1.0.
Values near 0.0 create small faces that are very thin and close to the original vertices and edges.
Values near 0.5 size faces evenly between edges.
Values near 1.0 create large new faces and make the original faces very small.
Relax: Applies a positive relax effect to smooth all vertices.
Project to Limit Surface: Places all points on the "limit surface" of the MeshSmooth result, which is the surface that would be produced after an infinite number of iterations. The topology is still controlled by the number of iterations.
Surface Parameters group
Applies smoothing groups to the object and restrict the MeshSmooth effect by surface properties.
Smooth Result: Applies the same smoothing group to all faces.
Separate by Materials: Prevents the creation of new faces for edges between faces that do not share Material IDs.
Separate by Smoothing Groups: Prevents the creation of new faces at edges between faces that don't share at least one smoothing group.
Settings rollout
Input Conversion group
Operate On Faces/Polygons: Operate On Faces treats every triangle as a face and smoothes across all edges, even invisible edges. Operate On Polygons ignores invisible edges, treating polygons (like the quads making up a box or the cap on a cylinder) as a single face.
Keep Faces Convex: (Available only with Operate On Polygons mode.) Keeps all input polygons convex. Selecting this option causes non-convex polygons to be handled as a minimum number of separate faces, each of which is convex. (Turn on Display/Weighting group > Display Control Mesh to see what's happening here.)
"Convex" means that you can connect any two points in the polygon with a line that doesn't go outside the polygon. Most letters aren't convex. In the capital letter "T," for example, you can't connect the upper-left corner to the bottom with a straight line without going outside the shape. Circles, rectangles, and regular polygons are all convex.
Problems that can occur with non-convex faces include the fact that changes in the geometry of the input object can result in a different topology for the MeshSmooth result. For instance, in a box, if you drag one of the top corners across the middle of the top face, the box becomes non-convex. MeshSmooth would then see this as two triangles instead of one quad, and the number of points in the result would change.
If you need to make sure your output topology is stable, turn this off. If you have a lot of letters or other non-convex faces in your mesh, however, you'll probably want it on.
Update Options group
Sets manual update options, for situations where the complexity of the smoothed object is too high for automatic updates.
Always: Updates the object automatically whenever you change any MeshSmooth settings.
Manually: Turns on manual updating. When manual updating is selected, any settings you change don't take effect until you click the Update button.
Update: Updates the object in the viewport to match the current MeshSmooth settings.
Resets rollout
This rollout allows you to go back to default or initial settings on any changes you made such as sub-object transforms (geometric edits), and changes to edge creases, vertex weights, and edge weights.
You can reset changes for all control levels or to the current control level. Turn on the reset option for the sub-object level you want, and then click the appropriate button.
Reset All Levels: Returns to the default or initial settings for geometric edits, creases, and weights for all sub-object levels.
Reset This Level: Returns to the default or initial settings for geometric edits, creases, and weights for the current sub-object level.
Reset Geometric Edits: Returns to the default or initial settings for any transforms made to vertices or edges.
Reset Edge Creases: Returns to the default or initial setting for edge creases.
Reset Vertex Weights: Returns to the default or initial setting for vertex weights.
Reset Edge Weights: Returns to the default or initial setting for edge weights.
Reset Everything: Returns to the default or initial setting for everything.