
Create panel > Shapes > Splines > Object Type rollout > Line
Create menu > Shapes > Line
Use Line to create a free-form spline made of multiple segments.
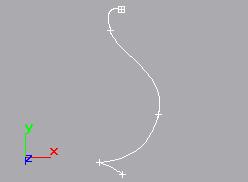
Example of line
Procedures
To create a line:

 Go to the Create panel and choose Shapes.
In the Object Type rollout, click the Line button.
Choose a creation method.
Click or drag the start point.
Click or drag additional points.
Do one of the following:
Right-click to create an open spline.
Click the first vertex and click Yes in the "Close spline?" dialog to create a closed spline.
To create a line using rectilinear and angle-snap options:
These two options aid in creating regular shapes:
While creating a spline with the mouse, press and hold SHIFT to constrain new points to 90-degree-angle increments from previous points. Use the default Initial type setting of Corner and click all subsequent points to create fully rectilinear shapes.
While creating a spline with the mouse, press and hold CTRL to constrain new points to angle increments determined by the current Angle Snap setting. To set this angle, go to Customize menu > Grid and Snap Settings, click the Options tab in the Grid and Snap Settings dialog, and change the value in the Angle (deg) field.
The angle for each new segment relates to the previous segment, so the angle snap works only after you've placed the first two spline vertices (that is, the first segment). Angle Snap need not be enabled for this feature to work.
To create a line from the keyboard:
Enter values in the X, Y, and Z fields to specify a vertex coordinate.
Click Add Point to add a vertex to the current line at the specified coordinate.
Repeat steps 1 and 2 for each additional vertex.
Do one of the following:
Click Finish to create an open spline.
Click Close to connect the current vertex to the first vertex and create a closed spline.
Interface
Automatic Conversion to an Editable Spline
Because the Line tool has no dimension parameters to be carried over to the Modify panel, it converts to an editable spline when you move from the Create panel to the Modify panel. While you are creating the line, the Create panel displays the original controls, such as Interpolation, Mesh Settings, Creation Method, and Keyboard Entry. After creating the line, when you go to the Modify panel you have immediate access to the Selection and Geometry rollouts to edit the vertices or any part of the shape.
Mesh Settings and Interpolation rollouts
All spline-based shapes share these parameters. See Splines for an explanation of these parameters.
Creation Method rollout
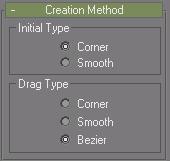
Creation method options for lines are different from other spline tools. You choose options to control the type of vertex created when you click or drag vertices.
You can preset the default types of spline vertices during line creation with these settings:
Initial Type group
Sets the type of vertex you create when you click a vertex location.
Corner: Produces a sharp point. The spline is linear to either side of the vertex.
Smooth: Produces a smooth, non-adjustable curve through the vertex. The amount of curvature is set by the spacing of the vertices.
Drag Type group
Sets the type of vertex you create when you drag a vertex location. The vertex is located at the cursor position where you first press the mouse button. The direction and distance that you drag are used only when creating Bezier vertices.
Corner: Produces a sharp point. The spline is linear to either side of the vertex.
Smooth: Produces a smooth, non-adjustable curve through the vertex. The amount of curvature are set by the spacing of the vertices.
Bezier: Produces a smooth, adjustable curve through the vertex. The amount of curvature and direction of the curve are set by dragging the mouse at each vertex.
Keyboard Entry rollout
Keyboard entry for lines is different from keyboard entry for other splines. Entering keyboard values continues to add vertices to the existing line until you click Close or Finish.
Add Point: Adds a new point to the line at the current X/Y/Z coordinates.
Close: Closes the shape, adding a final spline segment between the most recent vertex and the first.
Finish: Finishes the spline without closing it.