
Main toolbar > Launch gmax Material Editor
Main toolbar > Material/Map Navigator > Open gmax Material Editor
The gmax Material Editor provides functions to create materials and assign maps.
Materials create greater realism in a scene. A material describes how an object reflects or transmits light. Material properties work hand-in-hand with light properties, simulating how the object would look in a real-world setting.
You apply materials to individual objects or selection sets; a single scene can contain many different materials.
Note: It is possible for a material to be applied to an object but not listed in the Material Editor. For example, you might have dragged the material from the Material/Map Navigator directly into the scene. The Get button lets you get a material from an object and then edit it in the Material Editor.
See also
Applying a Material to an Object
Procedures
To view the Material Editor:
Click the Launch gmax Material Editor button on the main toolbar.
To give a material a different name:
Edit the Name field that appears above the material component tabs.
The name of the active material appears in the Scene Material list at the top of the Material Editor window. The name of the material is not a file name: it can contain spaces, numbers, and special characters.
The name can be longer than the length of the Name field.
To make a copy of a material:
 In the Material Editor, click Copy.
The Material Editor creates a new material with the same settings as the one you copied. By default, this new material is named "Copy of" followed by the original material's name.
To apply a material to objects in a scene:
In the Scene Materials list, select the material you want to apply.
Select the objects you want to apply the material to.
 Click Apply.
When you apply a material to an object or selection, that material becomes a hot material. When you change the properties of a hot material, the scene immediately updates to reflect those changes. Any object with that material will change its appearance, not just the objects in the current selection.
To make a material no longer hot so it doesn't change the current scene, click Copy. The Material Editor creates a new material that has the same settings, but isn't yet applied to any objects.
Tip: You can also use the Material/Map Navigator to apply a material.
To get a material from a scene:
If a material that you want to change has been saved in the scene, but not in the Material Editor, you can load the material by getting it from the scene.
Select an object with a material assigned to it.
In the Material Editor, the Get button becomes available. This button is available only when a single object with an applied material is selected.
 Click Get.
The material is added to the Scene Materials list in the Material Editor, and becomes the current material.
When you get a material from a scene, it is initially a hot material.
To get a material from a library:
 Open the Material/Map Navigator.
In the Browse From group at the upper left, choose Material Library.
If you have opened a library, the list of materials shows the contents of the library.
If you haven't opened a library, click Open in the File group of the Navigator. In the file dialog that is displayed, you can choose a material library to open. After you open the library, the list of materials updates to show the library's contents.
Drag from the list of materials to an object in the scene.
The material is applied to the object.
Select the object.
In the Material Editor, click Get.
The material is now current in the Material Editor.
To select objects that have the same material applied:
When a material in the Material Editor is applied to objects in the scene, you can select the objects from the Material Editor.
 Click Select Object(s) With Material.
A Select Objects dialog appears, listing all the objects that have the current material applied to them. Use this dialog to select the objects you want.
Interface
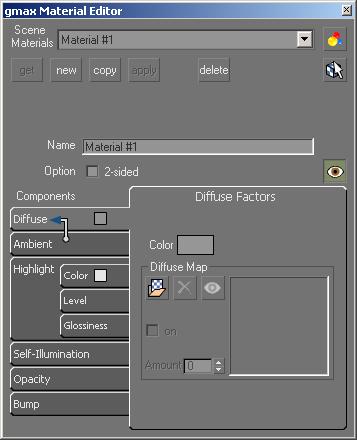
Scene Materials: This drop-down list contains the names of all materials in the Material Editor. A material in the Material Editor can also be applied to objects in the scene, but that is not necessary.
The name currently displayed is the material whose settings you are currently editing. To edit another material, choose another name from this list.
Launch Material/Map Navigator: Click to display the Material/Map Navigator.
Get: Gets the material from the selected object. The material becomes the current material. You can now edit the material, or apply it to other objects.
Caution: When you get a material from a scene, it is initially a hot material. To edit the material without changing the scene, click Copy to make a copy of the material.
This button is available only when a single object with an applied material is selected.
New: Click to create a new material. The new material becomes the current one.
By default, the name of the new material is incremented from an existing default name. For example, if the highest-numbered material in your Material Editor is "Material #25," the new material is named "Material #26."
Copy: Makes a copy of the current material.
The Material Editor creates a new material with the same settings as the one you copied. By default, this new material is named "Copy of" followed by the original material's name.
Apply: Applies the current material to the objects currently selected in the scene.
When a material is applied to objects and it is also current in the Material Editor, it is known as a hot material.
Delete: Click to delete the material from the Material Editor.
Warning: You can't undo deleting a material.
Select Object(s) With Material: Displays a Select Objects dialog that lists all the objects that have the current material applied to them. Use this dialog to select the objects you want.
Name: Shows the name of the current material. You can use this field to change the material's name.
When the material is a multi/sub-object material, this part of the Material Editor interface changes to show two fields, as described in the next section.
2-Sided: Makes the material 2-sided. Applies the material to both sides of selected faces.
 Show Material's Maps in Viewport: Click to toggle the display of the material's maps in viewports.
Multi-Material Name Controls

Multi-Material Sub-Material: This drop-down list contains the names of all sub-materials contained in the multi/sub-object material.
The name currently displayed is the sub-material whose settings you are currently editing. To edit another sub-material, choose another name from this list.
Sub-Material Name: Shows the name of the current sub-material. You can use this field to change the sub-material's name.
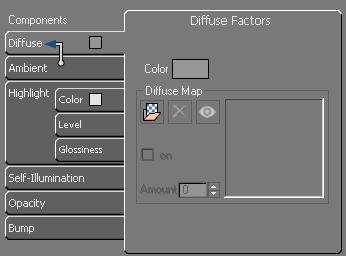
Components
The lower, and larger part of the Material Editor interface consists of tabs for setting the eight material components.
The use and contents of the component tabs are described in these topics: