CrossSection Modifier
Select a spline object with spline cross-sections. > Modify panel > Modifier List > Patch/Spline Editing > CrossSection
Make a selection. > Modifiers menu > Patch/Spline Editing > CrossSection
The CrossSection modifier creates a "skin" across multiple splines. It works by taking 3D splines and connecting their vertices to form a skin. The resulting object is another spline object that can be used with the Surface modifier to create a patch surface.
CrossSection can build a skin across various shaped splines with different vertex counts and open/closed status. The more different the splines in vertex count and complexity, the more likely the skin will have discontinuity.
Note: The CrossSection and Surface modifiers together are referred to as Surface Tools.
See also
Surface Modifier
Procedures
Example: To explore the CrossSection modifier:
-

 On the Create panel, click Shapes, then click Circle.
-
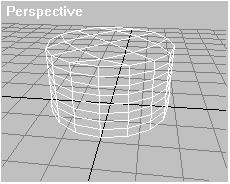
Drag in the Top viewport to create a circle about 100 units in radius.
-
 On the Modify panel, choose Edit Spline from the Modifier List.
-
In the modifier stack display, turn on Spline sub-object, then select the circle.
-
In the Front viewport, Shift-Move the spline up to copy it.
-
Shift-Move the copy up to create a third circle.
Note: The order that you attach or clone splines is important: this is the order that CrossSection uses to create the skin.
-
On the Modify panel, choose CrossSection from the Modifier List.
CrossSection joins the vertices of the three circles. A basic spline cylinder displays.

-
On the Modify panel, on the Modifiers List, choose Surface to add the Surface modifier.
The spline cylinder is transformed into a patch surface by the Surface modifier.
-
To edit the model's surface, change the splines using controls in the Edit Spline modifier. Or, since the output of the Surface modifier is a patch surface, add an Edit Patch modifier and use patch edit controls to change the surface.

An Edit Patch modifier above the Surface modifier was used to create the images.
Example: Using the CrossSection modifier to skin several splines with different shapes:
-
On the Create panel, click Shapes.
-
On the Object Type rollout, turn on Start New Shape, then click NGon.
-
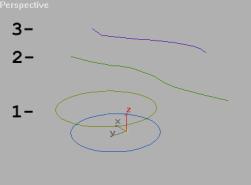
In the Top viewport, create two five-sided circular NGons.
-
On the Create panel, with Shapes still active, click Line. Create two lines, each with four vertices. Create the vertices left-to-right.

-
 On the main toolbar, click Select And Move, then move the objects in the viewport to order them along the Z axis with the NGons at the bottom and the lines above the NGons.
-
Select the bottom NGon.
-
On the Modify panel, choose Edit Spline from the Modifier List.
-
In the Geometry rollout, click Attach.
-
Select the remaining NGon and lines in an ascending order, as numbered in the image.
Note: The order of selection is important. The CrossSection modifier uses the selection order to define the skin.
Example continued: Lining up the vertices:
-
On the Modify panel, choose the Vertex sub-object level in the stack display.
Lining up the first vertex of each spline is important to prevent the surface from twisting.
-
Use CTRL+click to select the right-most vertex of each line and the bottom-most vertex of each NGon.
-
On the Geometry rollout, click Make First.

Aligning the first vertex is important. This is where the seam forks, going from a closed to an open spline.
Example continued: Using CrossSection and Surface to "skin" the shapes:
-
On the Modify panel, choose CrossSection from the Modifier List.
The CrossSection modifier connects the splines at the vertices.
-
On the Modifiers List, choose Surface.
The Surface modifier generates a patch surface based on the splines.
-
In the modifier stack display, choose the CrossSection modifier.
-
On the CrossSection Parameters rollout, toggle between Linear and Smooth. Notice how the splines change.
-
 On the Modify Panel, toggle the Show End Result On/Off Toggle button to display the final patch surface. The toggle won’t remain on if the CrossSection modifier is current. Drop down to the Editable Patch in the stack and turn on the Show End Result toggle if you like.
Tip: When you use CrossSection, draw splines in a consistent direction. A twisted surface results when lines are created from vertices that are not lined up.
Interface

Linear/Smooth/Bezier/Bezier Corner: Determines what type of curve will be used through the spline vertices.