This program has a familiar wizard-like user interface with each
page being pretty self-descriptive. It is however strongly advised
that you read each page thoroughly, and think twice before giving a
positive answer to any questions and warning messages.
Note that no modifications will be made to your setup until you
have pressed the Finish button in the last page in this program.
Below is a short overview of the main elements in the editor page.
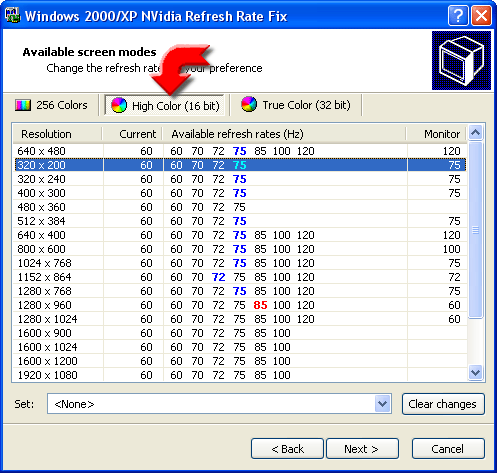
Color depth buttons

Usually there are 3 buttons located directly above the refresh
rate editor window. These buttons show what color depths your
display adapter is supporting.
Refresh rate editor window elements

Resolution - displays the available screen resolutions in
the given color depth
Current - displays the current default refresh rate in the
given resolution. A red value as shown in the screenshot indicates that
it exceeds your monitor's supported range at that resolution
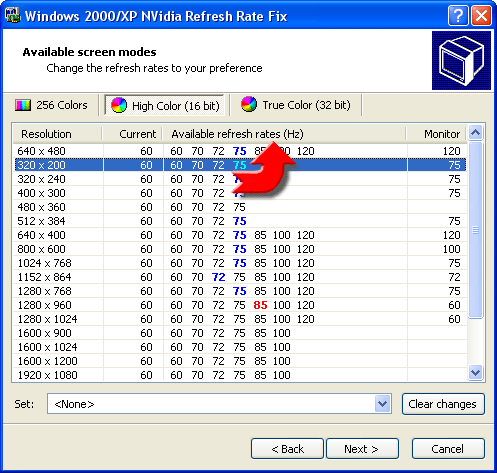
Refresh rates - displays all the refresh rates available in
the given resolution
Monitor - displays the maximum refresh
rate your monitor is capable handling at the given resolution. A blank
cell indicates that this resolution is not supported by your monitor. If
all the cells are blank, then it is advised not to use this program.
See below how to modify the refresh rates.
Action list

This list contains several pre-defined actions to help you set
multiple modes at once. The use of this list will be described
below in this chapter.
Clear changes button
Obviously, this button clears all the changes you have made.
There are several ways to set a new refresh rate. You can set
rates to every resolution individually, or you can select an action
from the action list to set rates to several resolutions at once.
To set the rates individually, just double-click on a refresh rate
value on the Refresh rates column. If the new rate
falls into the range of your monitor's supported rates, then it
will be displayed in blue. However, if the new rate exceeds your
monitor's supported range, then the new rate will be displayed in
red. Before you can set a rate higher than your monitor enables,
you will be prompted to use a lower refresh rate.
CAUTION: Remember, that ignoring the warning messages
about the unsupported refresh rates might cause unstable display and/or
damaged hardware. Please refer to the chapter Troubleshooting
in this document to learn how to recover from the situations
where your monitor has become unstable or blank as a result of
using unsupported modes.
• To quickly set the maximum rate your monitor is capable handling at
the given resolution, double-click on the value in the Monitor
column.
• To reset a refresh rate back to your current default rate, double-
click on the value in the Current column.
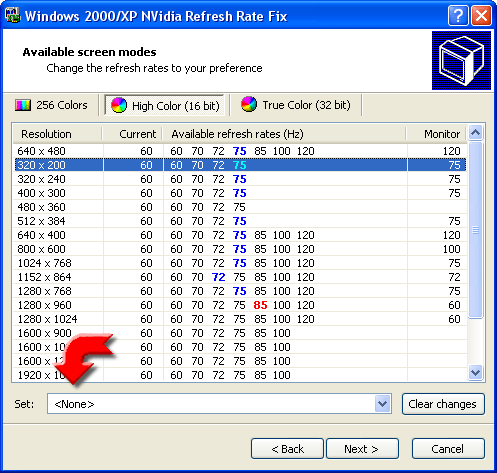
Click on the Set: combo box under the editor window and choose
a pre-defined action from the drop-down list. These actions apply
to all modes in all color depths.
Set everything back to system default 60Hz -
As the title says, each mode will be reset to the system's
default rate -- usually 60Hz.
Set every resolution to monitor's maximum supported rate -
A safe way to quickly set every mode to the maximum rate your
monitor is capable handling at the given resolution.
Set every resolution to XXHz or to closest possible rate -
Each resolution will be set to the indicated rate, or to a closest rate acceptable
to your monitor. All other resolutions and refresh rates which don't match the
given criteria are left intact.
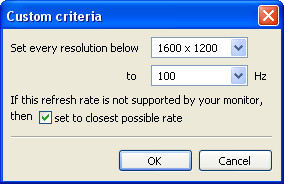
Set by custom criteria -
Lets you specify your own criteria. In the custom criteria dialog box
there's an additional option of "set to closest possible rate" which,
if checked, lets the program to find
the closest safe refresh rate in case the rate you specified is too high
for your monitor. If this option is unchecked, unsafe refresh rates won't
be set.

| Windows 2000/XP NVidia Refresh Rate Fix |
Copyright ⌐ 2000, 2001 Sten Uusvali |


