GIF Movie
GearTM
2.0
User Guide
Welcome to GIF Movie GearTM and its User Guide. Hopefully, this document will answer any questions you have about using this product to its fullest. Enjoy!
Basics
GIF Movie GearTM
is a tool for building GIF animations. A GIF animation is nothing
more than an ordered list of separate GIF images, much like a
slide show, with instructions on how long to delay between
images. The original GIF 89a specification was extended by adding
the ability to loop, paving the way for animation on the World
Wide Web that is simple to build and quick to download. The end
result is what looks like a plain old GIF file (i.e.
"filename.gif") but actually contains a small
animation. An animation is inserted into an HTML page using an <IMG> tag, just like a "normal" GIF.
Terminology
First, some notes on
terminology used in this document. A frame
is a single image in an animation. An ordinary bitmap image
becomes a frame once it is inserted into an animation. An animation
refers to the collection of frames, complete with all related
timing and color instructions. A GIF animation defines a screen
size which is the rectangle in which the animation
is visible. Individual frames are clipped to this screen.
A frame's delay is the amount of time
that the animation pauses after displaying the frame and before
displaying the next frame; the delay is the primary method of
controlling the flow of the animation. A palette
is a collection of colors that is used to define a frame. GIF
animations can contain two different kinds of palettes: a global
palette that applies to all the frames in an animation and a
local palette that controls the colors of a single frame. The GIF
format definition limits palettes to 256 colors.
Program
Layout
Below is a screen
shot of GIF Movie Gear displaying the gamanim.gif
animation. The sample file is located in the help folder
of GIF Movie Gear's installation location.
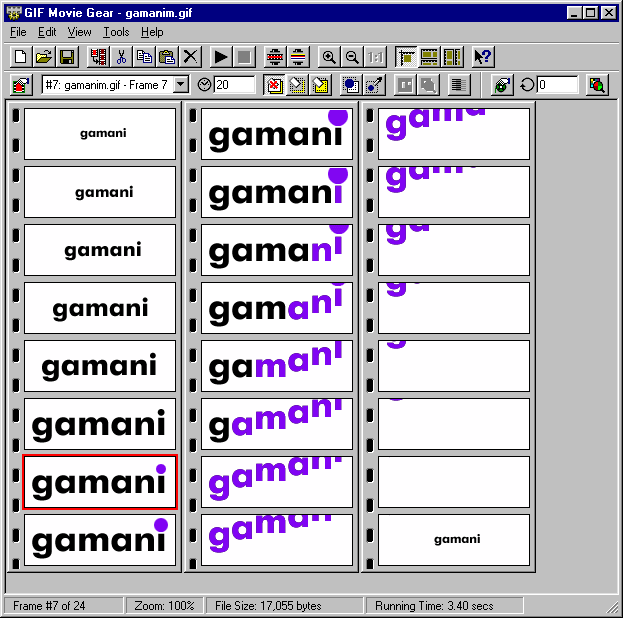
The window contains four main parts: the menu bar, two toolbars,
the animation view, and the status bar. The menu bar contains all
of the program's commands. The top toolbar contains a subset of
those commands in a quickly accessible format, and the lower
toolbar contains "shortcuts" to the frame and animation
properies. The status bar displays five pieces of information:
the current selection, the total number of frames in the
animation, the current zoom setting of the view, the file size of
the GIF animation, and the total running time of the animation.
![]() The most interesting
area, of course, is the main window area. The animation's frames
are displayed as a collection of filmstrips that can be oriented either horizontally or vertically. Each
strip is shown as a raised bar with "sprockets" along
one side (on the left for vertical strips and on the top for
horizontal strips) and contains as many frames as can fit in that
direction in the window. Multiple strips are then displayed next
to each other and scroll to show more strips (in the above
example, if the window was smaller, the strips would scroll
horizontally). The frames are ordered starting from the top left
of the window, follow along the current strip, and then continue
on the next strip. When viewed in a Web browser, the animation
displayed above looks like:
The most interesting
area, of course, is the main window area. The animation's frames
are displayed as a collection of filmstrips that can be oriented either horizontally or vertically. Each
strip is shown as a raised bar with "sprockets" along
one side (on the left for vertical strips and on the top for
horizontal strips) and contains as many frames as can fit in that
direction in the window. Multiple strips are then displayed next
to each other and scroll to show more strips (in the above
example, if the window was smaller, the strips would scroll
horizontally). The frames are ordered starting from the top left
of the window, follow along the current strip, and then continue
on the next strip. When viewed in a Web browser, the animation
displayed above looks like:
![]() GIF Movie Gear's
toolbars contain some nonstandard buttons. Holding the mouse
cursor over any one of the buttons will display a ToolTip window
identifying the function of that button. Below is a brief summary
of what the buttons do with links to more information in this
document.
GIF Movie Gear's
toolbars contain some nonstandard buttons. Holding the mouse
cursor over any one of the buttons will display a ToolTip window
identifying the function of that button. Below is a brief summary
of what the buttons do with links to more information in this
document.
![]()
![]() The upper toolbar
contains buttons for file management, clipboard operations,
viewing controls, and global functions. Specifically, from left
to right:
The upper toolbar
contains buttons for file management, clipboard operations,
viewing controls, and global functions. Specifically, from left
to right:
| New Animation | Starts a new animation. | |
| File Open | Open an existing GIF file. | |
| File Save | Save current document; file name is requested if necessary. | |
| Insert Frame | Insert a new frame (or frames) into animation | |
| Cut | Cut currently selected frame. | |
| Copy | Copy currently selected frame. | |
| Paste | Paste contents of clipboard (clipboard must contain a frame to add to animation). | |
| Delete | Delete the currently selected frame. | |
| Show Animation Preview | Shows animation preview window. | |
| Stop Animation Preview | Closes animation preview window (if open). | |
| Optimize Animation | ||
| Unoptimize Animation | ||
| Zoom In | Increase current zoom; cannot exceed 100%. | |
| Zoom Out | Decrease current zoom; cannot zoom below 20% magnification. | |
| View Actual Size | Set zoom to 100%. | |
| Default Orientation | Allow GIF Movie Gear to pick filmstrip orientation. | |
| Horizontal Strips | Use horizontal filmstrips. | |
| Vertical Strips | Use vertical filmstrips. | |
| Help | Brings up this document. |
![]()
![]() The lower toolbar contains information and
settings for the currently selected frame and for the animation
as a whole. From left to right:
The lower toolbar contains information and
settings for the currently selected frame and for the animation
as a whole. From left to right:
| Frame Properties | Displays current frame's property page. | |
| Identifies frame by number and by its source file. This is also a dropdown that allows selection of other frames in the animation. | ||
| In 1/100th of a second | ||
| Leave Alone, Restore Background, or Restore Previous | ||
| Pick a transparency index | ||
| (Enabled only when local palette present) | ||
| Animation Properties | Displays animation's property page. | |
| 0 means continuous loop | ||
Loading Frames and Animations
Choose Open from the File menu to open a GIF file. The GIF file
may contain either a single image or a collection of images
making up an animation. Additionally, more than one file can be
opened at once; all of the opened files are automatically
concatenated into a single animation. Using the multiple-open
feature is the quickest way to go from individual GIF images to
an animation. For alternative ways to add frames to an animation,
see Adding Frames
below. This version of GIF Movie Gear can also read other
graphics formats in addition to GIF: AVI (Video for Windows) and
BMP (Windows Bitmap Format).
Previewing the Animation
Hit the Play
button on the toolbar or choose the View>Animation
Preview menu item to see a preview of the
animation. This brings up a new window that plays the animation.
There are two ways to view the animation: in a continuous loop or
a frame at a time. By default, the animation preview displays in
a continuous loop using the delay settings specified in the
animation. Clicking on the Stop button
stops the animation; to restart the animation loop, click the Play
button again. Clicking any of the Single Step
buttons stops the animation loop (if running) and advances the
animation one frame at a time; one click advances by one frame.
To close the animation preview window, either click on the 'x' at
the upper right of the window, hit the Stop
button on the main window toolbar, or uncheck the View>Animation
Preview menu item.
![]() Notice that the
animation window can continue playing as the animation is being
edited and changed. This means that changes can be viewed in the
preview as they are made. This is especially useful for
fine-tuning the delay settings.
Notice that the
animation window can continue playing as the animation is being
edited and changed. This means that changes can be viewed in the
preview as they are made. This is especially useful for
fine-tuning the delay settings.
Managing
Frames
Frames can be
selected, inserted, deleted, and moved around. Most of the
functions are found in the the toolbar.
Selecting a Frame
To select a frame, click on it with the mouse using
the left mouse button. Clicking on a frame with the right mouse
button also selects the frame and additionally brings up a
context menu allowing you to view more information about the
frame. Double-clicking on a frame with the left mouse button
selects the frame and automatically invokes the frame's Frame
Properties dialog box. The
currently selected frame is highlighted with a red rectangle and
its frame number is show in the lower left part of the status
bar. For example, in the screen shot shown above, the 7th frame is selected.
![]() At times it may be
more convenient to select a frame from a list of frame numbers.
To do this, use the dropdown combobox located on the lower
toolbar. The frames are listed in their current order with
"#nn" indicating the current frame position and more
descriptive text identifying the source file of the frame.
At times it may be
more convenient to select a frame from a list of frame numbers.
To do this, use the dropdown combobox located on the lower
toolbar. The frames are listed in their current order with
"#nn" indicating the current frame position and more
descriptive text identifying the source file of the frame.
![]() To deselect a frame,
either select another frame or click on the window background
where there are no frames (so that no frames are selected).
To deselect a frame,
either select another frame or click on the window background
where there are no frames (so that no frames are selected).
Deleting a Frame
To delete a
frame, it must first be selected. Once selected, the frame can either be
permanently deleted using the Edit>Delete
menu item or by hitting the Del key on the keyboard. The
frame can also be cut and placed in the keyboard using the Edit>Cut
menu item or the Ctrl-X keyboard
shortcut. The clipboard can then be used to paste the frame back
into GIF Movie Gear with its animation information intact or into
another application as a single bitmap image.
Adding Frames
Frames may be inserted into an animation using
several methods, but first, a note about insertion. The insertion
point of an animation is defined as follows: if a frame is
currently selected, the inserted frame(s) is(are) placed before
the currently selected frame. If no frames are selected, the
inserted frame(s) is(are) placed at the very end of the
animation. The exception to this rule involves files that are
drag&dropped directly into GIF Movie Gear; more on that
below. Insertions can take several forms:
Insert Frame
The File>Insert Frame menu item (or corresponding toolbar button) can be used to open one or more image files and insert their contents into the current animation. It brings up the standard File Open dialog. Select the file or files that you wish to insert and hit OK.
Pasting
Two types of objects can be pasted into GIF Movie Gear using the Windows clipboard: Device Independent Bitmaps cut or copied from another application and frames that were cut or copied from within GIF Movie Gear. In either case, the inserted image is placed immediately preceding the currently selected frame or at the end of the animation if no frame is currently selected.
Drag & Drop
GIF files can be dragged from the Windows Explorer and dropped directly into GIF Movie Gear. The effect is the same as using the File>Insert Frame menu item, the only difference being that using Drag&Drop, the insertion location depends on where exactly the files are dropped. If the files are between two frames, that's where the new frame(s) will be inserted. If the file is dropped in an area beyond the existing frames, the new frame(s) will be inserted at the end of the animation.
Insertion
Conflicts
When a frame is inserted into an existing
animation, there are a few issues that might need resolving to
ensure that the final animation is displayed optimally. The two
issues involve the frame's size and the frame's palette.
Sizing Conflict
There is a sizing conflict if the current animation's dimensions are smaller than those of the frame being inserted. Canceling at this point cancels the entire insertion. There are two choices presented in the conflict dialog:
- Clip the inserted frame to fit within the animation. Note that the original frame is not physically clipped; instead, it is only effectively clipped by the size of the final animation. To minimize the storage required for the frame, it is recommended that the animation be optimized before saving.
- Enlarge the dimensions of the animation to accommodate the inserted frame. As of version 1.0, the extra space added to the animation by this operation is not "filled in" with anything. In order to keep the animation working nicely, the first image might need to be enlarged to fill in the background for the subsequent frames in the animation.
Logistically, if a certain setting is deemed to be the appropriate one for every conflict encountered, that setting can be made into the default preference for the operation. Checking the box at the bottom of the dialog will result in the dialog not coming up again.
Palette Conflict
Unfortunately, the GIF file format limits the number of colors that can be used in an image to 256 colors. The actual number of colors that can be displayed on a given display and how those colors are displayed vary with the application used to view the image. To make a long story short, it is usually a good idea to make sure that all of the frames in a GIF animation use the same global palette for specifying colors.
- Merge with global palette
The new palette is mapped to the global palette, taking up unused spots when available and mapping to the nearest color once all 256 spots are used up. In scenarios where the palettes are small or very similar, a merge is hardly, if at all, noticeable. This is the recommended option for most cases.- Map to current global palette
The new palette's colors are mapped to the current global palette without changing the global palette.- Map to Web "Color Cube" Palette
This predefined palette of 216 colors contains a fair representation of the color spectrum. It is the palette used by most browsers to display images on a 256-color display and therefore essentially guarantees that the animation will be viewed as is during Web browsing. With this as the new global palette, all of the frames in the animation will be remapped.
- Use a Local Palette
The frame's palette is used as its local palette in the animation. This means that the inserted frame(s) will have its(their) own palette for display. Using a local palette preserves color information, but it often makes the resulting file larger and less optimizable.Dithering is the next decision. Once a palette is selected, the frame can be mapped to that palette either with or without dithering. Dithering is a process of displaying colors not directly available on an output device -- in this case in a destination palette -- by intermixing other colors. The result is an image that appears to contain all the colors. Dithered image look better (sometimes) than identical ones that were not dithered, but they do not compress as well when the animation is saved, resulting in increased file size.
Reordering
Frames
Frames can be reordered within an animation using a
number of techniques. The simplest is to select a frame, and
keeping the mouse button pressed, to drag the frame to its
intended position. When a frame is being dragged, the cursor
changes to the multi-arrow move cursor and the "drop
spot" for the frame is illustrated with an "insertion
bar." You cannot drag a frame outside of the GIF Movie Gear
application.
![]() The other way to move
a frame is to use cut&paste: Select the frame, cut it (see Deleting
a Frame) and then pasting
it in the desired position (see Pasting).
The other way to move
a frame is to use cut&paste: Select the frame, cut it (see Deleting
a Frame) and then pasting
it in the desired position (see Pasting).
Copying Frames to an Image Editor
Once a frame has
been inserted into an animation, most image editors can no longer
edit that frame from within the GIF file. To transfer a frame to
an image editor, select the frame and copy it to the clipboard
using either the Edit>Copy menu
item, the Copy toolbar button, or the Ctrl-C
keyboard shortcut. This places a copy of the image in the
clipboard that can then be pasted into an image editor. To return
the frame to the animation, either save it to a GIF file in the
image editor and use Insert Frame or copy it to the clipboard in the image editor and
paste it into GIF Movie Gear.
Frame
Properties
A frame's
properties, or settings, can be viewed and edited by using either
its property sheet or the toolbar. Once a frame is selected, its properties are visible on the lower
toolbar. The property sheet dialog can be activated in three
ways: 1) select the frame and choose the Edit>Frame
Properties menu item, 2) right-click on the frame
and choose Frame Properties from the
context menu, or 3) select the frame and hit the Frame Properties
button on the toolbar. (Note: The properties can be set for all
of the frames at once using the Global Frame Properties dialog.) The dialog contains a comprehensive
collection of settings, but the most imprtant settings can also
be conveniently viewed and set directly from the toolbar. A
frame's properties tell a lot about the frame:
| Name | The source file of the frame. (In the current version, this information is not maintained once the animation is saved.) | |
| Width & Height | The size of the image represented by the frame. This is not accessible from the toolbar and is not editable in the dialog. | |
| Offsets | The offset from the upper left corner of the animation "screen" to the upper left corner of the frame's image. This is not accessible from the toolbar. | |
| Transparency | The GIF format allows an image to specify one color index to be treated as transparent. Transparency is toggled on or off using the checkbox in the dialog or the button on the toolbar. Turning the transparency on also requires picking the transparent color index. Both the dialog and the toolbar offer the ability to pick the transparency color index at any time by clicking the appropriate button. | |
| Interlacing | Is the image to be stored interlaced? Interlacing is a method for storing a GIF image so that it can be displayed progressively as it is downloaded; it does not significantly affect the size of the GIF file and depending on the displaying browser may be ignored for all but the first image in an animation. This flag be toggled on or off in either the dialog or the toolbar. | |
| Local Palette | The frame has a local palette (or not). If present, the local palette may be viewed using the Show... button. The use of a local palette can be eliminated by unchecking the box (or button on the toolbar); note however that this operation may require handling a palette conflict. A local palette cannot be added to a frame after the frame's initial insertion into the animation. | |
| Delay | The delay (in 1/100ths of a second) following the displaying of the frame before the next frame is shown. | |
| Removal Method | There are
four choices for how an image is removed before the next
frame is drawn. Three are actually meaningful: do nothing
(i.e. simply draw the next frame on top of the current
one, represented by "Leave alone" and by
default "No disposal method"), replace the
background behind the current frame before drawing the
next one (represented by "Background color"),
and restore the animation to the state it was at before
the current frame was drawn ("Restore
previous"). All four choices and presented in the
dialog for completeness with the GIF 89a specification.
The toolbar choices are limited to the three meaningful
choices. Note: Netscape Navigator 3.0
does not properly handle the "Restore previous"
option in some cases. |
Making Global Changes
Sometimes it might be
desirable to change a frame property for all of the frames at
once. This can be done by selecting Global Frame Properties from
the Edit menu. The resulting dialog looks quite similar to the
Frame Properties dialog with the one notable exception being that
it reflects and affects all of the frames in the
animation. When this dialog shows a definitive setting (a number
in a number fields, a fully-checked box for a checkbox), this
indicates that all of the frames in the animation possess the
same setting. If, however, the dialog shows an undeterminate
setting (a blank for a number or a gray-checked box for a
checkbox), this means that not all the frames share the exact
same setting. Subsequently selecting a definite setting will
affect all of the frames.
Picking the Transparent Index
A frame's
transparency color is selected in the "Pick Transparent
Index" dialog. The dialog presents two ways to select the
index: 1) click on one of the colors in the color table (on the
left) or 2) click on any pixel within the image (on the right).
When a new index is selected, the image on the right flashes the
affected pixels and then displays them as transparent.
Moving
and Cropping Frames
To move a frame
within the animation's screen or to crop a frame down in
size, select the Edit>Move/Crop Frame
menu item (this menu item is also accessible via the frame's
context (right click) menu). These bring up a dialog that lets
you manipulate the location and size of the frame's rectangle.
All the relevant numbers can be set (negative offsets allow a
move up and to the left, cropping the upper left of of the frame
appropriately), and the view window shows the current location of
the frame in the animation screen: the frame's rectangle is shown
as a dashed black line, and the animation screen is shown as a
solid blue line. The alignment buttons in the upper right corner
allow an easy way to align a frame within the screen. If this
dialog is used on a display capable of more than 256 colors, you
can "ghost" the next or previous frame to help with
inter-frame alignment by checking the appropriate boxes.
Rotating Frames
Frames can be flipped
and rotated in place using the Edit>Rotate Frame
menu item (also found on the frame's context (right click) menu).
Only rotations in 90 degree increments are allowed at the present
time. In the cases where a 90 degree rotation requires the
animation screen size to grow (picture rotating a horizontal
landscape to be vertical: the frame's height would then exceed
the animation screen height), the current Sizing
Conflict
settings are used to decide if the frame gets clipped or the
animation screen size grows.
Animation Properties
The
"Animation Properties" dialog is invoked by either
choosing the Edit>Animation Properties
menu item, by right-clicking in the GIF Movie Gear window and
choosing Animation Properties from the context menu, or by
clicking on the Animation Properties button on the toolbar. At
least one frame must be present for this dialog to be available.
These settings affect the animation as a whole. The lower toolbar
offers direct access for setting the number of iterations and for
showing the global palette.
| Name | The name of the GIF file. This value can be changed by using the File>Save As menu item. | |
| Width & Height | The width and height of the animation. This rectangles defines the size of the animation "screen" (the term used in the GIF specification). All frames are clipped to this rectangle. Changing these values may affect the final look of the animation by either clipping it or by leaving parts of the rectangle undrawn (if is sized larger than the largest frame). | |
| Auto Size | Calculates the size of the animation so that it completely encompasses all of the current frames. | |
| Global Palette | A global palette is present (or not). If one exists (recommended), the Show... button displays the palette. | |
| Number of Frames | Number of frames in the animation. This value is for reference purposes only. | |
| Enable Animation | Adds looping information to the GIF file. When disabled, the animation is played exactly once. See more information below. | |
| Number of Iterations | The number of times that the animation loop should be played. 0 indicates a continuous loop. Note: the animation preview plays the animation in a continuous loop regardless of the specified number of iterations. |
Setting Preferences
Selecting Preferences
from the Edit menu brings up the Preferences dialog box and
allows the setting of some default values that can be useful when
building an animation from scratch. The settings are broken into
four pages, each specific to a certain type of operation.
![]() The default delay
setting is assigned to any frame that does not already have an
associated delay value when it is inserted into the animation.
Similarly, a default number of iterations can be set to be used
for any animation being built from scratch.
The default delay
setting is assigned to any frame that does not already have an
associated delay value when it is inserted into the animation.
Similarly, a default number of iterations can be set to be used
for any animation being built from scratch.
![]() The next two pages
deal with palette conflicts. Two distinct types of conflicts are covered,
merging among 256-color images and mapping a high-color image
down to 256 colors. One of the choices is to always ask the user
for guidance, resulting in the palette conflict dialog coming up
every time a conflict is encountered.
The next two pages
deal with palette conflicts. Two distinct types of conflicts are covered,
merging among 256-color images and mapping a high-color image
down to 256 colors. One of the choices is to always ask the user
for guidance, resulting in the palette conflict dialog coming up
every time a conflict is encountered.
![]() The last page deals
with sizing conflicts. One of the choices is to always ask the user for
guidance, resulting in the sizing conflict dialog coming up every
time a conflict is encountered.
The last page deals
with sizing conflicts. One of the choices is to always ask the user for
guidance, resulting in the sizing conflict dialog coming up every
time a conflict is encountered.
![]() Setting these default
preferences as needed before starting to build or edit an
animation can save time and thought by avoiding the conflict
dialogs altogether.
Setting these default
preferences as needed before starting to build or edit an
animation can save time and thought by avoiding the conflict
dialogs altogether.
Optimizing
File Size
One of the unchanging guidelines of
producing digital graphics is that "smaller is better."
Perhaps nowhere is this more true than when creating images for
the World Wide Web. The smaller the file size, the faster the
download and display, and that makes for an audience that is
happy and involved rather than bored and waiting for the
download. Since animations are usually larger than standalone
images, their size is even more of an issue. The big dilemma
facing anyone designing graphics is how to keep the file size
small without sacrificing the quality of the graphics themselves.
![]() Before starting the
process of file size reduction, it helps to understand how GIF
files store images. The GIF format uses technique known
as LZW Compression to reduce the size of the images.
Roughly speaking, the way this compression scheme works is that
it searches an image for recurring patterns, replacing each
recurring pattern with a special code that takes up less space
than the uncompressed pattern. The more recurring patterns are
found, the smaller the resulting file. The most drastic example
would be a image that is all white; because it consists of
essentially one pattern, it compresses very well. On the other
end of the scale would be a photographic image with lots of
colors and detail; it does not contain many repeating patterns
and as a result compresses poorly. The moral of the story is that
if you can get away with less detail in your frames (where less
detail means more recurring patterns), they will compress better.
More on that below.
Before starting the
process of file size reduction, it helps to understand how GIF
files store images. The GIF format uses technique known
as LZW Compression to reduce the size of the images.
Roughly speaking, the way this compression scheme works is that
it searches an image for recurring patterns, replacing each
recurring pattern with a special code that takes up less space
than the uncompressed pattern. The more recurring patterns are
found, the smaller the resulting file. The most drastic example
would be a image that is all white; because it consists of
essentially one pattern, it compresses very well. On the other
end of the scale would be a photographic image with lots of
colors and detail; it does not contain many repeating patterns
and as a result compresses poorly. The moral of the story is that
if you can get away with less detail in your frames (where less
detail means more recurring patterns), they will compress better.
More on that below.
![]() GIF Movie Gear has
several ways of helping you reduce the file size:
GIF Movie Gear has
several ways of helping you reduce the file size:
File
Size Tracking
GIF Movie Gear keeps you appraised of the size of the animation
on the status bar. While this does not actively change the size
of the file, it does regularly update as changes (for example,
deleting or adding a frame) are made to the animation. Keep an
eye on it as you edit your animation. Note: the
file size value is updated using a thread that runs in
the background, allowing you to keep working instead of waiting
for the calculation; while it is calculating, the file size field
says "Calculating..."
Palette
Reduction
A first line of attack for reducing file size of GIF images and
animations is palette reduction. Selecting the Tools>Reduce
Palettes menu item or the corresponding toolbar
button brings up GIF Movie Gear's palette reduction dialog. On
the left is the animation with its current palette and on the
right is the animation with a reduced palette. With this
side-by-side comparison, you can determine how much color loss is
acceptable for how much file size savings. The animation file
size is displayed below both versions to allow you to gauge the
savings. In the center of the dialog are located animation
preview controls similar to those found in the Animation
Preview
window that allow you to advance to a particular frame or watch
the animation play back in real time. The level of palette
reduction is controlled by the combobox -- how many colors do you
want to have? -- and the dithering checkbox. Every time a setting
is changed, the right animation is rebuilt and its file size
recalculated to reflect the new settings (the file size
calculation is performed in the background, allowing you to
manipulate the animation concurrently; if the size isn't there,
wait a bit for the calculation to finish).
![]() Why does palette
reduction affect the file size? In a nutshell, the fewer the
colors in an image, the better it will compress (dithering throws
a wrench into this, but more on that later), and when all the
frames compress better, an animation file can shrink
significantly in size. Unfortunately, as colors are taken away,
the image quality tends to degrade. The goal with palette
reduction is to find a balance between effective compression and
image quality. Conveniently the human eye is very good at
compensating for lack of color depth. Some quick experimentation
will show you that most 256-color images can be reduced to 64
colors or less without noticeably degrading in quality. With
moving images (ie animations), even fewer colors are needed to
keep the animation looking good. The key is to experiment: lower
the number of colors until just before the loss of quality
becomes intolerable.
Why does palette
reduction affect the file size? In a nutshell, the fewer the
colors in an image, the better it will compress (dithering throws
a wrench into this, but more on that later), and when all the
frames compress better, an animation file can shrink
significantly in size. Unfortunately, as colors are taken away,
the image quality tends to degrade. The goal with palette
reduction is to find a balance between effective compression and
image quality. Conveniently the human eye is very good at
compensating for lack of color depth. Some quick experimentation
will show you that most 256-color images can be reduced to 64
colors or less without noticeably degrading in quality. With
moving images (ie animations), even fewer colors are needed to
keep the animation looking good. The key is to experiment: lower
the number of colors until just before the loss of quality
becomes intolerable.
![]() Dithering adds a bit
of complication into the palette reduction process. Specifically,
dithering sometimes enhances the image quality when there are
fewer colors to choose from, but it also usually hurts the file
size (it is not uncommon to have a 256-color image actually grow
in size when reduced and dithered to 128 colors, for example).
Again, it's a matter of experimentation: turn dithering on and
off with the various reduced palette settings to determine a good
compromise between file size and image quality.
Dithering adds a bit
of complication into the palette reduction process. Specifically,
dithering sometimes enhances the image quality when there are
fewer colors to choose from, but it also usually hurts the file
size (it is not uncommon to have a 256-color image actually grow
in size when reduced and dithered to 128 colors, for example).
Again, it's a matter of experimentation: turn dithering on and
off with the various reduced palette settings to determine a good
compromise between file size and image quality.
Optimization
Selecting the Tools>Optimize Animation
menu item or the corresponding toolbar button brings up the
Optimization dialog. The tools in this dialog work on the
animation in fairly automated ways to try to reduce the file
size. The operations are broken up into two separate pieces,
palette shrinking and frame reduction. The right side of the
dialog tracks the file size before and after optimization. Note:
As you experiment with the different options, keep an eye on the
file size values; it is possible that in some cases certain
operations can cause the file size to increase and
should therefore not be used. Remember that the ultimate goal is
a smaller file.
![]() Palette
shrinking refers to the process of compacting a palette
by removing unused colors. This differs from palette reduction,
where colors are mapped to a smaller subset of colors and does
not affect image quality. Depending on the specifics of the
animation, shrinking palettes may result in a modest file size
reduction (by eliminating unused colors, the palette gets smaller
and hence takes up less room; there may also be minor gains in
compression) or in no change at all. (You can track which colors
are being used in the Show Palette dialog.)
Palette
shrinking refers to the process of compacting a palette
by removing unused colors. This differs from palette reduction,
where colors are mapped to a smaller subset of colors and does
not affect image quality. Depending on the specifics of the
animation, shrinking palettes may result in a modest file size
reduction (by eliminating unused colors, the palette gets smaller
and hence takes up less room; there may also be minor gains in
compression) or in no change at all. (You can track which colors
are being used in the Show Palette dialog.)
![]() Removing
local palettes (when they exist) can reduce file size by
both saving on palette storage and by making frame reduction more
likely. Removing local palette may affect the frame images, so
two options are offered: "only remove with a clean
merge," meaning that the local palette will not be removed
unless it can be removed without altering the image, and
"map to global," where the frame's palette is mapped to
the global palette, possibly requiring the image to be remapped
to a new set of colors.
Removing
local palettes (when they exist) can reduce file size by
both saving on palette storage and by making frame reduction more
likely. Removing local palette may affect the frame images, so
two options are offered: "only remove with a clean
merge," meaning that the local palette will not be removed
unless it can be removed without altering the image, and
"map to global," where the frame's palette is mapped to
the global palette, possibly requiring the image to be remapped
to a new set of colors.
![]() Frame
reduction takes advantage of image data that is repeated
between frames. By eliminating this repeated image data,
frames can be made smaller and more compressible. The first step
of frame reduction is to clip each frame to the smallest
rectangle that is needed to maintain the animation. This
rectangle contains all the changes between the previous frame and
this frame. The next step is to look for pixels that duplicate
the pixels in the previous frame; these pixels can then be made
transparent, the goal being to reduce pixel noise and
improve compression. Because of the vagaries of LZW
Compression, both of these techniqutes are not always
effective at reducing the file size: keep your eye on the file
size and don't choose any options that inadvertantly increase it.
Lastly, frames that are exact duplicates of the previous frame
can be eliminated altogether.
Frame
reduction takes advantage of image data that is repeated
between frames. By eliminating this repeated image data,
frames can be made smaller and more compressible. The first step
of frame reduction is to clip each frame to the smallest
rectangle that is needed to maintain the animation. This
rectangle contains all the changes between the previous frame and
this frame. The next step is to look for pixels that duplicate
the pixels in the previous frame; these pixels can then be made
transparent, the goal being to reduce pixel noise and
improve compression. Because of the vagaries of LZW
Compression, both of these techniqutes are not always
effective at reducing the file size: keep your eye on the file
size and don't choose any options that inadvertantly increase it.
Lastly, frames that are exact duplicates of the previous frame
can be eliminated altogether.
![]() Some animations
optimize better than others. Because frame reduction looks at how
the frames are shown during animation playback, the removal
method of each frame must
be taken into account. Both "Restore Background" and
"Restore Previous" removals mean that the next frame
does not depend on the previous frame, thereby eliminating the
possibility of frame redcution (no shared information = no
repeated data). The "Leave Alone" removal method is the
one that makes frame reduction useful. Also, any frames that have
a local palette cannot be reduced in relation to other frames due
to palette incompatibilities, so removing local palettes can also
help with frame reduction.
Some animations
optimize better than others. Because frame reduction looks at how
the frames are shown during animation playback, the removal
method of each frame must
be taken into account. Both "Restore Background" and
"Restore Previous" removals mean that the next frame
does not depend on the previous frame, thereby eliminating the
possibility of frame redcution (no shared information = no
repeated data). The "Leave Alone" removal method is the
one that makes frame reduction useful. Also, any frames that have
a local palette cannot be reduced in relation to other frames due
to palette incompatibilities, so removing local palettes can also
help with frame reduction.
![]() Note:
Frame reduction is dependent on the current frame ordering. After
any frame reduction operation, the animation is no longer as
editable as it was before. Reordering, inserting, deleting, or
editing frames may break the animation. It is a good idea to save
the animation in a non-optimized form if you intend to edit it in
the future. Unoptimizing
can often restore the animation to an editable state, but it is
not always an exact inverse of optimization.
Note:
Frame reduction is dependent on the current frame ordering. After
any frame reduction operation, the animation is no longer as
editable as it was before. Reordering, inserting, deleting, or
editing frames may break the animation. It is a good idea to save
the animation in a non-optimized form if you intend to edit it in
the future. Unoptimizing
can often restore the animation to an editable state, but it is
not always an exact inverse of optimization.
Other
Reduction Thoughts
There are other ways
to reduce an animation's file size that can be done manually or
while designing the individual frames. Here are some thoughts:
Additional Functions
GIF Movie Gear offers
a host of other functions that are somewhat secondary to the
creation of GIF animations.
Unoptimizing
Occasionally it
might be useful to force all the frames to be "full
size" with no offsets or transparency, just as they would be
viewed when the animation is being played. To accomplish this,
select the Tools>Unoptimize Animation
menu item. This function performs the opposite of the
optimization operation: it "fills in" every frame to
show the full view of the animation. This operation is useful for
editing a frame after an optimization. Note that regardless of
its name, unoptimization does not necessarily restore the
animation to its original state following an optimization operation.
Generating HTML Code
To facilitate the
adding of a GIF animation to an HTML page, GIF Movie Gear can
generate the <IMG> code that corresponds to the current
animation. To add an animation to an HTML page, simply choose the
Tools>HTML menu item and
copy the generated HTML. GIF Movie Gear automatically adds the width=
and height= attributes and allows you to make the image
into a link, to add a text description (alt= tag), and
to add a border.
Editing Comments
The GIF89a format allows for several types of data beyond the
basics of animation frames. While GIF Movie Gear does not provide
full editing support for these structures, it does provide the
ability to edit GIF comments. These comments are located within
the GIF file and can contain information such as copyright
notices or contact information. The comments are only displayed
by specialized applications, such as GIF Movie Gear, and are not
accessible from most image editor/viewers or Web browsers.
![]() To edit a GIF's
comments, choose the Edit>GIF Comments
menu item. The dialog box contains a list of the current comments
located in the file. Multi-line comments are shown with
"..." following the first line. To edit a comment or
view all the lines of a multi-line comment, select the comment,
and click the Edit button. Double-clicking on a comment also
opens the comment editor.
To edit a GIF's
comments, choose the Edit>GIF Comments
menu item. The dialog box contains a list of the current comments
located in the file. Multi-line comments are shown with
"..." following the first line. To edit a comment or
view all the lines of a multi-line comment, select the comment,
and click the Edit button. Double-clicking on a comment also
opens the comment editor.
![]() To remove a comment
block, select it and click the Remove button or hit the Del key.
To remove a comment
block, select it and click the Remove button or hit the Del key.
![]() To add a new comment,
use the Add button. The comment can then be entered in the
comment editor. The comment is inserted preceding the currently
selected comment or at the end of the comment list if no comment
is selected.
To add a new comment,
use the Add button. The comment can then be entered in the
comment editor. The comment is inserted preceding the currently
selected comment or at the end of the comment list if no comment
is selected.
![]() Additionally, you can
define a Signature Comment, a special
comment that will be automatically inserted into an animation
when it is saved. This is an easy way to automatically add a
copyright notice or other author identification to any animation
you create. To define/view the signature comment, select the Edit>Signature
Comment menu item. Note that the signature comment
is not inserted into the animation until the animation is saved,
so it will not appear in the comment list until after the first
time the animation is saved.
Additionally, you can
define a Signature Comment, a special
comment that will be automatically inserted into an animation
when it is saved. This is an easy way to automatically add a
copyright notice or other author identification to any animation
you create. To define/view the signature comment, select the Edit>Signature
Comment menu item. Note that the signature comment
is not inserted into the animation until the animation is saved,
so it will not appear in the comment list until after the first
time the animation is saved.
Exporting
Options
An animation is
usually saved as a GIF animation file, but it can also be saved
in other formats in a process called Exporting.
The choices for exporting are found in the File>Export
As menu item. This version of GIF Movie Gear
supports the following export options:
AVI
The animation is saved in the AVI format (this format is also know as the Video for Windows format). Unfortunately, GIF animation and AVI are two very different approaches to storing animation that do not always tranlsate well from one to the other. As a result, exported AVI files can grow to be very large.
GIF Filmstrip
The animation is saved as a single GIF image (non-animated) that consists of all of the frames concatenated together in "filmstrips" in a manner similar to the GIF Movie Gear main display. You can specify the orientation fo the strips (horizontal or vertical) and the the number of frames per strip. Unlike the program's display, the resulting image has frames abutting each other without any additional space.
Viewing Palettes
Both global palettes
and local palette are viewed with the same dialog. To view the
global palette, click the button (the last one) on the second
toolar or select Show... next to the
palette entry in the Animation Properties dialog. Similarly a
local palette is viewed by clicking the appropriate button on the
toolbar (only enabled if the selected frame has a local palette)
or via the Frame Properties dialog. The Show Palette
dialog displays the palette as an array of colored rectangles.
The dialog displays the colors in the palette that are actually
being used by one or more frames when "Show Colors
in Use" is checked. An in-use color shown with a small
contrasting color square in the middle. During optimization, GIF Movie Gear can automatically
eliminate all unused colors, thereby reducing the size of the
palette and its memory.
Changing the View
The way that the animation's
frames are displayed on the screen can be altered in several
ways. First, the orientation of the filmstrips can be changed
from horizontal to vertical or vice versa using either the
appropriate toolbar buttons or the View>Orientation
menu item. The Default orientation uses a vertical
filmstrip when the frame size is wider than it is tall;
otherwise, horizontal strips are used.
![]() Changing the zoom
setting also alters the way the animation data is viewed. The
toolbar offers buttons for zooming in, zooming out, or viewing at
actual size (100% zoom). The View>Zoom
menu item presents the zoom choices available. Note that zooming
only affects the viewing of the animation frames and does not
actually change the animation. Zooming abilities are provided to
allow all of the frames of animation to be viewed at once in
those cases where they cannot fit into the window at full size.
Changing the zoom
setting also alters the way the animation data is viewed. The
toolbar offers buttons for zooming in, zooming out, or viewing at
actual size (100% zoom). The View>Zoom
menu item presents the zoom choices available. Note that zooming
only affects the viewing of the animation frames and does not
actually change the animation. Zooming abilities are provided to
allow all of the frames of animation to be viewed at once in
those cases where they cannot fit into the window at full size.
![]() Another view
customization involves choosing how transparency is displayed.
The settings dialog for this is one of the tabs in the
Preferences dialog, accessible using the Edit>Preferences
menu item. The three choices are:
Another view
customization involves choosing how transparency is displayed.
The settings dialog for this is one of the tabs in the
Preferences dialog, accessible using the Edit>Preferences
menu item. The three choices are:
![]()
![]() 1. True Transparency: "see" the
window below where image is transparent
1. True Transparency: "see" the
window below where image is transparent
![]()
![]() 2. Defined Color: show the transparent
color as defined in the palette
2. Defined Color: show the transparent
color as defined in the palette
![]()
![]() 3. Picked Color: choose a color to
represent transparency
3. Picked Color: choose a color to
represent transparency
The latter choice can easily make transparency stand out, which
can be useful for tracking transparency. Mostly, however, this
settings is a personal choice.
Copyright,
Licensing, Trademarks, Warranty, Etc.
This software
product is copyright (c) 1996-1997 gamani productions. All rights
reserved. All title and copyrights in and to the software product
(including but not limited to any images, animations, and text
incorporated into the software product) are owned by gamani
productions. The software product is protected by copyright laws
and international treaty provisions. Therefore, you must treat
the software product like any other copyrighted material.
![]() Once the user registers this software, the user is restricted to
the use of a single copy on only a single personal computer or
workstation which is not used as a server. The user is restricted
from modifying or copying the software, except that the user may
make one copy solely for backup or archival purposes.
Once the user registers this software, the user is restricted to
the use of a single copy on only a single personal computer or
workstation which is not used as a server. The user is restricted
from modifying or copying the software, except that the user may
make one copy solely for backup or archival purposes.
![]() Movie Gear
is a trademark of gamani productions.
Movie Gear
is a trademark of gamani productions.
![]() The Graphics
Interchange Format⌐ (GIF) is the Copyright property of
CompuServe Incorporated. GIF(sm) is a Service Mark of CompuServe
Incorporated.
The Graphics
Interchange Format⌐ (GIF) is the Copyright property of
CompuServe Incorporated. GIF(sm) is a Service Mark of CompuServe
Incorporated.
![]() The compression
technology used in the GIF file format covered by a patent owned
by Unisys Corporation. This software is licensed under U.S.
Patent No. 4,558,302 and foreign counterparts. Note that the
Unisys patent applies to software which reads and writes GIF
files, not to the GIF files themselves.
The compression
technology used in the GIF file format covered by a patent owned
by Unisys Corporation. This software is licensed under U.S.
Patent No. 4,558,302 and foreign counterparts. Note that the
Unisys patent applies to software which reads and writes GIF
files, not to the GIF files themselves.
![]() Windows and Video for
Windows is a trademarks of Microsoft Corporation.
Windows and Video for
Windows is a trademarks of Microsoft Corporation.
![]() Netscape Navigator is
a trademark of Netscape Communications Corporation.
Netscape Navigator is
a trademark of Netscape Communications Corporation.
Disclaimer of Warranty
THIS SOFTWARE AND THE ACCOMPANYING FILES ARE PROVIDED "AS
IS" AND WITHOUT WARRANTIES AS TO PERFORMANCE OF
MERCHANTABILITY OR ANY OTHER WARRANTIES WHETHER EXPRESSED OR
IMPLIED. Because of the various hardware and software
environments into which this software may be put, NO WARRANTY OF
FITNESS FOR A PARTICULAR PURPOSE IS OFFERED.
![]() Good data processing
procedure dictates that any program be thoroughly tested with
non-critical data before relying on it. The user must assume the
entire risk of using the program. ANY LIABILITY OF THE SELLER
WILL BE LIMITED EXCLUSIVELY TO PRODUCT REPLACEMENT OR REFUND OF
PURCHASE PRICE.
Good data processing
procedure dictates that any program be thoroughly tested with
non-critical data before relying on it. The user must assume the
entire risk of using the program. ANY LIABILITY OF THE SELLER
WILL BE LIMITED EXCLUSIVELY TO PRODUCT REPLACEMENT OR REFUND OF
PURCHASE PRICE.
Registration
GIF Movie
GearTM is distributed as a
fully-functional trial program that expires 30 days after first
use. Information about obtaining a registered, non-expiring copy
of GIF Movie Gear is found here.
Contacting
Us
Technical
Support
Please email
technical support issues to gamtech@gamani.com. Include your registration number in the
email to ensure a prompt response. Registered users will get
priority.
Feedback
We are always
striving to make our products better. If you have any bugs to
report or features and improvements to suggest, please email them
to gamtech@gamani.com.
Updates
To find out about the
latest updates to GIF Movie Gear and (possibly) other tools being
developed by gamani productions, visit us at http://www.gamani.com.
Copyright (c)
1997 gamani productions. All rights reserved.
Movie Gear
is a trademark of gamani productions.
GIF(sm) is a Service Mark of CompuServe Incorporated.