Setting Up Your 32-Bit Dialer
STEP 1: Verifying that Dial-up Networking is
installed
STEP 2: Verifying that the Dial-up Adapter and
TCP/IP are installed
STEP 3: Configuring TCP/IP protocol
STEP 4: Setting up the connection icon
STEP 5: Connecting to the Concentric
Network
STEP 1: Verifying that Dial-up Networking is
installed
Windows 95 calls its 32-bit dialer "Dial-Up Networking." To verify
that you installed the Dial-Up Networking component when you
installed Windows 95:
- Press the Taskbar's
 button, and select SETTINGS |
CONTROL PANEL. button, and select SETTINGS |
CONTROL PANEL.
- Double-click the ADD/REMOVE PROGRAMS icon.
- Select the WINDOWS SETUP tab.
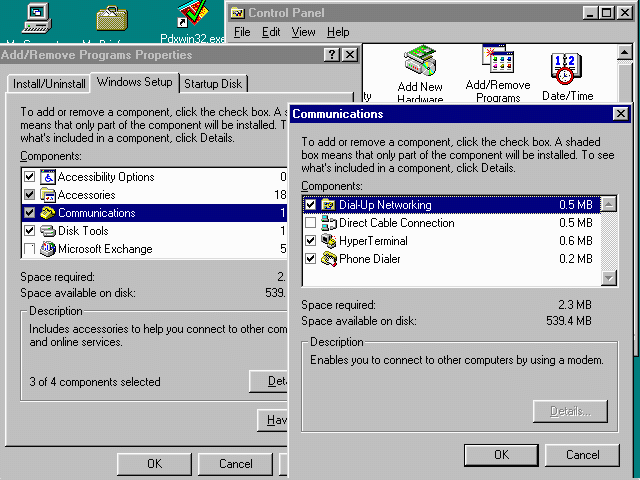
- Highlight the COMMUNICATIONS component and press the DETAILS
button, as shown in the figure below. If DIAL-UP NETWORKING is
installed, a check appears in the box to the left of it.
- If the box beside Dial-Up Networking is checked, go on to
step 2.
- If the box is unchecked, install Dial-Up Networking on your
system as follows:
-
- Put your Windows 95 setup disks or CD-ROM into your disk
drive.
- Check the box next to Dial-Up Networking and click the OK
button.
- Follow the prompts to add the Dial-Up Networking files to
your system.
Note: The setup program may prompt you to name your
computer if you have not already done so. CNC's network does
not use this information, so enter whatever you like.
- After adding the Dial-Up Networking files, restart your
computer when prompted. Click on the START button, and select SHUT
DOWN | RESTART THE COMPUTER?
- When Windows 95 reloads, the CONTROL PANEL program group
should appear on your screen. If it does not, click on the START
button and select SETTINGS | CONTROL PANEL.
GO ON TO STEP 2
STEP 2: Verifying that the Dial-up Adapter
and TCP/IP are installed
- Go to the CONTROL PANEL.
- Double-click the NETWORK icon.
- Click on the CONFIGURATION tab. The list of displayed network
components should include both DIAL-UP ADAPTER and TCP/IP (DIAL-UP
ADAPTER).
- If both are present, proceed to step 3.
- If the DIAL-UP ADAPTER is not installed, follow these steps to
add it:
-
- Click the ADD... button.
- Double-click ADAPTER.
- Scroll down the list and select MICROSOFT.
- Choose the DIAL-UP ADAPTER from the listing on the right.
- Click on the OK button.
- If TCP/IP is not installed on your system, follow these steps
to add it (see figure below):
-
- Click the ADD... button.
- Double-click PROTOCOL.
- Select MICROSOFT.
- Select TCP/IP.
- Click on the OK button.
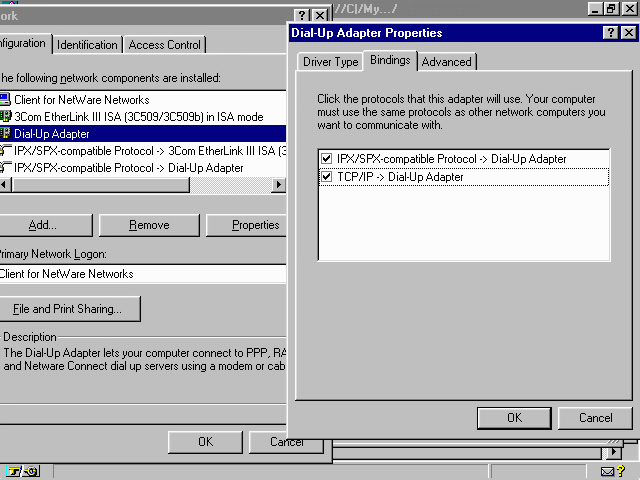
- The NETWORK dialog box should now show both DIAL-UP ADAPTER
and TCP/IP.
- Select DIAL-UP ADAPTER, and click the PROPERTIES button.
- Choose the BINDINGS tab, and make sure the TCP/IP box is
checked.
- Your computer will prompt you to restart. Click on the OK
button twice.
GO ON TO STEP 3
STEP 3: Configuring TCP/IP protocol
- Go to the CONTROL PANEL, and double-click the NETWORK icon.
- Click on the TCP/IP protocol and press the PROPERTIES...
button.
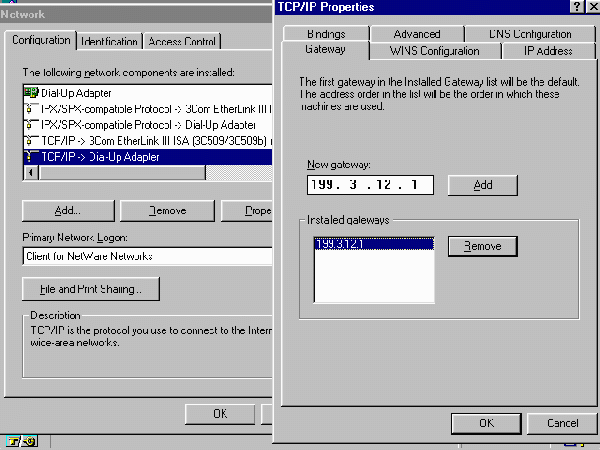
- Click through the tabs in the TCP/IP Properties dialog box,
making sure the settings match those below, as shown in the
following figure:
- IP ADDRESS - Set the IP address to "Obtain an IP Address
Automatically."
WINS CONFIGURATION - Select "Disable WINS Resolution."
GATEWAY - Set Gateway to 199.3.12.1. Click the ADD button.
BINDINGS - Set nothing in the Bindings section. Though it may
default to Client for Microsoft Network, leave it alone.
ADVANCED - If a check does not appear in the box to the left of
'Set This Protocol To Be The Default Protocol,' add the check.
Otherwise, change nothing.
DNS CONFIGURATION - Set these to the following:
-
- Set to Enable DNS.
- Host = crc3
- Domain = concentric.net
- Under DNS Server Search Order:
-
- Type 199.3.12.2
- Click the ADD button.
- Type 199.3.12.3
- Click the ADD button again.
- Under Domain Suffix Search Order:
-
- Type concentric.net
- Click the ADD button.
- Click on the "OK" button.
- Click on the "OK" button again.
- Your TCP/IP Protocol setup is now complete. Restart your
computer when prompted.
GO ON TO STEP 4
STEP 4: Setting Up The Connection Icon
- Double-click the MY COMPUTER icon on your desktop.
- Double-click the DIAL-UP NETWORKING icon.
- Double-click the MAKE NEW CONNECTION icon.
- For the "Name of the computer you are dialing," enter
CONCENTRIC NETWORK.
- Click the CONFIGURE button.
- Click on the GENERAL tab, as shown in the figure below.
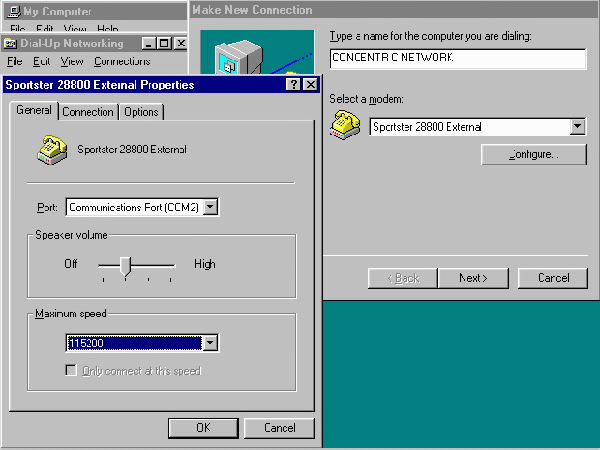
- Set the maximum speed to the highest baud rate your modem can
handle. Windows 95 should have automatically configured your
modem. Do not check "Only Connect at This
Speed."
- Click on the CONNECTION tab. Make sure your preferences are
set to:
-
- Data Bits: 8
- Parity: none
- Stop bits: 1
- Change nothing under the OPTIONS tab.
- Click the OK button.
- Click the NEXT> button.
- Enter the phone number that you use to dial in to the
Concentric Network (your Local
Access Number or CNC's hourly 800 number: 1-(800) 991-4227).
- If you have call waiting, add *70, (including the asterisk) to
the beginning. This will temporarily disable call waiting.
- Press the NEXT> button, then the FINISH button. This
creates a new CONCENTRIC NETWORK icon for you to click whenever
you want to dial into the Internet.
- Click the right mouse button on the new icon.
- Click on PROPERTIES.
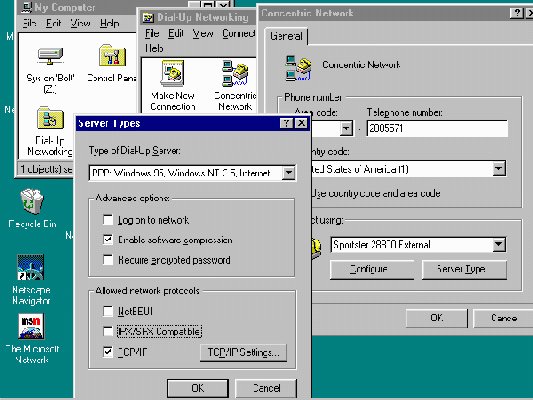
- Click the Server Type button, as shown in the following
figure:
-
- Make sure "PPP, Windows 95...." appears in the Type of Dial-up
Server box.
- Under advanced options, check "Enable Software Compression."
- Under allowed network protocols, check "TCP/IP."
- Click the TCP/IP settings button.
- Check the "Server assigned IP address" button.
- Check the "Specify Name server addresses" button.
- For the Primary DNS, enter 199.3.12.2
- For the Secondary DNS, enter 199.3.12.3.
- Click OK in each of the three boxes as you exit out.
GO ON TO STEP 5
STEP 5: Connecting to the Concentric Network
- Double-click on the CONCENTRIC NETWORK connection icon
established in step 4. This will bring up a
login screen.
- Click the CONNECT button, and your modem should start dialing.
- Open your Netscape Navigator or other favorite Internet
software, and enjoy your 32-bit dial-up connection!
Click here to review the steps for
setting up your Windows 95 32-bit dialer.
Dialer Settings
Below are the IP numbers and server names needed to configure most
Internet software. Click here for your
Local Access Numbers:
- IP Address: 192.0.2.1
- Name Server Primary: 199.3.12.2
- Secondary: 199.3.12.3
- Domain Name: concentric.net
- Subnet Mask: 255.255.255.0
- IP Gateway Server: 199.3.12.1
- Mail Server: pop3.concentric.net
- Pop3 Server: pop3.concentric.net
- Pop3 Account: email-id@pop3.concentric.net
- SMTP Server: smtp.concentric.net
- World Wide Web Home Page: http://home.concentric.net
- News Server: news.concentric.net
- Gopher Server: gopher.concentric.net
- IRC Server: irc.concentric.net
Troubleshooting Your Dialer
Click here for Dialer
Troubleshooting help.
[Back to the Handbook
Home Page / Introduction to the
Web / Intro to Concentric
Network]
[Connecting to Concentric
Network / Troubleshooting / Talk to
Us]
Questions? Send e-mail to support@concentric.net
|
Your original Windows 95 setup disks or CD-ROM.
A printout of these instructions
(optional, but very helpful).
About 20 minutes of free time. (You
must restart your computer several times during this process,
requiring some time and patience.)