
Xcode is a powerful professional tool that allows you to perform the
most common software development tasks simply, quickly, and in a way that
should be familiar. Its capabilities, however, are much more powerful than
what is needed to build just a single type of application. Xcode is
designed to let you build any kind of software product you
can dream of. From Cocoa and Carbon applications to kernel extensions and
Spotlight importers, Xcode is up to the task. Xcode's unique interface is
designed to help you navigate your source code in a variety of ways and
provides access to the large amount of functionality in the underlying
toolset—including GCC, javac, jikes, and GDB—that is used to
build software products. It's a tool designed by professionals for
professionals.
Because of what it can do, Xcode has already been widely adopted by the
Mac developer community. And with Apple's transition to Intel-based
Macintosh computers now underway, moving to Xcode is more important than ever. This is because using Xcode is the way to create
universal binaries, the executable file format that places native code for
both PowerPC and Intel architectures into one package. In fact, for
developers who have not yet moved to Xcode, doing so is the essential
first step towards moving their applications to universal
binaries.
To become truly proficient with Xcode, whether you've been using it for
a while or are just starting to make the transition, an understanding of
the Xcode user interface and how it is used to organize a software project
is required. This understanding will take you a long way towards understanding
the philosophy behind Xcode and how it works, and will help to make it work better for
you.
Xcode Projects Defined
All activity in Xcode, from creating and editing files to
building and debugging applications, revolves around projects.
Xcode projects organize and give access to all of the files and
resources that are used to build a software product. Regardless of what you are building, Xcode manages three
kinds of information to build your product:
- Source file references that include source code, images, localized string files, data models, and more.
- Targets that define the products to build.
A target organizes the files and instructions needed to build a
product into a sequence of build actions that can be taken.
- Executable environments in which you can
run and test a software product. An executable environment
defines the program that should be used to run the product with. In
many cases, this will be the product itself, but doesn't have to
be. In addition, the executable environment defines any
command-line arguments and environment variables which should be
used.
These three elements of an Xcode project come together as shown in Figure 1.
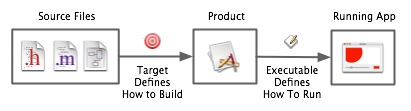
Figure 1: How Xcode uses source file references, targets, and executable environments.
When you execute the Build and Run command (Command-R), Xcode processes a target that performs a set of actions on source code that in turn produces a product. Then, Xcode runs the product using the active executable environment.
"But wait," you might ask, "why does an executable environment have to be set up? Can't you just run the product directly?" That's a good question. If it were just a matter of running a built Cocoa application, then defining an executable environment would be overkill. However, there are many products, such as plug-ins, that require you to define a host application in which to run the product. Executable environments are also used to run products in the debugger. You can even define multiple executable environments to run the same product in different ways.
The Project Groups & Files List
The source file references, targets, and executable environments that make up a project are all displayed in the Groups & Files list in the Xcode user interface. Now that we've identified these components, let's take a look at their placement in the Groups & Files list, as shown in Figure 2. Here we are looking at the DotView example application.
If you'd like, you can follow along for yourself. Just open
up the file:
/Developer/Examples/AppKit/DotView/DotView.xcodeproj
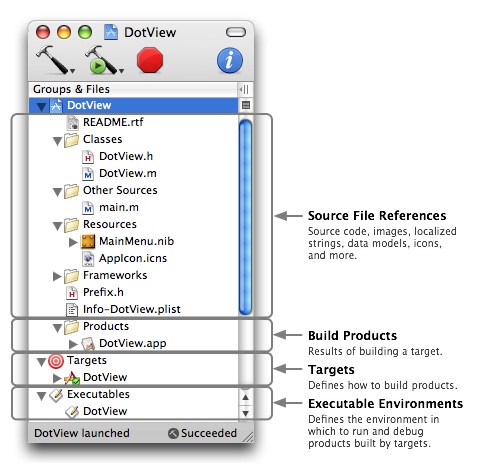
Figure 2: The Group & Files list encapsulates many different types of information into a compact interface.
Just as you can see all of the source file references in a project, you can expand each of the products in a project and see how it is put together, as shown in Figure 3.
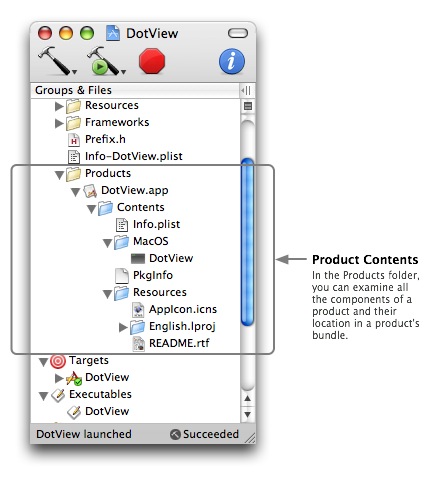
Figure 3: Expanding a product shows all of the built components of a product, in this case a Cocoa application.
As well, you can also expand a target to get a view of its contents which are the steps taken to build a product. This is shown in Figure 4.
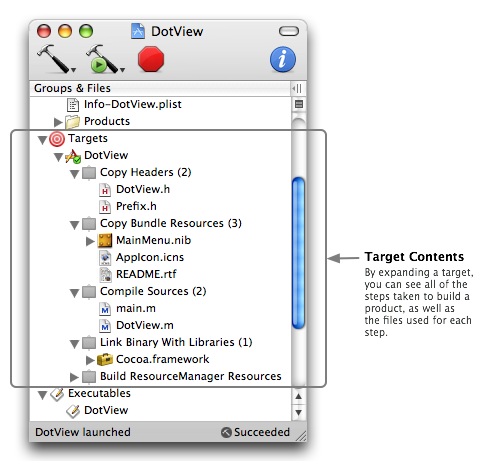
Figure 4: Expanding a target shows all of the steps taken to build a product.
Project Navigation
Below the source code files, projects, targets, and
executable environment entries in the Groups & Files list is
a set of tools to let you navigate the contents of your project.
These entries take the form of Smart Groups that
work the same way as Smart Folders in the Finder and Smart
Playlists in iTunes. These tools are shown in Figure 5.
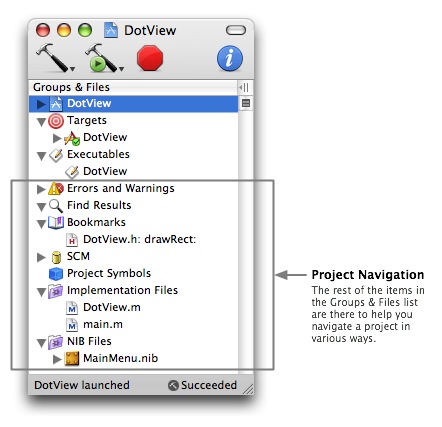
Figure 5: The Xcode Groups & Files list contains several tools to help you navigate around your project.
Users new to Xcode sometimes find the extensive functionality
available in the Groups & Files list overwhelming,
especially compared to the simple listings of files that they
may be used to from other environments. However, once you have
familiarized yourself with what all these items do, the project
panel becomes a powerful tool for obtaining access to all of the
functionality that Xcode has to offer.
Source File References In Depth
Now that we've taken a look at the basic components of an
Xcode project, it is time to focus our attention on source file
references. If you double-click on a source file reference, an
appropriate editor will open allowing you to modify it. However,
as you might be able to infer from the figures above, a source
file reference also implies a set of instructions that are
carried out when it is added to a target. For example, when you
add an Objective-C source code file (with a .m
extension) to a project and associate with a target, it is
added to the Compile Sources step of the target
and processed by the GCC compiler.
You can control whether a source file reference is part of a target using the Xcode project interface, as shown in Figure 6.
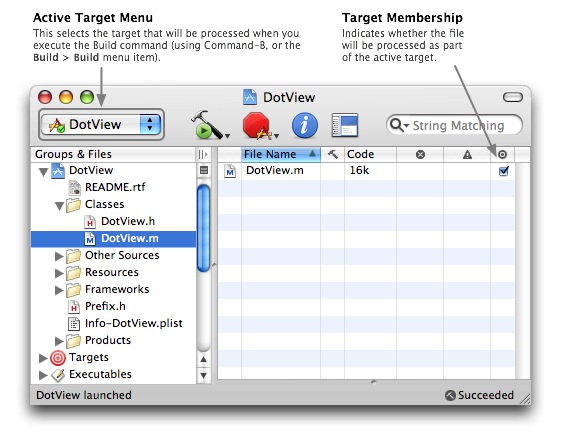
Figure 6: The Xcode interface lets you quickly adjust a source file reference's association with a target.
You can also adjust these settings by using the Get Info window for the source file reference, accessed with the File > Get Info menu item or Command-I. This window is shown in Figure 7.
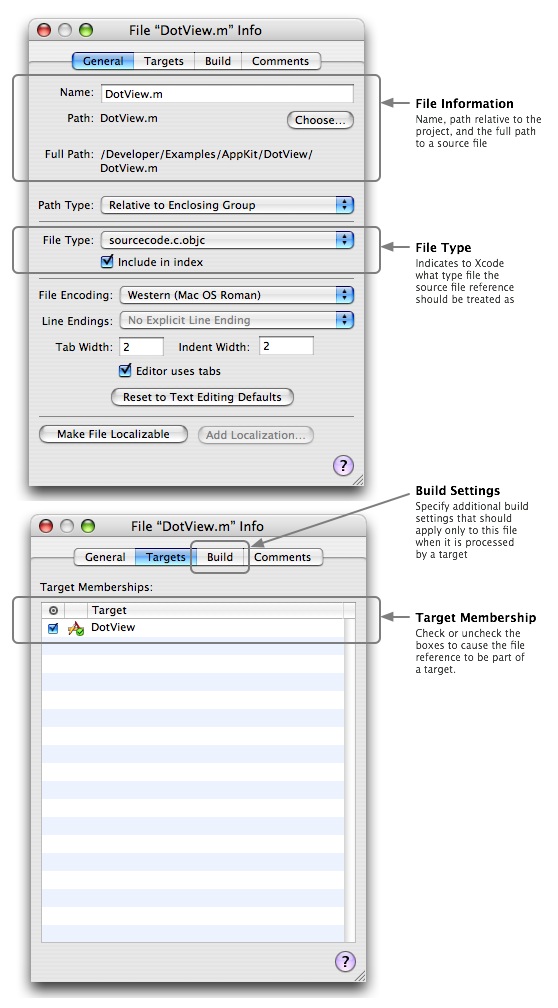
Figure 7: The Info window for a file reference allows you to set what targets a file is part of as well as any additional build settings.
In the case of the Objective-C source file we've been showing
in the figures, its inclusion in the active target results in it
being compiled by GCC and then linked into the final executable.
If you want to prevent its inclusion into the final product,
simply remove it from the target that builds the product.
How A Target Is Processed
Now, let's move our attention to targets and how they are processed. If we take a closer look at the target in the Groups & Files list we can see roughly what will happen when the product is built. Figure 8 explains the process of building the DotView product in more detail.
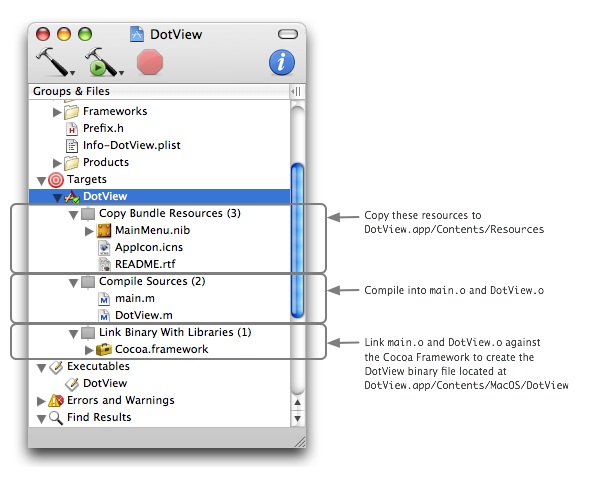
Figure 8: The actions taken on files as a result of their inclusion in a target.
You can see this process at work when you build a target by looking at the Build Results window, shown in Figure 9. You can bring this window up using the Build > Build Results menu item or Command-Shift-B.
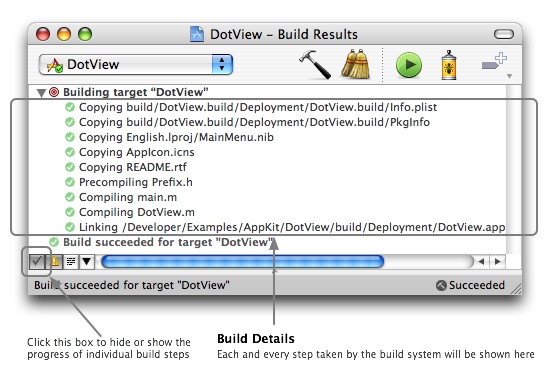
Figure 9: The step-by-step progress of a target's build in the Build Results window.
Build Rules and Settings
So, how does Xcode know what to do with the file references that belong to a target? It's simple: Xcode uses the build rules and settings associated with a target to sort things out. The default rules and settings specify that any files containing code in a language supported by GCC is compiled with GCC. However, if you want to compile your C source files with a previous version of GCC, you can easily set it to do so using the target's Info window, shown in Figure 10.
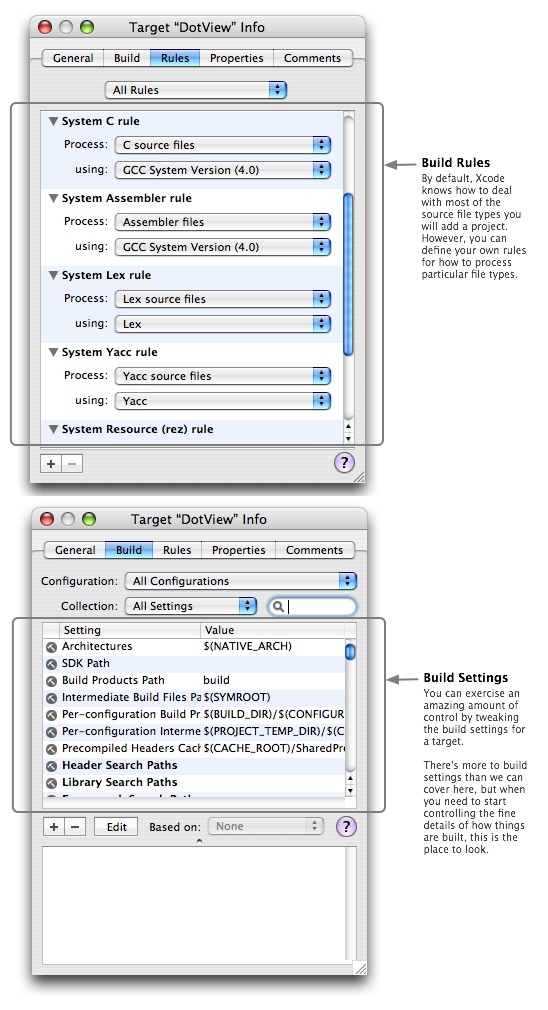
Figure 10: Both the build settings and build rules for a target can be modified in a target's Info window.
Now that we've taken a detailed look at both source file references and targets, let's look at the final part of the Xcode project equation: executable environments.
Executable Environments
As we said before, an executable environment defines how a product is run when you run it from Xcode. An executable environment defines what program Xcode should launch as well as how to launch it. You can set up multiple executable environments to test a product under a variety of situations.
In short, the executable environment defines the following:
- What executable to use. This can be one of the products built by a target or some other executable on the system.
- The command line arguments to pass to the executable.
- The environment variables to set in the executable's environment before launching it.
- The debugger that should be used and how to run the executable in the debugger.
You can see how these items are defined in the Info window for an executable, shown in Figure 11.
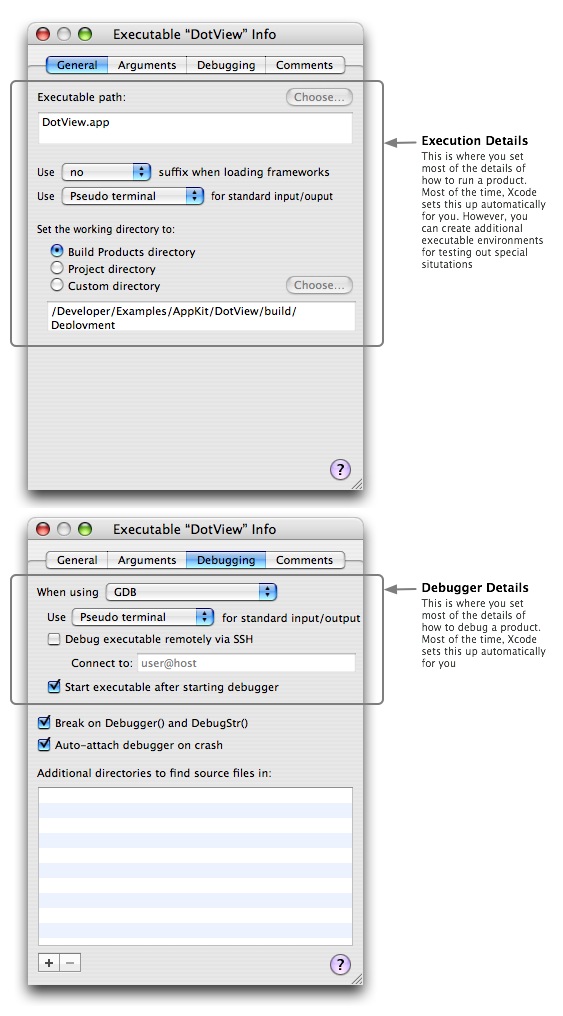
Figure 11: The executable Info window is where you can examine the details of how a product will be run.
For More Information
Updated: 2005-12-12
|