
In order to become an effective Xcode user, you need to understand two major Xcode concepts. The first is how Xcode projects are defined and organized. The
second is how the Xcode build system takes the targets that are defined in your projects and turns them into products. In a previous ADC article, Understanding Xcode Projects, we examined how Xcode projects are structured.
Now, we're going to look at how the Xcode build system works to create products from projects. More specifically, we're going see how the build
process can be customized with both build settings and build configurations.
There is a lot of flexibility in the Xcode build system for customization, so you can choose to keep your settings simple or make them as complex as you like. But
for most purposes, a basic understanding of how build settings and build configurations work will make this topic easy to master—once you have these concepts clear, you can choose the settings that work best for you.
So let's start out by reexamining how Xcode builds a project and then we can look at how to customize that process.
How Xcode Builds Products
To build a project, the Xcode build system takes a set of actions that are to be performed and translates them into a set of commands that are executed. These commands are executed on the command line and take advantage of a large number of tools, such as the GCC compiler, javac, jikes, and more. To get an idea of how this translation happens, let's take a look at a typical target.
A target is composed of a series of build phases. Each build phase performs an action on one or more files. Figure 1 shows this structure in detail.
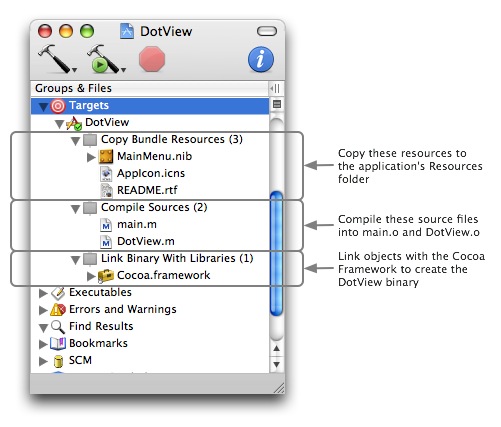
Figure 1: A target and the build steps that are performed to create a product.
As each build phase is processed by Xcode's build system, a series of commands is created and executed to complete the phase. While most of the
time, these commands are executed behind-the-scenes, they need not remain a mystery. You can see the steps that the build system takes, as well as the
commands created by the build system, using the Build Results window, as shown in Figure 2. You can display this window using the Build>Build Results menu item or Command-Shift B.
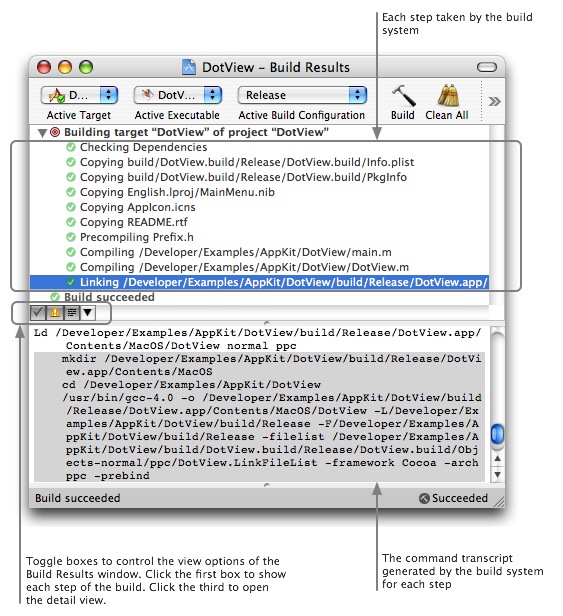
Figure 2: The step-by-step progress of a target's build in the Build Results window.
The result of all of the commands that the build system puts together and executes is the product of a target; in this case a simple Cocoa application, ready to use. In the simplest of cases, say building a straightforward Cocoa application based on a book example, you wouldn't need to know anything more than this. Software development, however, is rarely so easy. In order to effectively do your job, you need to know how to customize the way in which the build system works. To do this, we need to take a look at Build Settings.
Build Settings
In essence, a build setting is a variable that communicates information to the build system. A build setting can enable or disable a feature, such as Zero Link. It can communicate a property, such as the name of the product to be built. It can also indicate a flag that should be passed to an underlying tool, such as -Wmost to GCC.
You can set build settings at a number of levels. The two places where you're most likely to set them is at the project level and at the target level. To see the settings for
either a project or a target, open the respective Info inspector and select the Build tab, as shown in Figure 3.
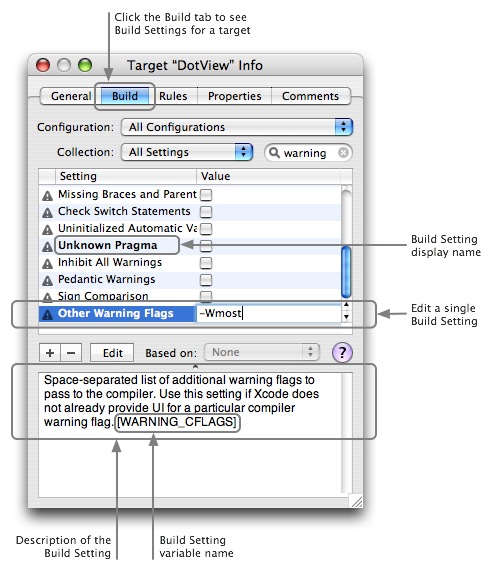
Figure 3: Build settings for a project's target.
The -Wmost flag set for Other Warning Flags is the typical default value for this build setting. And, indeed, if you look in the build transcript for the target, you'll find the -Wmost flag as part of the command used to compile the source files for the target:
/usr/bin/gcc-4.0 [many flags] -Wmost [many other flags] -c /Developer/Examples/AppKit/DotView/DotView.m -o /Developer/Examples/AppKit/DotView/build/DotView.build/Release/DotView.build/Objects-normal/ppc/DotView.o
If, instead of -Wmost you wanted to use the -Wall flag, you could set the Other Warning Flags build setting to
-Wall and the compile commands would be generated as follows:
/usr/bin/gcc-4.0 [many flags] -Wall [many other flags] -c /Developer/Examples/AppKit/DotView/DotView.m -o /Developer/Examples/AppKit/DotView/build/DotView.build/Release/DotView.build/Objects-normal/ppc/DotView.o
We've used a simple compiler flag as an example here, but almost every aspect of a build can be tweaked with a build setting. There are build settings for communicating which version of GCC to use (GCC_VERSION), the name of the product (PRODUCT_NAME), and the CPU architectures the product should be built for (ARCHS). In short, build settings are the real knobs and sliders for the build system. And by using the target and project inspectors, you can modify any part of the build process that you want to.
Finding the Build Setting You Want
With all the build settings available, you might ask "What's the best way to find the setting I want?" The answer is to use the search box in the inspector
window. When you enter a search term, both the build setting names and descriptions are searched in order to narrow down the possible build settings, as shown in
Figure 4.
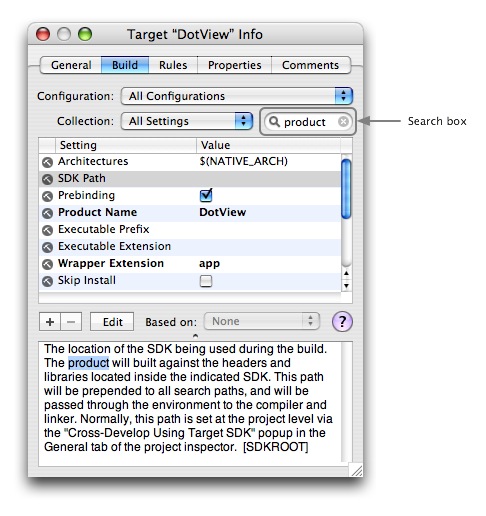
Figure 4: Quickly find a build setting using the search box. The search will occur both against the build setting names and the descriptions.
Because both the build setting names and descriptions are used for the search, you'll most likely find a build setting for any purpose by trying a few different words that describe
what you want to accomplish.
Build Setting Precedence
We've mentioned that you can set build settings at both the project and target levels. For most intents and purposes, these are indeed the two places where you'll interact with them most. However, there are actually a few other places where build settings can come from—and more importantly, there is an order of precedence in which they take effect during a build.
The levels at which build settings can be set, and their precedences are:
xcodebuild command-line flags (only applicable for command-line builds)- The target, editable via a target's Info inspector
- The project, editable via a project's Info inspector
- Xcode application settings, as set in Xcode > Preferences...
- Xcode's built in defaults
- The user environment, perhaps as set in a user's
~/.MacOSX/environment.plist file
For example, if you set the Other Warnings Flag build setting in your project to -Wnone, but set the Other Warnings Flag in the active target to -Wall, the target's value of -Wall will be used when you build using the Xcode GUI.
If you then execute a command-line build with the following command:
$ xcodebuild WARNING_CFLAGS=-Wmost
the source code files will be compiled with the -Wmost flag.
These orders of precedence are fairly straightforward and, for most developers, can be simplified to: Build settings at the target level override settings at a
project level. This lets you define build settings that should apply to all targets once at the project level rather than in each target, reducing duplication of effort
and possible fragility. To decide where a setting should be made, you need to decide if it is something that you'll only want in one target or that you'll want to be
on more than one. If the latter, then push the setting up into the project level.
Build Configurations
Being able to set build settings at various levels helps consolidate common settings at the project level and removes quite a few headaches. But, it doesn't take care
of a slightly different problem. Most of the time, the builds that you produce are for testing purposes only—you want to make sure that they are set up for debugging.
On the other hand, you want to make sure that the builds that you release to your customers are optimized. You wouldn't want to have to keep a list of all the build settings that are
different between release and debug builds and manually set them. You certainly wouldn't want to keep two different targets in sync to accomplish this task. And you don't
need to do so, thanks to Xcode's Build Configurations.
Build configurations are named collections of build settings that you can apply to a target or a project. In a way, you can think of them as build setting overrides. The
settings in a build configuration override any setting of the same name for a target or a project.
Without modification, new Xcode projects come with two configurations: Release and Debug. As you might expect, based on their names, one
configuration is set up for development debug builds, and the other is set up for providing builds to your customers. One of the primary differences between these two
kinds of builds is that for debug builds, you want to compile things as quickly as possible so that compile times don't get in the way of your development work. Yet for
release builds, you want to make sure to compile a universal binary.
The Architectures (ARCHS) build setting gives you the ability to control this. Compare the images in Figure 5: the Debug build configuration (left) is set up only to compile a
binary for the CPU architecture that Xcode is running on, shown by the value $(NATIVE_ARCH). The Release configuration (right) is configured to compile for both the PowerPC and Intel CPU architectures, shown by the value ppc i386.
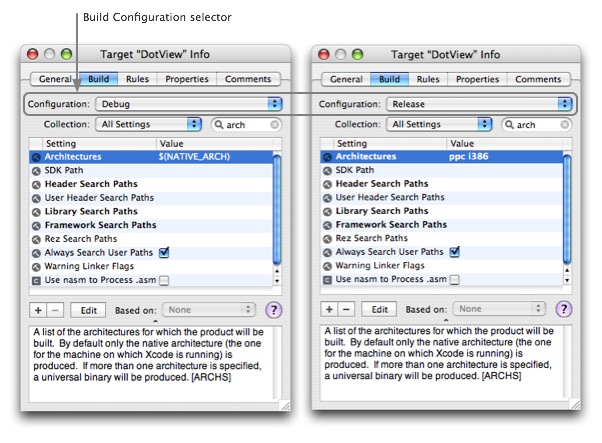
Figure 5: Build Configurations let you modify the value of a Build Setting for various kinds of builds.
There are other differences between Release and Debug builds as well. For example, debugging symbols will be generated during a Debug build and stripped for a Release build. As well, no optimization will be applied for a Debug build, but it is applied to Release builds, as shown in Figure 6 and the Optimization Level (GCC_OPTIMIZATION_LEVEL) build setting.
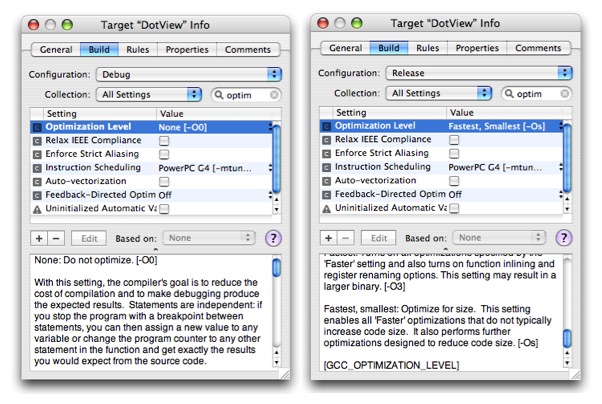
Figure 6: Another difference between Debug and Release configurations is the optimization setting used.
Like build settings, build configurations can be applied at the project and at the target level. It's important to remember that build settings with build configuration
overrides applied still obey the order of precedence.
Build Configuration Files
The last item to cover in this article is the ability to externalize build configurations in files. When you have a number of targets in dozens of projects, it can become
time-consuming and error-prone to define a common set of build settings over and over. When you base a target or project's build configuration on a configuration file, the
settings in that file are automatically applied before any local configuration settings.
For example, if you have a standard set of debug settings, you can store them in a configuration file—possibly named DebugSettings.xcconfig.
You can then base the debug build configuration in a target or project off of this file. Then, if needed, you can further modify the configuration for the target or project.
A build configuration file is a simple plain text file with a list of build setting variable names (the capitalized representation) and their assignments. For example:
ZERO_LINK = NO

GCC_OPTIMIZATION_LEVEL = -O0

GCC_GENERATE_DEBUGGING_SYMBOLS = YES
Once you have defined a build configuration file, simply add it to your project and it will become available to use in the build settings windows, as shown in Figure 7.
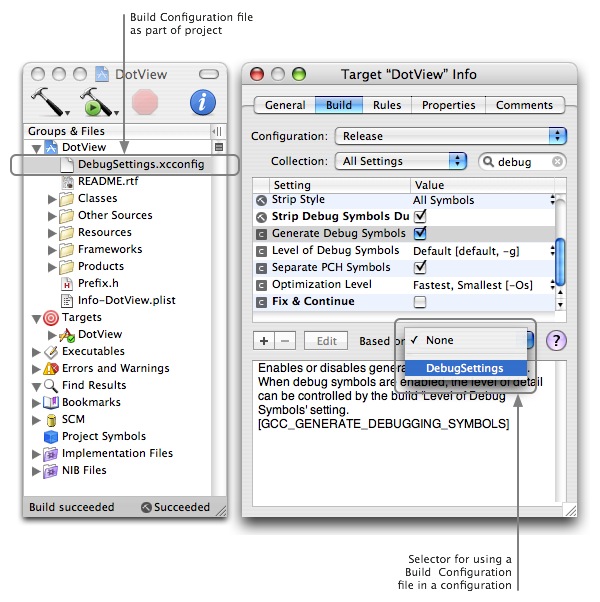
Figure 7: Adding and using a build configuration file to a project.
Build configuration files can also be easily shared across projects. This lets you consolidate a common set of settings across an organization. Simply put the build configuration file in a shared location and add it to all of your projects.
For More Information
This article has been an introduction to build settings and build configurations. With what you've learned, you'll be well equipped to venture deeper into the build
system and are one step closer to being proficient with Xcode. For next steps:
- Download the current version of Xcode from the Xcode page by clicking on the Download Xcode 2.2 button. You must be a registered ADC member. If you are new to ADC, click on sign up to register online.
- Continue your education into the details of Xcode by reading the Xcode 2.2 User Guide.
- For the latest information about Xcode Build settings see the Xcode 2.2 Build Settings Notes.
Updated: 2005-12-12
|