Configuring Your Application
Now that you have your very own functional application, it’s time to give it individual properties instead of the default properties. In this chapter, you learn about the Info.plist file, which is where you can change properties that govern your application’s attributes. This chapter also describes the essential identification properties required of Mac OS X applications. It walks you through the process of configuring these properties in Currency Converter. You learn what changing these various properties does when viewing information about the application. Finally, you learn how to give an application its own icon to set it apart from other applications.
The Info.plist File
Mac OS X applications contain information to help distinguish them from one another. This information includes the application’s primary and secondary version numbers, and the icon that the Finder and the Dock use to represent it. The file that stores these details is known as the information property list file (named Info.plist). This property list file is stored with the executable files and resources that make up an application, known as an application bundle.
Note: A bundle is a directory that groups files in a structured hierarchy. To make it easy for users to manipulate bundles, bundles can be represented as files instead of folders in the Finder; these bundles are known as packages. An application bundle stores the executable files and resources that make up an application. Although it’s more correct to refer to application bundles as application packages because they’re always shown to users as single files in the Finder, this chapter adopts the term application bundle instead of application package. For more information on bundles and packages, see Bundle Programming Guide.
Basic Project Attributes
There are several essential properties that identify applications to users and to Mac OS X: application identifier, build version number, release version number, copyright notice, application name, and application-icon filename.
Without application identifiers, administrators would have to navigate to the location of each managed application, a relatively tedious task. The application-identifier property specifies a string Mac OS X uses to identify an application. This property does not identify a specific application bundle in the filesystem or a particular version of the application. In normal conditions, users don’t see application identifiers.
The application-identifier property is specified with the
CFBundleIdentifierkey in theInfo.plistfile.Application identifiers are uniform type identifiers (UTIs) or reverse Domain Name System (DNS) names; that is, the top-level domain comes first, then the subdomains, separated by periods (
.). There are two parts to an application identifier: the prefix and the base. The application-identifier prefix identifies the company or organization responsible for the application and is made up of two or more domains. The first prefix domain, or top-level domain, is normallycomororg. The second domain is the name of the company or organization. Subsequent domains can be used as necessary to provide a narrower scope. Prefix domains use lowercase letters by convention. For example, Apple applications use application identifiers that start withcom.apple.The application-identifier base comprises a single domain, which refers to the application proper. This domain should use word capitalization, for example,
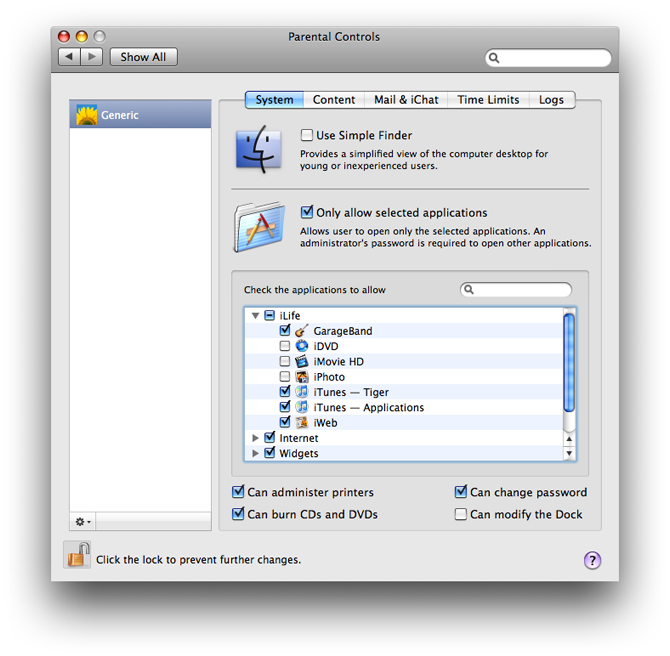
AddressBook. See Uniform Type Identifiers Overview for more information about uniform type identifiers.Mac OS X uses application identifiers to precisely refer to application bundles irrespective of their location on the filesystem. For example, some Mac OS X features, such as parental controls, use only application identifiers to refer to applications on a user’s computer. The Parental Controls preferences pane contains a list of application filenames, in which administrators select the applications for which a user is to have managed access, as shown in Figure 7-1.
The build-version-number property identifies an iteration of the application.
The build-version-number property is specified with the
CFBundleVersionkey in theInfo.plistfile.The build version number is made up of a string of period-separated integers. Each integer must be equal to or greater than zero. For example,
55,1.2, and1.2.0.55, are all valid build version numbers.Mac OS X uses the build version number to, for example, decide which version of an application to launch to open a file when there are multiple versions in the filesystem (as determined by their application identifiers). In such cases, Mac OS X launches the application bundle with the highest build version number. To ensure the accurate operation of this mechanism, you must adhere to one version-numbering style as you release new versions of your application. That is, if you publish your application for the first time using a multi-integer build version number, subsequent publicly available versions must use the same number of integers in their build version numbers.
The release-version-number property specifies the version information the Finder displays for the application. When you specify both a build version number and a release version number, the About window displays the release version number, followed by the build version number in parenthesis, as shown in Figure 7-2.
The release-version-number property is specified with the
CFBundleShortVersionStringkey in theInfo.plistfile.The release version number identifies a released iteration of the application. Similar to the build version number, the release version number is made up of a string of period-separated integers. However, you should specify no more than three integers for the release version number. By convention, the first integer represents major revisions to the application, such as revisions that implement new features or major changes. The second integer denotes revisions that implement less prominent features. The third integer represents maintenance releases.
The copyright-text property specifies the copyright notice for the application, for example,
© 2007, My Company. This notice is shown to users in the About window of the application.The copyright-notice property is specified with the
NSHumanReadableCopyrightkey in theInfo.plistfile.The application-name property specifies the title of the application menu in the menu bar when the application opens and the name of the application in its About window.
The application-name property is specified with the
CFBundleNamekey in theInfo.plistfile.The application-icon-filename property specifies the icon the Finder, the Dock, and the application’s About window display for the application.
The application-icon-filename property is specified with the
CFBundleIconFilekey in theInfo.plistfile.An icon file contains one or more images that depict an application’s icon at various resolutions. These separate versions of an icon allow the Finder and the Dock to render icons as sharp as possible at different sizes. You create icon files using the Icon Composer application.
For further details on these and other application properties, see Runtime Configuration Guidelines.
Specify the Identifier, Version, and Copyright Information
This section shows how to specify Currency Converter’s identifier, release version number, and copyright text.
Important: To complete this task, you need to open this document’s companion archive, ObjCTutorial_companion.zip.
Currency Converter’s name property is set to the project name you entered in “Creating a Project in Xcode,” Currency Converter. Therefore, you don’t need to change the value of this property.
First, remove the InfoPlist.strings file from the project. This file is used for internationalization, a subject outside the scope of this tutorial.
In the Currency Converter project window, select the Resources group in the Groups & Files list.
In the detail view, select the
InfoPlist.stringsfile.Choose Edit > Delete.
In the dialog that appears, click Also Move to Trash.
To set the application-identifier and build-version-number, follow these steps:
Open the Targets group in the project window and select the Currency Converter target.
Choose File > Get Info to view the Target Info.
Click the Properties tab to display the target’s properties.
Enter
com.mycompany.CurrencyConverterin the Identifier field to set the application identifier.Enter
100in the Build field to set the build-version-number to 100.
The release-version-number and copyright-text properties aren’t exposed in the Properties tab. You can edit them, and other attributes stored in the Info.plist file, by opening the Info.plist file and editing it directly.
Click the Open Info.plist as File button at the bottom of the Properties tab.
The Info.plist file is displayed in an editor, showing a list of keys on the left side and their associated values on the right side.
Set the release version number to
1.0.0Find the “Bundle version string, short” entry in the editor and change its value to “1.0.0”.
Set the copyright text to
© 2009, My Company:Select a line of the Info.plist file and click the plus button at the right end of the line.
Choose “Copyright (human-readable)” from the list of keys.
Double-click the value cell on the right side of the table and enter the text “© 2009, My Company”.
Save the
Info.plistfile.
To see how this affects your application:
Clean the project, and build and run the application.
Choose Currency Converter > About Currency Converter.
Notice how the name, version number, and copyright information you entered in the
info.plistfile are displayed correctly here.Note: If the information, such as the copyright information, is not the same, your
NSHumanReadableCopyrightvalue may be different from the one you entered in theInfo.plistfile. This will occur if there is an extra file calledInfoPlist.strings (English). This file is used for localization, that is, having different properties for an application based on the location it’s designed for. In this case, any key values set in the English localization file will override the values set in theInfo.plistfile when compiling the English version of the project. To fix this issue, you can either delete theInfoPlist.strings (English)file, or open the file and change the value just as in theInfo.plistfile.Quit Currency Converter.
To see how application identifiers can be beneficial, execute the following command in a Terminal window:
> open -b com.mycompany.CurrencyConverter
The
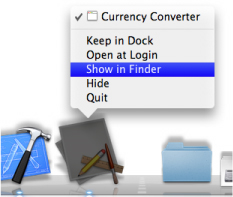
opencommand locates and launches Currency Converter based on its application identifier. This command can also use the filenames of application bundles to locate and launch applications (the.appsuffix is optional).In the Dock, Control-click or click-and-hold the Currency Converter icon and choose Show In Finder from the shortcut menu, as shown in Figure 7-3.
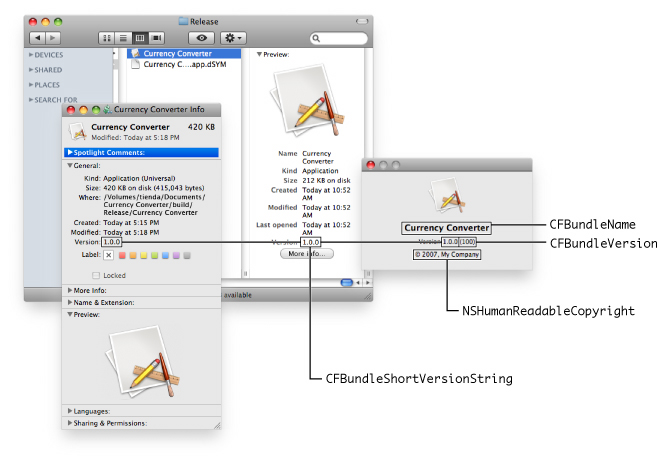
The Finder opens a window shown in Figure 7-4, displaying the Currency Converter application bundle. Notice that the release version number (
CFBundleShortVersionString) appears in the preview column (in column view) and in the Info window for the application bundle. The About Currency Converter window shows the application name (CFBundleName), build version number (CFBundleVersion) in parentheses, release version number, and copyright text (NSHumanReadableCopyright).Quit Currency Converter.
Now the only essential application identification information left unspecified for Currency Converter is its icon.
Create an Icon File
When you create a Cocoa application without specifying an icon for it, the Finder and the Dock assign it the generic application icon, as shown in Figure 7-4. To make your applications more appealing to their users and to differentiate them from other applications, you should give your applications distinctive icons. As a result, your applications stand out from other applications in Finder windows and in the Dock. This section describes the process of creating an icon file using Icon Composer and configuring Currency Converter to use the icon file. To do this, you must have downloaded the companion file provided with this document.
Note: Before doing this, make sure you have downloaded the companion archive (ObjCTutorial_companion.zip). The archive contains the icon image you will be using for this section.
To create the icon file for Currency Converter:
Launch Icon Composer, located in
/Developer/Applications/Utilities. Icon Composer displays an empty icon file editor window.In the Finder, navigate to the
ObjCTutorial_companion/application_icon_imagesdirectory. This directory contains the image file that depicts the Currency Converter application icon.Add the image file to the icon file.
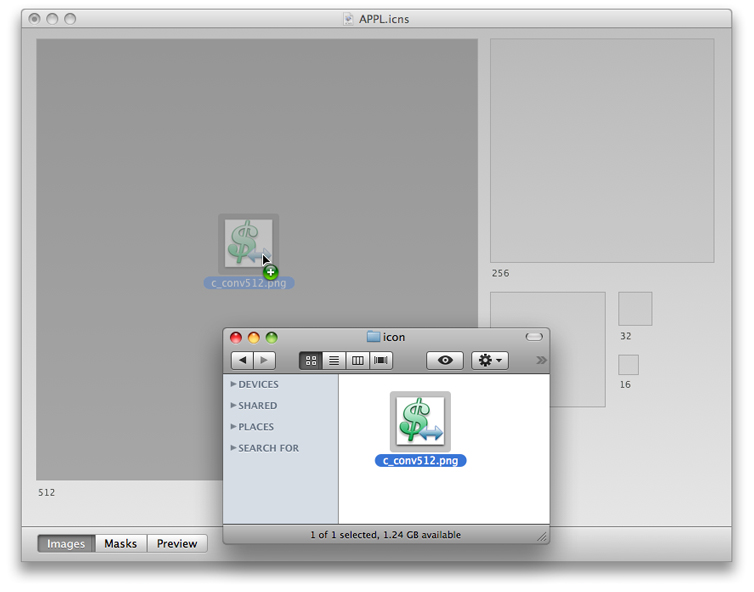
Drag
c_conv512.pngfrom the Finder window to the Large Image image well in the icon file editor, as shown in Figure 7-5.A dialog asks if you would like to copy the image to other sizes. Choose “Copy to all smaller sizes” and press Import. This automatically scales the 512 x 512 image to the smaller sizes.
The hit masks for all sizes are automatically extracted. Hit masks are a bitmapping of the locations in which the image will respond when it is clicked.
The icon file editor should look like Figure 7-6.
Save the icon file.
Choose File > Save As.
In the Save dialog, navigate to the Currency Converter project directory.
In the Save As text field, enter
APPL.icns.Click Save.
Quit Icon Composer.
Although the Currency Converter project directory contains the APPL.icns file, you still need to add it to the project.
To add the icon to the project:
In the Currency Converter project window, select the Resources group in the Groups & Files list.
Choose Project > Add to Project.
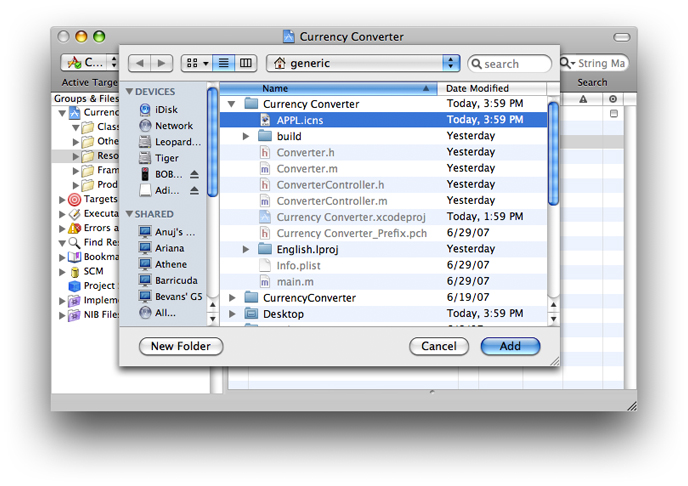
In the dialog that appears, select the
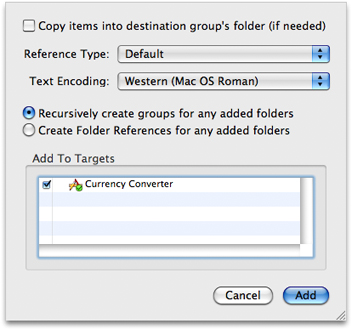
APPL.icnsfile in the Currency Converter project directory, and click Add, as shown in Figure 7-7.In the dialog that appears next, shown in Figure 7-8, click Add.
Finally, specify the name of the icon file in the Icon File field of the target properties.
To see the icon in your project:
Quit Currency Converter if you have not done so already.
Choose Build > Clean.
Click “Build and Go” to build and run the application.
Currency Converter now has a distinguishing icon, shown in Figure 7-9.
Configuring your applications appropriately is essential for providing a good experience to your customers.
What’s Next?
Now that your project is complete, you may want to learn about what separates Cocoa from other frameworks. You probably noticed how much you can do with the application you built without programming any of those features. In the next chapter, you learn about many of the features Cocoa supplies and how to take advantage of them.
Last updated: 2009-08-03