Bridging the Model and View: The Controller
Your model needs to be able to communicate with the view so it can understand what data is in the view’s text fields. Your view needs to connect with the model so it can receive updates when calculations are performed whose results must be shown to the user. The controller layer of an application consists of one or more classes whose purpose is to communicate between the model and the view.
In this chapter, you will learn about the paths used for communication between objects and how to use Interface Builder to define those paths. You will also learn how to define the controller’s behavior and how it can communicate between the model and the view using the paths you created.
Paths for Object Communication: Outlets, Targets, and Actions
In Interface Builder, you use outlets and actions to specify the paths for messages traveling between the controller and other objects. The following sections explain how the objects that implement the Currency Converter user interface communicate with each other in the running application.
Outlets
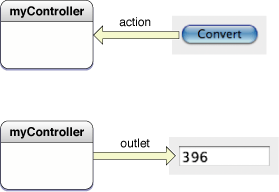
An outlet is an instance variable that identifies an object. Figure 5-1 illustrates how an outlet in one object points to another object.

An object can communicate with other objects in an application by sending messages to outlets. An outlet can reference any object in an application: user interface objects such as text fields and buttons, model objects (usually instances of custom classes), and even the application object itself. Outlets are special instance variables because they can be set in Interface Builder.
Outlets are declared as:
IBOutlet id variableName;
Note: IBOutlet is a null-defined macro that the C preprocessor removes at compile time. Interface Builder uses it to identify outlet declarations so that it can display them when connecting outlets visually.
Objects with id as their type are dynamically typed, meaning the class of the object is determined at runtime. You can use id as the type for any object. The dynamically typed object’s class can be changed as needed, even during runtime, which should invoke a sense of both excitement and extreme caution in even the most grizzled OO veteran. This can be a tremendous feature and allows for very efficient use of memory, but casting a type to an object that cannot respond to the messages for that type can introduce puzzling and difficult-to-debug problems into your application.
When you don’t need a dynamically typed object, you can—and should, in most cases—statically type it as a pointer to an object of a specific class:
IBOutlet NSButton* myButton;
You usually set an outlet’s target in Interface Builder by drawing connection lines between objects. There are ways other than outlets to reference objects in an application, but outlets and the ability of Interface Builder to initialize them are a great convenience.
At application load time, the instance variables that represent outlets are initialized to point to the corresponding target. For example, the parameter of the controller instance that receives the value from the exchange rate in the view would be initialized with a reference to the Exchange Rate text field object (see “Connect the ConverterController Instance to the Text Fields” for details). When an outlet is not connected, the value of the corresponding instance variable is null.
It might help to understand connections by imagining an electrical outlet plugged into the destination object. Also picture an electrical cord extending from the outlet in the source object. Before the connection is made, the cord is not plugged in, and the value of the outlet is null; after the connection is made (the cord is plugged in), a reference to the destination object is assigned to the source object’s outlet.
Target/Action in Interface Builder
You can view (and complete) target/action connections in the Connections pane in the Interface Builder inspector. This pane is easy to use, but the relation of target and action in it might not be apparent. First, a target is an outlet of a cell object that identifies the recipient of an action message. Well, you may say, what’s a cell object and what does it have to do with a button?
One or more cell objects are always associated with a control object (that is, an object inheriting from NSControl, such as a button). Control objects “drive” the invocation of action methods, but they get the target and action from a cell. NSActionCell defines the target and action outlets, and most kinds of cells in the Application Kit inherit these outlets.
For example, when a user clicks the Convert button in the Currency Converter window, the button gets the required information from its cell and invokes the convert method on the target outlet object, which is an instance of the custom class ConverterController. Figure 5-2 shows the interactions between the ConverterController class, the Convert button, and the Amount in Other Currency: field.
In the Actions column (in the Connections pane of the inspector), all action methods are defined by the class of the target object and known by Interface Builder. Interface Builder identifies action methods because their names follow this syntax:
- (IBAction)myAction:(id)sender; |
Note: IBAction, like IBOutlet, is a null defined macro, that the C preprocessor removes at compile time. Interface Builder uses it to identify action declarations so it can display them when connecting actions visually.
Which Direction to Connect?
Usually the outlets and actions you connect belong to a custom subclass of NSObject. For these occasions, you need only to follow a simple rule to know which way to specify a connection in Interface Builder. Create the connection from the object that sends the message to the object that receives the message:
To make an action connection, create the connection from an element in the user interface, such as a button or a text field, to the custom object you want to send the message to.
To make an outlet connection, create the connection from the custom object to another object (another custom object or a user interface element) in the application.
These are only rules of thumb for common cases and do not apply in all circumstances. For instance, many Cocoa objects have a delegate outlet. To connect these, you draw a connection line from the Cocoa object to your custom object.
Another way to clarify connections is to consider who needs to find whom. With outlets, the object with the outlet needs to find some other object, so the connection is from the object with the outlet to the other object. With actions, the control object needs to find the target, so the connection is from the control object to the custom object.
Defining the Controller Class
Interface Builder is a versatile tool for application developers. It enables you to not only compose the application’s graphical user interface, it gives you a way to define much of the programmatic interface of the application’s classes and to connect the objects eventually created from those classes.
The rest of the chapter shows how to define the ConverterController class and connect it to Currency Converter’s user interface.
Select the Classes group in your project’s Groups and Files list.
Choose File > New File.
Choose Objective-C Class and click Next.
Name the file
ConverterController.m.Make sure “Also create ‘ConverterController.h’” is selected and click Finish.
Defining the Outlets for the ConverterController Class
The ConverterController object needs to communicate with the user interface elements in the Currency Converter window. It must also communicate with an instance of the Converter class, defined in “Defining the Model.” The Converter class implements the conversion computation.
Open the ConverterController.h file for editing, if it’s not already open.
Add the following lines between the brackets in the ConverterController interface file:
IBOutlet NSTextField *amountField;
IBOutlet NSTextField *dollarField;
IBOutlet NSTextField *rateField;
These lines declare three outlets, one for each of the three text fields in your interface. Notice that the three text field outlets are of type NSTextField. Because Objective-C is a dynamically typed language, it’s fine to define all the outlets as type id. However, it’s a good idea to get into the habit of setting the types for outlets since statically typed instance variables receive much better compile-time error checking.
Declare the Controller Method
The ConverterController class needs one action method, convert:. When the user clicks the Convert button, the convert: message is sent to the target object, an instance of the ConverterController class. The ConverterController class must implement convert: so something will happen when a converter controller object receives the convert: message.
Add the declaration line for the convert: method to the interface file, as shown:
#import <Cocoa/Cocoa.h>
@interface ConverterController : NSObject {IBOutlet NSTextField *amountField;
IBOutlet NSTextField *dollarField;
IBOutlet NSTextField *rateField;
}
- (IBAction)convert:(id)sender;
@end
Save the file.
You might be asking yourself why the calculations aren’t done here in the controller. It would obviously be faster without the extra layer of communication. It is entirely possible to design an application this way, but the MVC design pattern was created to enable portability and maintainability. In more complex applications, the underlying functionality may be operating system-dependent. If you make the controller have a method convert:, all the view needs to know is to call this method. From there, the various controllers written for the different operating systems can take care of calling the correct model functions. In this way, it’s similar to writing an API for this particular application. Similarly, by factoring out the functionality into clearly distinct pieces, it’s easy to remember what objects are responsible for what functionality.
Interconnecting the Controller with the View
You’re now ready to connect the Currency Converter user interface and the ConverterController object to each other.
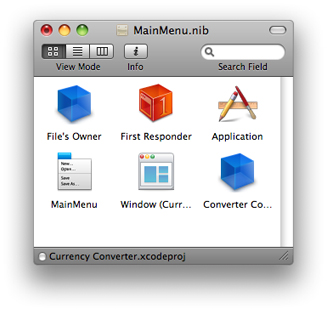
Add the ConverterController Class to Your Nib File
As the final step of defining a class in Interface Builder, you create an instance of the ConverterController class and connect its outlets and actions. Add this class to your nib file.
In Interface Builder, choose File > Read Class Files.
Select the
ConverterController.hfile and click Open.In the library, drag an object item into the
MainMenu.xibwindow.Select the new object and navigate to the Identity tab in the Inspector.
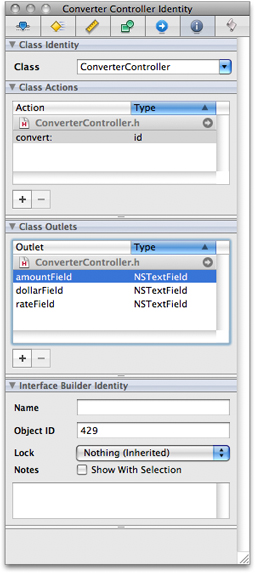
In the Class drop-down box, type
ConverterControllerand press Return. The class actions and class outlets are filled in to match the outlets and actions you defined in theConverterController.hfile.
The result of these operations when the class is viewed in the object inspector in Interface Builder is shown in Figure 5-4.
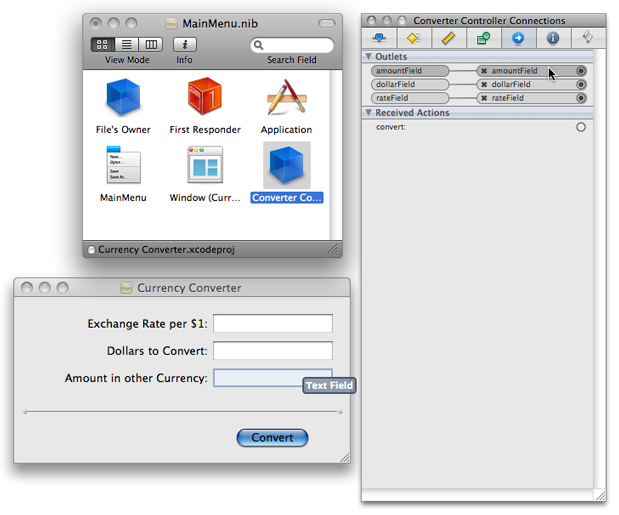
Connect the ConverterController Instance to the Text Fields
By connecting the ConverterController instance to specific objects in the interface, you initialize its outlets. The ConverterController object uses these outlets to get and set values in the user interface. To connect the instance to the user interface:
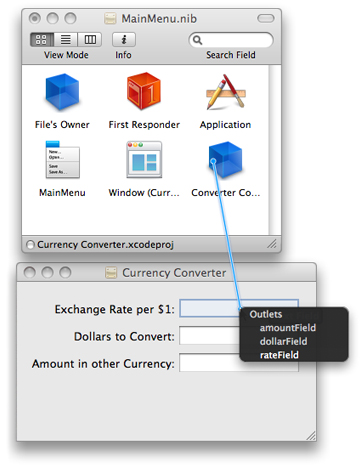
Control-drag a connection from the
ConverterControllerinstance to the Exchange Rate text field.Interface Builder displays the possible connections in a black box.
Select the outlet that corresponds to the first field,
rateFieldas shown in Figure 5-5.Following the same steps, connect the
ConverterControllerclass’sdollarFieldandamountFieldoutlets to the appropriate text fields.
Connect the Convert Button to the Appropriate Methods
To connect the user interface elements in the Currency Converter window to the methods of the ConverterController class:
Control-drag a connection from the Convert button to the
ConverterControllerinstance in the nib file window.A black box will pop up similar to the one we used to connect outlets. Choose
convert:.Save the nib file.
Check Your Work
To make sure everything is done correctly:
Select the Converter Controller instance in the MainMenu.nib window.
Navigate to the Connections tab in the Inspector.
Make sure each outlet is connected to the correct text field by hovering the mouse over the connections as shown in Figure 5-6.
Connecting the Controller to the Model
Create an instance of the converter class inside the ConverterController class in Xcode.
In the Classes folder in the Groups and Files sidebar, double-click
ConverterController.hto open it in an editor window.Declare a pointer to a converter object by adding the following line to your code right after the outlets are declared, before the ending bracket:
Converter *converter;
When clicked, the Convert button sends the
convert:message to theConverterControllerobject. Complete the definition of theconvert:method in theConverterControllerso that it sends theconvertCurrencymessage to theConverterinstance to execute the conversion:Import
Converter.hsoConverterControllercan instantiate aConverterobject. Add the following line under the first import statement inConverterController.h.#import "Converter.h"
In the Classes group, double-click
ConverterController.mto open this file in an editor window.Add the definition of the
convert:method, as shown in Listing 5-1, toConverterController.m.Listing 5-1 Definition of the
convert:method inConverterController.m#import "ConverterController.h"
@implementation ConverterController
- (IBAction)convert:(id)sender {float amount;
converter = [[Converter alloc]init];
// 1[converter setSourceCurrencyAmount:[dollarField floatValue]];
// 2[converter setRate:[rateField floatValue]];
// 2amount = [converter convertCurrency];
// 3[amountField setFloatValue:amount];
// 4[rateField selectText:self];
// 5}
@end
The convert: method does the following:
Initializes a Converter object.
Sets the member variables of the
Converterclass to the values in therateFieldanddollarFieldtext fields.Sends the
convertCurrencymessage to the object pointed to by theconverterpointer and gets the returned value.Uses
setFloatValue:to write the returned value to the Amount in Other Currency text field (amountField).Sends the
selectText:message to the rate field. As a result, any text in the field is selected; if there is no text, the insertion point is placed in the text field so the user can begin another calculation.
Each code line in the convert: method, excluding the declaration of floating-point variables, is a message. The “word” on the left side of a message expression identifies the object receiving the message (called the receiver). These objects are identified by the outlets you defined and connected. After the receiver comes the name of the method that the sending object (called the sender) wants the receiver to execute. Messages often result in values being returned; in the above example, the local variable amount holds a returned value.
Garbage Collection
You may be feeling a little uneasy about the following line being called every time the convert: method is called:
converter = [[Converter alloc]init]; |
This line allocates space in memory for a Converter instance and should be deallocated after you use it. You may notice that you didn’t deallocate this instance.
The reason you can do this is because Objective-C 2.0 utilizes garbage collection. To enable garbage collection:
Choose Project > Edit Project Settings
Navigate to the Build tab
Set the value for Objective-C Garbage Collection to
Supportedunder GCC 4.0 - Code Generation.
By supporting garbage collection, you don’t have to worry about deallocating objects you instantiate. You can leave your code just the way it is and not have to worry about memory leaks.
More information about garbage collection can be found in GNU C/C++/Objective-C 4.0.1 Compiler User Guide.
What’s Next?
You’ve now completed the implementation of Currency Converter. Notice how little code you had to write, given that your application now has a fully functional currency-converting system and a beautiful user interface. In the next chapter, you will learn how to build and run the application.
Last updated: 2009-08-03