Adding Properties
The next task is to add properties to the entities. There are two sorts of property—attributes and relationships. They share a number of features in common (in their implementation, NSAttributeDescription and NSRelationshipDescription both inherit from NSPropertyDescription), but there are differences in the way you configure them in the tool.
Adding Attributes
When you add an attribute you must specify name and its type—for example, string, number, date, and so on. In addition, you can specify a default value and constraints on values that a property can have—for example the maximum or minimum values of a numeric value, a regular expression that a string value must match, or the cardinality of a relationship. You can specify all these sorts of constraint in the model, and they will be automatically applied when you try to save an instance at runtime. If you want to specify other constraints on property values, or to enforce inter-property constraints, you must implement validation methods in the custom class for the entity. For more details, see NSManagedObject.
You can now add attributes to the entities, as described by the following steps.
In the entity list, select the Employee entity.
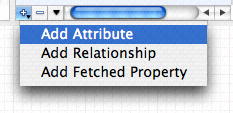
Add a new attribute. In the properties pane, ensure that either the Show All Properties or the Show Attributes item is selected from the “v” pop-up menu. Click the plus button to the lower left of the table view, as illustrated in “Adding a property,” and choose Add Attribute from the pop-up menu. Alternatively, in the Design menu choose Data Model > Add Attribute.
Select the new attribute in the table view. Use the detail pane to set the attributes of the employee’s
firstNameattribute as follows: the attribute is neither optional nor transient; its type is String; there are no constraints specified for Max Length or Reg. Ex; Min Length is 2; and there is no default value. When you have finished the pane should look like that shown in “Editing an attribute.”Follow steps 1-3 to add a
lastNameattribute to the Employee entity, and then anameattribute to the Department entity.

Follow similar steps to add a salary attribute to the Employee entity and a budget attribute to the Department entity. These differ from the name attributes in that they are numeric values. Set the type to Decimal, and impose suitable constraints. Both have a minimum value of 0. Set for each whatever maximum value you think is reasonable.
Adding Relationships
In Core Data, you should almost always model both sides of a relationship. Core Data relies on this information so that it can ensure referential integrity. If you do not model both sides of a relationship, you must do additional work yourself to ensure that your data is not corrupted. Modeling just one side of a relationship is strongly discouraged.
For the current example, start by adding a “department” relationship from Employee to Department, as described by the following steps.
In the entity list, select the Employee entity.
Add a new relationship. In the properties pane, ensure that either the Show All Properties or the Show Relationships item is selected from the “v” pop-up menu. Click the plus button to the lower left of the table view, as illustrated in “Adding a property,” and choose Add Relationship from the pop-up menu. (Alternatively, either in the Design menu choose Data Model > Add Relationship, or—in the diagram view—select the line tool, drag from the Employee node to the Department node.)
Select the new relationship in the table view. Use the Property view in the inspector to describe Employee’s
departmentrelationship, as shown in “The Employee entity’s department relationship.” Note the following:The relationship name is
department.The destination is Department.
Max and Min Count are 1 (and not editable).
The relationship is not Optional, and not Transient.
The Inverse relationship is currently No Inverse Relationship—it has not yet been created.
The Delete Rule is Nullify—this means that if an Employee instance is deleted, it is removed from the backwards relationship (once it is specified) from its Department instance.
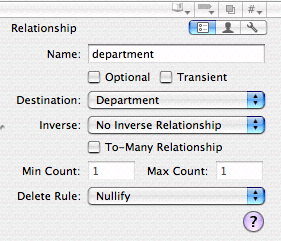
Also note that in the diagram view, an arrow is added that points from the Employee entity to the Department entity.
Now follow these steps to add an employees relationship to the Department entity.
In the entity list, select the Department entity.
Add a new relationship. In the properties section, ensure that button is selected in the segmented control. Click the plus button to the lower left of the table view, as illustrated in “Adding a property,” and choose Add Relationship from the pop-up menu. Alternatively, in the Design menu choose Data Model > Add Relationship.
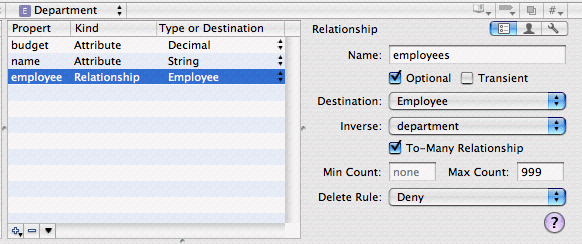
Select the new relationship in the table view. Use the Property view in the inspector to describe the department’s
employeesrelationship, as shown in “Department entity’s employees relationship.” Note the following:The relationship name is
employees.The destination is Employee.
Min Count is
0and Max Count is999.The relationship is Optional and not Transient.
The Inverse relationship is department.
The Delete Rule is Deny—this means that a Department cannot be deleted if it still has employees.
Now that you have added the Department to Employee relationship, you can specify the inverse relationship for the Employee to Department relationship.
In the entity list, select the Employee entity.
In the properties table view, select the
departmentrelationship. Use the Property view in the inspector to set the Inverse relationship toemployees
You have fully specified the relationship between the Department and Employee entities. You can now specify the reflexive relationship in the Employee entity to describe the relationship between a manager and direct reports.
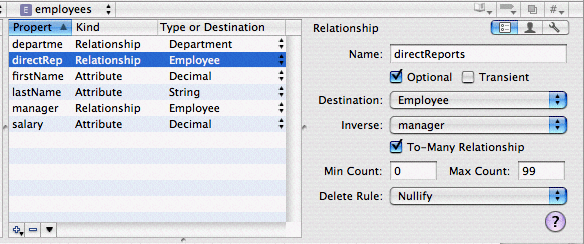
Follow the same steps as before to create two relationships from the Employee entity to itself—that is, the destination entity is Employee. The manager relationship is a to-one relationship, the directReports relationship is a to-many relationship. Both are optional, and the delete rule for both is Nullify. Remember to specify the inverse relationship for both. When you have finished, the directReports relationship should look like the image shown in “Employee’s directReports relationship.”
Last updated: 2009-03-02