Quick Start for Collection Views
This quick start gives you a quick, practical introduction to collection views. The main goal of a collection view is to visually arrange a group of objects into an organized fashion, with each individual object getting its own view in the larger collection view.
Before using the NSCollectionView class, you must have an existing window-based Cocoa Application in Xcode. You start by creating a model class in your application, which will store all of the data for each individual object that you wish to display. Then, in Interface Builder, you add a collection view and an array controller to your project. You will also create an array that will store the various objects you wish to display, and to ensure that everything remains in sync, you will create various bindings between the collection view, the array controller, and the array. When you are finished, your collection view will display all of your objects in an organized manner.
This tutorial assumes a basic understanding of the the Model-View-Controller design pattern, bindings, and key-value observing compliance.
Set Up the Project
Open your window-based Cocoa application.
Create a model class that will store each object’s data.
This tutorial uses a simple
PersonModelclass as an example model class. Each instance of this class consists of two pieces of data: a string object representing a person’s name, and another string representing their occupation. Both of these variables are properties and therefore are declared in the header file and synthesized in the implementation file. The following code snippet is what the simple header file for aPersonModelclass would look like:#import <Cocoa/Cocoa.h>
@interface PersonModel : NSObject {NSString * name;
NSString * occupation;
}
@property(retain, readwrite) NSString * name;
@property(retain, readwrite) NSString * occupation;
@end
And the implementation file:
#import "PersonModel.h"
@implementation PersonModel
@synthesize name;
@synthesize occupation;
-(void) dealloc {[name release];
[occupation release];
[super dealloc];
}
@end
This
PersonModelclass is a good example of a simple model object. It encapsulates and provides access to a set of data and is KVC compliant. Likewise, it is also very simple to create multiple instances of thePersonModelclass, and each one can store unique data and be accessed individually. You are certainly not required to replicate this example class, but it will provide a good starting point for understanding the inner workings of the collection view.
Make the Views
Open the main window’s nib file in Interface Builder.
Add an
NSCollectionViewobject to your application’s window, and resize it to your desired specifications.Notice that two new items have been automatically added to your nib: a “Collection View Item” and a new
NSViewobject:The “Collection View Item” is the controller that will mediate the flow of information between the cells in your collection view and the model objects (that is, the
PersonModelobject) that provide the data for your views. You will configure this later.The new view represents the template for an individual cell in your collection view. It is up to you to configure this view to look exactly how an individual cell will look in your collection view.
For example, to display a
PersonModelobject, the view would need to contain two text labels, each of enough width to display a person’s full name and occupation. It could look something like this:
Add all of your desired objects (text labels, image views, etc.) to the newly created view. Resize the cell to be the desired size.
Remember, you will want to display the information that is stored in your model class, so keep this in mind as you design your cell layout. Using the
PersonModelclass as an example, each cell contains two text labels (see above view): a label for the name string, and a label for the occupation string.
Make the Array Controller and the Array
Add an
ArrayControllerobject to your nib.Before completing the next step, it is necessary to make sure your model object class is complete and that it contains all the data you wish to display. Each property in your model object is necessary for this next step, so having a complete model object is required before continuing.
In the Attributes Inspector for your
ArrayController, specify its object controller’s mode as “Class”, give it the appropriate name for your model object class, and add the properties from your model that you wish to be associated with each view in theNSCollectionViewto the “Key” list.If the
PersonModelclass were used, the array controller’s Attributes Inspector would look as follows: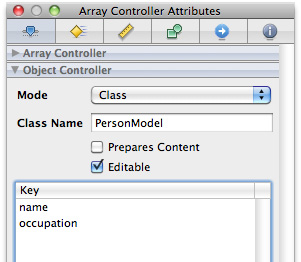
In your controller file in Xcode (see note below), create an
NSMutableArrayobject, and make it a property, as you did with the data in your model class. This array will be used to store all of the objects that you wish to display in your collection view. Later, you will add methods to make sure that this array is KVO compliant, and can be connected with your collection view.Note: It is assumed that your Cocoa application has a main controller file. When a new Cocoa application is created, two files are automatically created that are titled
<Your Project’s Name>AppDelegate.hand<Your Project’s Name>AppDelegate.m. You should declare the array property in the.hfile, and then synthesize it in the.mfile, similar to the properties in your model class.
Create the Array Controller Bindings
You need to bind the array property you have just created in Xcode to the ArrayController that exists in your nib file. Then, your collection view will be hooked up to display the contents of whatever the ArrayController is currently associated with. Therefore, any time a change is made in the array property in your controller file in Xcode, it will trigger a change in the ArrayController in InterfaceBuilder, which will then trigger a change in your collection view, and everything will remain in sync. These next steps involve the use of bindings, which this article does not cover. For more information about bindings, see the Bindings Programming Guide.
First, hook up the controller’s array property to the
ArrayControllerobject in the nib.To do so, click on your
ArrayControllerobject, go to its Bindings Inspector, and bind its content array to your controller object. Then, specify its model key path to whatever the name of your array is. It should look similar to this: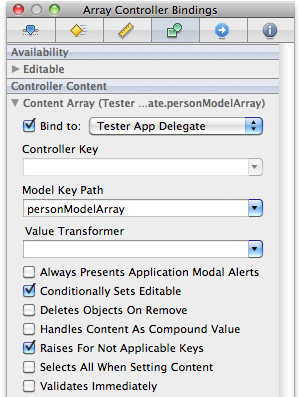
Bind your collection view to your array controller.
Select your
NSCollectionViewobject, go to the “Bindings Inspector” window, and in the content section, bind your collection view to the “Array Controller” option. It is also necessary to specify the Controller Key as “arrangedObjects”. Essentially, this allows your array controller to tell your collection view to display any objects that the array controller is managing.
Bind the Views to the Data
Binding the Subviews
For each object (that is, NSImageView objects, NSTextLabel objects, etc.) in your Collection View Item, do the following:
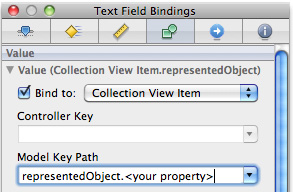
Select it and go to its Bindings Inspector.
Bind the subview to a collection view item, and bind the subviews object property to the appropriate model property by setting its Model Key Path as
representedObject.<your property>.For example, you would bind the name label to the model key path
respresentedObject.name.
Complete and Run the Collection View
There are only two more steps to get your collection view up and running. First, you need to make the array property in your controller class in Xcode key-value observing compliant, and second, you need to create some data to display.
Make your array KVO compliant.
For this example, we will assume you are storing all of your data objects (
PeopleModelobjects) in an array. To make this array KVO compliant, you need to add a few methods to your controller class, so that other objects (in this case, yourArrayController) can be notified if changes are made to the array. A list of the necessary combinations of functions is available in the KVC programming guide, but if you are using a simpleNSMutableArray, this group of functions should work:-(void)insertObject:(PersonModel *)p inPersonModelArrayAtIndex:(NSUInteger)index { [personModelArray insertObject:p atIndex:index]; } -(void)removeObjectFromPersonModelArrayAtIndex:(NSUInteger)index { [personModelArray removeObjectAtIndex:index]; } -(void)setPersonModelArray:(NSMutableArray *)a { personModelArray = a; } -(NSArray*)personModelArray { return personModelArray; }Note: For the detailed naming protocols for these functions, see the Key-Value Coding Programming Guide.
Create some data for your collection view to display.
In your controller class, create an
-(void)awakeFromNibmethod that initializes the model objects that you want to put into your collection view.Also, in this method, create an
NSMutableArrayobject that will be used to temporarily hold all of this data.Then, add each of your model objects to your newly created array.
When you are done, use the
(void)setPersonModelArraymethod to set your array property to your newly populated array. Setting the array will trigger the update of your collection view.A sample bit of code that creates three people objects and puts them in the array might look as follows:
- (void)awakeFromNib {

    PersonModel * pm1 = [[PersonModel alloc] init];
    pm1.name = @"John Appleseed";
    pm1.occupation = @"Doctor";

    PersonModel * pm2 = [[PersonModel alloc] init];
    pm2.name = @"Jane Carson";
    pm2.occupation = @"Teacher";

    PersonModel * pm3 = [[PersonModel alloc] init];
    pm3.name = @"Ben Alexander";
    pm3.occupation = @"Student";

    NSMutableArray * tempArray = [NSMutableArray arrayWithObjects:pm1, pm2, pm3, nil];
    [self setPersonModelArray:tempArray];

}
Your collection view should now be up and running and displaying all of your objects in a nice, organized manner. Congratulations on finishing your first collection view!
If following the
PersonModelexample in this tutorial, your final screen could look something like this: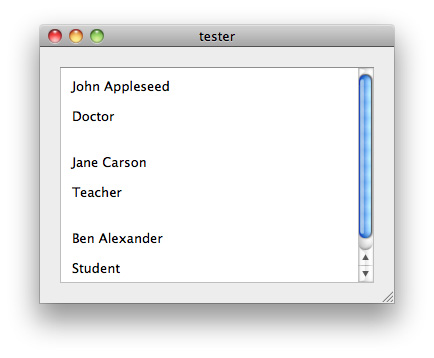
For more information on KVO compliance, see the Key-Value Observing Programming Guide.
What’s Next?
This quick start tutorial does not touch on all of the cool and powerful functionality of the NSCollectionView class. There are such features as incorporating image views, setting objects as selectable or not selectable and changing colors if they are selected, alternating colors in the subviews, ordering the subviews in alphabetical order, and much more. Now that you have a working implementation of a simple collection view, customizing your view and adding these features should come fairly quickly. See the more detailed articles in this programming guide to get started on some of these advanced elements of the NSCollectionView class. Likewise, some of the more advanced features of collection views require a detailed understanding of bindings. To learn more about bindings, see the Cocoa Bindings Programming Topics.
Last updated: 2009-08-17