Configuring the View
Interface Builder provides a library of objects that you can add to a nib file. Some of these are user interface elements such as buttons and text fields, others are controller objects such as view controllers. Your nib file already contains a view—now you just need to add the button and text fields.
Adding the User Interface Elements
You add user interface elements by dragging them from the Interface Builder library.
>> In Interface Builder choose Tools > Library to display the library window
You can drag view items from the library and drop them onto the view just as you might in a drawing application.
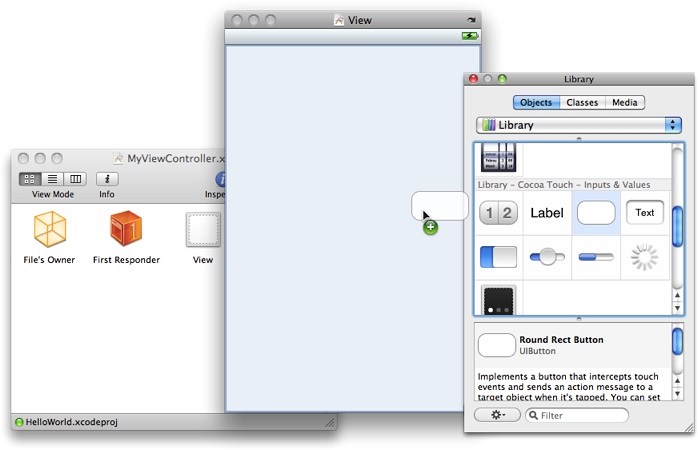
>> Add a text field (UITextField), a label (UILabel), and a button (UIButton) to the view.
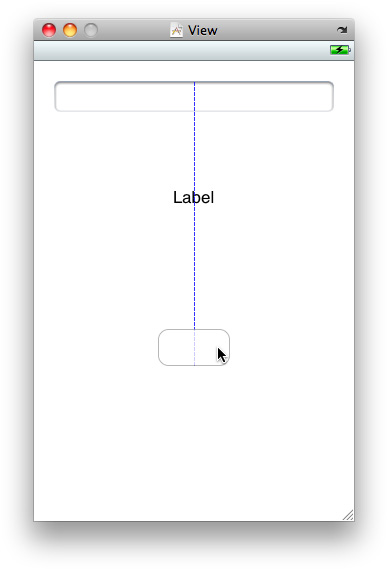
You can then resize the items using resize handles where appropriate, and reposition them by dragging. As you move items within the view, alignment guides are displayed as dashed blue lines.
>> Lay out the elements so that they look like this:
>> Make the following changes:
Add a placeholder string
Your Nameto the text field by entering it in the Text Field Attributes inspector.Resize the label so that it extends for the width of the view.
Delete the text (“Label”) from the label either using the Label Attributes inspector or by directly selecting the text in the label (double-click to make a selection) and press Delete.
Add a title to the button by double-clicking inside the button and typing
Hello.Use the inspector to set the text alignment for the text field and label to centered.
You should end up with a view that looks like this:

>> In the view section of the label’s Label Attributes inspector, select Clear Context Before Drawing. This ensures that when you update the greeting the previous string is removed before the new one is drawn. If you don’t do this, the strings are drawn on top of each other.
There are several other changes to make to the text field—it might be fairly obvious that the first change applies to the text field, but the others are less obvious. First, you might want to ensure that names are automatically capitalized. Second, you might want to make sure that the keyboard associated with the text field is configured for entering names, and that the keyboard displays a Done button.
The guiding principle here is that: you know when you’re putting it on screen what a text field will contain. You therefore design the text field to make sure that at runtime the keyboard can configure itself to best suit the user’s task. You make all of these settings using text input traits.
>> In Interface Builder, select the text field then display the Attributes inspector. In the Text Input Traits section:
In the Capitalize popup menu, select Words
In the Keyboard Type popup menu select, Default
In the Keyboard Return Key popup menu, select Done
>> Save the file.
If you build and run your application in Xcode, when it launches you should see the user interface elements as you positioned them. If you press the button, it should highlight, and if you tap inside the text field, the keyboard should appear. At the moment, though, after the keyboard appears, there’s no way to dismiss it. To remedy this, and add other functionality, you need to make appropriate connections to and from the view controller. These are described in the next section.
The View Controller Interface Declaration
To make connections to the user interface from the view controller, you need to specify outlets (recall that an outlet is just an instance variable). You also need a declaration for its very simple model object, the string.
>> In Xcode, in MyViewController.h add the following instance variables to the MyViewController class:
UITextField *textField; |
UILabel *label; |
NSString *string; |
>> You then need to add property declarations for the instance variables and a declaration for the changeGreeting: action method:
@property (nonatomic, retain) IBOutlet UITextField *textField; |
@property (nonatomic, retain) IBOutlet UILabel *label; |
@property (nonatomic, copy) NSString *string; |
- (IBAction)changeGreeting:(id)sender; |
IBOutlet is a special keyword that is used only to tell Interface Builder to treat an instance variable or property as an outlet. It’s actually defined as nothing so it has no effect at compile time.
IBAction is a special keyword that is used only to tell Interface Builder to treat a method as an action for target/action connections. It’s defined to void.
The view controller is also going to be the text field’s delegate; as such, it must adopt the UITextFieldDelegate protocol. To specify that a class adopts a protocol, in the interface add the name of the protocol in angle brackets (<>) after the name of the class from which your class inherits.
>> Specify that the UIViewController object adopts the UITextFieldDelegate protocol by adding <UITextFieldDelegate> after UIViewController.
Your interface file should look like this:
#import <UIKit/UIKit.h> |
@interface MyViewController : UIViewController <UITextFieldDelegate> { |
UITextField *textField; |
UILabel *label; |
NSString *string; |
} |
@property (nonatomic, retain) IBOutlet UITextField *textField; |
@property (nonatomic, retain) IBOutlet UILabel *label; |
@property (nonatomic, copy) NSString *string; |
- (IBAction)changeGreeting:(id)sender; |
@end |
>> Save the MyViewController.h file so that Interface Builder will notice the changes.
So that you can test the project at the end of this section, in the implementation file (MyViewController.m) implement a stub changeGreeting: method.
>> After the @implementation MyViewController line add:
- (IBAction)changeGreeting:(id)sender { |
} |
>> Save the file.
Making Connections
Now that you’ve defined the view controller’s outlets and action, you can establish the connections in the nib file.
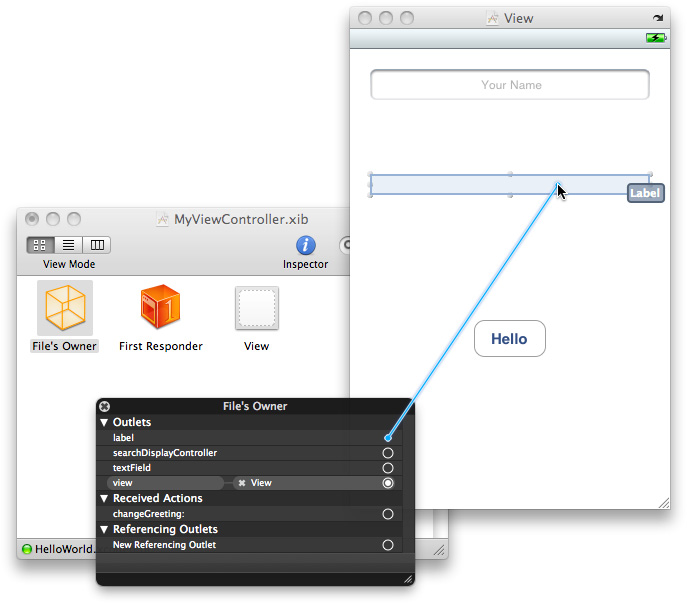
>> Connect the File’s Owner’s label outlet. Control click File’s Owner to display a translucent panel that shows all the available outlets and actions, then drag from the circle to the right of the list to the destination to make the connection.
You can resize the panel to show more or fewer outlets and actions at a time by dragging the resize handle at the bottom right of the panel. If there is not sufficient space to show all the outlets and actions, the panel displays a scroller to allow you to navigate within the list view.
Interface Builder will not allow you to make connections to the wrong sort of element. For example, since you declared the label property to be an instance of UILabel, you cannot connect the label outlet to the text field.
>> Connect the File’s Owner’s textField outlet to the text field in the same way you connected the label.
>> Set the button’s action method by Control-clicking the button to show the inspector, then dragging from the open circle in the Touch Up Inside Events list to the File’s Owner icon and selecting changeGreeting: in the translucent panel that appears over File’s Owner (you may have to scroll within the inspector to reveal the Touch Up Inside connection).
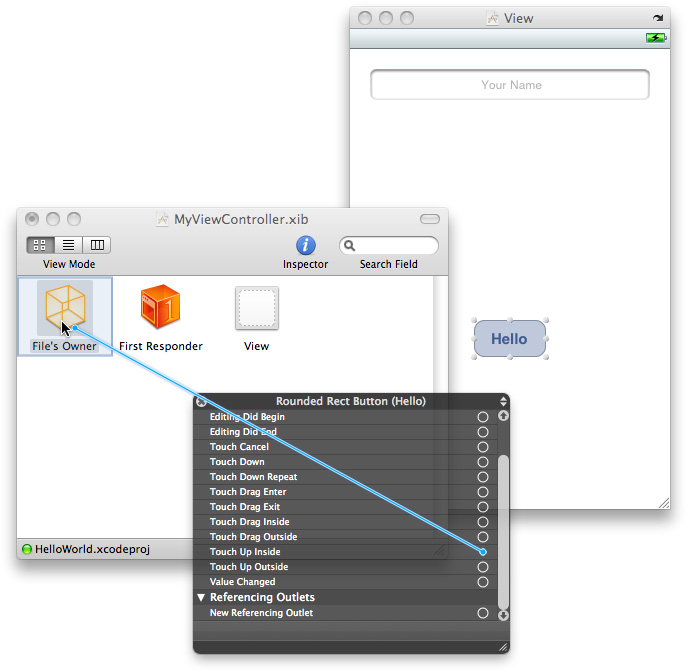
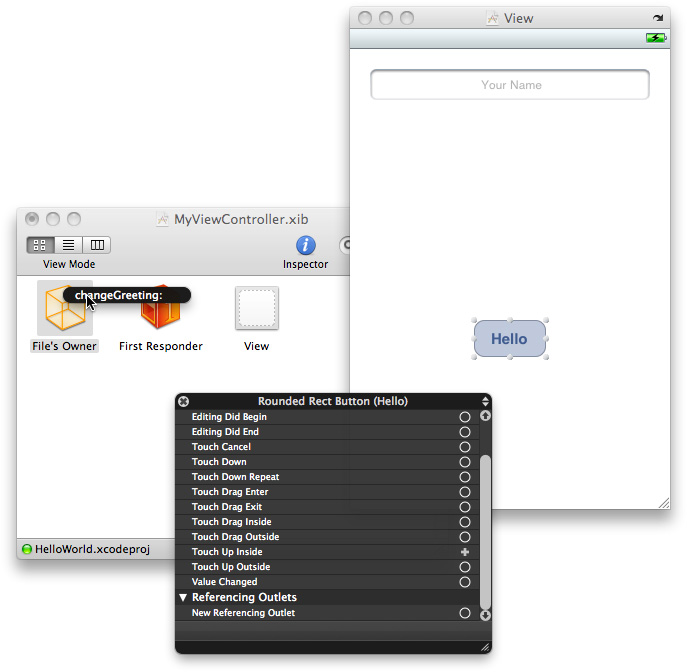
This means that when you run the application, when you lift your finger inside the button the button sends a changeGreeting: message to the File’s Owner object. (For a definition of all the control events, see UIControl.)
The text field sends a message to its delegate when the user taps the Return button in the keyboard. You can use this callback to dismiss the keyboard (see “The Text Field’s Delegate”).
>> Set the text field’s delegate to be the File’s Owner (the view controller) by Control-dragging from the text field to the File’s Owner and selecting delegate in the translucent panel that appears.
Testing
You can now test the application.
>> Building and running the project.
There will be several compiler warnings because you haven’t yet implemented accessor methods for the properties—you’ll fix these in the next chapter. You should find, though, that the button works (it highlights when you tap it). You should also find that if you touch in the text field, the keyboard appears and you enter text. There is, however, no way to dismiss the keyboard. To do that, you have to implement the relevant delegate method. You’ll also do that in the next chapter.
Recap
You added instance variables and property declarations, and a declaration for the action method, to the view controller class interface. You added a stub implementation of the action method to the class implementation. You also configured the nib file.
Last updated: 2010-07-01