Windows and Views
Important: This document contains information that used to be in iOS Application Programming Guide. The information in this document has not been updated specifically for iOS 4.0.
This chapter provides a basic overview of windows and views and how they work together to present your application’s content.
View Architecture and Geometry
Because views are focal objects in iPhone applications, it is important to understand a little about how views interact with other parts of the system. The standard view classes in UIKit provide a considerable amount of behavior to your application for free. They also provide well-defined integration points where you can customize that behavior and do what you need to do for your application.
The following sections explain the standard behavior of views and call out the places where you can integrate your custom code. For information about the integration points of specific classes, see the reference document for that class. You can get a list of all the class reference documents in UIKit Framework Reference.
The View Interaction Model
Any time a user interacts with your user interface, or your own code programmatically changes something, a complex sequence of events takes place inside of UIKit to handle that interaction. At specific points during that sequence, UIKit calls out to your view classes and gives them a chance to respond on behalf of your application. Understanding these callout points is important to understanding where your views fit into the system. Figure 1-1 shows the basic sequence of events that starts with the user touching the screen and ends with the graphics system updating the screen content in response. Programmatic events follow the same basic steps without the initial user interaction.
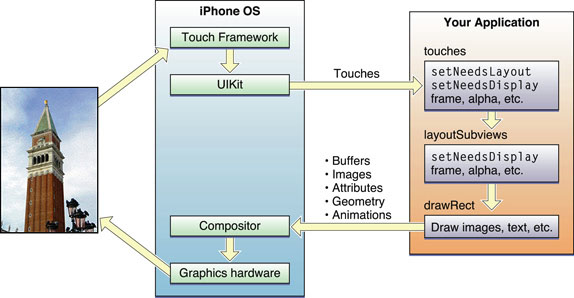
The following steps break the event sequence in Figure 1-1 down even further and explain what happens at each stage and how your application might want to react in response.
The user touches the screen.
The hardware reports the touch event to the UIKit framework.
The UIKit framework packages the touch into a
UIEventobject and dispatches it to the appropriate view. (For a detailed explanation of how UIKit delivers events to your views, see Event Handling Guide for iOS.)The event-handling methods of your view might respond to the event by doing any of the following:
Adjust the properties (frame, bounds, alpha, and so on) of the view or its subviews.
Mark the view (or its subviews) as needing a change in its layout.
Mark the view (or its subviews) as needing to be redrawn.
Notify a controller about changes to some piece of data.
Of course, it is up to the view to decide which of these things must be done and call the appropriate methods to do it.
If a view is marked as requiring layout, UIKit calls the view’s
layoutSubviewsmethod.You can override this method in your custom views and use it to adjust the position and size of any subviews. For example, a view that provides a large scrollable area would need to use several subviews as “tiles” rather than create one large view, which is not likely to fit in memory anyway. In its implementation of this method, the view would hide any subviews that are now offscreen or reposition them and use them to draw newly exposed content. As part of this process, the view can also mark the new tiles as needing to be redrawn.
If any part of the view is marked as needing to be redrawn, UIKit calls the view’s
drawRect:method.UIKit calls this method for only those views that need it. Each view’s implementation of this method should redraw the specified area as quickly as possible. Each view should draw only its own contents and not the contents of any subviews. Views should not attempt to make any further changes to their properties or layout at this point.
Any updated views are composited with the rest of visible content and sent to the graphics hardware for display.
The graphics hardware transfers the rendered content to the screen.
Note: The preceding update model applies primarily to applications that use native views and drawing techniques. If your application draws its content using OpenGL ES, you would typically configure a single full-screen view and then draw directly to your OpenGL graphics context. Your view would still handle touch events, but it would not need to lay out subviews or implement a drawRect: method. For more information about using OpenGL ES, see “Drawing with OpenGL ES.”
Given the preceding set of steps, the primary integration points for your own custom views are as follows:
These event-handling methods:
The
layoutSubviewsmethodThe
drawRect:method
These are the methods that most custom views implement to get the behavior they want; you may not need to override all of them. For example, if you are implementing a view whose size never changes, you might not need to override the layoutSubviews method. Similarly, if you are implementing a view that displays simple content, such as text and images, you can often avoid drawing altogether by simply embedding UIImageView and UILabel objects as subviews.
It is also important to remember that these are the primary integration points but not the only ones. Several methods of the UIView class are designed to be override points for subclassers. You should look at the method descriptions in UIView Class Reference to see which methods might be appropriate for you to override in your custom implementations.
The View Rendering Architecture
Although you use views to represent content onscreen, the UIView class itself actually relies heavily on another object for much of its basic behavior. Each view object in UIKit is backed by a Core Animation layer object, which is an instance of the CALayer class. This layer class provides the fundamental support for the layout and rendering of a view’s contents and for compositing and animating that content.
In contrast with Mac OS X (in which Core Animation support is optional) iOS integrates Core Animation into the heart of the view rendering implementation. Although Core Animation has a central role, UIKit streamlines the programming experience by providing a transparent layer on top of Core Animation. This transparent layer eliminates the need to access Core Animation layers directly most of the time, instead letting you access similar behaviors using the methods and properties of the UIView class. Where Core Animation becomes important, however, is when the UIView class does not provide everything you need. At that point, you can dive down into the Core Animation layers and do some pretty sophisticated rendering for your application.
The following sections provide an introduction to Core Animation and describe some of the features it provides to you for free through the UIView class. For more detailed information about how to use Core Animation for advanced rendering, see Core Animation Programming Guide.
Core Animation Basics
Core Animation takes advantage of hardware acceleration and an optimized architecture to implement fast rendering and real-time animations. The first time a view’s drawRect: method is called, the layer captures the results into a bitmap. Subsequent redraw calls use this cached bitmap whenever possible to avoid calling the drawRect: method, which can be expensive. This process allows Core Animation to optimize its compositing operations and deliver the desired performance.
Core Animation stores the layers associated with your view objects in a hierarchy referred to as the layer tree. Like views, each layer in the layer tree has a single parent and can have any number of embedded sublayers. By default, objects in the layer tree are organized exactly like the views in your view hierarchy. You can add layers, however, without adding a corresponding view. You might do this to implement special visual effects for which a view is not required.
Layer objects are actually the driving force behind the rendering and layout system in iOS, and most view properties are actually thin wrappers for properties on the underlying layer object. When you change the property of a layer in the layer tree (directly using the CALayer object), the changed value is reflected immediately in the layer object. If the change triggers a corresponding animation, however, that change may not be reflected onscreen immediately; instead, it must be animated onto the screen over time. To manage these sorts of animations, Core Animation maintains two additional sets of layer objects in what are referred to as the presentation tree and the render tree.
The presentation tree reflects the state of the layers as they are currently presented to the user. When you animate the changing of a layer value, the presentation layer reflects the old value until the animation commences. As the animation progresses, Core Animation updates the value in the presentation-tree layer based on the current frame of the animation. The render tree then works together with the presentation tree to render the changes on the screen. Because the render tree runs in a separate process or thread, the work it does does not impact your application’s main run loop. While both the layer tree and the presentation tree are public, the render tree is a private API.
The placement of layer objects behind your views has many important implications for the performance of your drawing code. The upside to using layers is that most geometry changes to your views do not require redrawing. For example, changing the position and size of a view does not require the system to redraw the contents of a view; it can simply reuse the cached bitmap created by the layer. Animating this cached content is significantly more efficient than trying to redraw that content every time.
The downside to using layers is that the additional cached data can add memory pressure to your application. If your application creates too many views or creates very large views, you could run out of memory quickly. You should not be afraid to use views in your application, but do not create new view objects if you have existing views that can be reused. In other words, pursue approaches that minimize the number of views you keep in memory at the same time.
For a more detailed overview of Core Animation, the object trees, and how you create animations, see Core Animation Programming Guide.
Changing the Layer of a View
Because views are required to have an associated layer object in iOS, the UIView class creates this layer automatically at initialization time. You can access the layer that is created through the layer property of the view, but you cannot change the layer object after the view is created.
If you want a view to use a different type of layer, you must override the view’s layerClassclass method and return the class object for the layer you want it to use. The most common reason to return a different layer class is to implement an OpenGL-based application. To use OpenGL drawing commands, the layer for the underlying view must be an instance of the CAEAGLLayer class. This type of layer interacts with the OpenGL rendering calls to present the desired content on the screen.
Important: You should never modify the delegate property of a view’s layer; that property stores a pointer to the view and should be considered private. Similarly, because a view can operate as the delegate for only one layer, you must not assign it as the delegate for any other layer objects. Doing so will cause your application to crash.
Animation Support
One of the benefits of having a layer object behind every view in iOS is that you can animate content more easily. Remember that animation is not necessarily about creating visual eye candy. Animations provide the user with a context for any changes that occur in your application’s user interface. For example, when you use a transition to move from one screen to another, you are indicating to users that the screens are related. The system provides automatic support for many of the most commonly used animations, but you can also create animations for other parts of your interface.
Many properties of the UIView class are considered to be animatable. An animatable property is one for which there is semiautomatic support for animating from one value to another. You must still tell UIKit that you want to perform the animation, but Core Animation assumes full responsibility for running the animation once it has begun. Among the properties you can animate on a UIView object are the following:
Even though other view properties are not directly animatable, you can create explicit animations for some of them. Explicit animations require you to do more of the work in managing the animation and the rendered contents, but they still use the underlying Core Animation infrastructure to obtain good performance.
For more information about creating animations using the UIView class, see “Animating Views.” For more information about creating explicit animations, see Core Animation Programming Guide.
View Coordinate Systems
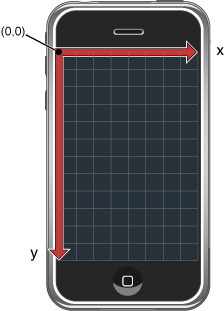
Coordinates in UIKit are based on a coordinate system whose origin is in the top-left corner and whose coordinate axes extend down and to the right from that point. Coordinate values are represented using floating-point numbers, which allow for precise layout and positioning of content and allow for resolution independence. Figure 1-2 shows this coordinate system relative to the screen, but this coordinate system is also used by the UIWindow and UIView classes. This particular orientation was chosen to make it easier to lay out controls and content in user interfaces, even though it differs from the default coordinate systems in use by Quartz and Mac OS X.
As you write your interface code, be aware of the coordinate system currently in effect. Every window and view object maintains its own local coordinate system. All drawing in a view occurs relative to the view’s local coordinate system. The frame rectangle for each view, however, is specified using the coordinate system of its parent view, and coordinates delivered as part of an event object are specified relative to the coordinate system of the enclosing window. For convenience, the UIWindow and UIView classes each provide methods to convert back and forth between the coordinate systems of different objects.
Although the coordinate system used by Quartz does not use the top-left corner as the origin point, for many Quartz calls this is not a problem. Before invoking your view’s drawRect: method, UIKit automatically configures the drawing environment to use a top-left origin. Quartz calls made within this environment draw correctly in your view. The only time you need to consider these different coordinate systems is when you set up the drawing environment yourself using Quartz.
For more information about coordinate systems, Quartz, and drawing in general, see “Graphics and Drawing.”
The Relationship of the Frame, Bounds, and Center
A view object tracks its size and location using its frame, bounds, and centerproperties. The frame property contains a rectangle, the frame rectangle, that specifies the view’s location and size relative to its parent view’s coordinate system. The bounds property contains a rectangle, the bounds rectangle, that defines the view’s position and size relative to its own local coordinate system. And although the origin of the bounds rectangle is typically set to (0, 0), it need not be. The center property contains the center point of the frame rectangle.
You use the frame, bounds, and center properties for different purposes in your code. Because the bounds rectangle represents the view’s local coordinate system, you use it most often during drawing or event-handling code when you need to know where in your view something happened. The center point represents the known center point of your view and is always the best way to manipulate the position of your view. The frame rectangle is a convenience value that is computed using the bounds and center point and is valid only when the view’s transform is set to the identity transform.
Figure 1-3 shows the relationship between the frame and bounds rectangles. The complete image on the right is drawn in the view starting at (0, 0). Because the size of the bounds does not match the full size of the image, however, only part of the image outside the bounds rectangle is clipped automatically. When the view is composited with its parent view, the position of the view inside its parent is determined by the origin of the view’s frame rectangle, which in this case is (5, 5). As a result, the view’s contents appear shifted down and to the right from the parent view’s origin.

When there is no transform applied to the view, the location and size of the view are determined by these three interrelated properties. The frame property of a view is set when a view object is created programmatically using the initWithFrame: method. That method also initializes the bounds rectangle to originate at (0.0, 0.0) and have the same size as the view's frame. The center property is then set to the center point of the frame.
Although you can set the values of these properties independently, setting the value for one changes the others in the following ways:
When you set the
frameproperty, the size of theboundsproperty is set to match the size of theframeproperty. Thecenterproperty is also adjusted to match the center point of the new frame.When you set the
centerproperty, the origin of theframechanges accordingly.When you set the size of the
boundsrectangle, the size of theframerectangle changes to match.
You can change the bounds origin without changing the other two properties. When you do, the view displays the portion of the underlying image that you have identified. In Figure 1-3, the original bounds origin is set to (0.0, 0.0). In Figure 1-4, that origin is moved to (8.0, 24.0). As a result, a different portion of the underlying image is displayed by the view. Because the frame rectangle did not change, however, the new content is displayed in the same location inside the parent view as before.

Note: By default, a view’s frame is not clipped to its parent view’s frame. If you want to force a view to clip its subviews, set the view’s clipsToBounds property to YES.
Coordinate System Transformations
Although coordinate system transformations are commonly used in a view’s drawRect: method to facilitate drawing, in iOS, you can also use them to implement visual effects for your view. For example, the UIView class includes a transformproperty that lets you apply different types of translation, scaling, and zooming effects to the entire view. By default, the value of this property is the identity transform, which causes no changes to the view. To add transformations, get the CGAffineTransform structure stored in this property, use the corresponding Core Graphics functions to apply the transformations, and then assign the modified transform structure back to the view’s transform property.
Note: When applying transforms to a view, all transformations are performed relative to the center point of the view.
Translating a view shifts all subviews along with the drawing of the view's content. Because coordinate systems of subviews inherit and build on these alterations, scaling also affects the drawing of the subviews. For more information about how to control the scaling of view content, see “Content Modes and Scaling.”
Important: If the transform property is not the identity transform, the value of the frame property is undefined and must be ignored. After setting the transform, use the bounds and center properties to get the position and size of the view.
For information about using transforms in conjunction with your drawRect: method, see “Coordinates and Coordinate Transforms.” For information about the functions you use to modify the CGAffineTransform structure, see CGAffineTransform Reference.
Content Modes and Scaling
When you change the bounds of a view or apply a scaling factor to the transformproperty of a view, the frame rectangle is changed by a commensurate amount. Depending on the content mode associated with the view, the view’s content may also be scaled or repositioned to account for the changes. The view’s contentMode property determines the effect that bounds changes and scaling operations have on the view. By default, the value of this property is set to UIViewContentModeScaleToFill, which always causes the view’s contents to be scaled to fit the new frame size. For example, Figure 1-5 shows what happens when the horizontal scaling factor of the view is doubled.

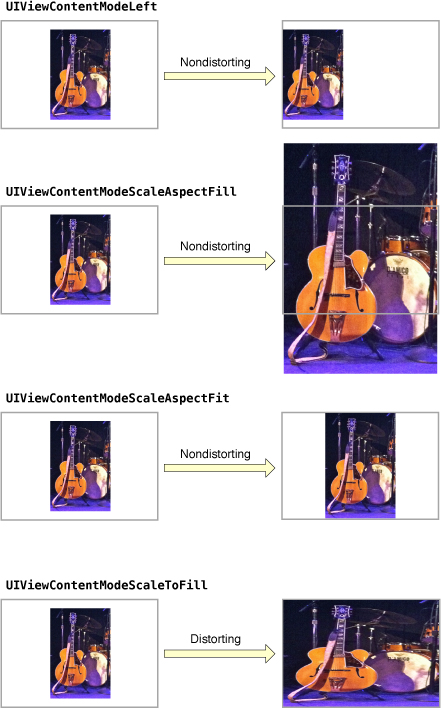
Scaling of your view’s content occurs because the first time a view is shown, its rendered contents are cached in the underlying layer. Rather than force the view to redraw itself every time its bounds change or a scaling factor is applied, UIKit uses the view’s content mode to determine how to display the cached content. Figure 1-6 compares the results of changing the bounds of a view or applying a scaling factor to it using several different content modes.
Although applying a scaling factor always scales the view’s contents, there are content modes that do not scale the view’s contents when the bounds of the view change. Several UIViewContentMode constants (such as UIViewContentModeTop and UIViewContentModeBottomRight) display the current content in different corners or along different edges of the view. There is also a mode for displaying the content centered inside the view. Changing the bounds rectangle with one of these content modes in place simply moves the existing contents to the appropriate location inside the new bounds rectangle.
Do consider using content modes when you want to implement resizable controls in your application; by doing so you can avoid both control distortion and the writing of custom drawing code. Buttons and segmented controls are particularly suitable for content mode–based drawing. They typically use several images to create the appearance of the control. In addition to having two fixed-size end cap images, a button that can grow horizontally uses a stretchable center image that is only 1 pixel wide. By displaying each image in its own image view and setting the content mode of the stretchable middle image to UIViewContentModeScaleToFill, the button can grow in size without distorting the appearance of the end caps. More importantly, the images associated with each image view can be cached by Core Animation and animated without any custom drawing code, which results in much better performance.
Although content modes are good to avoid redrawing the contents of your view, you can also use the UIViewContentModeRedraw content mode when you specifically want control over the appearance of your view during scaling and resizing operations. Setting your view’s content mode to this value forces Core Animation to invalidate your view’s contents and call your view’s drawRect: method rather than scale or resize them automatically.
Autoresizing Behaviors
When you change the frame rectangle of a view, the position and size of embedded subviews often needs to change to match the new size of the original view. If the autoresizesSubviewsproperty of a view is set to YES, its subviews are automatically resized according to the values in the autoresizingMask property. Often, simply configuring the autoresizing mask for a view provides the appropriate behavior for an application. Otherwise, it is the application's responsibility to reposition and resize the subviews by overriding the layoutSubviews method.
To set a view’s autoresizing behaviors, combine the desired autoresizing constants using a bitwise OR operator and assign the resulting value to the view’s autoresizingMask property. Table 1-1 lists the autoresizing constants and describes how each one affects the size and placement of a given view. For example, to keep a view pinned to the lower-left corner of its superview, add the UIViewAutoresizingFlexibleRightMargin and UIViewAutoresizingFlexibleTopMargin constants and assign them to the autoresizingMask property. When more than one aspect along an axis is made flexible, the resize amount is distributed evenly among them.
Autoresizing mask | Description |
|---|---|
If set, the view doesn’t autoresize. | |
If set, the view’s height changes proportionally to the change in the superview’s height. Otherwise, the view’s height does not change relative to the superview’s height. | |
If set, the view’s width changes proportionally to the change in the superview's width. Otherwise, the view’s width does not change relative to the superview’s width. | |
If set, the view’s left edge is repositioned proportionally to the change in the superview’s width. Otherwise, the view’s left edge remains in the same position relative to the superview’s left edge. | |
If set, the view’s right edge is repositioned proportionally to the change in the superview’s width. Otherwise, the view’s right edge remains in the same position relative to the superview. | |
If set, the view’s bottom edge is repositioned proportionally to the change in the superview’s height. Otherwise, the view’s bottom edge remains in the same position relative to the superview. | |
If set, the view’s top edge is repositioned proportionally to the change in the superview’s height. Otherwise, the view’s top edge remains in the same position relative to the superview. |
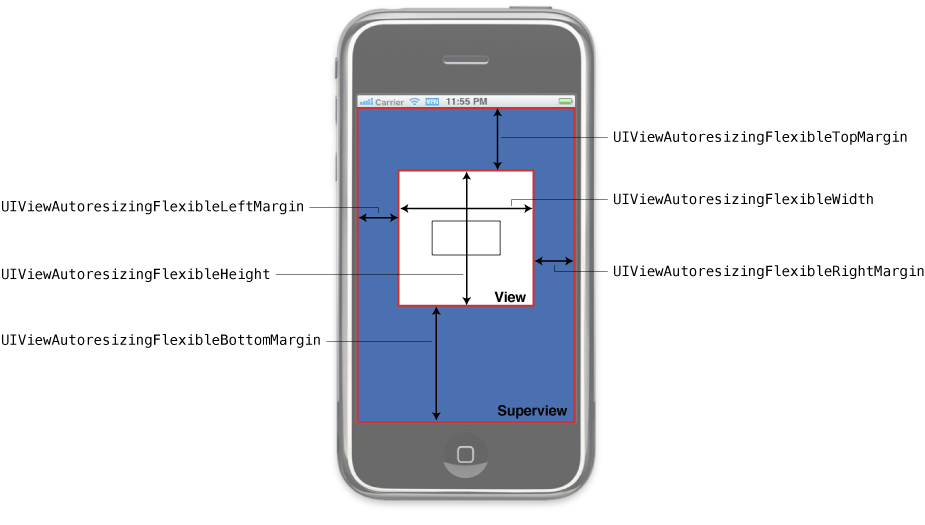
Figure 1-7 provides a graphical representation of the position of the constant values. When one of these constants is omitted, the view's layout is fixed in that aspect; when a constant is included in the mask, the view's layout is flexible in that aspect.
If you are using Interface Builder to configure your views, you can set the autoresizing behavior for each view by using the Autosizing controls in the Size inspector. Although the flexible width and height constants from the preceding figure have the same behavior as the Interface Builder springs located in the same position have, the behavior of the margin constants is effectively reversed. In other words, to apply the flexible right margin autoresizing behavior to a view in Interface Builder, you must leave the space on that side of the Autosizing control empty, not place a strut there. Fortunately, Interface Builder provides an animation to show you how changes to the autoresizing behaviors affect your view.
If the autoresizesSubviews property of a view is set to NO, any autoresizing behaviors set on the immediate subviews of that view are ignored. Similarly, if a subview’s autoresizing mask is set to UIViewAutoresizingNone, the subview does not change size and so its immediate subviews are never resized either.
Note: For autoresizing to work correctly, the view’s transform property must be set to the identity transform. The behavior is undefined if it is not.
Although autoresizing behaviors may be suitable for some layout needs, if you want more control over the layout of your views, you should override the layoutSubviews method in the appropriate view classes. For more information about managing the layout of your views, see “Responding to Layout Changes.”
Creating and Managing the View Hierarchy
Managing the view hierarchy of your user interface is a crucial part of developing your application’s user interface. How you organize your views defines not only the way your application appears visually but also how your application responds to changes. The parent-child relationships in the view hierarchy help define the chain of objects that is responsible for handling touch events in your application. When the user rotates the device, parent-child relationships also help define how each view’s size and position are altered by changes to the user interface orientation.
Figure 1-8 shows a simple example of how the layering of views creates a desired visual effect. In the case of the Clock application, tab-bar and navigation-bar views are mixed together with a custom view to implement the overall interface.
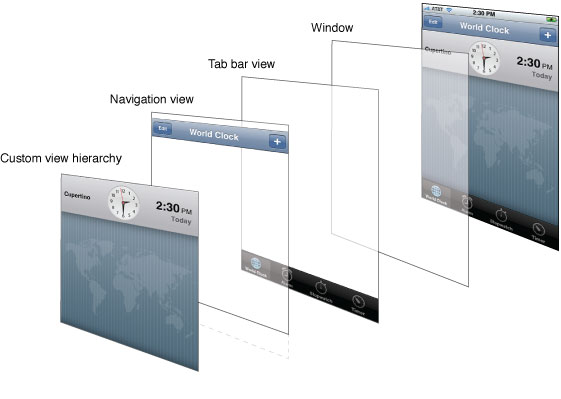
If you look at the object relationships for the views in the Clock application, you see that they look something like the relationships shown in Figure 1-9. The window object acts as the root view for the application’s tab bar, navigation bar, and custom view.

There are several ways to build view hierarchies in iPhone applications, including graphically in Interface Builder and programmatically in your code. The following sections show you how to assemble your view hierarchies and, having done that, how to find views in the hierarchy and convert between different view coordinate systems.
Creating a View Object
The simplest way to create views is to use Interface Builder and load them from the resulting nib file. From Interface Builder’s graphical environment, you can drag new views out of the library and drop them onto a window or another view and build your view hierarchies quickly. Because Interface Builder uses live view objects, when you build your interface graphically you see exactly how it will appear when you load it at runtime. And there is no need to write tedious code to allocate and initialize each view in your view hierarchy.
If you prefer not to use Interface Builder and nib files to create your views, you can create them programmatically. To create a new view object, allocate memory for the view object and send that object an initWithFrame: message to initialize it. For example, to create a new instance of the UIView class, which you could use as a container for other views, you would use the following code:
CGRect viewRect = CGRectMake(0, 0, 100, 100); |
UIView* myView = [[UIView alloc] initWithFrame:viewRect]; |
Note: Although all system objects support the initWithFrame: message, some may have a preferred initialization method that you should use instead. For information about any custom initialization methods, see the reference documentation for the class.
The frame rectangle that you specify when you initialize the view represents the position and size of the view relative to its intended parent view. You must add views to a window or to another view to make them appear on the screen. When you do, UIKit uses the frame rectangle you specify to place the view inside its parent. For information on how to add views to your view hierarchy, see “Adding and Removing Subviews.”
Adding and Removing Subviews
Interface Builder is the most convenient way to build view hierarchies because it lets you see exactly how those views will appear at runtime. It then saves the view objects and their hierarchical relationships in a nib file, which the system uses at runtime to recreate the objects and relationships in your application. When a nib file is loaded, the system automatically calls the UIView methods needed to recreate the view hierarchy.
If you prefer not to use Interface Builder and nib files to create your view hierarchies, you can create them programmatically instead. A view that has required subviews should create them in its own initWithFrame: method to ensure that they are present and initialized with the view. Subviews that are part of your application design (and not required for the operation of your view) should be created outside of your view’s initialization code. In iPhone applications, the two most common places to create views and subviews programmatically are the applicationDidFinishLaunching: method of your application delegate and the loadView method of your view controllers.
To manipulate views in the view hierarchy, you use the following methods:
To add a subview to a parent, call the
addSubview:method of the parent view. This method adds the subview to the end of the parent’s list of subviews.To insert a subview in the middle of the parent’s list of subviews, call any of the
insertSubview:...methods of the parent view.To reorder existing subviews inside their parent, call the
bringSubviewToFront:,sendSubviewToBack:, orexchangeSubviewAtIndex:withSubviewAtIndex:methods of the parent view. Using these methods is faster than removing the subviews and reinserting them.To remove a subview from its parent, call the
removeFromSuperviewmethod of the subview (not the parent view).
When adding subviews, the current frame rectangle of the subview is used as the initial position of that view inside its parent. You can change that position at any time by changing the frameproperty of the subview. Subviews whose frame lies outside of their parent’s visible bounds are not clipped by default. To enable clipping, you must set the clipsToBounds property of the parent view to YES.
Listing 1-1 shows a sample applicationDidFinishLaunching: method of an application delegate object. In this example, the application delegate creates its entire user interface programmatically at launch time. The interface consists of two generic UIView objects, which display primary colors. Each view is then embedded inside a window, which is also a subclass of UIView and can therefore act as a parent view. Because parents retain their subviews, this method releases the newly created views to prevent them from being over retained.
Listing 1-1 Creating a window with views
- (void)applicationDidFinishLaunching:(UIApplication *)application { |
// Create the window object and assign it to the |
// window instance variable of the application delegate. |
window = [[UIWindow alloc] initWithFrame:[[UIScreen mainScreen] bounds]]; |
window.backgroundColor = [UIColor whiteColor]; |
// Create a simple red square |
CGRect redFrame = CGRectMake(10, 10, 100, 100); |
UIView *redView = [[UIView alloc] initWithFrame:redFrame]; |
redView.backgroundColor = [UIColor redColor]; |
// Create a simple blue square |
CGRect blueFrame = CGRectMake(10, 150, 100, 100); |
UIView *blueView = [[UIView alloc] initWithFrame:blueFrame]; |
blueView.backgroundColor = [UIColor blueColor]; |
// Add the square views to the window |
[window addSubview:redView]; |
[window addSubview:blueView]; |
// Once added to the window, release the views to avoid the |
// extra retain count on each of them. |
[redView release]; |
[blueView release]; |
// Show the window. |
[window makeKeyAndVisible]; |
} |
Important: When you’re considering memory management, think of the subviews as any other collection object. Specifically, when you insert a view as a subview using addSubview:, that subview is retained by its superview. Inversely, when you remove the subview from its superview using the removeFromSuperview method, the subview is autoreleased. Releasing views after adding them to your view hierarchy prevents them being over retained, which could cause memory leaks.
For more information about Cocoa memory management conventions, see Memory Management Programming Guide.
When you add a subview to a parent view, UIKit sends several messages to both the parent and child to let them know what is happening. You can override methods such as willMoveToSuperview:, willMoveToWindow:, willRemoveSubview:, didAddSubview:, didMoveToSuperview, and didMoveToWindow in your custom views to process changes before and after they occur and to update the state information in your view accordingly.
After you create a view hierarchy, you can use the superview property of a view to get its parent or the subviews property to get its children. You can also use the isDescendantOfView: method to determine whether a view is in the view hierarchy of a parent view. Because the root view in a view hierarchy has no parent, its superview property is set to nil. For views currently onscreen, the window object is typically the root view of the hierarchy.
You can use the window property of a view to get a pointer to the window that currently contains the view (if any). This property is set to nil if the view is not currently attached to a window.
Converting Coordinates in the View Hierarchy
At various times, particularly when handling events, an application may need to convert coordinate values from one frame of reference to another. For example, touch events usually report the touch location using the coordinate system of the window, but view objects need that information in the local coordinate system of the view, which may be different. The UIView class defines the following methods for converting coordinates to and from the view’s local coordinate system:
The convert...:fromView: methods convert coordinates to the view’s local coordinate system, while the convert...:toView: methods convert coordinates from the view’s local coordinate system to the coordinate system of the specified view. If you specify nil as the reference view for any of the methods, the conversions are made to and from the coordinate system of the window that contains the view.
In addition to the UIView conversion methods, the UIWindow class also defines several conversion methods. These methods are similar to the UIView versions except that instead of converting to and from a view’s local coordinate system, these methods convert to and from the window’s coordinate system.
Coordinate conversions are straightforward when neither view is rotated or when dealing only with points. When converting rectangles or sizes between views with different rotations, the geometric structure must be altered in a reasonable way so that the resulting coordinates are correct. When converting a rectangle, the UIView class assumes that you want to guarantee coverage of the original screen area. To this end, the converted rectangle is enlarged so that when located in the appropriate view, it completely covers the original rectangle. Figure 1-10 shows the conversion of a rectangle in the rotatedView object's coordinate system to that of its superview, outerView.
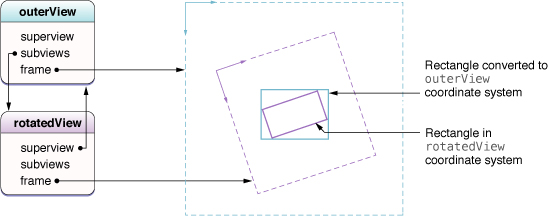
When converting size information, UIView simply treats it as a delta offset from (0.0, 0.0) that you need to convert from one view to another. Though the offset distance remains the same, the balance along the two axes shifts according to the rotation. When converting sizes, UIKit always returns sizes that consist of positive numbers.
Tagging Views
The UIView class contains a tag property that you can use to tag individual view objects with an integer value. You can use tags to uniquely identify views inside your view hierarchy and to perform searches for those views at runtime. (Tag-based searches are faster than iterating the view hierarchy yourself.) The default value for the tag property is 0.
To search for a tagged view, use the viewWithTag: method of UIView. This method searches the receiver’s subviews using a depth-first search, starting with the receiver itself.
Modifying Views at Runtime
As applications receive input from the user, they adjust their user interface in response to that input. An application might rearrange the views in its interface, refresh existing views that contain changed data, or load an entirely new set of views. When deciding which techniques to use, consider your interface and what you are trying to achieve. How you initiate these techniques, however, is the same for all applications. The following sections describe these techniques and how you use them to update your user interface at runtime.
Note: For background information about how UIKit moves events and messages between itself and your custom code, see “The View Interaction Model” before proceeding.
Animating Views
Animations provide fluid visual transitions between different states of your user interface. In iOS, animations are used extensively to reposition views, change their size, and even change their alpha value to make them fade in or out. Because this support is crucial for making easy-to-use applications, UIKit simplifies the process of creating animations by integrating support for them directly into the UIView class.
The UIView class defines several properties that are inherently animatable—that is, the view provides built-in support for animating changes in the property from their current value to a new value. Although the work needed to perform the animation is handled for you automatically by the UIView class, you must still let the view know that you want the animation to happen. You do this by wrapping changes to the given property in an animation block.
An animation block starts with a call to the beginAnimations:context: class method of UIView and ends with a call to the commitAnimations class method. Between these calls, you configure the animation parameters and change the properties you want to animate. As soon as you call the commitAnimations method, UIKit performs the animations, animating changes from their current values to the new values you just set. Animation blocks can be nested, but nested animations do not start until the outermost animation block is committed.
Table 1-2 lists the animatable properties of the UIView class.
Property | Description |
|---|---|
| The view’s frame rectangle, in superview coordinates. |
| The view’s bounding rectangle, in view coordinates. |
| The center of the frame, in superview coordinates. |
| The transform applied to the view, relative to the center of its bounds. |
| The view’s alpha value, which determines the view’s level of transparency. |
Configuring Animation Parameters
In addition to changing property values inside an animation block, you can configure additional parameters that determine how you want the animation to proceed. You do this by calling the following class methods of UIView:
Use the
setAnimationStartDate:method to set the start date of the animations after thecommitAnimationsmethod returns. The default behavior is to schedule the animation for immediate execution on the animation thread.Use the
setAnimationDelay:method to set a delay between the time thecommitAnimationsmethod returns and the animations actually begin.Use the
setAnimationDuration:method to set the number of seconds over which the animations occur.Use the
setAnimationCurve:method to set the relative speed of the animations over their course. For example, the animations can gradually speed up at the beginning, gradually slow down near the end, or remain the same speed throughout.Use the
setAnimationRepeatCount:method to set the number of times the animations repeat.Use the
setAnimationRepeatAutoreverses:method to specify whether the animations reverse automatically when they reach their target value. Combined with thesetAnimationRepeatCount:method, you can use this method to toggle each property between its initial and final values smoothly over a period of time.
The commitAnimations class method returns immediately and before the animations begin. UIKit performs animations in a separate thread and away from your application’s main event loop. The commitAnimations method posts its animations to this separate thread where they are queued up until they are ready to execute. By default, Core Animation finishes the currently running animation block before starting animations currently on the queue. You can override this behavior and start your animation immediately, however, by passing YES to the setAnimationBeginsFromCurrentState: class method within your animation block. This causes the current in-flight animation to stop and the new animation to begin from the current state.
By default, all animatable property changes within an animation block are animated. If you want to prevent some changes made within the block from being animated, use the setAnimationsEnabled: method to disable animations temporarily, make your changes, and then reenable them. Any changes made after a setAnimationsEnabled: call with the value NO are not animated until a matching call with the value YES occurs or you commit the animation block. Use the areAnimationsEnabled method to determine whether animations are currently enabled.
Configuring an Animation Delegate
You can assign a delegate to an animation block and use that delegate to receive messages when the animations begin and end. You might do this to perform additional tasks immediately before and after the animation. You set the delegate using the setAnimationDelegate: class method of UIView, and use the setAnimationWillStartSelector: and setAnimationDidStopSelector: methods to specify the selectors that will receive the messages. The signatures of the corresponding methods are as follows:
- (void)animationWillStart:(NSString *)animationID context:(void *)context; |
- (void)animationDidStop:(NSString *)animationID finished:(NSNumber *)finished context:(void *)context; |
The animationID and context parameters for both methods are the same parameters that were passed to the beginAnimations:context: method at the beginning of the animation block:
animationID - an application-supplied string used to identify animations in an animation block.
context - another application-supplied object you can use to pass additional information to the delegate.
The setAnimationDidStopSelector: selector method has an additional argument—a Boolean value that is YES if the animation ran to completion and was not canceled or stopped prematurely by another animation.
Responding to Layout Changes
Whenever the layout of your views changes, UIKit applies each view’s autoresizing behaviors and then calls its layoutSubviews method to give it a chance to adjust the geometry of its contained subviews further. Layout changes can occur when any of the following happens:
The size of a view’s bounds rectangle changes.
The content offset value—that is, the origin of the visible content region—of a scroll view changes.
The transform associated with the view changes.
The set of Core Animation sublayers associated with the view’s layer changes.
Your application forces layout to occur by calling the
setNeedsLayoutorlayoutIfNeededmethods of the view.Your application forces layout by calling the
setNeedsLayoutmethod of the view’s underlying layer object.
A view’s autoresizing behaviors handle the initial job of positioning any subviews. Applying these behaviors guarantees that your views are close to their intended size. For information about how autoresizing behaviors affect the size and position of your views, see “Autoresizing Behaviors.”
Sometimes, you might want to adjust the layout of subviews manually using layoutSubviews, rather than rely exclusively on autoresizing behaviors. For example, if you are implementing a custom control that is built from several subview elements, by adjusting the subviews manually you can precisely configure the appearance for your control over a range of sizes. Alternatively, a view representing a large scrollable content area could display that content by tiling a set of subviews. During scrolling, views going off one edge of the screen would be recycled and repositioned at the incoming screen edge along with any new content.
Note: You can also use the layoutSubviews method to adjust the size and position of custom CALayer objects attached as sublayers to your view’s layer. Managing custom layer hierarchies behind your view lets you perform advanced animations directly using Core Animation. For more information about using Core Animation to manage layer hierarchies, see Core Animation Programming Guide.
When writing your layout code, be sure to test your code in each of your application’s supported interface orientations. Applications that support both landscape and portrait orientations should verify that layout is handled properly in each orientation. Similarly, your application should be prepared to deal with other system changes, such as the height of the status bar changing. This occurs when a user uses your application while on an active phone call and then hangs up. At hang-up time, the managing view controller may resize its view to account for the shrinking status bar size. Such a change would then filter down to the rest of the views in your application.
Redrawing Your View’s Content
Occasionally, changes to your application’s data model require that you also change the corresponding user interface. To make those changes, you mark the corresponding views as dirty and in need of an update (using either the setNeedsDisplay or setNeedsDisplayInRect: methods). Marking views as dirty, as opposed to simply creating a graphics context and drawing, gives the system a chance to process drawing operations more efficiently. For example, if you mark several regions of the same view as dirty during a given cycle, the system coalesces the dirty regions into a single call to the view’s drawRect: method. As a result, only one graphics context is created to draw all of the affected regions. This practice is much more efficient than creating several graphics contexts in quick succession.
Views that implement a drawRect: method should always check the rectangle passed to the method and use it to limit the scope of their drawing operations. Because drawing is a relatively expensive operation, limiting drawing in this way is a good way to improve performance.
By default, geometry changes to a view do not automatically cause the view to be redrawn. Instead, most geometry changes are handled automatically by Core Animation. Specifically, when you change the frame, bounds, center, or transform properties of the view, Core Animation applies the geometry changes to the cached bitmap associated with the view’s layer. In many cases, this approach is perfectly acceptable, but if you find the results undesirable, you can force UIKit to redraw your view instead. To prevent Core Animation from applying geometry changes implicitly, set your view’s contentModeproperty to UIViewContentModeRedraw. For more information about content modes, see “Content Modes and Scaling.”
Hiding Views
You can hide or show a view by changing the value in the view’s hiddenproperty. Setting this property to YES hides the view; setting it to NO shows it. Hiding a view also hides any embedded subviews as if their own hidden property were set.
When you hide a view, it remains in the view hierarchy, but its contents are not drawn and it does not receive touch events. Because it remains in the view hierarchy, a hidden view continues to participate in autoresizing and other layout operations. If you hide a view that is currently the first responder, the view does not automatically resign its first responder status. Events targeted at the first responder are still delivered to the hidden view. For more information about the responder chain, see Event Handling Guide for iOS.
Creating a Custom View
The UIView class provides the underlying support for displaying content on the screen and for handling touch events, but its instances draw nothing but a background color using an alpha value and its subviews. If your application needs to display custom content or handle touch events in a specific manner, you must create a custom subclass of UIView.
The following sections describe some of the key methods and behaviors you might implement in your custom view objects. For additional subclassing information, see UIView Class Reference.
Initializing Your Custom View
Every new view object you define should include a custom initWithFrame:initializer method. This method is responsible for initializing the class at creation time and putting your view object into a known state. You use this method when creating instances of your view programmatically in your code.
Listing 1-2 shows a skeletal implementation of a standard initWithFrame: method. This method calls the inherited implementation of the method first and then initializes the instance variables and state information of the class before returning the initialized object. Calling the inherited implementation is traditionally performed first so that if there is a problem, you can simply abort your own initialization code and return nil.
Listing 1-2 Initializing a view subclass
- (id)initWithFrame:(CGRect)aRect { |
self = [super initWithFrame:aRect]; |
if (self) { |
// setup the initial properties of the view |
... |
} |
return self; |
} |
If you plan to load instances of your custom view class from a nib file, you should be aware that in iOS, the nib-loading code does not use the initWithFrame: method to instantiate new view objects. Instead, it uses the initWithCoder: method that is defined as part of the NSCodingprotocol.
Even if your view adopts the NSCoding protocol, Interface Builder does not know about your view’s custom properties and therefore does not encode those properties into the nib file. As a result, your own initWithCoder: method does not have the information it needs to properly initialize the class when it is loaded from a nib file. To solve this problem, you can implement the awakeFromNib method in your class and use it to initialize your class specifically when it is loaded from a nib file.
Drawing Your View’s Content
As you make changes to your view’s content, you notify the system that parts of that view need to be redrawn using the setNeedsDisplay or setNeedsDisplayInRect: methods. When the application returns to its run loop, it coalesces any drawing requests and computes the specific parts of your interface that need to be updated. It then begins traversing your view hierarchy and sending drawRect: messages to the views that require updates. The traversal starts with the root view of your hierarchy and proceeds down through the subviews, processing them from back to front. Views that display custom content inside their visible bounds must implement the drawRect: method to render that content.
Before calling your view’s drawRect: method, UIKit configures the drawing environment for your view. It creates a graphics context and adjusts its coordinate system and clipping region to match the coordinate system and bounds of your view. Thus, by the time your drawRect: method is called, you can simply begin drawing using UIKit classes and functions, Quartz functions, or a combination of them all. If you need to access the current graphics context, you can get a pointer to it using the UIGraphicsGetCurrentContext function.
Important: The current graphics context is valid only for the duration of one call to your view’s drawRect: method. UIKit may create a different graphics context for each subsequent call to this method, so you should not try to cache the object and use it later.
Listing 1-3 shows a simple implementation of a drawRect: method that draws a 10-pixel-wide red border around the view. Because UIKit drawing operations use Quartz for their underlying implementations, you can mix drawing calls as shown here and still get the results you expect.
Listing 1-3 A drawing method
- (void)drawRect:(CGRect)rect { |
CGContextRef context = UIGraphicsGetCurrentContext(); |
CGRect myFrame = self.bounds; |
CGContextSetLineWidth(context, 10); |
[[UIColor redColor] set]; |
UIRectFrame(myFrame); |
} |
If you know that your view’s drawing code always covers the entire surface of the view with opaque content, you can improve the overall efficiency of your drawing code by setting the opaqueproperty of your view to YES. When you mark a view as opaque, UIKit avoids drawing content that is located immediately behind your view. This not only reduces the amount of time spent drawing but also minimizes the work that must be done to composite that content together. You should set this property to YES only if you know your view provides opaque content. If your view cannot guarantee that its contents are always opaque, you should set the property to NO.
Another way to improve drawing performance, especially during scrolling, is to set the clearsContextBeforeDrawing property of your view to NO. When this property is set to YES, UIKIt automatically fills the area to be updated by your drawRect: method with transparent black before calling your method. Setting this property to NO eliminates the overhead for that fill operation but puts the burden on your application to completely redraw the portions of your view inside the update rectangle passed to your drawRect: method. Such an optimization is usually a good tradeoff during scrolling, however.
Responding to Events
The UIView class is a subclass of UIResponder and is therefore capable of receiving touch events corresponding to user interactions with the view’s contents. Touch events start at the view in which the touch occurred and are passed up the responder chain until they are handled. Because views are themselves responders, they participate in the responder chain and therefore can receive touch events dispatched to them from any of their associated subviews.
Views that handle touch events typically implement all of the following methods, which are described in more detail in Event Handling Guide for iOS.
Remember that, by default, views respond to only one touch at a time. If the user puts a second finger down, the system ignores the touch event and does not report it to your view. If you plan to track multifinger gestures from your view’s event-handler methods, you need to reenable multi-touch events by setting the multipleTouchEnabledproperty of your view to YES.
Some views, such as labels and images, disable event handling altogether initially. You can control whether a view handles events at all by changing the value of the view’s userInteractionEnabled property. You might temporarily set this property to NO to prevent the user from manipulating the contents of your view while a long operation is pending. To prevent events from reaching any of your views, you can also use the beginIgnoringInteractionEvents and endIgnoringInteractionEvents methods of the UIApplication object. These methods affect the delivery of events for the entire application, not just for a single view.
As it handles touch events, UIKit uses the hitTest:withEvent: and pointInside:withEvent: methods of UIView to determine whether a touch event occurred in a given view. Although you rarely need to override these methods, you could do so to implement custom touch behaviors for your view. For example, you could override these methods to prevent subviews from handling touch events.
Cleaning Up After Your View
If your view class allocates any memory, stores references to any custom objects, or holds resources that must be released when the view is released, you must implement a dealloc method. The system calls the dealloc method when your view’s retain count reaches zero and your view is about to be deallocated itself. Your implementation of this method should release the objects and resources it holds and then call the inherited implementation, as shown in Listing 1-4.
Listing 1-4 Implementing the dealloc method
- (void)dealloc { |
// Release a retained UIColor object |
[color release]; |
// Call the inherited implementation |
[super dealloc]; |
} |
Last updated: 2010-07-07