Navigating a Data Hierarchy With Table Views
A common use of table views—and one to which they’re ideally suited—is to navigate hierarchies of data. A table view at a top level of the hierarchy lists categories of data at the most general level. Users select a row to “drill down” to the next level in the hierarchy. At the bottom of the hierarchy is a view (often a table view) that presents details about a specific item (for example, an address-book record) and may allow users to edit the item. This section explains how you can map the levels of the data-model hierarchy to a succession of table views and describes how you can use the facilities of the UIKit framework to help you implement such navigation-based applications.
Hierarchical Data Models and Table Views
For a navigation-based application, you typically design your application data as a graph of model objects that is sometimes referred to as the application’s data model. You can then implement the model layer of your application using various mechanisms or technologies, including Core Data, property lists, or archives of custom objects. Regardless of the approach, the traversal of your application’s data model follows patterns that are common to all navigation-based applications. The data model has hierarchical depth, and objects at various levels of this hierarchy should be the source for populating the rows of a table view.
Note: Core Data was introduced as a supported technology in iOS 3.0. To learn about the Core Data technology and framework, see Core Data Overview.
The Data Model as a Hierarchy of Model Objects
A well-designed application factors its classes and objects in a way that conforms to the Model-View-Controller (MVC) design pattern. The application’s data model consists of the model objects in this pattern. You can describe model objects (using the terminology provided by the object modeling pattern) in terms of their properties. These properties are of two general kinds: attributes and relationships.
Note: The notion of “property” here is abstractly related to, but not identical with, the declared property feature of Objective-C. A class definition typically represents properties programmatically through instance variables and declared properties. For more on declared properties, see The Objective-C Programming Language. To find out more about MVC and object modeling, read ““Cocoa Design Patterns”” in Cocoa Fundamentals Guide.
Attributes represent elements of model-object data. Attributes can range from an instance of a primitive class (for example, an NSString, NSDate, or UIColor object) to a C structure or a simple scalar value. Attributes are generally what you use to populate a table view that represents a “leaf node” of the data hierarchy and presents a detail view of that item.
A model object may also have relationships with other model objects, and it is through these relationships that a data model acquires hierarchical depth by composing an object graph. Relationships are of two general kinds in terms of cardinality: to-one and to-many. To-one relationships define an object’s relationship with another object (for example, a parent relationship). A to-many relationship on the other hand defines an object’s relationship with multiple objects of the same kind. The to-many relationship is characterized by containment and can be programmatically represented by collections such as NSArray objects (or, simply, arrays). An array might contain other arrays, or it could contain multiple dictionaries, which are collections that identify their contained values through keys. Dictionaries, in turn, can contain one or more other collections, including arrays, sets, and even other dictionaries. By collections thus nesting other collections, your data model can acquire hierarchical depth.
Table Views and the Data Model
The rows of a table view in the regular (or plain) style are typically backed by collection objects of the application’s data model, and these objects are usually arrays. The array contains strings or other elements that the table view can use when displaying row content. When you create a table view (described in “Creating and Configuring a Table View”), the table view immediately queries its data source for its dimensions—that is, the number of sections and the number of rows per section—and then asks for the content of each row. This content is fetched from an array in the appropriate level of the data-model hierarchy.
In many of the methods defined for a table view’s data source and delegate, the table view passes in an index path to identify the section and row that is the focus of the current operation—for example, fetching content for a row or indicating the row the user tapped. An index path is an instance of the Foundation framework’s NSIndexPath class that you can use to identify an item in a tree of nested arrays. The UIKit framework extends NSIndexPath to add a section and a row property to the class. The data source should use these properties to map a section and row of the table view to a value at the corresponding index of the array used as the source of data for the table view.
Note: The UIKit framework extension of the NSIndexPath class is described in NSIndexPath UIKit Additions.
Consider the sequence of table views in Figure 3-1. The top level of the data hierarchy in this example is an array of four arrays, with each inner array containing objects representing the trails for a particular region. When the user selects one of these regions, the next table view lists names identifying the trails within the selected array. When the user selects a particular trail, the next table view displays detail about that trail in a table view in the grouped style.

For the purpose of illustration, the above diagram shows a sequence of three table views navigating three levels of a data hierarchy. You could easily redesign this application so that there are only two table views. The first table view could be a list (plain style) in which each region is a section of the table view whose rows name the trails for that region. The data model could reflect this arrangement as an array nesting multiple arrays. When the table view asks its data source for the content for a particular row, it passes an NSIndexPath object that the data source can use to locate, first, the inner array (section property) and then the object within that array (row property).
View Controllers and Navigation-Based Applications
The UIKit framework provides a number of view-controller classes for managing common user-interface patterns in iOS. View controllers are controller objects that inherit from the UIViewController class. They are an essential tool for view management, especially when an application uses those views to present successive levels of its data hierarchy. For managing table views, the UIKit provides the UITableViewController class, a subclass of UIViewController that is described in “Table-View Controllers.” This section explains what view controllers are and describes how they present and manage a succession of views, including table views.
Overview of View Controllers and Navigation Controllers
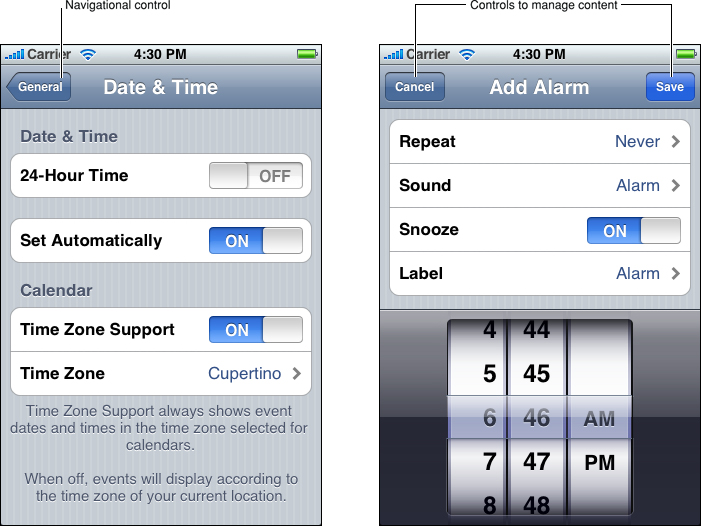
Navigation bars are a user-interface device that enables users to navigate a hierarchy of data. Users start with general, top-level items and “drill down” the hierarchy to detail views showing specific properties of leaf-node items. The view below the navigation bar presents the current level of data. A navigation bar includes a title for the current view and, if that view is lower in the hierarchy than the top level, a back button on the left side of the bar; the back button is a navigation control that the user taps to return to the previous level. (The back button by default displays the title for the previous view.) A navigation bar may also have an Edit button—used to enter editing mode for the current view—or custom buttons for functions that manage content (see Figure 3-2).
Note: This section gives an overview of view controllers and navigation controllers to provide some background for the coding tasks discussed throughout this document. To learn about view controllers and navigation controllers in depth, see View Controller Programming Guide for iOS.
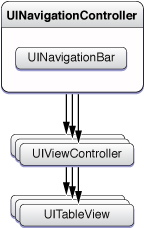
Navigation bars are UINavigationBar objects. Their per-managed-view components, such as the bar title, back button, and any Edit buttons or custom button, are instances of the UINavigationItem class. If those components are buttons, they take UIBarButtonItem objects as their values. If you use a navigation controller—an instance of UINavigationController—to manage the navigation items and the presented view, you never have to deal directly with either UINavigationBar or UINavigationItem except, in the latter case, to set a navigation item’s value.
The UINavigationController class inherits from UIViewController, a base class that defines the common programmatic interface and behavior for controller objects that manage views in iOS. Through inheritance from this base class, a view controller acquires an interface for general view management. Once it implements parts of this interface, a view controller can autorotate its view, respond to low-memory notifications, overlay “modal” views, respond to taps on the Edit button, and otherwise manage the view.
A UINavigationController manages the navigation bar, including the items that are displayed in the bar for the view below it. A UIViewController object manages a view displayed below the navigation bar. For this view controller, you create a subclass of UIViewController or a subclass of a view-controller class that the UIKit framework provides for managing a particular type of view. For table views, this view-controller class is UITableViewController. For a navigation controller that displays a sequence of table views reflecting levels within a data hierarchy, you need to create a separate custom table-view controller for each table view.
A navigation controller manages a navigation bar that traverses a sequence of table views by maintaing a stack of view controllers, one for each of the table views displayed (see Figure 3-3). It begins with what’s known as the root view controller. When the user taps a row of the table view (often on a disclosure indicator or a detail disclosure button), the root view controller pushes the next view controller onto the stack; the new view controller’s table view visually slides into place from the right and the navigation bar items are updated appropriately. When users tap the back button in the navigation bar, the current view controller is popped off the stack. As a consequence, the navigation controller displays the table view managed by the view controller now at the top of the stack.
The UIViewController includes methods that allow view controllers to access and set the navigation items (which are UINavigationItem objects) displayed in the navigation bar for the currently displayed table view. It also declares a title property through which you can set the title of the navigation bar for the current table view.
Not all applications need to use the navigation controller and view controller architectures. If your application is displaying a single table view and not a sequence of them, you don’t need to use navigation controllers unless you want to have an Edit button or other specialized buttons appear in the navigation bar. Also, if an application shows only one table view, it doesn’t even need a custom view controller to manage it. For example, an application that uses a table view to present a list of selectable options can have an object other than a view controller assume the roles of data source and delegate for the table view.
Table-View Controllers
Although you could manage a table view within the navigation-controller architecture using a direct subclass of UIViewController, you save yourself a lot of work if instead you subclass UITableViewController. The UITableViewController class takes care of many of the details you would have to implement if you were to create a direct subclass of UIViewController to manage a table view.
You create a table-view controller by allocating memory for it and “Initialization” it with the initWithStyle: method, passing in either UITableViewStylePlain or UITableViewStyleGrouped for the required type of table view. Once you create a table-view controller, it either creates its table view or loads it from a nib file. In either case, the behavior is slightly different:
If a nib file is specified, the
UITableViewControllerobject loads theUITableViewobject archived in the nib file. (The nib file is usually specified as attribute of theUITableViewController, which must be the File’s Owner of the nib file.) The table view’s attributes, size, and autoresizing characteristics are usually set in the nib file. The data source and delegate of the table view become those objects defined in the nib file, if any.If there is no nib file, the
UITableViewControllerobject allocates and initializes an unconfiguredUITableViewobject with the correct dimensions and autoresize mask. It sets itself as the data source and the delegate of the table view; it also does this if the nib file defines no data source or delegate.
When the table view is about to appear for the first time, the table-view controller sends reloadData to the table view, which prompts it to request data from its data source. The data source tells the table view how many sections and rows-per-section it wants, then gives the table view the data to display in each row. This process is described in “Creating and Configuring a Table View.”
The UITableViewController class also performs other common tasks. It clears selections when the table view is about to be displayed and flashes the scroll indicators when the table finishes displaying. In addition, it responds properly when users tap the Edit button by putting the table view into editing mode (or taking it out of editing mode if users tap Done). The class exposes one property, tableView, which gives you access to the managed table view.
Note: UITableViewController has new capabilities in iOS 3.0. A table-view controller supports inline editing of table-view rows; if, for example, rows have embedded text fields in editing mode, it scrolls the row being edited above the virtual keyboard that is displayed. In addition, it now supports the NSFetchedResultsController class for managing the results returned from a Core Data fetch request.
The UITableViewController class implements the foregoing behavior by overriding loadView, viewWillAppear:, and other methods inherited from UIViewController. In your subclass of UITableViewController, you may also override these methods to acquire specialized behavior. If you do override these methods, be sure to invoke the superclass implementation of the method, usually as the first method call, to get the default behavior.
Note: You should use a UIViewController subclass rather than a subclass of UITableViewController to manage a table view if the view to be managed is composed of multiple subviews, one of which is a table view. The default behavior of the UITableViewController class is to make the table view fill the screen between the navigation bar and the tab bar (if either are present).
If you decide to use a UIViewController subclass rather than a subclass of UITableViewController to manage a table view, you should perform a couple of the tasks mentioned above to conform to the human-interface guidelines. To clear any selection in the table view before it’s displayed, implement the viewWillAppear: method to clear the selected row (if any) by calling deselectRowAtIndexPath:animated:. After the table view has been displayed, you should flash the scroll view’s scroll indicators by sending a flashScrollIndicators message to the table view; you can do this in an override of the viewDidAppear: method of UIViewController.
Managing Table Views In a Navigation-Based Application
A UITableViewController object—or any other object that assumes the roles ofdata source and delegate for a table view—must respond to messages sent by the table view in order to populate its rows, configure it, respond to selections, and manage editing sessions. The subsequent chapters in this document describe how to do these things. However, there are certain other things you need to do to ensure the proper display of a sequence of table views in a navigation-based application.
Note: This section summarizes view-controller and navigation-controller tasks with a focus on table views. For a thorough discussion of view controllers and navigation controllers, including the complete details of their implementation, see View Controller Programming Guide for iOS.
The sequence typically starts with the application delegate in its implementation of the applicationDidFinishLaunching: (or application:didFinishLaunchingWithOptions:) method. The delegate creates an instance of the UITableViewController subclass that is to be the root view controller. Then it allocates an instance of UINavigationController and initializes it with the just-created table-view controller with the initWithRootViewController: method. This initializer has the side effect of making the root view controller the first object on the stack of view controllers managed by the navigation controller After creating the navigation controller, the delegate adds the navigation controller’s view to the window and makes the window visible. Listing 3-1 illustrates this series of calls.
Listing 3-1 Setting up the root view controller—window in nib file
- (void)applicationDidFinishLaunching:(UIApplication *)application { |
RootViewController *rootViewController = [[RootViewController alloc] initWithStyle:UITableViewStylePlain]; |
NSArray *timeZones = [NSTimeZone knownTimeZoneNames]; |
rootViewController.timeZoneNames = [timeZones sortedArrayUsingSelector:@selector(localizedCaseInsensitiveCompare:)]; |
UINavigationController *aNavigationController = [[UINavigationController alloc] initWithRootViewController:rootViewController]; |
self.navigationController = aNavigationController; |
[aNavigationController release]; |
[rootViewController release]; |
[window addSubview:[navigationController view]]; |
[window makeKeyAndVisible]; |
} |
The window in this example is unarchived from a nib file and assigned to an outlet of the application delegate. If you were to create the window programmatically, the code would look similar to Listing 3-2. (In this case, window is a property of the application delegate.)
Listing 3-2 Setting up the root view controller—window created programmatically
- (void)applicationDidFinishLaunching:(UIApplication *)application { |
// Create the window |
window = [[UIWindow alloc] initWithFrame:[[UIScreen mainScreen] bounds]]; |
// Create the navigation and view controllers |
RootViewController *rootViewController = [[RootViewController alloc] initWithStyle:UITableViewStylePlain]; |
navigationController = [[UINavigationController alloc] initWithRootViewController:rootViewController]; |
[rootViewController release]; |
// Configure and show the window |
[window addSubview:[navigationController view]]; |
[window makeKeyAndVisible]; |
} |
When you initialize a table-view controller with initWithStyle:, that “Initialization” is invoked as well as the initializers inherited from superclasses:
initWithNibName:bundle:—inherited fromUIViewControllerIf your table view is defined in a nib file, instead of setting the Nib Name attribute of the table-view controller (as File’s Owner) in Interface Builder, you can override this method to call
super, supplying the superclass with the name of the nib file.init—inherited fromNSObject
You can override any of these initializers to perform set-up tasks common to view controllers—for example, setting the title of the navigation bar, as shown in Listing 3-3.
Listing 3-3 Setting the title of the navigation bar in init
- init { |
if (self = [super init]) { |
self.title = NSLocalizedString(@"List", @"List title"); |
} |
return self; |
} |
You can perform the same set-up tasks in the loadView and viewDidLoad methods, which are invoked right after initialization. You can also in these methods set various UINavigationItem properties through the inherited navigationItem property. These properties generally are button items. Listing 3-4 shows how one table-view controller class places an Edit|Done and an add (“+”) button on its navigation bar.
Listing 3-4 Setting the buttons of a navigation bar in loadView
- (void)loadView { |
[super viewDidLoad]; |
self.tableView.allowsSelectionDuringEditing = YES; |
self.navigationItem.leftBarButtonItem = self.editButtonItem; |
UIBarButtonItem *addButtonItem = [[UIBarButtonItem alloc] |
initWithBarButtonSystemItem:UIBarButtonSystemItemAdd target:self action:@selector(addItem:)]; |
self.navigationItem.rightBarButtonItem = addButtonItem; |
[addButtonItem release]; |
} |
At this point, let’s assume the table view managed by our root table-view controller is presented to users. It is a list (or regular-style) table view. How does the application display the next table view in the sequence?
When a user taps a row of the table view, the table view calls the tableView:didSelectRowAtIndexPath: or tableView:accessoryButtonTappedForRowWithIndexPath: method implemented by the its delegate. (That latter method is invoked if the user taps a row’s detail-disclosure indicator.) The delegate in the example shown in Listing 3-5 creates the table-view controller managing the next table view in the sequence, sets the data it needs to populate its table view, and pushes this new view controller onto the navigation controller’s stack of view controllers.
Listing 3-5 Creating and pushing the next table-view controller on the stack
- (void)tableView:(UITableView *)tableView accessoryButtonTappedForRowWithIndexPath:(NSIndexPath *)indexPath { |
BATDetailViewController *trailDetailController = [[BATDetailViewController alloc] initWithStyle:UITableViewStyleGrouped]; |
trailDetailController.curTrail = [trails objectAtIndex:indexPath.row]; |
[[self navigationController] pushViewController:trailDetailController animated:YES]; |
[trailDetailController release]; |
} |
This last code example is provided to give you a general idea of how a navigation-based application displays a sequence of table views. For complete details about handling selections in table views, see “Managing Selections.”
Design Pattern for Navigation-Based Applications
A good design for a navigation-based application with table views should be consistent with the following pattern:
A view controller object (typically a
UITableViewControllerobject), acting in the role of data source, populates its table view with data from an object representing a level of the data hierarchy.The object is typically an array when the table view displays a list of items; when the table view displays item detail (that is, a leaf node of the data hierarchy), the object can be a custom model object, a Core Data managed object, a dictionary, or something similar.
The view controller stores the data it needs for populating its table view.
The view controller can use this data directly for populating the table view, or it can use it to fetch or otherwise obtain the necessary data. When you design your view-controller subclass, you should define an instance variable (whose access is mediated via a declared property or accessor methods) to hold this data.
View controllers should not obtain the data for their table view through a global variable or a singleton object such as the application delegate. Such direct dependencies make your code less reusable and more difficult to test and debug.
The current view controller on top of the navigation-controller stack creates the next view controller in the sequence and, before it pushes it onto the stack, sets the data this view controller, acting as data source, needs to populate its table view.
Last updated: 2010-08-03