Annotating Maps
The MKMapView class implements an opaque view hierarchy for displaying a scrollable map. Although the map itself is scrollable, any subviews you add to a map view remain fixed in place and do not scroll. If you want to affix content to the map itself, and thus have that content scroll along with the rest of the map, you must use annotations and overlays.
Annotations are used to display content that can be defined by a single coordinate point. By contrast, overlays are used to display content that is defined by any number of points and may constitute one or more contiguous or noncontiguous shapes. For example, you use annotations to represent information such as the user’s current location, a specific address, or a single point of interest. You use overlays to present more complex information such as traffic information, the boundaries of parks, lakes, cities, states, countries, or other bounded areas.
Map Kit separates the data associated with an annotation or overlay from its visual presentation on the map. This separation allows the map to manage visible annotations and overlays much more efficiently and means that you can add hundreds of annotations and overlays to a map and still expect reasonable performance.
Adding Annotations to a Map
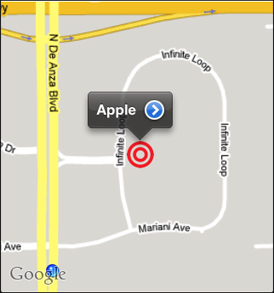
Annotations offer a way to highlight specific coordinates on the map and provide additional information about them. You can use annotations to call out specific addresses, points of interest, and other types of destinations. When displayed on a map, annotations typically have some sort of image to identify their location and may also have a callout bubble providing information and links to more content. Figure 5-1 shows an annotation that uses a custom image to highlight a particular location.
In order to display an annotation on a map, your application must provide two distinct objects:
An object that conforms to the
MKAnnotationprotocol and manages the data for the annotation. (This object is the annotation object.)A view (derived from the
MKAnnotationViewclass) used to draw the visual representation of the annotation on the map surface. (This is the annotation view.)
Annotation objects are typically small data objects that store the map coordinate data and any other relevant information about the annotation, such as a title string. Because annotations are defined using a protocol, you can turn any class in your application into an annotation object. In practice, it is good to keep annotation objects lightweight, especially if you intend to add large numbers of them to the map. The map view keeps a reference to the annotation objects you add to it and uses the data in those objects to determine when to display the corresponding view.
Map Kit provides some standard annotation views and you can also define custom annotation views if you want. However, you do not add annotation views directly to the map surface. Instead, you provide an annotation view when asked for it and let the map view incorporate that view into its opaque view hierarchy. You provide the annotation view using your map view delegate object.
The annotations you create are typically anchored to a single map coordinate that does not change. However, you can change the coordinate for an annotation programmatically as needed and can implement support to allow the user to drag annotations around the map. In iOS 4.0 and later, support for dragging annotations is even incorporated into the Map Kit classes; implementing this support in prior versions of the operating system requires some additional custom code on your part.
Checklist for Adding an Annotation to the Map
The steps for implementing and using annotations in your map-based application are shown below. These steps assume that your application incorporates an MKMapView object somewhere in its interface.
Define an appropriate annotation object using one of the following options:
Use the
MKPointAnnotationclass to implement a simple annotation. This type of annotation contains properties for specifying the title and subtitle strings to display in the annotation’s onscreen callout bubble.Define a custom object that conforms to the
MKAnnotationprotocol, as described in “Defining a Custom Annotation Object.” This type of annotation can store any type of data you want.
Define an annotation view to present the data on screen. How you define your annotation view depends on your needs and may be one of the following:
If the annotation can be represented by a static image, create an instance of the
MKAnnotationViewclass and assign the image to itsimageproperty; see “Using the Standard Annotation Views.”If you want to use a standard pin annotation, create an instance of the
MKPinAnnotationViewclass; see “Using the Standard Annotation Views.”If a static image is insufficient for representing your annotation, subclass
MKAnnotationViewand implement the custom drawing code needed to present it. For information about how to implement custom annotation views, see “Defining a Custom Annotation View.”
Implement the
mapView:viewForAnnotation:method in your map view delegate.Your implementation of this method should dequeue an existing annotation view if one exists or create a new one. If your application supports multiple types of annotations, you must include logic in this method to create a view of the appropriate type for the provided annotation object. For more information about implementing this method, see “Creating Annotation Views from Your Delegate Object.”
Add your annotation object to the map view using the
addAnnotation:oraddAnnotations:method.
When you add an annotation to a map view, the map view displays the corresponding annotation view whenever the coordinate for the annotation is in the visible map rectangle. If you want to hide annotations selectively, you must manually remove them from the map view yourself. You can add and remove annotations at any time.
All annotations are drawn at the same scale every time, regardless of the map’s current zoom level. If your map contains many annotations, this could result in your annotation views overlapping each other as the user zooms out. To counter this behavior, you can add and remove annotations based on the map’s current zoom level. For example, a weather application might display information only for major cities when the map is zoomed out to show the entire state. As the user zooms in, the application could then add new annotations containing weather information for smaller cities and regions. Implementing the logic necessary to add and remove annotations is your responsibility.
For more information about how to manage the annotations of a map view effectively, see “Managing the Map’s Annotation Objects.”
Defining a Custom Annotation Object
The most important part of an annotation is the annotation object, which is an object that conforms to the MKAnnotation protocol. If all you want to do is associate a title with a map coordinate, you can use the MKPointAnnotation class for your annotation object. However, if you need to represent additional information with the annotation, you need to define a custom annotation object.
A custom annotation object consists of a map coordinate and whatever other data you want to associate with the annotation. Listing 5-1 shows the minimal code needed to declare a custom annotation class. The coordinate property declaration is from the MKAnnotation protocol and must be included in all annotation classes. Because this is a simple annotation, it also includes an initializer method, which is used to set the value of the coordinate property, since it is read-only. Your own declaration would likely also include methods and properties defining the additional annotation data.
Listing 5-1 Creating a simple annotation object
@@interface MyCustomAnnotation : NSObject <MKAnnotation> { |
CLLocationCoordinate2D coordinate; |
} |
@property (nonatomic, readonly) CLLocationCoordinate2D coordinate; |
- (id)initWithLocation:(CLLocationCoordinate2D)coord; |
// Other methods and properties. |
@end |
The implementation for your custom class must provide an implementation for the coordinate property and a way to set its value. Because coordinate is a declared property, you can synthesize the code needed to implement it easily enough using the @synthesize keyword. All that remains is to implement the code for the custom initWithLocation: method, which is shown in Listing 5-2.
Listing 5-2 Implementing the MyCustomAnnotation class
@implementation MyCustomAnnotation |
@synthesize coordinate; |
- (id)initWithLocation:(CLLocationCoordinate2D)coord { |
self = [super init]; |
if (self) { |
coordinate = coord; |
} |
return self; |
} |
@end |
Important: When you implement the coordinate property in your class, it is recommended that you synthesize its creation. If you choose to implement the methods for this property yourself, or if you manually modify the variable underlying that property in other parts of your class after the annotation has been added to the map, be sure to send out key-value observing (KVO) notifications when you do. Map Kit uses KVO notifications to detect changes to the coordinate, title, and subtitle properties of your annotations and make any needed changes to the map display. If you do not send out KVO notifications, the position of your annotations may not be updated properly on the map.
For more information about how to implement KVO-compliant accessor methods, see Key-Value Observing Programming Guide.
For an example of an annotation object that is based on a Core Data object, see the sample code project WeatherMap.
Using the Standard Annotation Views
Using one of the standard annotation views is the easiest way to present annotations on your map. The MKAnnotationView class is a concrete view that defines the basic behavior for all annotation views. The MKPinAnnotationView class is a subclass of MKAnnotationView that displays one of the standard system pin images at the associated annotation’s coordinate point.
The MKAnnotationView class is perfect for situations where you have a static image that you want to display for an annotation. After creating an instance of this class, assign your custom image to the image property of the object. When the annotation is displayed, the image is displayed centered over the target map coordinate. If you do not want the image to be centered on the map coordinate, you can use the centerOffset property to move the center point horizontally and vertically in any direction. Listing 5-3 shows an example of how to create an annotation view with a custom image and offset.
Listing 5-3 Creating a standard annotation view
MKAnnotationView* aView = [[[MKAnnotationView alloc] initWithAnnotation:annotation |
reuseIdentifier:@"MyCustomAnnotation"] autorelease]; |
aView.image = [UIImage imageNamed:@"myimage.png"]; |
aView.centerOffset = CGPointMake(10, -20); |
You create the standard annotation views in your delegate’s mapView:viewForAnnotation: method. For more information about how to implement this method, see “Creating Annotation Views from Your Delegate Object.”
Defining a Custom Annotation View
If a static image is insufficient for representing your annotation, you can subclass MKAnnotationView and draw content dynamically in one of two ways. You can continue to use the image property of MKAnnotationView but change the image at regular intervals, or you can also override the view’s drawRect: method and draw your content dynamically every time. As with any custom drawing you do in a view, you should always consider performance before choosing an approach. Custom drawing gives you the most flexibility but if most of your content is fixed, using images may still be faster.
If you choose to define a custom annotation view, you subclass like any other view. The only difference is that instead of subclassing UIView, you subclass MKAnnotationView as shown in Listing 5-4.
Listing 5-4 Declaring a custom annotation view
#import <UIKit/UIKit.h> |
#import <MapKit/MapKit.h> |
@interface MyCustomAnnotationView : MKAnnotationView |
{ |
// Custom data members |
} |
// Custom properties and methods. |
@end |
When drawing content using the drawRect: method, you must always remember to specify a nonzero frame size for your annotation view shortly after initialization. The default initialization method for annotation views does not take a frame rectangle as a parameter. Instead, it uses the image you specify in the image property to set that frame size later. If you do not set an image, though, you must set the frame property of the view explicitly in order for your rendered content to be visible, as shown in Listing 5-5. Because the view draws in only part of its frame, it also sets its opaque property to NO so that the remaining map content shows through. If you do not do this, the drawing system fills your view with the current background color before calling your drawRect: method.
Listing 5-5 Initializing a custom annotation view
- (id)initWithAnnotation:(id <MKAnnotation>)annotation reuseIdentifier:(NSString *)reuseIdentifier |
{ |
self = [super initWithAnnotation:annotation reuseIdentifier:reuseIdentifier]; |
if (self) |
{ |
// Set the frame size to the appropriate values. |
CGRect myFrame = self.frame; |
myFrame.size.width = 40; |
myFrame.size.height = 40; |
self.frame = myFrame; |
// The opaque property is YES by default. Setting it to |
// NO allows map content to show through any unrendered |
// parts of your view. |
self.opaque = NO; |
} |
return self; |
} |
In all other respects, drawing custom content in an annotation view is the same as it is in any view. The system calls your view’s drawRect: method as needed to redraw portions of the view that need it and you can force a redraw operation by calling the setNeedsDisplay or setNeedsDisplayInRect: method of your view at any time. If you want to animate the contents of your view, you need to set up a timer to fire at periodic intervals and update your view.
For information on how to set up timers, see Timer Programming Topics. For information about how views draw content in iOS, see View Programming Guide for iOS.
Creating Annotation Views from Your Delegate Object
When is needs an annotation view, the map view calls the mapView:viewForAnnotation: method of its delegate object. If you do not implement this method, or if you implement it and always return nil, the map view uses a default annotation view, which is typically a pin annotation view. If you want to return annotation views other than the default ones, you need to override the method and create your views there.
Before trying to create a new view in your mapView:viewForAnnotation: method, you should always check to see if a similar annotation view already exists. Like table views, the map view has the option of caching unused annotation views that it is not using. When it does this, it makes the unused views available from the dequeueReusableAnnotationViewWithIdentifier: method. If this method returns a value other than nil, you should update the view’s attributes and return it. If the method returns nil, just create a new instance of the appropriate annotation view class. In both cases, it is your responsibility to take the annotation passed to this method and assign it to your annotation view. You should also use this method to update the view before returning it.
Listing 5-6 shows a sample implementation of the mapView:viewForAnnotation: method. This method provides pin annotation views for custom annotation objects. If an existing pin annotation view already exists, this method associates the annotation object with that view. If no view is in the reuse queue, this method creates a new one, setting up the basic properties of the view and configuring an accessory view for the annotation’s callout. If the map is currently showing the user’s location, this method returns nil for any MKUserLocation objects so that the map uses the default annotation view.
Listing 5-6 Creating annotation views
- (MKAnnotationView *)mapView:(MKMapView *)mapView |
viewForAnnotation:(id <MKAnnotation>)annotation |
{ |
// If it's the user location, just return nil. |
if ([annotation isKindOfClass:[MKUserLocation class]]) |
return nil; |
// Handle any custom annotations. |
if ([annotation isKindOfClass:[MyCustomAnnotation class]]) |
{ |
// Try to dequeue an existing pin view first. |
MKPinAnnotationView* pinView = (MKPinAnnotationView*)[mapView |
dequeueReusableAnnotationViewWithIdentifier:@"CustomPinAnnotationView"]; |
if (!pinView) |
{ |
// If an existing pin view was not available, create one. |
pinView = [[[MKPinAnnotationView alloc] initWithAnnotation:annotation |
reuseIdentifier:@"CustomPinAnnotation"] |
autorelease]; |
pinView.pinColor = MKPinAnnotationColorRed; |
pinView.animatesDrop = YES; |
pinView.canShowCallout = YES; |
// Add a detail disclosure button to the callout. |
UIButton* rightButton = [UIButton buttonWithType: |
UIButtonTypeDetailDisclosure]; |
[rightButton addTarget:self action:@selector(myShowDetailsMethod:) |
forControlEvents:UIControlEventTouchUpInside]; |
pinView.rightCalloutAccessoryView = rightButton; |
} |
else |
pinView.annotation = annotation; |
return pinView; |
} |
return nil; |
} |
Managing the Map’s Annotation Objects
If your application works with more than a few annotations, you might need to think about how you manage those objects. The map view does not make any distinction between active and inactive annotations; it considers all annotation objects it knows about to be active. As a result, it always tries to display a corresponding annotation view when the given coordinate point is on the screen. If the coordinates for two annotations are close together, this could lead to overlap between the corresponding annotation views. And if your map includes hundreds of annotations, zooming out far enough could lead to a visually unappealing mass of annotation views. Even worse, the views may be so close together that the user cannot access some of them.
The only way to eliminate annotation overcrowding is to remove some of the annotation objects from the map view. This typically involves implementing the mapView:regionWillChangeAnimated: and mapView:regionDidChangeAnimated: methods to detect changes in the map zoom level. During a zoom change, you can add or remove annotations as needed based on their proximity to one another. You might also consider other criteria (such as the user’s current location) to eliminate some annotations.
In iOS 4.0 and later, Map Kit includes numerous functions to make determining the proximity of map points easier. If you convert the map coordinate of your annotation to the map point coordinate space, you can use the MKMetersBetweenMapPoints method to get absolute distances between two points. You can also use each coordinate as the center of a map rectangle and use the MKMapRectIntersectsRect function to find any intersections. For a complete list of functions, see Map Kit Functions Reference.
Marking Your Annotation View as Draggable
In iOS 4.0 and later, annotation views provide built-in dragging support. This support makes it very easy to drag annotations around the map and to ensure that the annotation data is updated accordingly. To implement minimal support for dragging, you must do the following:
In your annotation objects, implement the
setCoordinate:method to allow the map view to update the annotation’s coordinate point.When creating your annotation view, set its
draggableproperty toYES.
When the user touches and holds a draggable annotation view, the map view begins a drag operation for it. As the drag operation progresses, the map view calls the mapView:annotationView:didChangeDragState:fromOldState: method of its delegate to notify it of changes to the drag state of your view. You can use this method to affect or respond to the drag operation.
If you want to animate your view during a drag operation, you can do that by implementing a custom dragState method in your annotation view. As the map view processes drag-related touch events, it updates the dragState property of the affected annotation view. Implementing a custom dragState method gives you a chance to intercept these changes and perform additional actions, such as animate the appearance of your view. For example, the MKPinAnnotationView class raises the pin off the map when a drag operation starts and drops the pin back down on the map when it ends.
If you need to support draggable annotations in earlier versions of iOS, you must implement the support for it yourself. For information and sample code showing how to do it, see “Legacy Map Techniques.”
Displaying Overlays on a Map
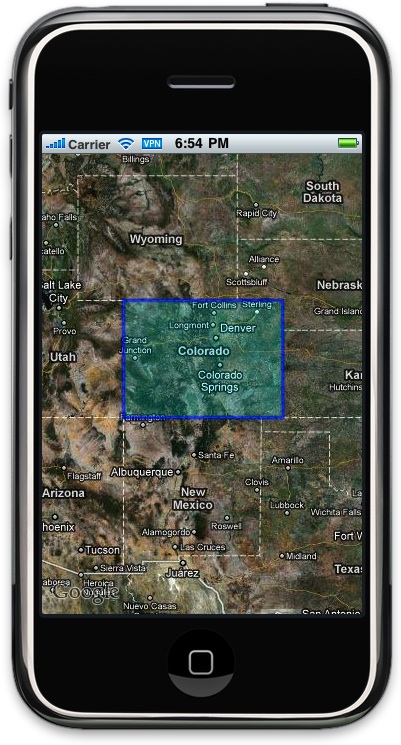
Overlays offer a way to layer content over an arbitrary region of the map. Whereas annotations are always defined by a single map coordinate, overlays are typically defined by multiple coordinates. You can use these coordinates to create contiguous or noncontiguous sets of lines, rectangles, circles, and other shapes, which can then be filled or stroked with color. For example, you might use overlays to layer traffic information on top of roadways, highlight the boundaries of a park, or show city, state, and national borders. Figure 5-2 shows a filled and stroked overlay covering the state of Colorado.
In order to display an overlay on a map, your application must provide two distinct objects:
An object that conforms to the
MKOverlayprotocol and manages the data points for the overlay. (This object is the overlay object.)A view (derived from the
MKOverlayViewclass) used to draw the visual representation of the overlay on the map surface. (This is the overlay view.)
Overlay objects are typically small data objects that store the points that define the overlay and any other relevant information, such as a title string. Because overlays are defined using a protocol, you can turn any class in your application into an overlay object. In addition, Map Kit defines several concrete overlay objects for specifying different types of standard shapes. The map view keeps a reference to the overlay objects you add to it and uses the data in those objects to determine when to display a corresponding view.
Map Kit provides standard overlay views that are capable of drawing any shapes represented by the concrete overlay objects. Like annotations, you do not add overlay views directly to the map surface. Instead, you provide an overlay view when asked for it and let the map view incorporate that view into its opaque view hierarchy. You provide the annotation view using your map view delegate object.
Once defined, the position of an overlay on the map typically never changes. Although it is possible to create draggable overlays, doing so is rare and you would need to implement the code to track the dragging operation and update the overlay coordinate points yourself.
Checklist for Adding an Overlay to the Map
Here are the steps for implementing and using overlays in your map-based application. These steps assume that your application incorporates an MKMapView object somewhere in its interface.
Define an appropriate overlay data object using one of the following options:
Use the
MKCircle,MKPolygon, orMKPolylineclass as-is.Subclass
MKShapeorMKMultiPointto create overlays that provide application-specific behaviors or use custom shapes.Use an existing class from your application and make it conform to the
MKOverlayprotocol.
Define an overlay view to present on the screen using one of the following options:
For standard shapes, use the
MKCircleView,MKPolygonView, orMKPolylineViewto represent the annotation. You can customize many of the drawing attributes of the final shape using these classes.For custom shapes descended from
MKShape, define an appropriate subclass ofMKOverlayPathViewto render the shape.For all other custom shapes and overlays, subclass
MKOverlayViewand implement your custom drawing code.
Implement the
mapView:viewForOverlay:method in your map view delegate.Add your overlay data object to the map view using the
addOverlay:method or one of many others.
Unlike annotations, rendered overlays are automatically scaled to match the current zoom level of the map. Scaling the overlay is necessary because overlays generally highlight boundaries, roads, and other content that also scales during zooming. In addition, you can rearrange their Z-ordering of overlays in a map to ensure that specific overlays are always displayed on top of others.
Using the Standard Overlay Objects and Views
If all you want to do is highlight a specified map region, the standard overlay classes are the easiest way to do it. The standard overlay classes include MKCircle, MKPolygon, and MKPolyline. These classes define the basic shape of the overlay and are used in conjunction with the MKCircleView, MKPolygonView, or MKPolylineView classes, which handle the rendering of that shape on the map surface.
Listing 5-7 shows an example of how you would create the rectangular polygon shown in Figure 5-2. This polygon consists of four map coordinates that correspond to the four corners of the state of Colorado. After creating the polygon, all you have to do is add it to the map using the addOverlay: method.
Listing 5-7 Creating a polygon overlay object
// Define an overlay that covers Colorado. |
CLLocationCoordinate2D points[4]; |
points[0] = CLLocationCoordinate2DMake(41.000512, -109.050116); |
points[1] = CLLocationCoordinate2DMake(41.002371, -102.052066); |
points[2] = CLLocationCoordinate2DMake(36.993076, -102.041981); |
points[3] = CLLocationCoordinate2DMake(36.99892, -109.045267); |
MKPolygon* poly = [MKPolygon polygonWithCoordinates:points count:4]; |
poly.title = @"Colorado"; |
[map addOverlay:poly]; |
In order for an overlay can be shown on the map, the mapView:viewForOverlay: method of your map view delegate needs to provide an appropriate overlay view. For the standard overlay shapes, you can do this by creating a view that matches the type of shape you want to display. Listing 5-8 shows an implementation of this method that creates the polygon view used to cover the state of Colorado. In this example, the method sets the colors to use for rendering the shape and the border width.
Listing 5-8 Creating a polygon view for rendering a shape
- (MKOverlayView *)mapView:(MKMapView *)mapView viewForOverlay:(id <MKOverlay>)overlay |
{ |
if ([overlay isKindOfClass:[MKPolygon class]]) |
{ |
MKPolygonView* aView = [[[MKPolygonView alloc] initWithPolygon:(MKPolygon*)overlay] autorelease]; |
aView.fillColor = [[UIColor cyanColor] colorWithAlphaComponent:0.2]; |
aView.strokeColor = [[UIColor blueColor] colorWithAlphaComponent:0.7]; |
aView.lineWidth = 3; |
return aView; |
} |
return nil; |
} |
It is important to remember that the standard overlay views are there to simply fill and stroke the shape represented by the overlay. If you want to display additional information, you need to create a custom overlay view to do the necessary drawing. You should avoid adding subviews to an existing overlay in an attempt to render any extra content. Any subviews you add to an overlay are scaled along with the overlay itself and made to fit the zoom level of the map. Unless your subviews contain content that also scales well, the results would probably not look very good.
Defining a Custom Overlay Object
The job of an overlay object is to manage the coordinate data and any additional information associated with the overlay. Map Kit provides a couple of options for defining custom overlays. You can subclass MKShape or MKMultiPoint to define new types of shape-based overlays or you can adopt the MKOverlay protocol into one of your application’s existing classes. The choice between the two techniques depends mostly on whether you already have a class with the data you want. If you do, you should incorporate the protocol into your existing class; otherwise, subclass MKShape or MKMultiPoint to create a custom shape subclass.
Whether you subclass or adopt the MKOverlay protocol, the work you have to do in any custom overlay object is the same. The main job of an overlay object is to vend two key pieces of information:
A coordinate defining the center point of the overlay
A bounding rectangle that completely encompasses the overlay’s content
Of the two pieces of information, the bounding rectangle is the one that is most important to the overlay itself. The map view uses the bounding rectangle specified by an overlay object as its cue for when to add the corresponding overlay view to the map. (If you add the overlay to the map as an annotation as well, the coordinate value similarly determines when the corresponding annotation view should be added to the map.) The bounding rectangle itself must be specified using map points, not map coordinates. You can convert between the two coordinate systems using the Map Kit functions.
Most of the real work involved with displaying an overlay is incurred by the corresponding overlay view object. The overlay object simply defines where on the map the overlay should be placed, whereas the overlay view defines the final appearance of the overlay, including what information (if any) is displayed for the overlay. The creation of custom overlay views is described further in “Defining a Custom Overlay View.”
Defining a Custom Overlay View
If you want to do more than draw the boundaries or fill the content of your overlay shape, you need to create a custom overlay view. Custom overlays give you the opportunity to draw any content you want. For example, if you are drawing a traffic overlay, you could use a custom overlay view to color-code each roadway based on its conditions. You can also use custom drawing code to animate your overlay’s appearance.
To create a custom overlay view, you must subclass MKOverlayView. (If you simply want to modify the drawing behavior of an existing shape-based overlay, you can subclass MKOverlayPathView instead.) In your custom implementation, you should implement the following methods:
drawMapRect:zoomScale:inContext:to draw your custom contentcanDrawMapRect:zoomScale:if your drawing code depends on content that might not always be available
The canDrawMapRect:zoomScale: method is for situations where your content may not always be ready to draw. For example, a traffic overlay would need to download the needed traffic data from the network before it could draw. If you return NO from this method, the map view refrains from drawing your view until you signal that you are ready. You can do this by marking your view as dirty using either the setNeedsDisplayInMapRect: or setNeedsDisplayInMapRect:zoomScale: method.
When your view is ready to draw, the map view calls the drawMapRect:zoomScale:inContext: method to do the actual drawing. Unlike drawing in a normal view, drawing in an overlay view involves some special considerations, including the following:
Your drawing code should never use the view’s bounds or frame as reference points for drawing. Instead, it should use the map points associated with the overlay object to define shapes. Immediately before drawing, it should then convert those map points to points (
CGPointand so on) using the conversion routines found in theMKOverlayViewclass.Also, you typically do not apply the zoom scale value passed to this method directly to your content. Instead, you provide it only when a Map Kit function or method specifically requires it. As long as you specify content using map points and convert to points, your content should be scaled to the correct size automatically.
If you use UIKit classes and functions to draw, you must explicitly set up and clean up the drawing environment. Before issuing any calls, call the
UIGraphicsPushContextfunction to make the context passed to your method the current context. When you are done drawing, callUIGraphicsPopContextto remove that context.Remember that the map view may tile large overlays and render each tile on a separate thread. Your drawing code should therefore not attempt to modify variables or other data unless it can do so in a thread-safe manner.
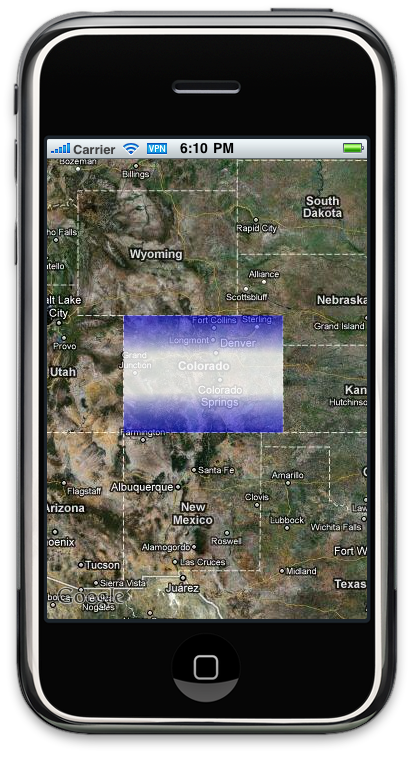
Listing 5-9 shows the drawing code used to fill the bounding rectangle of an overlay using a gradient. When drawing gradients, it is especially important to contain the drawing operation by applying a clipping rectangle to the desired drawing area. The view’s frame is actually larger than the overlay’s bounding rectangle, so without a clipping rectangle, the gradient would render outside the expected area. Because the bounding rectangle of the overlay defines the actual shape in this case, this method simply clips to the bounding rectangle. For more complex overlays, you would want to clip to the path representing your overlay. The results of this drawing code are shown in Figure 5-3.
Listing 5-9 Drawing a gradient in a custom overlay view
- (void)drawMapRect:(MKMapRect)mapRect zoomScale:(MKZoomScale)zoomScale inContext:(CGContextRef)context |
{ |
// Get the overlay bounding rectangle. |
MKMapRect theMapRect = [self.overlay boundingMapRect]; |
CGRect theRect = [self rectForMapRect:theMapRect]; |
// Clip the context to the bounding rectangle. |
CGContextAddRect(context, theRect); |
CGContextClip(context); |
// Set up the gradient color and location information. |
CGColorSpaceRef myColorSpace = CGColorSpaceCreateDeviceRGB(); |
CGFloat locations[4] = {0.0, 0.33, 0.66, 1.0}; |
CGFloat components[16] = {0.0, 0.0, 1.0, 0.5, |
1.0, 1.0, 1.0, 0.8, |
1.0, 1.0, 1.0, 0.8, |
0.0, 0.0, 1.0, 0.5}; |
// Create the gradient. |
CGGradientRef myGradient = CGGradientCreateWithColorComponents(myColorSpace, components, locations, 4); |
CGPoint start, end; |
start = CGPointMake(CGRectGetMidX(theRect), CGRectGetMinY(theRect)); |
end = CGPointMake(CGRectGetMidX(theRect), CGRectGetMaxY(theRect)); |
// Draw. |
CGContextDrawLinearGradient(context, myGradient, start, end, 0); |
// Clean up. |
CGColorSpaceRelease(myColorSpace); |
CGGradientRelease(myGradient); |
} |
Figure 5-3 shows the results of drawing custom content over the overlay for the state of Colorado. In this case, the overlay view fills its content with a custom gradient.
Creating Overlay Views from Your Delegate Object
When it needs an overlay view, the map view calls the mapView:viewForOverlay: method of its delegate object. If you do not implement this method, or if you implement it and always return nil, the map view does not display anything for the specified overlay. Therefore, you must implement this method and return a valid overlay view for any overlays you want displayed on the map.
For the most part, every overlay is different. Although you should always create your overlay views in your mapView:viewForOverlay: method, you may need to be a little more creative in how you configure those views. If all of your views share the same drawing attributes, you can implement this method in a way similar to the one shown in Listing 5-8. However, if each overlay uses different colors or drawing attributes, you should find a way to initialize that information using the annotation object, rather than having a large decision tree in this method.
Because overlays are typically different from one another, the map view does not recycle those views when they are removed from the map. Instead of dequeueing an existing overlay view, you must create a new overlay view every time.
Managing the Map’s Overlay Objects
If your application works with more than one overlay, you might need to think about how to manage those objects. Like annotations, the overlays associated with a map are always displayed when any portion of the overlay intersects the visible portion of the map. Unlike annotations, overlays scale proportionally with the map and therefore do not automatically overlap one another. This means, you are less likely to have to remove overlays and add them later to prevent overcrowding. In cases where the bounding rectangles of two overlays do overlap, you can either remove one of the overlays or arrange their Z-order to control which one appears on top.
The overlays property of the MKMapView class stores the registered overlays in an ordered array. The order of the objects in this array matches the Z-order of the objects at render time, with the first object in the array representing the bottom of the Z-order. To place an overlay on top of all other overlays, you add it to the end of this array. You can also insert objects at different points in the array and exchange the position of two objects in the array using the map view’s methods.
If you decide to implement some type of overlap-detection algorithm for overlays, one place to do so is in the mapView:didAddOverlayViews: method of your map view delegate. When this method is called, you can use the MKMapRectIntersectsRect function to see if the added overlay intersects the bounds of any other overlays. If there is an overlap, use whatever custom logic is needed to choose which one should be placed on top in the rendering tree and exchange positions as needed. (Because the map view is an interface item, any modifications to the overlays array should be synchronized and performed on the application’s main thread. The actual comparisons may occur on a different thread, though.)
Using Overlays as Annotations
The MKOverlay protocol conforms to the MKAnnotation protocol. As a result, all overlay objects are also annotation objects and can be treated as one or both in your code. If you opt to treat an overlay object as both, you are responsible for managing that object in two places. If you want to display both an overlay view and annotation view for it, you must implement both the mapView:viewForOverlay: and mapView:viewForAnnotation: methods in your application delegate. It also means that you must add and remove the object from both the overlays and annotations arrays of your map.
Last updated: 2010-05-20