
While Cocoa applications are generally written in Objective-C, Python is a
fully capable choice for application development. Python is an interpreted, interactive and object-oriented programming language, that provides higher-level features such as
regular expressions and garbage collection, and it's built into Mac OS X Tiger. Best of all, there's little you need to
sacrifice in order to gain Python's flexibility and productivity, which are making this language increasingly popular. With Python, you still
leverage the complete power and maturity of Cocoa, the capable project
management of Xcode and the rapid interface development offered by Interface
Builder. Today, you can build native, uncompromising, best-of-breed Mac OS X
applications using only Python.
Python stands alone from Cocoa, as does Cocoa from Python. Between the two
systems, enabling interoperability, stands PyObjC, the
Python/Objective-C bridge.
PyObjC (pronounced pie-obz-see) is the key piece which makes it possible to
write Cocoa applications in Python. It enables Python objects to message
Objective-C objects as if they're fellow Python objects, and likewise
facilitates Objective-C objects to message Python objects as brethren.
In this article, we'll touch on Cocoa bridges and Python in
general, and discuss some of the factors to consider before choosing this option. Then we'll explain where to get PyObjC and
how to install it. Finally, you'll learn how to write a Cocoa application in
Python by building a simple application from start to finish. A trio of QuickTime movies
are included which demonstrate using Interface Builder to accomplish this
task.
NOTE: This article is intended for use with Mac OS X v10.4 Tiger.
Many Bridges to Your Destination
PyObjC is just one of many Cocoa bridges. Apple has offered its Java bridge since
Mac OS X 10.0, and Mac OS X Tiger 10.4 rolled out a JavaScript bridge which
allows Dashboard Widgets to communicate with Objective-C objects. Third-party
developers have also created bridges for C#, Lisp, Perl, Ruby and Smalltalk to
name a few. And, of course, Python.
PyObjC's scope ranges all the way from a simple imperative scripting
environment for dynamically interacting with Cocoa objects, all the way to
building fully-fledged custom applications. It supports the latest technologies,
such as Key-Value Observing, Core Data and Xgrid. PyObjC's maturity is unmatched—it's been around longer than even Apple's Java bridge (it originated on
NeXTstep). Finally, while PyObjC is a third-party bridge, it is well known internally at
at Apple, and boasts an exceptionally talented group of enthusiastic
developers.
There are few limits in terms of how Objective-C and Python can work together. Objective-C classes can inherit from Python classes, and Python classes can inherit from Objective-C classes. You can declare categories on Objective-C classes, with the method definition given in Python. Python classes can implement and define Objective-C protocols, and it's perfectly fine to use Cocoa Bindings to bind a Python object to an Objective-C object and vice-versa.
Python Advantages
The primary advantage to using PyObjC for Cocoa application development is development speed. PyObjC offers a very rapid development environment owing to a number of factors:
- Automatic Memory Management. Python is garbage collected, freeing you of most manual memory allocation bookkeeping. When you create an Objective-C object instance from Python, Python takes ownership of the object and manages its retain count on your behalf.
- Python is succinct. Python gets a lot of work done in a small amount of code, without being terse. Its expressive nature means you write less code to get any job done. And less code can lead to less bugs and greater productivity. Common tasks such as performing an operation for each element in a collection are one-liners in Python. And the built-in regular expression support makes processing text a breeze.
- Compile and link times vanish. Gone are the days of editing a fundamental
.h file, and having to wait for a recompile of your entire application. When change is cheap, you'll be able to explore more options, faster. (Though you can compile Python, during development you'll probably want to skip compiling and execute your application via the source interpreter.)
- More Dynamic. PyObjC builds on the Objective-C runtime, enabling even more dynamism. For example, PyObjC allows you to create Cocoa-compatible classes at runtime, even allowing you to create new methods while your app continues. PyObjC comes with an interpreter window you can add to (or inject into) your application, enabling instant control and inspection over your application's objects.
Another advantage is Python's cross-platform nature. It's quite feasible to maintain a cross-platform code base, utilizing PyObjC to build a best-of-breed, Mac-native user interface. Traditionally, such a cross-platform code is written in C or C++, but Python may be a better fit for your project. For instance, PyObjC allows binding your cross-platform objects directly to Cocoa UI elements. This isn't the case for C++, where you need to create either proxy objects or custom controllers.
Getting Started with PyObjC
It's easy getting started with PyObjC. Python (version 2.3.5) comes pre-installed with Mac OS X Tiger 10.4, so you just need to install the Python/Objective-C bridge itself from the PyObjC project homepage (PyObjC 1.3.7 is the current version as of this writing). Unless you want to manually install a newer version of Python than what comes with Mac OS X, download the version that uses Python 2.3.x.
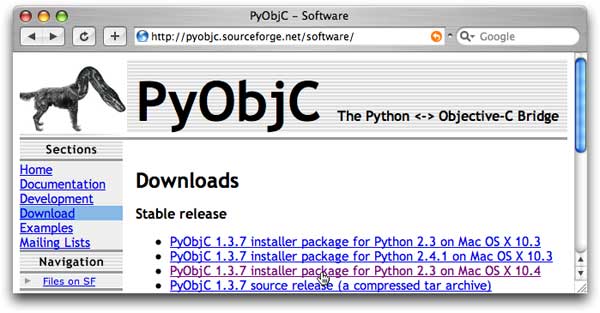
Figure 1: Downloading PyObjC
Installing is equally easy: simply open the downloaded Installer package and walk through the standard installation assistant. Once the installation is completed, you'll want to take notice of a new folder on your boot volume: /Developer/Python.
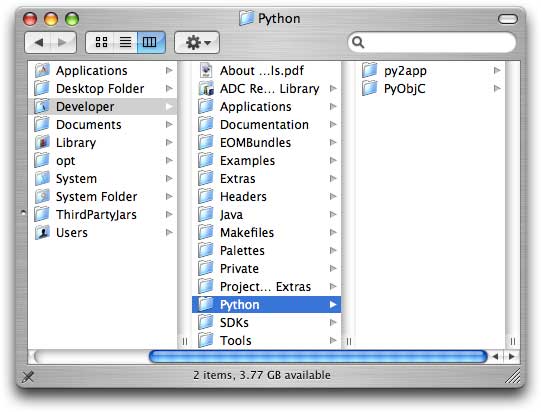
Figure 2: The installed PyObjC folder
The PyObjC folder contains PyObjC documentation and example code. The py2app folder contains a utility which converts python scripts into stand-alone Mac OS X applications. The PyObjC installer also installs Xcode project and file templates, making it painless to create new PyObjC Cocoa applications.
Once PyObjC is installed, you're ready to create your first PyObjC application. Start by opening Xcode (this text assumes Xcode 2.1, but 2.0 should work as well). Create a new project by selecting New Project from the File menu, and select PyObjC Application under the Application group.
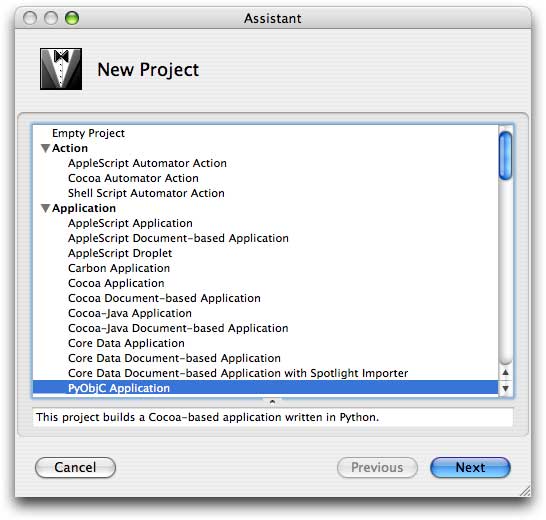
Figure 3: The installed PyObjC folder
Name the project "PyAverager". This will be your first PyObjC application. But before you're ready to lay down code, you need to understand specifically how Python interoperates with Objective-C.
Rules of the Bridge
Tabs vs. Spaces
While Python and Objective-C play well together, there are notable differences. For one, Python famously uses text indenting to denote code structure (Objective-C, like most languages, ignores indentation level). This is mostly a non-issue except this reliance on whitespace brings up the eternal spaces-versus-tabs debate. Python will happily use either, but you must use either consistently (no mixing of spaces and tabs for indenting). It so happens the developers of PyObjC use spaces for indentation, so the PyObjC-supplied sample code, project and file templates all use spaces. Thus, you'll probably want to use spaces yourself just avoid headaches.
Xcode can effortlessly use spaces (instead of tabs) for indentation, but first you need to adjust the correct preference. Ensure that "Insert 'tabs' instead of spaces" checkbox is unchecked in the Indentation panel of Xcode's preferences window before writing new Python code.

Figure 4: Xcode Indentation Preferences
Calling Objective-C Methods
Python and Objective-C differ in their syntax for invoking methods on objects. Objective-C uses square brackets to denote "message sends", like so:
[myString capitalizedString];
Python uses the more common dot notation (also used by C++, Java and JavaScript):
myString.capitalizedString()
The difference is trivial. Where the two languages diverge further is how they handle method parameters. Objective-C interleaves the method's name with its parameters, such as in this example:
[myObject setValue:@"Fred" forKey:@"firstName"];
In contrast, Python goes the more traditional route and keeps the method name separate from the parameters. Here's the same call in PyObjC:
myObject.setValue_forKey_(u"Fred", u"firstName")
This may seem somewhat confusing at first, but PyObjC follows a straightforward rule for transformation: it replaces colons with underscores. In this example, the Objective-C method name (selector) is setValue:forKey: (in Objective-C, each colon indicates a parameter position, so this method takes two parameters). Replacing the colons with underscores yields a PyObjC method name of setValue_forKey_.
If an Objective-C method accepts only one parameter, then the PyObjC method name will have a trailing underscore. For example, this Objective-C code:
[helloString stringByAppendingString:@"world"];
Translates to this PyObjC code:
helloString.stringByAppendingString_(u"world")
Leaving off the trailing underscore will lead to a runtime error. PyObjC will raise an AttributeError, reporting the object does not have an attribute with the name stringByAppendingString.
As a side note, Apple's JavaScript bridge also uses the colons-become-underscores technique for enabling JavaScript to message Objective-C objects. Unlike PyObjC, however, it also allows the Objective-C side to expose "prettier" JavaScript-style method names.
The NSError** Rule
In addition to the colons-become-underscores rule, there's an additional rule for methods that accept NSError** parameters. NSError was introduced in Mac OS X 10.2 Jaguar to better encapsulate runtime error information. Today, more and more System-supplied methods will return rich error information if desired. NSError-returning methods deduce whether error information is wanted by checking to see if a non-nil pointer-to-a-pointer is passed in the error: parameter. If a non-nil pointer is supplied, the NSError object is created and populated if an error occurs.
Unfortunately the PyObjC bridge lacks an apparatus for representing pointer-to-pointers to Python objects in method parameter lists. To work around this limit, PyObjC introduces another rule: when calling with a method taking an NSError** parameter from Python, skip that parameter. PyObjC will notice the NSError** and will dynamically supply the parameter on your behalf. Once the method returns, PyObjC will append the NSError to the return result. It does so by bundling the method's result and the NSError result into one tuple, which it returns as the actual result.
This NSError** rule means every method that accepts a NSError** parameter will return a tuple. As an example, consider NSString's stringWithContentsOfFile:encoding:error: method. Here's how you would call it using Objective-C:
NSError *error;
NSString *names = [NSString stringWithContentsOfFile:@"/usr/share/dict/propernames"
                                            encoding:NSASCIIStringEncoding
                                               error:&error];
if(error == nil) {
    NSLog(@"Successfully read names: %@", names);
} else {
    NSLog(@"Encountered an error attempting to read names: %@", [error description]);
}
In Objective-C, you're responsible for allocating a pointer to an NSError on the stack and a pointer to the pointer to the method. In contrast, PyObjC handles this for you, simply returning the NSError along with the method's standard result:
names, error = NSString.stringWithContentsOfFile_encoding_error_(
    u"/usr/share/dict/propernames",
    NSASCIIStringEncoding)
if(error == None):
    NSLog(u"Successfully read names: "+names)
else:
    NSLog(u"Encountered an error attempting to read names: "+error.description())
Notice how the Python version of the code doesn't pass in an error parameter in the call to stringWithContentsOfFile_encoding_error_(). The error parameter is skipped because it's an NSError**.
Object Creation
Instantiating an NSObject-derived object differs from Python's standard object creation idiom. Python's standard instantiation technique is to call the class name like a function:
myPythonObject = MyPythonClass()
Instantiating NSObject-derived classes differs in that it reads like Objective-C, with explicit invocation of the allocation and initialization methods:
myString = NSString.alloc().init()
The widespread Objective-C practice of offering instantiating convenience class methods (which bundle the allocation, initialization and autoreleasing of objects under one method call) is also supported:
myString = NSString.string()
PyObjC offers a safety net that will issue a runtime TypeError if the incorrect instantiation technique is used on an NSObject-derived class:
>>> myString = NSString()
Traceback (most recent call last):
  File "<stdin>", line 1, in ?
TypeError: Use class methods to instantiate new Objective-C objects
Creating Your First PyObjC Application
Now that you know the rules of the bridge, you're ready to write your PyObjC application. Return to the PyAverager Xcode project you created above. This simple application will calculate the averages (both the mean and the median) of the numbers the user enters.
Create a new Python class named "Averager" by selecting New File... from the File menu. Select Python Class under the Cocoa group. This code will house the logic of the application.
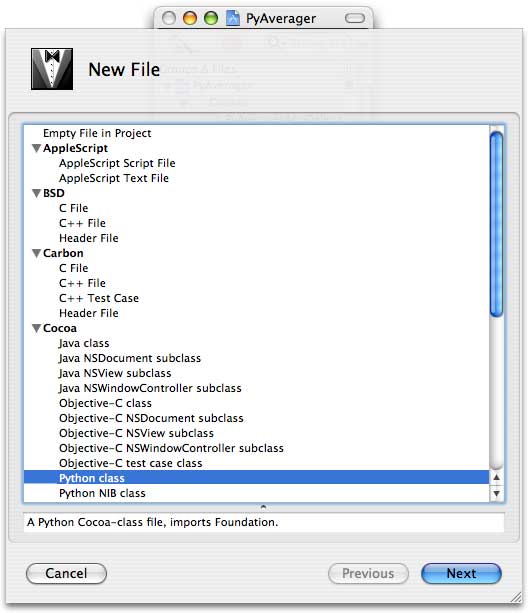
Figure 5: Creating a New PyObjC class
Enter the following source code into Averager.py:
from Foundation import *
import objc

class Averager (NSObject):
    numbersInput = objc.ivar(u"numbersInput")
    calculatedMean = objc.ivar(u"calculatedMean")
    calculatedMedian = objc.ivar(u"calculatedMedian")

    def setNumbersInput_(self, value):
        self.numbersInput = value

        # Parse the string into a sorted array of numbers.
        numbers = []
        if(value != None):
            numberStrings = value.split()
            for numberString in numberStrings:
                numbers.append(float(numberString))
            numbers.sort()
        numberCount = len(numbers)

        if(numberCount > 0):
            # Calculate the mean.
            self.calculatedMean = sum(numbers) / numberCount
            # Calculate the median.
            self.calculatedMedian = numbers[ (((numberCount+1)/2)-1) ]
        else:
            self.calculatedMean = 0.0
            self.calculatedMedian = 0.0
Walking Through the Source
Averager.py is a model class — it defines the heart of the program, and doesn't have any knowledge of the application's user interface. Averager relies on Cocoa Bindings to reduce the amount of necessary code. Indeed, it only defines one method: setNumbersInput_(), which is used as a bottleneck on the user's input to recalculate the dependent properties (calculatedMean and calculatedMedian).
from Foundation import *
import objc
The first import statement is analogous to #import <Foundation/Foundation.h> in Objective-C — it adds all of Cocoa's fundamental classes (like NSObject, NSString and NSDictionary) and functions (like NSLog() and NSMakeRange()) to the current namespace, suitable for invocation. Meanwhile, import objc brings in PyObjC's support for tighter Objective-C integration, seen below.
class Averager (NSObject):
This line defines a class named Averager that inherits from NSObject, provided by the Foundation module imported above.
numbersInput = objc.ivar(u"numbersInput")
calculatedMean = objc.ivar(u"calculatedMean")
calculatedMedian = objc.ivar(u"calculatedMedian")
Python, like Objective-C, supports instance variables. However, normal Python instance variables will only be visible from Python. In order to leverage Cocoa bindings, expose the instance variables to Objective-C using the special objc.ivar() property.
def setNumbersInput_(self, value):
This is the bottleneck mutator method called automatically by Cocoa Bindings. When called, it will update all the other instance variables with the correct calculated values. The act of assigning the new calculated values to the instance variables will fire change notifications to any and all observing objects, which will keep the user interface updated and synchronized with the object's state.
self.numbersInput = value
Here, the new value (a string representing a whitespace-delimited list of numbers) entered by the user will be copied into the object's instance variable.
# Parse the string into a sorted array of numbers.
numbers = []
if(value != None):
    numberStrings = value.split()
    for numberString in numberStrings:
        numbers.append(float(numberString))
    numbers.sort()
numberCount = len(numbers)
If the user enters a nonempty value (the test against None), the string is broken into a list on whitespace boundaries (split()). The list of strings is parsed into a list of numbers (the for loop and float() parsing function) and is sorted by value (sort()) and the number of elements noted (len()).
if(numberCount > 0):
    # Calculate the mean.
    self.calculatedMean = sum(numbers) / numberCount
    # Calculate the median.
    self.calculatedMedian = numbers[ (((numberCount+1)/2)-1) ]
else:
    self.calculatedMean = 0.0
    self.calculatedMedian = 0.0
Finally, if the user entered any numbers, the calculations are performed (otherwise the calculation results are zeroed out). The sum is divided by the count to yield the calculated mean, and the middle number of the sorted list is selected as the calculated median. Thanks to Cocoa Bindings and PyObjC, simply assigning the new values to the instance variables will automatically update the user interface.
Building with Interface Builder
Averager.py is the only source file that was necessary to add, so the only development task left is to define the user interface in Interface Builder. Open the MainMenu.nib file in the PyAverager project.
Once MainMenu.nib is opened, go under the Classes tab, select NSObject and control-click it to subclass it. The subclass name should be "Averager", just like your Python class name. Now that you've registered the class's existence with Interface Builder, control-click the subclass and instantiate it. You can view these steps in Movie 1.
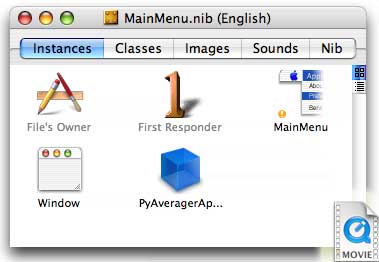
Movie 1: Registering and instantiating the Averager class
(Click Image to Play Movie—file size 492KB)
Now populate the empty NSWindow supplied by the project template with five NSTextFields so it looks like the first frame of Movie 2 (play the entire movie to see how to build the user interface).
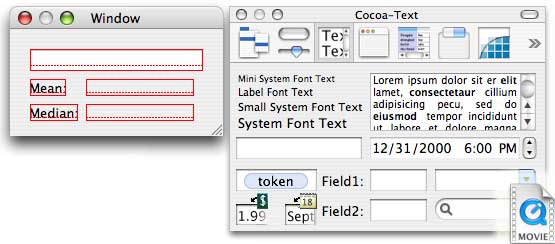
Movie 2: Adding NSTextFields using Interface Builder
(Click Image to Play Movie—file size 332KB)
Finally, it's time to bind the three active text fields to our Averager Python object. Set the topmost, editable NSTextField value binding to Averager, with a model key path of numbersInput. Be sure to also enable "Continuously Updates Value" to have the application dynamically calculate and display the average as the user types. Likewise, bind the noneditable "Mean:" output NSTextField to Averager with a model key path of calculatedMean, and the "Median:" output field to Averager with a path of calculatedMedian. Setting up these bindings is demonstrated in Movie 3.
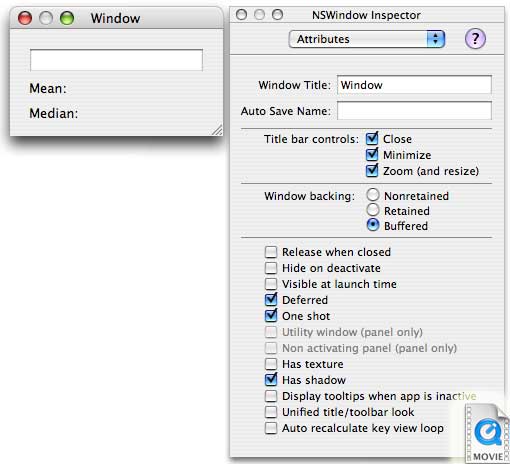
Movie 3: Binding the active NSTextFields to the Averager Python model object
(Click Image to Play Movie—file size 572KB)
At this point your application is ready to use. Build and run in Xcode (be sure to notice the lack of the lengthy header-precompile phase that usually occurs when first compiling a Cocoa project) and start entering numbers into your application. As you type in numbers, the mean and median should be calculated and displayed in the bottom of the window.
For More Information
This article gave you the grounding you need to start using Python for Cocoa development. The resources mentioned below will help you further explore Python on Mac OS X:
Posted: 2005-8-15
|