Master Class Preparation - More about stylesheets
This is powerful stuff. In case you have forgotten the example at the end of the Quick Tutorial you may want to go back.
Some theory
- The great thing of stylesheets is that you can control the look of your complete site from one single file. Believe me, you want this. You can also use a stylesheet at the document level or combine the both and override a general stylesheet with one in the document. The Stylesheet Assistant will help you smooth the learning curve. Bring it up by pressing ctrl + F8.
- By the way, you do have MSIE 3, Netscape 4 or another stylesheet enabled browser?
- A stylesheet lets you add lay-out properties to all HTML tags. The most important tags are available at the contextmenu (click right) of the Insert Tag button. Alternatively you can type tags in the box right next to the button. Click the button to get the tag to the list.
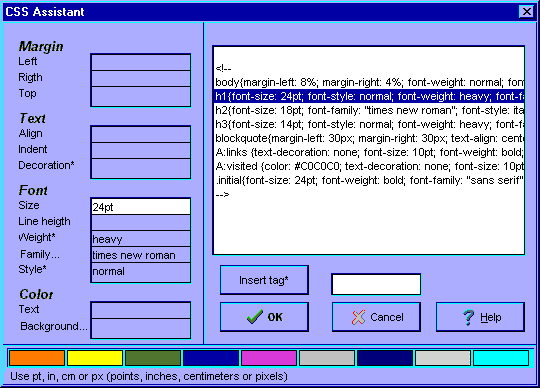
- Each tag in the stylesheet displays as a single line in the Assistant. To inspect or edit the settings for a particular tag, you just select its line. Where possible mousemenu's (indicated by a *) and dialogs (watch the triple points, see the second screensample) will help you.
- Press tab to update the list display. Press OK when you're done.
- Anansi will insert the stylesheet between the head tags of a document. If however you want to use a general stylesheet file, then start with a new file, give it any name you like but make sure it has the css extension. Linking files to this stylesheet goes as follows: <LINK rel="stylesheet" type="text/css" href="filename.css">, where you have to replace filename with the name of your file. The Stylesheet Assistant works with both css files and with stylesheets embedded in html files.
- There are a few limitation you should know of. Let's start with browser problems. Both MSIE 3 and Netscape 4 can't handle settings for line-height correctly without messing up tables, images, etc. Netscape 4 also can't do background images. Both browsers are not at all capable to do word or letter spacing, so you won't find these two options in the Assistant.
- Then there are a few limitations with the Assistant. Anansi treats each line as a separate tag and also requires each setting to be preceded by the name of the property. Don't use shortcuts like H1 {font: 15pt/17pt 'Arial' }, Anansi won't understand them. Besides, this way of coding is prone to give unexpected results with different browser versions.
Some practise
- Using the same sample as in Quick Tutorial, we're going to add margins, change the header and have the paragraphs right aligned in a special font. Adding the margins was already explained in the Quick Tutorial, let's continue with changing the header.
- Click the Insert Tag button right and choose Header 1, confirm by clicking left. Select H1 in the list and set Text Align to center. Click the Font Family label to display the options for fonts. Choose New Courier from the safe list, which gives you the fonts available on all machines running Windows as well as one or two fonts available on other machines. It won't hurt to choose a generic font as well, say Sans Serif. Click the Font Family label again to return to the main view. Rightclick the Font Style and choose italic from the menu.
- Insert p for paragraph manually. Set align to right. Now something fun for the Font Family. I like to see all parapgrahs in BernhardMod BT. Enable the Font Family view and go the the installed fonts list. Do you have BernhardMod BT? That's rather unlikely. Just choose something you do have and make sure to set something from the safe list as an alternative for those who don't have your favourite fonts. Don't forget adding a generic font too.
- Get the first3.htm file in your editor and play around with it. Try different fonts and see how easy it is to change the complete look of a page.
Advanced stuff: classes
- This chapter will demonstrate the use of classes. Classes are used as attributes in other tags, ie to <FONT size="+1" class="hotstuff">make this piece of text draw some attention.</FONT>;. Naturally, the style for the hotstuff class is defined in the stylesheet and what you do with it there is up to you. One thing you need to know though: classes are defined by prepending a dot. So you would get something like - and notice the dot just before hotstuff - this: .hotstuff{font-size: 300%; color: #8be1ff; background: #004080;}.
- Another example of a class is all over this page: my initial class. It's jus like the hotstuff class, but with different settings: .initial{font-size: 150%; font-weight: bold; font-family: "sans serif"; color: #8be1ff; background: #004080;}
- You can make classes conditional on tags. Say you want different hotstuff classes for paragraphs and font tags. You could do this by defining two conditional classes p.hotstuff and font.hotstuff. Whenever you use your hotstuff class in a paragraph tag you get the look as defined by p.hotstuff. Use hotstuff in a font tag and you get font.hotstuff.
- If you want to use a class but don't want to use one of the existing tags you can use the div tag: <DIV>...</DIV>. This tag has no meaning at all so it's perfect for use with classes.
A few more things you should know
- You'd better use comments like shown in one of the previous screencapture of the Assistant. Older browsers will otherwise show all your definitions and that be won't nice.
- The main list and the font list in the Stylesheet Assistant have several shortcuts. You can change the order of items by using cltr and arrow up or down. Items can also be deleted by pressing the delete button.
- Be very careful with setting font sizes in absolute values. Where possible you should use font sizes as percentage of the user defaults.
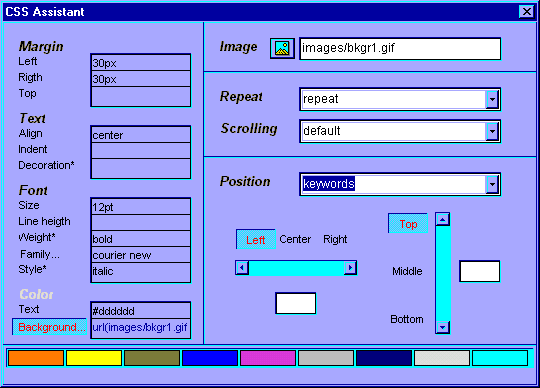
- Don't mind the complicated settings for the background image. Simply use the default for the best results. And as mentioned before, background images are currently only supported by MSIE 3. As you will also see in the screencapture above, the project colors are also available in the Stylesheet Assistant. Drag them to the color settings if you need one.
- Netscape hates class names with uppercase letters. Lowercase names allways seem to work.
- Try the links page of this manual if you want more information or examples of stylesheets.
See the first sample file with a stylesheet
Return to the Index