RSU32 1.13
Remote Software Update for Networks
32 Bit Version
Documentation
Copyright ⌐ 1992-1998 Burkhard Daniel & Hans-Georg Michna
Table of Contents
Shareware Licensing and Registration
RSU32 including its documentation files is Copyright ⌐ 1992-1998 Burkhard Daniel (homepage, e-mail) and Hans-Georg Michna (homepage, e-mail). It is distributed under the Shareware concept. Its use on isolated PCs, for example to change settings in the Windows 95 or Windows NT registry through batch files without the involvement of any network file server is free, even if the computer is connected to a network. As soon as RSU32 is used to copy files from a network file server to a user’s local storage or to copy any parts of files of the Windows INI type from a network file server, however, its free use is restricted to a 30 day trial period. After that the shareware fee has to be paid, if the program is still used.
Since the combinations of file servers and workstations can be rather involved, some specifications are in order. If RSU32 is used to manipulate shared files on other file servers (for example several slave servers being updated from one master server), then each target file server being updated counts only as one user, as long as no individual workstation files are modified on it. In other words, user workstations do not count if RSU32 is not used to alter their individual registries or files like WIN.INI, SYSTEM.INI, PROGMAN.INI or PROTOCOL.INI. A special case is that each workstation has its individual files in a workstation specific folder on a file server and RSU32 is used to update the workstations’ individual files on that file server (example: diskless workstations). In this case, each workstation should be counted as one user, since RSU32 is doing exactly the same amount of work as if the workstation specific files were on local workstation disks.
The shareware fee for RSU32 1.x is US $98.00 or DM 179.00 (German Mark) for each group of up to 100 users. In other words, if the program is used for 1 to 100 users, the fee is US $98.00 or DM 179.00. If it is used for 101 to 200 users, the fee is US $196.00 or DM 358.00, for 201 to 300 users US $294.00 or DM 537.00 and so on. Prices may change in future versions if the exchange rate changes considerably.
If buying in Germany, add the legally prescribed Value Added Tax (for example 15% in 1998).
The program contains no technical means to enforce payment other than noting the requirement on screen when an unregistered copy of RSU32 is started.
To pay the fee through CompuServe log on to CompuServe and enter the command: GO SWREG. Search for the keyword RSU32 and register according to the choices you get on screen. Each single registration or license is good for up to 100 users.
Alternatively, send a check and your e-mail address (or fax number) to one of the following addresses.
USA: A.C.I. Micro, Ms. Birgit Liebl, 196
Dorrence Rd., Granville, OH 43023-9703
Important - Make check payable to: Liebl
World: A.C.I. Micro, Mr. Hans-Georg Michna, Notingerweg 42, D-85521 Ottobrunn (Germany)
In Europe use a Eurocheque for the appropriate DM price (see above) for the required number of users.
If buying in Germany, add the legally prescribed Value Added Tax (currently 15%).
If you require an invoice, please ask for it by e-mail or send a purchase order to A.C.I. Micro in Germany. But please keep bureaucracy to a minimum. If you can, please register directly through CompuServe’s SWREG service, which is much more convenient and probably cheaper for you as well as for us. Within the European community please add your VAT ID. The VAT ID of ACI Micro is: DE 129 2759 98
This is a sample SWREG session in CompuServe:
!go cis:swreg


One moment please...

Shareware Registration   SWREG

 1 Instructions to Register Shareware
 2 Register Shareware
 3 Instructions to Submit Shareware
 4 Submit Shareware (Authors)
 5 Shareware Beta Forum
 6 ASP/Shareware Forum
 7 Provide Feedback
 8 Frequently Asked Questions

!2


In addition to CompuServe's Service Terms and Copyright Rules, the following
terms apply to this database:

Customer agrees and acknowledges that upon registration, information including
name, address and CompuServe user ID, are forwarded to the designated member
who provided the shareware description for registration.

CUSTOMER AGREES TO INDEMNIFY AND HOLD COMPUSERVE HARMLESS FROM ANY CLAIMS AND
EXPENSES, INCLUDING REASONABLE ATTORNEY'S FEES, RELATED TO THE QUALITY OF THE
SHAREWARE, QUALITY OF THE SHAREWARE REGISTRATION INFORMATION, OR THE QUALITY
OF THE CUSTOMER AND TECHNICAL SUPPORT ASSOCIATED WITH THE SHAREWARE. MEMBERS
WHO PROVIDE SHAREWARE DESCRIPTIONS FOR REGISTRATION AGREE TO INDEMNIFY, SAVE
AND HOLD HARMLESS COMPUSERVE, ITS AGENTS, EMPLOYEES, OFFICERS AND DIRECTORS
FROM AND AGAINST ALL CLAIMS, DEMANDS AND ALLEGATIONS THAT THE SHAREWARE
INFRINGES UPON THE PROPRIETARY RIGHTS OF ANY THIRD PARTIES.


Press <CR> to continue!

Please select the geographic region
for which you will be registering shareware.

 1 United States
 2 Canada/Mexico
 3 Europe
 4 Asia/Pacific Rim
 5 Central/South America
 6 Africa
 7 Middle East
 8 Australia/New Zealand


Enter region number: 1

Register Shareware

SEARCH BY:

 1 Registration ID
 2 Title
 3 File Name
 4 Author's User ID
 5 Author's Name
 6 Keywords (Categories)


Enter choice!6

Register Shareware

Enter Keyword (ex. - GAMES): RSU

Register Shareware

   2 Programs Selected

              Title             Author                     Fee  Currency

 1  RSU Version 1              Hans-Georg Michna          59.00 US$
 2  RSU32 Version 1.x          Hans-Georg Michna          98.00 US$


Enter choice(s)!2
Reg ID: 14198                     Fee (US$): 98.00
                    Shipping/Handling (US$): 0.00

Title: RSU32 Version 1.x
File Name: RSU32X.EXE             Author: Hans-Georg Michna [74776,2361]
Size: 120000                      Compression: SFX
Computer Type/Operating Systems:  WINDOWS

Support: E-Mail to 74776,2361

Forum: GO WINSHA       Library:                        Library Number: 5

RSU32 1.x is a program that can
- determine whether the user has the latest update level,
- add, change and delete keys and values in the registry,
- copy, delete, add lines or whole sections from one INI file to another,
- insert environment variables,
- synchronize folders, i.e. make them equal without unnecessary copying
and more. Shareware $98 for 100 users.


Would You Like to Register? (Y/N) y

Register Shareware

Enter Your Name:

Enter Your Company Name:

Is your mailing address in the United States? (Y/N)

Your Street Address/P.O. Box:

Your City:

Your State:

Your Zip Code:

Your Phone Number (Optional):

How Many Copies Do You Wish to Register? (ex. 2):
When you license RSU32, you will receive, usually within 24 hours, information including hints on how to upgrade and a special key to turn RSU32 into a registered version, but you will not normally receive any paper mail. Neither will you receive the program itself, which is available only on CompuServe and on the Internet. You should retrieve updates from wherever you received the program in the first place. From time to time you may receive information on upgrades and related programs.
The program may be freely distributed as long as the files stay together unaltered and packed in one file using an archiving program like PKZIP, LHA or similar, preferably self extracting. It is not allowed to add any other files other than minor additions that do not exceed the size of the original files. It is not allowed to distribute RSU32 as part of another program or package because we fear that this might look as if RSU32 may no longer require its shareware fee payment which it always does according to the rules outlined above.
We have in the past sent information by e-mail when there were significant changes to RSU32. But you have to download the new versions on your own. You don’t have to pay anything again for any upgrades to RSU32 version 1.x.
We may mention publicly that your company uses RSU32 in our company profile. If you really don’t want this, please let us know every time you purchase a license.
Support is available from Hans-Georg Michna, e-mail: Hans_Georg_Michna@compuserve.com and from Burkhard Daniel, e-mail: burk@berlin.snafu.de. This support is free (within reasonable limits).
Should these mail or World Wide Web addresses not work after some years, please use any good search engine on the World Wide Web (like Alta Vista, Excite, or HotBot), to locate us by name.
In our experience, luckily, RSU32 needs very little support, because it doesn’t seem to cause many problems. But if you need help, usually in the beginning, please feel free to send e-mail. The same holds for questions, remarks or proposals for future enhancements of RSU32 and its documentation (the one you are reading right now).
At the present state of software technology it is not possible to create error-free software. RSU32 may contain errors. Anybody using it should take precautions like creating safety backups in case a defect causes damage to any computer or data. The authors of RSU32 can under no circumstances be held responsible for any damage.
Microsoft« is a trademark of Microsoft, Inc.
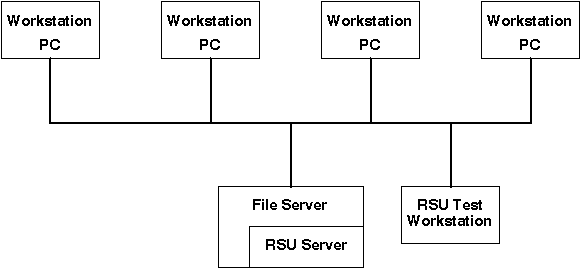
RSU32 (Remote Software Update) is a program that updates the software on many individual workstation PCs connected to a file server. The file server, when equipped with RSU32, becomes an RSU32 server.
The RSU32 program does not run on the RSU32 server, however. It normally runs on the workstations. The RSU32 server consists only of subfolders and files on the file server.
Sample RSU32 installation
The fundamental idea is that all workstation configurations are stored on the RSU32 server. RSU32 then copies the appropriate modules to each workstation while retaining individual settings or individual software on the workstations.
The file server used for RSU32 does not have to be the same file server that is used for normal work. It is necessary, of course, that users log in to the RSU32 server from time to time to get the topical remote software update.
A separate RSU32 test workstation is needed to develop and test the configurations. If testing on different hardware is needed then one RSU32 test workstation is needed for each hardware setup. RSU32 test workstations can be used for other work when they are not being used for RSU32 development. Their RSU32 related configuration has to be totally reset, however, before it is used for testing. RSU32 can
Since the file server or any program running on any workstation has normally no access to any local disks the main RSU32 program has to run on each workstation to work its magic. The most convenient way to achieve this is to run it each time any user logs in to the RSU32 server.
This can be achieved in different ways on different operating systems. On a Novell network, for example, a command can be called up after the system login script finishes, by using the Novell EXIT "<command>" syntax or by calling it in the middle of the login script with the # syntax. See the manual of your network for details. RSU32 can be called from a DOS batch file. It has one command line parameter which is the path of the RSU32 program file. Example:
f:\RSU32\RSU32.exe f:\RSU32\RSU32.prg
RSU32.EXE will execute the RSU32 program file. Files are typically copied from the RSU32 server to the local disk or modified on the local disk. Instead of the local disk the individual user storage space may also be on a file server. In this case each user’s private storage should be mapped to a drive like U:, such that each user sees his private storage area when he refers to U:.
Each file server can be a RSU32 server. The basic method is to keep a mirror image of a workstation in a RSU32 server folder, for example in R:\RSU32\WSIMAGE. There can be several such folders for several different configurations. The configurations have to be created and tested on test workstations, then copied to the RSU32 server. In addition the RSU32 server needs one other folder with read-only access for RSU32.EXE, SPAWN.EXE and the RSU32 program file (example: RSU32.RSU, example of RSU32 read-only folder: R:\RSU32). SPAWN.EXE must be in the same folder as RSU32.EXE itself.
The management of more than one workstation configuration can easily achieved by creating small signal files on the different workstations which indicate the configuration type. The existence of any of these signal files can then be queried by a simple "If Exist” command.
Before installing RSU32 you have to make sure that all workstations connected to the RSU32 server have a valid minimal installation. The absolute minimum would be an installed DOS and the minimal network drivers to be able to connect to the server.
It is recommended that you have an initial workstation setup procedure to erase all RSU32 related folders and files from a workstation and recreate the whole minimal setup from scratch. This could be done with a batch file like INSTALL.BAT on the RSU32 server. This will be very useful for users if they have somehow destroyed vital files on their workstation. They will then have a way to get up and running again if everything else fails and no service person is available.
It is also conceivable to use RSU32 to such an extent that each and every file on the workstation is covered by RSU32. This would have the advantage that every workstation would recover from any loss or mutilation of files automatically when logging on to the RSU32 server. But this will often not be practicable for performance or other reasons.
RSU32 will run on Windows 95 and Windows NT. Note, however, that Windows 95 and Windows NT and any active services or other programs may keep certain files open, such that these files themselves cannot be copied or updated.
The RSU32 development cycle is the process of developing a new configuration. Frequently this will just be a small change in an existing configuration, but it could also be an entirely new configuration for a new type of workstation, for example. Development proceeds in these steps:
In many cases this development cycle can be shortened by skipping certain actions if their effect is minimal or if the number of workstations is low enough such that some risk can be taken.
The following sections describe these actions in detail.
First you have to make sure that your RSU32 test workstation is equal to a topical workstation elsewhere in the network. If the test workstation has not been used for anything that might have altered the files and folders concerned then it can be used right away. If not, and whenever there are any doubts, the test workstation should be installed fresh from the RSU32 server. It is a good precaution to log in once after installation and obtain the latest changes from the RSU32 server to make sure they are included in the workstation image on the RSU32 server.
The RSU32 update level information can be stored in any file for each workstation. You only have to edit this file or touch it such that the file date or time is changed to force an update.
Start the RSU32 program, normally by logging in to the RSU32 server. The test workstation should automatically be updated to the topical update level. After the test workstation is up to the present standard you can now make the desired changes.
Now you can make the desired modification on the test machine only. Test thoroughly, since all your users who use that module will depend on your conscientiousness.
As soon as you touch the RSU32 server all users who happen to use the server will receive any modification. Therefore you have to make sure that this does not happen.
There are several ways to protect users:
After you have tested the new configuration thoroughly on your test machine you can now copy the modifications to the RSU32 server (for example to the F:\RSU32\WSIMAGE folder and its subfolders). It is useful to have a program that can detect the difference between files on two drives like the Norton Commander™ with its "Compare folders” command. In any case be sure to copy all changes from the test machine to the RSU32 server.
Now change the RSU32 program (example: F:\RSU32\RSU32.PRG) if necessary. The modified RSU32 program should be able to copy all modifications from the RSU32 server area to any workstation PC.
If you make changes to files by means of direct manipulation by the RSU32 program, for example with IniChangeLine, be sure to make those changes on the original files on the RSU32 server as well, such that users who do an install from scratch also get them immediately before they receive the next RSU32 update.
After the update is entirely in place but not yet activated you should test it before releasing it to all users. For this you either need a second test machine or you have to reset the first one to the previous configuration which is still standard for all other users.
Then you have to make sure that the new update affects only the test machine but not yet all the other users. There are several ways to achieve this. The easiest is to modify the RSU32 program file such that only the testing user gets the update. Example:
...
If %USER% <> SUPERVISOR Then
   Goto Not_yet
End If
rem   Here enter the RSU32 commands to be tested.
Not_yet:
...
This sample batch file fragment presumes that the network user name was written into the environment variable USER, for example with the Novell Netware login script command:
DOS SET USER="%USER_ID"
Check whether the update is correct. You may have to test each configuration separately if there are several.
Finally, after you have convinced yourself that the new update works correctly, you can release it to all users by removing any blocking commands you might have inserted. From that very moment all users who log on will receive the update.
RSU32 is an interpreter for the RSU32 control language which strongly resembles BASIC and, to some extent, DOS batch files. The RSU32 program is the file which controls all RSU32 operations. It should reside on the RSU32 server, for example as F:\RSU32\RSU32.PRG. All users should have read-only access to it.
RSU32 is started from a DOS box or from a shortcut with either of the following commands:
RSU32 <program file name> [<switches>]
RSU32.EXE <program file name> [<switches>]
RSU32
RSU32.EXE
The following switches can be applied.
| /output | Shows an additional output window of RSU32 and allows user interaction. Useful for echo, pause and any user input commands and for testing. Required by /trace. |
| /debug | Writes a file named DEBUGLOG.RSU into the system root folder (often C:\WINDOWS or C:\WINNT). Also adds the commands that are executed and any error messages into the output window. |
| /log <logfilename> | Writes a logfile into the current folder. The logfile contains the same output as the output window. If the output window is not activated, the logfile still contains the same output that would have been written into the output window if it existed. |
| /trace | Traces program execution in the output window (requires /output). Stops after each command and waits for the user to press a key. |
| /noabort | Disables the Abort button, so the user cannot abort RSU32 while running. |
| /quiet | RSU32 produces no output whatsoever and will not show any window. If
/debug is specified along with /quiet, the debug log file is written. Note: This switch is effective only in the registered version. Warning: RSU32 will never finish if in quiet mode commands are executed that require user input, such as PAUSE. |
If no command line parameters are given at all, then RSU32 searches WIN.INI (in the main Windows folder) for a section named [RSU32]. In that section, RSU32 looks for a line that begins with:
default command line=
All text after the equals sign (=) is used as if it were given in the command line. If RSU32 cannot find this line, it shows an error message, then aborts.
As long as the program is unregistered, it always displays a shareware registration screen first. Apart from this, however, the program is fully functional and may be tested with all functions for 30 days. After that time the program must be registered for further legal use, although the program would technically still function properly.
This is an example of an RSU32.PRG file:
rem   RSU32.PRG file

rem   First determine whether the user already has the latest version:

If c:\RSU32\version.txt Equal f:\RSU32\version.txt Then
   echo Your workstation has the latest update level.
   Goto Finish
End If

rem   Let user know what's going to happen to his computer:

type f:\RSU32\version.txt
pause

rem   Modifications to WIN.INI:

IniCopySection f:\RSU32\wsimage\win31\win.ini c:\win31\win.ini [fonts]
IniCopySection f:\RSU32\wsimage\win31\win.ini c:\win31\win.ini [devices]
IniDeleteSection c:\win31\win.ini [ObscureOldProgram]
IniCopyLine f:\RSU32\wsimage\win31\win.ini c:\win31\win.ini [windows] load
IniDeleteLine c:\win31\win.ini [fonts] Swiss=
IniChangeLine c:\win31\win.ini [mail] mailbox=%USER%

rem   Modifications to SYSTEM.INI:

IniAddLine c:\win31\system.ini [display] svgamode=98

rem   Synchronization of user files:

SynchronizeDir
   From f:\RSU32\wsimage\win31
   To   c:\win31
   Add
End SynchronizeDir

SynchronizeDir
   From f:\RSU32\wsimage\util
   To   c:\util
   Add
   Overwrite
   Delete
   Subdirectories
End SynchronizeDir

rem   Users with HappyVGA adapters get a new driver and support
rem   utilities. This requires that such users have a signal file
rem   c:\RSU32\happyvga.sig:

If Exist c:\RSU32\happyvga.sig Then
   SynchronizeDir
      From f:\RSU32\wsimage\happyvga
      To   c:\happyvga
      Add
      Overwrite
      Delete
      Subdirectories
   End SynchronizeDir
End If

rem   Now install version text file to make sure that this
rem   user doesn't get the same update again:

Shell copy f:\RSU32\version.txt c:\RSU32

Finish:

rem   End Of File
RSU32 is a pure and simple interpreter. This has consequences especially when using the Goto command in connection with If, Then, Else constructs. RSU32 takes these commands exactly in the sequence they are processed. This means that a Goto jump into an If structure can cause unexpected results if the programmer isn’t aware of the actual processing sequence. Therefore it is not advisable to jump into an If command. Jumping out of an If command doesn’t hurt. The If construct is simply never completed. But if it is done many times, for example in a loop, it will eventually cause a memory overflow. You should therefore try to use the Goto command sparingly and prudently. Ghastly mistakes can happen if the interpreter encounters, for example, an Else command after jumping out of an If construct, because the interpreter would assume that the Else belongs to the last encountered If command.
This describes the return values of RSU32, which can be queried using the Windows 95/NT construct "if errorlevel". In general, RSU32 returns the most recent error code it encountered as its error level.
| Errorlevel | Meaning |
|---|---|
| 0 | No error |
| 1 | Memory allocation error |
| 2 | Command construction error |
| 3 | File access error |
| 4 | Syntax error |
| 5 | IF/ELSE mismatch error |
| 6 | IF Bios no longer supported error |
| 7 | IF/END IF mismatch error |
| 8 | Too many nested IFs error (max. 4096) |
| 9 | Section not found error (for reading) |
| 10 | Section or Line not found error (for writing) |
| 11 | Line not found error (for reading) |
| 12 | Unknown command line option error |
| 13 | Registry key could not be opened/created error |
| 14 | Invalid registry value type error |
| 15 | Existing registry key could not be openend error |
| 16 | Registry key could not be deleted error |
| 17 | User abort error |
All control files are text files in which each line is followed by a carriage return/line feed pair (13dec and 10dec).
Spaces and tab characters in the beginning of any line are totally ignored. In effect it is as if those characters were removed before executing the RSU32.PRG program.
Lines beginning with "REM ” or ";” (a semicolon) are treated as comments and not otherwise executed.
Upper and lower case are functionally equivalent. However, the case is retained when information is forwarded into another file.
Command parameters are separated by spaces, with the exception of section headers (section name in brackets) and INI lines after a section header. If a parameter itself contains one or more spaces, it has to be enclosed in double quotes (character no. 34 in the ASCII/ANSI alphabet), so it is not mistaken for several separate parameters. If a quote character itself is to be included, two adjacent quote characters have to be written, but this is possible only within another pair of quotes.
Examples:
If Bios(C000-C080) = "ATI GRAPHICS" Then
   ...
End If

If %COMPUTER_TYPE% = "Label ""Taiwan""" Then
   ...
End If
The second example compares the environment variable COMPUTER_TYPE with the following text, including the two quotes: Label "Taiwan"
If the first word in any line is a valid RSU32 command then it is executed. If not the line is deemed to be the name of an executable file and is executed.
Internal commands, such as DIR, cannot be executed that way. They require the command SHELL and are then forwarded to the command processor (CMD.EXE or COMMAND.COM).
Not every command can be used. For example, the command SET has no effect because it is running under a secondary command processor that has no access to the primary environment.
In the syntax definitions below, a few special characters and words are used that have a special meaning.
A word enclosed in angle brackets is a placeholder for a user defined, variable entry:
< >
The following placeholder stands for any valid RSU32 command:
<command>
An ellipsis stands for "more of the same”:
...
Braces and vertical bars are used to define a user choice of one out of several units. Only one can and must be chosen:
{ <choice 1> | <choice 2> | <choice 3> }
Several commands work on sections in .INI files. A section is recognized by its header. It ends before the next section header. A section header consists of a section name in brackets.
Examples:
[windows]

[HPPCL5A,LPT1:]

[Microsoft Word]
The section header must begin in cloumn 1, i.e. in the leftmost position of a line. Technically spoken, the opening bracket must immediately follow the carriage return, line feed pair that ends the previous line, or it must be the first byte of the whole file. All lines following the section header belong to this section until another section header follows.
Note that section headers can contain spaces. RSU32 still recognizes the section header by the enclosing brackets. You don’t need double quotes when referring to a section header in an RSU32 command.
The text file manipulation method to use REM in front of a section name, which was used in RSU for DOS, is not supported in RSU32.
Environment variables can be inserted in any command with the syntax:
%<environment variable>%
Example:
IniChangeLine C:\WIN31\WIN.INI [mail] mailbox=%USER%
This example will take the name from the USER= entry in the environment and substitute it for %USER% before executing the IniChangeLine command. For example, if the environment contains an entry reading:
USER=DANIEL
then the command above will be changed to:
IniChangeLine C:\WIN31\WIN.INI [mail] mailbox=DANIEL
which is useful for example to save users the separate logging in to Microsoft« Mail.
The substitution happens before any quote characters are processed, i.e. environment variables can be used inside quotes. To use a percent character (%) for other purposes, you have to write two adjacent percent characters (%%). However, RSU32 cannot use environment variable names that contain percent characters. You can use the double-percent feature only outside environment variable names.
Environment variable names may contain spaces (example: %DEPT NAME%). It is not necessary to enclose them in quotes because of these spaces-RSU32 already recognizes the percent signs and processes them before spaces are considered. But superfluous quotes outside the variable name don’t do any harm either.
Hint: Novell Netware 3.11 can place essential system information entries into the environment with the SET <variable>="<text>" syntax of its login scripts. Example of a command in a Netware login script:
SET USER="%USER_ID"
Any command found in an RSU32 program file that is not a valid RSU32 command is deemed to be an executable command (a .COM, .EXE, .BAT or, in Windows NT, .CMD file).
Note that direct commands, which reqire a secondary command processor (CMD.EXE or COMMAND.COM), need to be called with the SHELL command of RSU32 (see description of the Shell command below). This command loads a secondary command processor, forwards the command to it and executes it there.
There is no error checking and no logging with DOS commands, so be careful to test and use them properly.
This command changes the current directory and drive. It works in a similar way like the DOS command with the same name, but it changes not only the directory but also the drive, if one is given.
Syntax:
Cd <path>
Examples:
CD \TEMP
cd G:\
Cd C:\WINDOWS
This command simply echoes some text on the screen. It works like the DOS command with the same name. It was incorporated only to increase speed and to avoid unnecessary empty lines on screen.
Note that Echo has an effect only if /output or /log is used.
Syntax:
Echo <text>
Example:
Echo RSU32 is now installing new video drivers...
This command continues execution of the RSU32 program file at the point after the label. The label can be anywhere else in the program file but has to be in its own line, i.e. no other command can follow in the line that contains the label.
Labels may contain letters, digits and the underscore _. They may not contain spaces, umlauts or any other special characters.
Unlike RSU for DOS labels can be one character long in RSU32. The reason is that RSU32 uses the CD command to change drives and directories. What could be achieved in RSU for DOS with
C:
can be achieved with
cd C:\
in RSU32.
Syntax:
Goto <label>
...
<label>:
Example:
Goto Finish
...
Finish:
This command executes the other commands embedded between If and End If only if the condition after the If is met.
In addition, an Else clause can be inserted. The commands after the Else and before the final End If are only executed if the condition after the If is not met.
The comparison operators < <= = >= > <> determine whether the character string to the left is less than, less or equal, equal, greater or equal, greater than, unequal to the string on the right of the operator, ignoring upper or lower case. Thus a = A would count as true.
The operator "Exist” followed by a filename determines whether the following file exists, similar to the equivalent DOS batch command.
The operator "Equal” between two filenames determines whether the two files are exactly equal in size, date and time.
The If BIOS(...) ... command of the DOS version of RSU is not supported in RSU32. But it is possible to read and evaluate some hardware information from the HARDWARE key of the registry.
Note that after the If and between any other elements on the line one or more spaces are needed. Thus it would be wrong to write:
If %USER%=DANIEL Then
The correct form is:
If %USER% = DANIEL Then
If any of the variables contains spaces, it must be enclosed in double quotes. Apart from that, an If command with a comparison operator must have exactly 5 words in the line.
Syntax (4 different forms):
If <condition> Then
   <command>
   ...
End If

If <condition> Then
   <command>
   ...
Else
   <command>
   ...
End If

If Not <condition> Then
   <command>
   ...
End If

If Not <condition> Then
   <command>
   ...
Else
   <command>
   ...
End If

<condition> = {
  <text 1> <comparison operator> <text 2>
| Exist <filename>
| <filename 1> Equal <filename 2>
| RegKeyExist(<where>) <key>
| RegValueExist <valuename>
| RegValue(<valuename>) <comparison operator> <value> }

<comparison operator> = { < | <= | = | >= | > | <> }
For a definition of <where> see the RegOpenKey command below for definitions and examples.
The format of <value> depends on the actual type. See the RegSetValue command below for definitions and examples.
If <valuename> is empty, then the default value is used (version dependent).
Examples:
If Not %USER% = SUPERVISOR Then
   Goto Finish
End If
...
Finish:

If Not c:\RSU32\version.txt Equal f:\RSU32\version.txt Then
   Shell copy f:\RSU32\version.txt c:\RSU32
   ...
Else
   echo You already have the latest version. No update necessary.
EndIf

If Not Exist c:\windows\win.ini Then
   echo Your disk is not properly installed. Please follow
   echo the instructions to perform the base installation,
   echo then log on again.
   Goto Get_Out
End If

RegOpenKey Local \HKEY_CURRENT_USER
                  \Software
                   \Microsoft
                    \Word
                     \7.0
                      \options
If RegValue(AutoSpell) = "0" Then
echo The AutoSpell feature is disabled.
End If
Hint: End If can be written with or without a space between End and If, i.e. either "End If” or "EndIf”. The preferred form is: "End If”.
Warning: Between each of two keywords, operators and operands one space is required.
Warning: Do not use the Goto command to jump into an If - End If structure. Do not use the Goto command to jump out of an If - End If structure many times, for example in a loop with more than a few repetitions.
This command is used to add a line where several lines have the same variable name, like for example the device= lines in SYSTEM.INI. It appends one further line to the section. If the section does not exist it is newly created and appended to the .INI file first.
The only exception occurs if the exact line, variable name and text, exists in the file already. In this particular case the command has no effect. In other words, the command does not produce exact duplicates of whole lines like:
device=VSHARE.386
device=VSHARE.386
Syntax:
IniAddLine <ini file> [<section name>] <variable name>=<text>
Example:
IniAddLine C:\WIN31\SYSTEM.INI 386Enh device=VSHARE.386
This command changes the text after the equals sign (=) in a certain section and a certain line in an .INI file. If the section does not exist it is newly created and appended to the .INI file first. If the line does not exist it is newly created and appended at the end of the section. If several lines with the same variable name exist in the section then this command is probably not appropriate and should not be used since it would change only one of the lines.
Syntax:
IniChangeLine <ini file> [<section name>] <variable>=<text>
Example:
IniChangeLine C:\WIN31\WIN.INI [windows] load=NWPOPUP.EXE
Note that there is presently no command to change only part of a line. If something like this is desired one possible workaround is to use EDLIN in batch mode.
This command finds a certain line within a section in an .INI file and copies it into another .INI file. If a line with the same variable name to the left of the equals sign (=) already exists it is replaced with the new line. If several lines with the same variable name exist in the section then this command is probably not appropriate. It will work on the first occurrence of the variable. If the section does not exist in the target .INI file, it is newly created and appended to the .INI file first.
Syntax:
IniCopyLine <source ini file> <target ini file> [<section name>] <variable>
Examples:
IniCopyLine F:\RSU32\WSIMAGE\WIN31\WIN.INI C:\WIN31\WIN.INI [windows] load
IniCopyLine F:\RSU32\WSIMAGE\WIN31\WIN.INI C:\WIN31\WIN.INI [windows] load=
Both example lines do the same thing. Each one would search the file F:\RSU32\WSIMAGE\WIN31\WIN.INI for the section [windows]. Within the section it would locate the line beginning with load= and copy it into the line with the same section and variable name in the file C:\WIN31\WIN.INI.
This command works similar to the previous one but copies a whole section. If a section with the same name already exists in the target file, it is deleted and the new section copied and inserted in its place. IniCopySection also inserts an empty line before and after the section if there was none, to make the file easier to read and conform with the usual practice in Windows .INI files.
Syntax:
IniCopySection <source ini file> <target ini file> [<section name>]
Example:
IniCopySection F:\RSU32\WSIMAGE\WIN31\WIN.INI C:\WIN31\WIN.INI [HPPCL5A,LPT1:]
This example would copy the whole section [HPPCL5A,LPT1:] from F:\RSU32\WSIMAGE\WIN31\WIN.INI to C:\WIN31\WIN.INI. If there was a section with that name before it will be overwritten and all information lost entirely. If the previous section contained more or other lines than the new those old lines will be lost.
This command deletes a line in an .INI file.
Syntax:
IniDeleteLine <ini file> [<section name>] <variable>
IniDeleteLine <ini file> [<section name>] <variable>=
IniDeleteLine <ini file> [<section name>] <variable>=<value>
Examples:
IniDeleteLine C:\WIN31\WIN.INI [mail] Polling
IniDeleteLine C:\WIN31\WIN.INI [mail] Polling=
IniDeleteLine C:\WIN31\SYSTEM.INI [386Enh] device=comm.drv
This example will search C:\WIN31\WIN.INI for the section [mail] and in this section for the line beginning with Polling=. This line will be deleted from WIN.INI. It will then search C:\WIN31\SYSTEM.INI, section [386Enh] and delete the line device=comm.drv. Note that, with this syntax, other device= lines are not affected. This makes it possible to change particular lines when the same variable occurs more than once, as usual with the device= lines in SYSTEM.INI.
Syntax:
IniDeleteSection <ini file> [<section name>]
Example:
IniDeleteSection C:\WIN31\WIN.INI [Microsoft Word]
This example will search C:\WIN31\WIN.INI for the section [Microsoft Word]. The entire section will be deleted from WIN.INI.
This command halts execution until the user presses a key. It works like the DOS command with the same name.
Syntax:
Pause
Example:
Pause
This command removes and deletes a key and all of its contents from the registry of Windows NT or Windows 95.
Syntax:
RegDeleteKey <where> <keypath>
Example:
RegDeleteKey Local \\HKEY_CURRENT_USER\SOFTWARE\Microsoft\Word\6.0
This example will remove and delete the named key including all subkeys and all values inside itself and all subkeys.
This command entirely removes and deletes a value from the currently open registry key of Windows NT or Windows 95. The RegOpenKey command must have been used before, to open the desired key.
Syntax:
RegDeleteValue <valuename>
Example:
RegDeleteValue AUTOSAVE-PATH
This example will remove and delete the valuename AUTOSAVE-PATH and its contents from the currently opened key.
This command will not do anything to the registry key, but subsequent registry commands can create, change or delete some contents of that key. You must always use this command first, before you can use any other registry command. All other registry commands work only inside the opened registry key.
If the registry does not exist, it is created.
Syntax:
RegOpenKey <where> <key>
Examples:
RegOpenKey Local \\HKEY_CURRENT_USER\SOFTWARE\Microsoft\Word\7.0\Options
RegOpenKey \\ACI1 \\HKEY_CLASSES_ROOT\.avi
The first example will open the registry key that contains the Word 7.0 options on the local machine. The keyword "Local" or "LOCAL" or "local" means the machine on which RSU32 is running. Remote registry manipulation on Windows 95 works only if the Remote Registry Manipulation Service is installed.
The second example opens the registry key HKEY_CLASSES_ROOT\.avi on the computer \\ACI1.
The option {where} can be either "Local", or a server name on the current network (e.g. \\LONDONSERVER7), or a file name or a UNC name of a text file (which is not yet supported). "Local" denotes the local registry and a server name denotes the registry of the specified server. A file or UNC name denotes a text file that contains registry information and is to be manipulated.
Keys have the format \\KEY\SUBKEY\SUBKEY\....\SUBKEY
Example:
\\HKEY_LOCAL_MACHINE\System\CurrentControlSet
Long key names can be word-wrapped before the backslash (\), such as:
RegOpenKey Local \\HKEY_LOCAL_MACHINE\System
            \CurrentControlSet
             \Services
Keys can also be relative to the last opened key. For instance, the combination of the two commands
RegOpenKey Local \\HKEY_LOCAL_MACHINE\System\CurrentControlSet
RegOpenKey Local Services\Arbitrators
opens (and possibly creates) the key
\\HKEY_LOCAL_MACHINE\System\CurrentControlSet\Services\Arbitrators
in the local registry.
Please note that both commands refer to the same registry. If the second command referred to a remote registry or a file, the key name would have been considered complete (rather than relative) and the function would have failed (as Services\Arbitrators is not a valid complete key name).
This command creates and inserts a new value (including default values—see below at the end of this section) into the currently open registry key of Windows NT or Windows 95. The RegOpenKey command must have been used before, to open the desired key.
Syntax:
RegSetValue [<value>]:<type>:<content>
(see description of <content> below)
Example:
RegSetValue DOC-PATH:REG_SZ:"C:\Users\Daniel\"
This example will create or change the value DOS-PATH inside the current key and give it a REG_SZ value (i.e. a single string) of "C:\Users\Daniel" (without the quotes).
The {type} specifier in the RegSetValue command can be
REG_SZ
REG_EXPAND_SZ
REG_MULTI_SZ
REG_DWORD
REG_DWORD_LITTLE_ENDIAN
REG_DWORD_BIG_ENDIAN
REG_BINARY
The format of {content} depends on the type specified. REG_DWORD, REG_DWORD_LITTLE_ENDIAN and REG_DWORD_BIG_ENDIAN require one single unsigned DWORD, which can either be specified as a hex value, e.g.
0xFFFFFFFF
or as a decimal value, e.g.
4294967296
REG_SZ and REG_EXPAND_SZ require one single character string enclosed in quotes (").
REG_MULTI_SZ requires one or more character strings enclosed in quotes and delimited by spaces ( ) or commas (,).
REG_BINARY requires one or more bytes in hexadecimal or decimal form (e.g. 0xFF or 255), delimited by commas (,), e.g.
0,255,128,12
or
0x00,0xFF,0x80,0x0C
To set or modify the default value in a key, just omit the name of the value, i.e. write nothing before the first colon, e.g.
RegSetValue :REG_SZ:"Default"
This command loads the command processor (CMD.EXE or COMMAND.COM) and forwards the rest of the command line to it. This is needed to execute internal commands.
Precisely, RSU32 always tries to load the command processor given in the COMSPEC environment variable. If that cannot be found, RSU32 loads CMD.EXE.
Syntax:
Shell <command>
Example:
Shell DIR >DIRFILE.TXT
This example would load the command processor, then execute the DIR command and redirect the resulting output into the file DIRFILE.TXT.
Makes the target folder equal to the source folder including all files, including files that have a read-only, hidden or system attribute.
SynchronizeDir handles all files regardless of their attributes. Attributes are copied with each file only if the Preserve subcommand is used. Without it the archive attribute is set and all other attributes are reset in the target file. Similarly, the ACL (Access Control List) is copied only if the CopySecurity subcommand is used. The audit information is copied only if both the CopyAudit and CopySecurity subcommands are used
SynchronizeDir is a multi-line command and requires several subcommands to control its operation. Each subcommand has to be in one line. Empty lines and comment lines can also be used freely. The following subcommands can be used, and at least To and From and one other of them has to be used, otherwise SynchronizeDir will not do anything:
| SynchronizeDir | This begins the command block and is always required. |
| From | Write the source folder after this subcommand. |
| To | Write the target folder after this subcommand. |
| Delete | Delete files from the target folder if they don’t exist in the source folder. |
| Add | Add files to the target folder if they are not there already. |
| Overwrite | Overwrite files in the target folder if they also exist in the source folder but are different (have different size, date or time). This subcommand may not be used together with the Conflict subcommand. |
| Conflict | Conflict management. This subcommand may not be used together with the
Overwrite subcommand. If a file name exists in both source and target folders but with
different size, date or time, then this is considered a conflict and the following actions
are taken:
One possible purpose of this function is to allow users with portable PCs to copy their network user folders home with them and later reconciliate their local user folders with those on the network if both can have changed. See also our program Replicator, which performs bi-directional replication similar to the one of RSU32 with conflict management activated. |
| Subdirectories | Process subfolders. All subfolders of the folder to be synchronized are also processed. |
| Preserve | Preserve attributes. With this subcommand the hidden, system and
read-only attributes are copied from each source file to each destination file. Without
this subcommand, these attributes are reset in the target file. Warning: The Preserve subcommand affects only files that are copied for other reasons. It does not mean that existing equal files will now get their attributes copied if these are different. Keep in mind that the attributes are not used to determine whether two files are equal. |
| CopySecurity | Copy the security ACL (Access Control List). With this subcommand the
access rights to the file or folder are copied whenever a folder or file is copied. Note: A change in the ACL alone will not trigger a re-synchronization. Files that are equal except for their ACL will not be synchronized. If you want to force an update, changing the ACL will not do. Change the contents of the file or at least change its date to force the ACL to be updated on the destination side. This command can, of course, only work when both sides are on an NTFS partition and when the account that runs RSU32 has the necessary rights, usually administrator privileges. It also usually makes sense only within one domain, where the individuals and groups are known. |
| CopyAudit | Copy audit information. With this subcommand the audit settings for the
file or folder are copied. Note: This command is an addition to the CopySecurity subcommand and works only when CopySecurity is also specified. It requires backup operators’ rights in addition to the rights needed for CopySecurity. Warning: If any required right is missing, neither CopyAudit nor CopySecurity will work if CopyAudit is specified! This command can, of course, only work when both sides are on an NTFS partition. It also usually makes sense only within one domain, where the individuals and groups are known. |
| Report | Write the report file name (complete with path, if desired) after this
subcommand. Report all changes to a report text file. If the report text file already
exists, the new records/lines are appended. The report text file consists of one line for each reported file, followed by one carriage return and one line feed character. Each line contains the following 9 fields, separated by tab characters (character no. 9 in the ASCII/ANSI alphabet):
|
| ReportOnly | Requires the presence of the Report subcommand (see above). No changes are actually made to folders or files. Only the report file is written (appended) as if the changes had been made. This can be used for testing or if the report file is evaluated by other means. |
| DirsLike | Only one DirsLike statement can be included with any SynchronizeDir command. If it is present, only matching folders are processed. Write one folder name after this command. The name can contain the wildcard characters * and ? in the same way they are used in DOS commands. |
| FilesLike | Only one FilesLike statement can be included with any SynchronizeDir command. If it is included, only matching files are processed. Write one file name after this command. The name can contain the wildcard characters * and ? in the same way they are used in DOS commands. |
| ExcludeDir | Protect this folder and all its subfolders from synchronization, i.e. do not read, compare, copy, change or delete it and do not synchronize it with anything. The folder can be given with full path and even the drive specified. If it is given without a full path, i.e. with neither a drive designator nor a backslash (\) at the beginning, then all folders with this name and all their subfolders are excluded from synchronization if several occur within the folder tree. The ExcludeDir subcommand can occur several times with different subfolders. It is useful only when the Subdirectories subcommand is also present. |
| ExcludeFile | Protect this file from synchronization, i.e. do not read, compare, copy, change or delete it and do not synchronize it with anything. The file can be given with full path and even with the drive specified. If it is given without a full path, i.e. with neither a drive designator nor a backslash (\) at the beginning, then all files with this name are excluded from synchronization if several occur within the folder, or within the whole folder tree. The file name can contain the wildcard characters * and ? which have the same function as in DOS. The ExcludeFile subcommand can occur several times with different files. |
| End SynchronizeDir | This ends the complete SynchronizeDir command. Exactly one space has to be between "End” and "SynchronizeDir”. This subcommand is always required after all others. |
Warning: SynchronizeDir will overwrite or erase files with any attributes in the target folder and, with the Subdirectories subcommand, any of its subfolders, even if they are read-only, hidden or system files.
Syntax:
SynchronizeDir
   From <source folder>
   To <target folder>
   [Delete]
   [Add]
   [{ Overwrite | Conflict }]
   [Subdirectories]
   [Preserve]
   [CopySecurity]
   [CopyAudit]
   [Report <report text file path and name>
   [ReportOnly]]
   [DirsLike <folder name with or without path and * or ? characters>]
   [FilesLike <file name with or without path and * or ? characters>]
   [ExcludeDir <folder>]
   ...
   [ExcludeFile <file name with or without path and * or ? characters>]
   ...
End SynchronizeDir
Examples:
SynchronizeDir
   From F:\RSU32\WSIMAGE\U
   To C:\U
   Delete
   Overwrite
   Add
   Subdirectories
   FilesLike *.BA*
   ExcludeDir F:\RSU32\WSIMAGE\U\ADMIN
   ExcludeFile *.BAK
   Report C:\SETUP\SYNCREP.TXT
   Preserve
   CopySecurity
   CopyAudit
End SynchronizeDir

SynchronizeDir
   From F:\RSU32\WSIMAGE\DOS
   To C:\DOS
   Overwrite
   Add
End SynchronizeDir
The first example would make the folder C:\U and all of its subfolders exactly equal to the folder F:\RSU32\WSIMAGE\U and all of its subfolders, as far as *.BA* files are concerned, except for the folder F:\RSU32\WSIMAGE\U\ADMIN, which is entirely skipped. If a target folder C:\U\ADMIN exists, it is not touched either. All files with the extension .BAK are skipped. If files with the extension .BAK exist in the target folder, they also remain untouched. If files or folders are copied, their file attributes, their ACLs (Access Control Lists) and their audit information are copied with them. A report text file C:\SETUP\SYNCREP.TXT is written, containing a list of all file changes.
The second would overwrite any files in C:\DOS that are different from their namesakes in F:\RSU32\WSIMAGE\DOS. It would also add files that are missing in C:\DOS, but it would not delete or otherwise touch any additional files the user may have added to his DOS folder. It would also not touch any subfolders of C:\DOS.
The old Syntax of the SynchronizeDir command that can still be used in the DOS version of RSU is not supported in RSU32.
In the following text each group of syntax lines is followed by one or more example lines which are indented.
RSU32 <program file name>
RSU32.EXE <program file name>
RSU32 <program file name> /debug
RSU32.EXE <program file name> /debug
f:
cd \RSU32
RSU32 RSU32.prg

Echo <text>
Echo RSU32 is now installing new video drivers...

Goto <label>
Goto Finish

<label>:
Finish:

If [Not] <condition> Then
   <command>
   ...
[Else
   <command>
   ...]
End If

If [Not] <condition> Then
   <command>
   ...
[Else
   <command>
   ...]
EndIf

<condition> = { <text 1> <comparison operator> <text 2> | Exist <filename> | <filename 1> Equal <filename 2> }

<comparison operator> = { < | <= | = | >= | > | <> }

If Not %USER% = SUPERVISOR Then
   Goto Finish
End If
...
Finish:
(The example above also shows how to insert an environment variable.)
IniAddLine <ini file> [<section name>] <variable name>=<text>
   IniAddLine C:\WIN31\SYSTEM.INI 386Enh device=VSHARE.386
   IniAddLine C:\WIN31\SYSTEM.INI 386Enh device=NETWARE.386

IniChangeLine <ini file> [<section name>] <variable>=<text>
   IniChangeLine C:\WIN31\WIN.INI [windows] load=NWPOPUP.EXE
   IniChangeLine C:\WIN31\WIN.INI [mail] mailbox=%USER%
(The second example above also shows how to insert an environment variable.)
IniCopyLine <source ini file> <target ini file> [<section name>] <variable>
   IniCopyLine F:\RSU32\WSIMAGE\WIN31\WIN.INI C:\WIN31\WIN.INI [windows] load
   IniCopyLine F:\RSU32\WSIMAGE\WIN31\WIN.INI C:\WIN31\WIN.INI [windows] load=

IniCopySection <source ini file> <target ini file> [<section name>]
   IniCopySection F:\RSU32\WSIMAGE\WIN31\WIN.INI C:\WIN31\WIN.INI [HPPCL5A,LPT1:]

IniDeleteLine <ini file> [<section name>] <variable>
IniDeleteLine <ini file> [<section name>] <variable>=
IniDeleteLine <ini file> [<section name>] <variable>=<value>
   IniDeleteLine C:\WIN31\WIN.INI [mail] Polling
   IniDeleteLine C:\WIN31\WIN.INI [mail] Polling=
   IniDeleteLine C:\WIN31\SYSTEM.INI [386Enh] device=comm.drv

IniDeleteSection <ini file> [<section name>]
   IniDeleteSection C:\WIN31\WIN.INI [Microsoft Word]

RegDeleteKey <where> <keypath>
   RegDeleteKey Local \\HKEY_CURRENT_USER\SOFTWARE\Microsoft\Word\6.0

RegDeleteValue <valuename>
   RegDeleteValue AUTOSAVE-PATH

RegOpenKey <where> <key>
   RegOpenKey Local \\HKEY_CURRENT_USER\SOFTWARE\Microsoft\Word\7.0\Options
   RegOpenKey \\ACI1 \\HKEY_CLASSES_ROOT\.avi

RegSetValue [<value>]:<type>:<content>
   RegSetValue DOC-PATH:REG_SZ:C:\Users\Daniel\

SynchronizeDir
   From <source folder>
   To <target folder>
   [Delete]
   [Add]
   [{ Overwrite | Conflict }]
   [Subdirectories]
   [Preserve]
   [Report <report text file path and name>
   [ReportOnly]]
   [DirsLike <folder name with or without path and * or ? characters>]
   [FilesLike <file name with or without path and * or ? characters>]
   [ExcludeDir <folder>]
   ...
   [ExcludeFile <file name with or without path and * or ? characters>]
   ...
End SynchronizeDir

   SynchronizeDir
      From F:\RSU32\WSIMAGE\U
      To   C:\U
      Delete
      Overwrite
      Add
      Subdirectories
      FilesLike *.BA*
      ExcludeDir F:\RSU32\WSIMAGE\U\ADMIN
      ExcludeFile *.BAK
      Report C:\SETUP\SYNCREP.TXT
      Preserve
   End SynchronizeDir

   SynchronizeDir
      From F:\RSU32\WSIMAGE\DOS
      To C:\DOS
      Overwrite
      Add
   End SynchronizeDir
Other features:
%<environment variable>% is replaced by the contents of the environment variable.
%% is replaced by %
"<any text containing spaces>" is taken as one parameter.
"" is replaced by "