The current installation process is performed manually (ie not using Wise or Installshield type installs) - as the process is very simple. Additionally, we've often installed third party products via in Installshield type installation, only to find that upon removal Delphi was completed corrupted and required scratch re-installation.
Please follow the instructions for generic installation for our components, property editors and experts - check the table below for installation notes for specific products and special procedures that apply.
Generic
Installation Instructions
(applies to all controls - please see the
references in the table above for exceptions to install the controls under "Special
Installation Procedures")
The files packed into the control archive include:
- Subdirectories for Delphi 1 (V1.00, timestamp on the Delphi.exe file is 8:02), 2 (V2.01) and 3 (all versions) and 4 (all versions), shown as D1, D2, D3 and D4. Appropriate compiled unit files (*.dcu) will be in these subdirectories
- Appropriate component resource files (*.dcr) that contains the control’s resource that is visible on the Delphi Component palette bar (if applicable) and possibly component resource files (*.res)
- A subdirectory for Help file(s), (*.hlp). Most of our controls have Windows Help files included. A 16bit subdirectory should exist off the Help directory. Also included in the Help directories are the kwf and cnt files. The kwf files are the context sensitive help files that require installation to Delphi 1 and 2. Delphi 3 and 4 use the 32bit Help system, hence supplied cnt files (and the installation is simpler)
- A subdirectory for Sample application files maybe included. These are generally zipped samples and contain source code only. Executable copies of the Samples are available on-line from our Downloads page for most components (also zipped)
- A subdirectory for the associated Documentation files called Docs. (You must have found it, or you wouldn't be reading this
- A subdirectory called History containing history revision notes for the component. Have a read of this to see if there are any important known problems and see what fixes and improvements have been made. This may be an empty file
- A subdirectory containing all the .pas source code called Source. Customers owning the Full Registration get the full control source code in this directory. Standard Registrations may also have some source code in this subdirectory also.
- A subdirectory called Tree contains files showing the components hierarchal structure (a descendency tree view list). Some folk may find this informative, especially customers that have the Full Registration (with source code) and intend to modify the code.
- UNZIP the archive with sub-directories option turned ON to a directory (we suggest C:\ADROCK) (PkZip users, please use the "-d" option with PkUnzip)
- The Adrock DateTime Suite consists of two zip archives - you must unzip both of them.
- If you've unzipped to c:\adrock - you should have a directory structure like this:
 |
Installation of the DCU, DCR, and any RES files and PAS files
- Next we add the component to the Delphi VCL Library
| Delphi 4 | |
| Delphi 3 | |
| Delphi 2 | |
| Delphi 1 |
Delphi 3 and 4:
[Delphi 3 is used in the examples below - use 'D4' as the directory to browse to
for Delphi 4 - the process is identical. And see the Delphi 4 installation
notes: at the bottom of this section.]
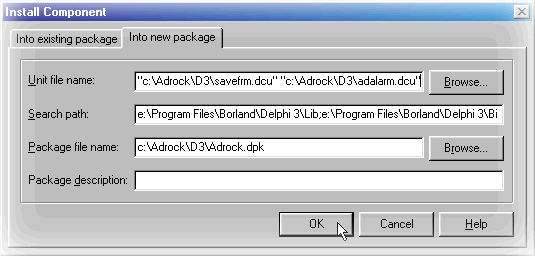
If Installing for the first time, Go: 'Component', 'Install Component'
(If not installing for the first time, just open the dpk file you wish to update (eg. 'c:\Adrock\D3\Adrock.dpk')).Select the 'Into new package' tab
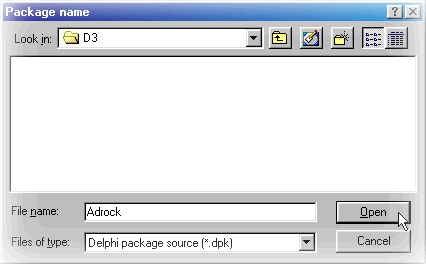
Use the 'Browse button beside the 'Package file name:' field and browse to 'c:\adrock\d3'. Type 'Adrock' into the 'File name' field and 'Open' it.
(you should be back at the 'Install Component' dialogue now) Now we can add the units (compiled units or source (dcu or pas)) into the new package.
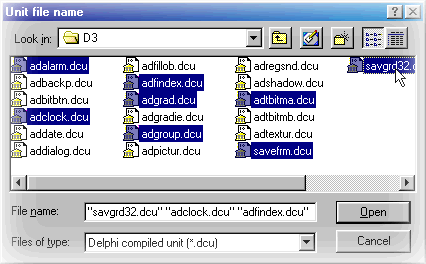
Use the 'Browse' button beside the 'Unit file name' field to add in one or more unit or pas files (select from the 'Files of type' list box) according to the following table:
Name Install this file AlarmList component adalarm.dcu Bitmap Property Editor adtbitma.dcu Analogue Clock component adclock.dcu Date Functions Class NA (see Date Functions Class for more...) Message Dialogue component NA (see Message Dialogue Class for more...) Gradient Fill component adgrad.dcu Group Box component adgroup.dcu SaveForm component savefrm.dcu SaveGrid component savegrid.dcu Source Code Finder expert adfindex.dcu DateTime Suite (main components) addsuite.pas (Note: install the pas file ) DateTime Suite (Baselevel components) adbase.pas (Note: install the pas file ) You can multi-select in the usual Windows way (holding the Control key down).
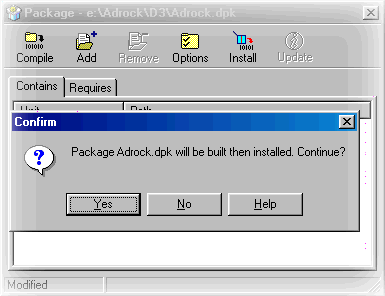
Once you've selected the units - OK the 'Install Component' dialogue - you'll be prompted to confirm building and installing the package...
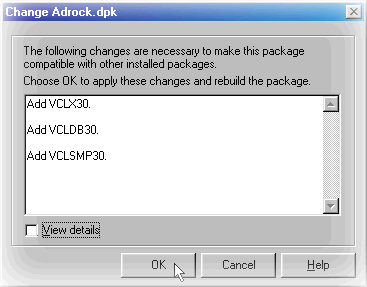
And confirm changes necessary to continue the build...
If you've set the show compilation progress in the environment options you'll see the package compiling and installing. You should end up with a dialogue showing you the components that have been installed.
You will notice on your VCL Palette bar in Delphi that there is now a new tab called ADROCK, inside here will be an icon to represent the component you just installed.
Delphi 4 installation notes:
I dunno, but the install of unit files (dcu's) into D4 is a bit weird. The unit files will open in the package editor window (and you'll consequently get a lot of messages about lines being too long).
What I've been doing is simply closing all these windows - and then continuing (re-doing) the build. I've also noted it won't build and install in one step. You'll probably have to use the Install button on the Package dialog.
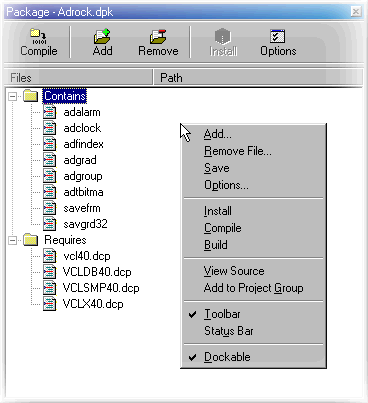
Additionally, the dcr (VCL palette icon) files often do not get included in the Package source. To fix this, right click the Package dialog (see the picture - right click, for example, where the mouse is below and you get the context menu)...
Select the 'View Source' menu option.
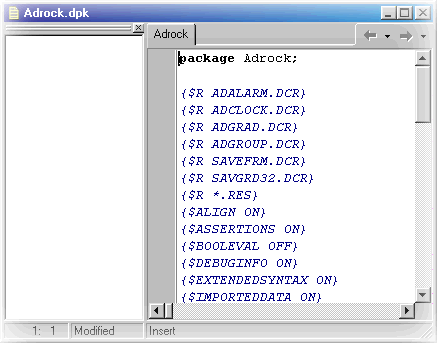
You should have something like this:
Note the dcr files at the top of the list. While yours may not match the sample picture above, it sure should include dcr files appropriate to the components you're installing.
If you don't have 'em in the list - you could cut n' past appropriate lines from the list below - then re-compile the library and your VCL palette will now show the correct icons.
NB: the DateTime Suite does not seem to be affected, as the files you install are pas files (and these in turn register all the components to Delphi). Likewise, if you're using the Adrock source code, you won't have the problem either. This problem just affects installation of compiled units (dcu's) that have the Delphi VCL register code imbedded.
(Any other (better) workarounds or solutions, please e-mail us at: Adrock@Adrock.com){$R ADALARM.DCR}
{$R ADCLOCK.DCR}
{$R ADGRAD.DCR}
{$R ADGROUP.DCR}
{$R SAVEFRM.DCR}
{$R SAVGRD32.DCR}
{$R *.RES}
Go: 'Component', 'Install'
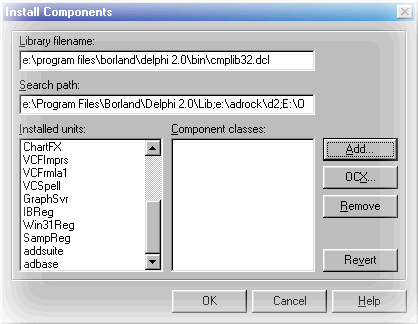
Click the 'Add' button and browse to 'c:\adrock\d2'
Install the components according to the following table:
(Source code owners: can copy the contents of the Source subdirectory into the D2 subdirectory (overwrite any duplicate names) and install the .pas files instead of the pre-compiled units)
Name Install this file AlarmList component adalarm.dcu Bitmap Property Editor adtbitma.dcu Analogue Clock component adclock.dcu Date Functions Class NA (see Date Functions Class for more...) Message Dialogue component NA (see Message Dialogue Class for more...) Gradient Fill component adgrad.dcu Group Box component adgroup.dcu SaveForm component savefrm.dcu SaveGrid component savegrid.dcu Source Code Finder expert adfindex.dcu DateTime Suite (main components) addsuite.pas (Note: install the pas file ) DateTime Suite (Baselevel components) adbase.pas (Note: install the pas file )
If you're installing more than one component Delphi 2 forces single selection of units or source to add. However, it doesn't take long to repetitively add more in; ('Add', 'Browse', <select component>, 'Add', 'Browse', <select component> ... etc).
And when you're ready, press the 'OK' button to compile. (You should see the compile progress and then the library link process).
Go: 'Options', 'Install Components'.
Click the 'Add' button and browse to 'c:\adrock\d1'
(You'll need to change the 'List Files of type:' to show 'Unit File (*.DCU)' - and indeed you need to do this repetitively if installing several components at once)Install the components according to the following table:
(Source code owners: can copy the contents of the Source subdirectory into the D1 subdirectory (overwrite any duplicate names) and install the .pas files instead of the pre-compiled units)
Name Install this file AlarmList component adalarm.dcu Bitmap Property Editor adtbitma.dcu Analogue Clock component adclock.dcu Date Functions Class NA (see Date Functions Class for more...) Message Dialogue component NA (see Message Dialogue Class for more...) Gradient Fill component adgrad.dcu Group Box component adgroup.dcu SaveForm component savefrm.dcu SaveGrid component savegrid.dcu Source Code Finder expert adfindex.dcu DateTime Suite (main components) addsuite.pas (Note: install the pas file ) DateTime Suite (Baselevel components) adbase.pas (Note: install the pas file ) In Delphi 1 you need to check that the directory where you have installed the components is in the search path edit field. All components that get installed must be in this search path. Using the suggested install directory, check that in the "Install Components" dialogue in the "Search Path" the edit field has 'c:\adrock\d1' included in as the path. Your entire path might now look like: 'c:\delphi\lib;c:\adrock\d1'. (In Delphi 2, 3 and 4 this is handled for you if it's a new directory and it's not already in the search path).
And when you're ready, press the 'OK' button to compile. (You should see the compile progress and then the library link process).
Installation of the HLP and KWF files
Delphi 3 and 4
- Copy or Move the Help files from the unzip directory (eg. 'c:\adrock\d4\adclock.hlp' and adclock.cnt) to the Delphi Help directory (eg. 'c:\Program Files\Borland\Delphi4\Help').
- Open the Adrock .cnt Help file you're installing for
editing (eg. 'wordpad c:\Program Files\Borland\Delphi4\Help\adclock.CNT') and:
- for Delphi 4 insert: ':Include delphi4.cfg'
- for Delphi 3 insert: ':Include delphi3.cfg'
- Open the Delphi cfg file for editing (eg.
'wordpad c:\Program Files\Borland\Delphi4\Help\delphi4.cfg') and insert the name of the
Adrock .hlp file (eg. adclock.hlp) as a ":Link" directive:
- eg. ':Link adclock.hlp'
- Your installed component (eg. Adrock Analogue Clock (adclock.dcu or pas)) will now have context sensitive help. If you're on a Property or Event of the Adrock component, pressing F1 will popup help for that Property or Event. Context sensitive Help will also popup for any Property, Method of Event in your code.
Delphi 1 and 2
- Exit Delphi is you are running it, as you can not install the .kwf file while Delphi is running.
- Move or copy the Help files (e.g.: 'c:\Adrock\HELP\16BIT\adclock.hlp') to your Delphi Bin directory (eg. 'c:\DELPHI\BIN'); it only really needs to be somewhere on the path, but the Delphi Bin directory is a good place. Delphi has a program to add our help index to Delphi’s help index. What this does is allow you to search for both Delphi commands and the commands and properties of the component you want to install. This program is called HELPINST and is found in the DELPHI\HELP sub-directory.
- Copy the keyword file (eg. 'c:\Adrock\HELP\16bit\adclock.kwf') to the Delphi help directory (usually DELPHI\HELP)
- Run Delphi’s HELPINST program (eg. 'c:\DELPHI\HELP\HELPINST.EXE') and load the DELPHI.HDX file from the DELPHI\BIN Directory.
- Add the .KWF file (e.g.: adclock.kwf) to the list of indexes.
- Save the new index file and then exit the HelpInst program.
- Your installed component (eg. Adrock Analogue Clock (adclock.dcu or pas)) will now have context sensitive help. If you're on a Property or Event of the Adrock component, pressing F1 will popup help for that Property or Event. Context sensitive Help will also popup for any Property, Method of Event in your code.
Special Installation Instructions
The TAdrockDates class is installed by simply including them in the USES clause of your program,
eg: USES AdDate;
Do not attempt to install this component to the Delphi VCL palette (ie via 'Component', 'Install')
The TAdrockDialog components is installed by simply including them in the USES clause of your program,
eg: USES AdDialog;
Do not attempt to install this component to the Delphi VCL palette (ie via 'Component', 'Install')
The Bitmap Property Editor is installed in the normal way - install the adbitma.dcu or .pas file.
However, it will not be visible on the Delphi VCL palette bar. The Bitmap Property Editor is invoked via a TImage or TGlyph Property (editor)...
 |
Normally, if you clicked on the Picture ellipse button you'd get the standard Delphi image browser - but now, with the Adrock Bitmap Property Editor installed - you'll get a much more powerful browser with preview, history and named bitmaps.
So the Adrock Bitmap Property Editor is available via every Object that has a TImage or TGlyph Property.
The Adrock Source Code Finder installs to the Delphi Help menu, MenuItem "Adrock Source Searcher".
 |
Installation of the Sample Application files (if applicable)
We suggest and assume you run any Sample Application from a directory such as \TEST (in our own environment, we use D1, D2 and D3 and D4 directories for testing).
Unzip the sample application archive (eg SAM3DCAL.ZIP) into the TEST directory.
Start Delphi and open the sample application’s project file (eg. 'E:\TEST\demodate.dpr', compile, and run!
If you have any problems installing our controls please feel free to contact us, see the contact details for more.
|
Last updated: August 24, 1998 |
